文章目录
1、FinSH组件介绍
FinSH 是 RT-Thread 的命令行组件,提供一套供用户在命令行调用的操作接口,主要用于调试或查看系统信息。它可以使用串口 / 以太网 / USB 等与 PC 机进行通信。
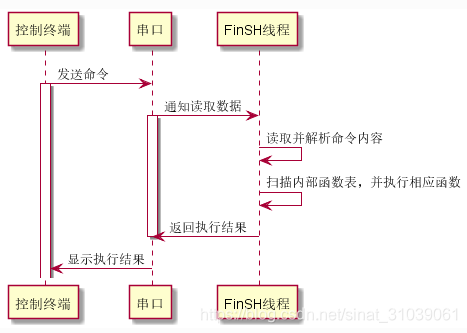
用户在控制终端输入命令,控制终端通过串口、USB、网络等方式将命令传给设备里的 FinSH,FinSH 会读取设备输入命令,解析并自动扫描内部函数表,寻找对应函数名,执行函数后输出回应,回应通过原路返回,将结果显示在控制终端上。
当使用串口连接设备与控制终端时,FinSH 命令的执行流程,如下图所示:
1.1 FinSH 支持的功能
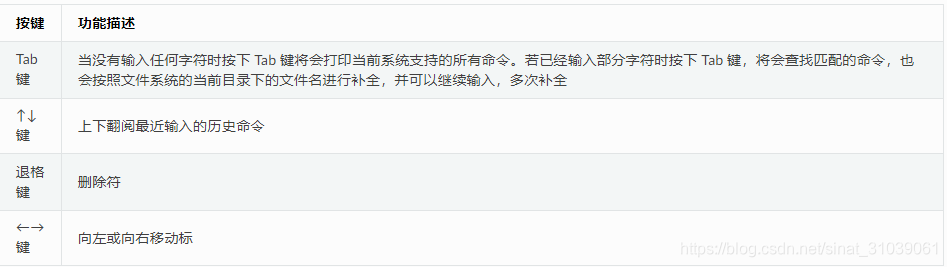
FinSH 支持自动补全、查看历史命令等功能,通过键盘上的按键可以很方便的使用这些功能,FinSH 支持的按键如下表所示:
1.2 FinSH 支持两种输入模式
FinSH 支持两种输入模式,分别是传统命令行模式和 C 语言解释器模式。
C 语言解释器模式又称为C-Style 模式,C-Style 模式在运行脚本或者程序时不太方便,而使用传统的 shell 方式则比较方便。另外,C-Style 模式下,FinSH 占用体积比较大。RT-Thread默认只开启传统命令行模式。此文只介绍传统命令行模式。
传统命令行模式:
此模式又称为 msh(module shell),msh 模式下,FinSH 与传统shell(dos/bash)执行方式一致,例如,可以通过 cd / 命令将目录切换至根目录。
msh 通过解析,将输入字符分解成以空格区分开的命令和参数。其命令执行格式如下所示:
command [arg1] [arg2] […]
其中 command 既可以是 RT-Thread 内置的命令,也可以是可执行的文件。
1.3 自定义 msh 命令
自定义的 msh 命令,可以在 msh 模式下被运行,将一个命令导出到 msh 模式可以使用如下宏接口:
MSH_CMD_EXPORT(name, desc);
| 参数 | 描述 |
|---|---|
| name | 要导出的命令 |
| desc | 导出命令的描述 |
导出无参数命令时,函数的入参为 void,示例如下:
void hello(void)
{
    rt_kprintf("hello RT-Thread!\n");
}
MSH_CMD_EXPORT(hello , say hello to RT-Thread);
系统运行起来后,在 FinSH 控制台按 tab 键可以看到导出的命令:
msh />
RT-Thread shell commands:
hello             - say hello to RT-Thread
version           - show RT-Thread version information
list_thread       - list thread
……
运行 hello 命令,运行结果如下所示:
msh />hello
hello RT_Thread!
msh />
导出有参数的命令时,函数的入参为 int argc 和 char**argv。argc 表示参数的个数,argv 表示命令行参数字符串指针数组指针。导出有参数命令示例如下:
#include <rtthread.h>

static void atcmd(int argc, char**argv)
{
    if (argc < 2)
    {
        rt_kprintf("Please input'atcmd <server|client>'\n");
        return;
    }

    if (!rt_strcmp(argv[1], "server"))
    {
        rt_kprintf("AT server!\n");
    }
    else if (!rt_strcmp(argv[1], "client"))
    {
        rt_kprintf("AT client!\n");
    }
    else
    {
        rt_kprintf("Please input'atcmd <server|client>'\n");
    }
}

MSH_CMD_EXPORT(atcmd, atcmd sample: atcmd <server|client>);
系统运行起来后,在 FinSH 控制台按 tab 键可以看到导出的命令:
msh />
RT-Thread shell commands:
hello             - say hello to RT-Thread
atcmd             - atcmd sample: atcmd <server|client>
version           - show RT-Thread version information
list_thread       - list thread
……
运行 atcmd 命令,运行结果如下所示:
msh />atcmd
Please input 'atcmd <server|client>'
msh />atcmd server
AT server!
msh />
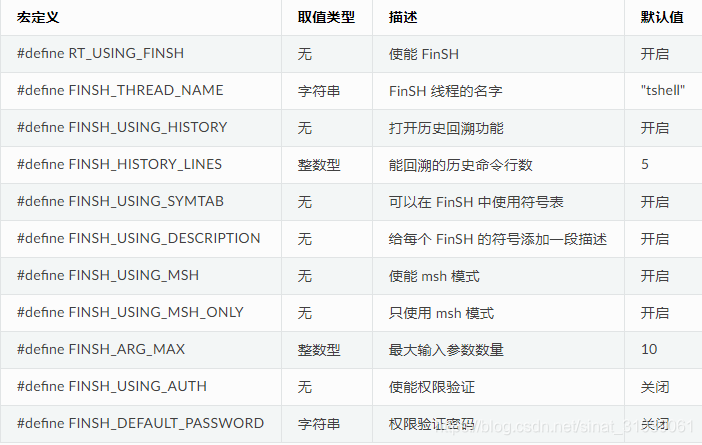
1.3 FinSH 功能配置
2、FinSH组件原理介绍
FinSH 源码位于 components/finsh 目录下。FinSH组件不属于内核层。要想实现FinSH组件,如果使能了RT_USING_POSIX,最少需要利用内核中的线程和设备两个模块,如果没有使能RT_USING_POSIX,还需要内核的信号量模块。FinSH线程用于维护shell,设备用于rt_kprintf() 输出,信号量用于同步。
以使能RT_USING_POSIX为例,不使用信号量。
2.1 finsh shell的结构

2.2 FinSH线程
FinSH线程的初始化使用的是RT-Thread 自动初始化机制,可以参考这篇文章了解https://blog.csdn.net/sinat_31039061/article/details/104127274
关于RT-Thread 的线程可以参考内核架构https://blog.csdn.net/sinat_31039061/article/details/104121771
创建FinSH线程:
    tid = rt_thread_create(FINSH_THREAD_NAME,
                           finsh_thread_entry, RT_NULL,
                           FINSH_THREAD_STACK_SIZE, FINSH_THREAD_PRIORITY, 10);
FinSH线程的入口函数为:
void finsh_thread_entry(void *parameter)
进入finsh线程首先运行 rt_kprintf(FINSH_PROMPT);,输出msh />,然后进入while (1)死循环等待键盘的输入:
rt_kprintf(FINSH_PROMPT);
while (1)
{
    ch = finsh_getchar();
    if (ch < 0)
    {
        continue;
    }
    ...
}
此线程根据键盘的输入命令,解析并自动扫描内部函数表,寻找对应函数名,执行函数后输出回应,回应通过原路返回,将结果显示在控制终端上。
2.3 FinSH 的输入
RT-Thread中FinSH 的输入使用的是finsh_getchar(),进入finsh_getchar()为stdio.h中的库函数getchar(),查看getchar()的百度百科解释:
getchar由宏实现:#define getchar() getc(stdin)。getchar有一个int型的返回值。当程序调用getchar时,程序就等着用户按键。用户输入的字符被存放在键盘缓冲区中。直到用户按回车为止。当用户键入回车之后,getchar才开始从stdin流中每次读入一个字符。getchar函数的返回值是用户输入的字符的ASCII码,若文件结尾则返回-1(EOF),且将用户输入的字符回显到屏幕。如用户在按回车之前输入了不止一个字符,其他字符会保留在键盘缓存区中,等待后续getchar调用读取。也就是说,后续的getchar调用不会等待用户按键,而直接读取缓冲区中的字符,直到缓冲区中的字符读完后,才等待用户按键。
getchar()函数的执行模式是阻塞式的,当需要接收字符流的时候,当前线程就会被挂起,其后的所有代码均要等待用户输入回车表示输入完毕后,线程才会被调度进入CPU时钟内执行其余的代码。
2.4 FinSH 的输出
RT-Thread中FinSH 的输出使用的是rt_kprintf,rt_kprintf使用的是RT-Thread的串口设备。关于RT-Thread设备框架的使用方法请参考这篇文章https://blog.csdn.net/sinat_31039061/article/details/104135728
2.4.1 创建并注册串口设备:
int rt_hw_usart_init(void)
{
    rt_size_t obj_num = sizeof(uart_obj) / sizeof(struct stm32_uart);
    struct serial_configure config = RT_SERIAL_CONFIG_DEFAULT;
    rt_err_t result = 0;

    stm32_uart_get_dma_config();

    for (int i = 0; i < obj_num; i++)
    {
        uart_obj[i].config = &uart_config[i];
        uart_obj[i].serial.ops    = &stm32_uart_ops;
        uart_obj[i].serial.config = config;
        /* register UART device */
        result = rt_hw_serial_register(&uart_obj[i].serial, uart_obj[i].config->name,
                                       RT_DEVICE_FLAG_RDWR
                                       | RT_DEVICE_FLAG_INT_RX
                                       | RT_DEVICE_FLAG_INT_TX
                                       | uart_obj[i].uart_dma_flag
                                       , NULL);
        RT_ASSERT(result == RT_EOK);
    }

    return result;
}
我在board.h中打开了串口1和串口3,如下:
#define BSP_USING_UART1
#define BSP_USING_UART3
所以在终端运行 list_device命令,运行结果如下所示:
device           type         ref count
-------- -------------------- ----------
uart3    Character Device     1
uart1    Character Device     2
pin      Miscellaneous Device 0
msh />
2.4.2 打开串口设备:
控制台配置的是使用uart1,所以打开串口1设备:
#define RT_CONSOLE_DEVICE_NAME "uart1"
.
.
.
    /* Set the shell console output device */
#if defined(RT_USING_DEVICE) && defined(RT_USING_CONSOLE)
    rt_console_set_device(RT_CONSOLE_DEVICE_NAME);
#endif
rt_device_t rt_console_set_device(const char *name)
{
    rt_device_t new_device, old_device;

    /* save old device */
    old_device = _console_device;

    /* find new console device */
    new_device = rt_device_find(name);
    if (new_device != RT_NULL)
    {
        if (_console_device != RT_NULL)
        {
            /* close old console device */
            rt_device_close(_console_device);
        }

        /* set new console device */
        rt_device_open(new_device, RT_DEVICE_OFLAG_RDWR | RT_DEVICE_FLAG_STREAM);
        _console_device = new_device;
    }

    return old_device;
}
把uart1这个串口设备句柄赋值给下边这个全局变量,以备rt_kprintf使用。
static rt_device_t _console_device
rt_kprintf的实现:
void rt_kprintf(const char *fmt, ...)
{
    va_list args;
    rt_size_t length;
    static char rt_log_buf[RT_CONSOLEBUF_SIZE];

    va_start(args, fmt);
    /* the return value of vsnprintf is the number of bytes that would be
     * written to buffer had if the size of the buffer been sufficiently
     * large excluding the terminating null byte. If the output string
     * would be larger than the rt_log_buf, we have to adjust the output
     * length. */
    length = rt_vsnprintf(rt_log_buf, sizeof(rt_log_buf) - 1, fmt, args);
    if (length > RT_CONSOLEBUF_SIZE - 1)
        length = RT_CONSOLEBUF_SIZE - 1;
#ifdef RT_USING_DEVICE
    if (_console_device == RT_NULL)
    {
        rt_hw_console_output(rt_log_buf);
    }
    else
    {
        rt_uint16_t old_flag = _console_device->open_flag;

        _console_device->open_flag |= RT_DEVICE_FLAG_STREAM;
        rt_device_write(_console_device, 0, rt_log_buf, length);
        _console_device->open_flag = old_flag;
    }
#else
    rt_hw_console_output(rt_log_buf);
#endif
    va_end(args);
}
