一、Intent概述及其属性
Intent基本应用:
- 开启一个activity
- 开启一个Service
- 传递广播
Intent对象的属性:
对于一个Intent对象,实际上是一组被捆绑的信息。
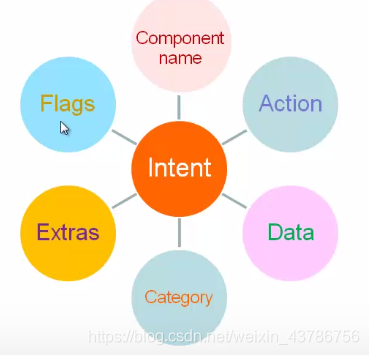
- Component name(组件名称):设置Intent对象的组件名称,通过设置Component name可以启动其他的activity或其他应用的activity,在指定组件名称时可以通过包名和类名来唯一确定一个activity。
可用**setComponent()**方法进行设置,需传递Component name的对象。
创建一个Component name对象需传递两个参数:应用包名,类名(类名中要包括完整包名)。
        Button button= (Button) findViewById(R.id.button);
        button.setOnClickListener(new View.OnClickListener() {
            @Override
            public void onClick(View view) {
                //创建一个Intent对象
                Intent intent=new Intent();
                //创建一个CompnentName对象
                ComponentName componentName=new ComponentName("com.mingrisoft.demo2","com.mingrisoft.demo2.DetailActivity");
                //设置意图
                intent.setComponent(componentName);
                //启动另一个activity
                startActivity(intent);
            }
        });
- Action和Data
Action属性:用来指定将要执行的动作。
Data属性:用来指定具体的数据的。
通常情况下,要一起使用才能表达一个具体的意思。
举个例子:比如Action为我想要喝…,喝什么呢?此时就需要Data指定具体的东西,水?奶茶?等等。
实例:使用Intent实现关于页面中拨打电话和发送短信的功能。
效果如下: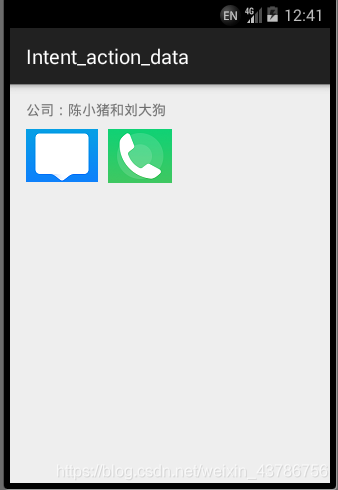
activity_main.xml文件
<?xml version="1.0" encoding="utf-8"?>
<RelativeLayout xmlns:android="http://schemas.android.com/apk/res/android"
    xmlns:tools="http://schemas.android.com/tools"
    android:layout_width="match_parent"
    android:layout_height="match_parent"
    android:paddingBottom="@dimen/activity_vertical_margin"
    android:paddingLeft="@dimen/activity_horizontal_margin"
    android:paddingRight="@dimen/activity_horizontal_margin"
    android:paddingTop="@dimen/activity_vertical_margin"
    tools:context="com.mingrisoft.intent_action_data.MainActivity">

    <TextView
        android:id="@+id/text"
        android:layout_width="wrap_content"
        android:layout_height="wrap_content"
        android:text="公司:陈小猪和刘大狗" />

    <ImageButton
        android:id="@+id/bt2"
        android:layout_width="wrap_content"
        android:layout_height="wrap_content"
        android:layout_below="@+id/text"
        android:layout_marginTop="10dp"
        android:layout_marginRight="10dp"
        android:background="#0000"
        android:src="@drawable/e1"/>

    <ImageButton
        android:id="@+id/bt1"
        android:layout_below="@+id/text"
        android:layout_toRightOf="@+id/bt2"
        android:layout_marginTop="10dp"
        android:background="#0000"
        android:layout_width="wrap_content"
        android:layout_height="wrap_content"
        android:src="@drawable/e2"/>


</RelativeLayout>
MainActivity.java文件
package com.mingrisoft.intent_action_data;
import android.content.Intent;
import android.net.Uri;
import android.support.v7.app.ActionBarActivity;
import android.os.Bundle;
import android.view.View;
import android.widget.Button;
import android.widget.ImageButton;
public class MainActivity extends ActionBarActivity {
@Override
protected void onCreate(Bundle savedInstanceState) {
super.onCreate(savedInstanceState);
setContentView(R.layout.activity_main);
ImageButton bt1= (ImageButton) findViewById(R.id.bt1);
ImageButton bt2= (ImageButton) findViewById(R.id.bt2);
bt1.setOnClickListener(l);
bt2.setOnClickListener(l);
}
//由于两个按钮的事件监听器比较像,所以可以直接设置一个事件监听器对象。
View.OnClickListener l=new View.OnClickListener() {
@Override
public void onClick(View view) {
Intent intent=new Intent();
ImageButton imageButton= (ImageButton) view;
switch (imageButton.getId())
{
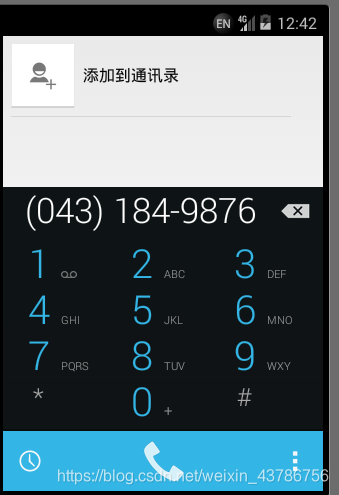
case R.id.bt1:
intent.setAction(intent.ACTION_DIAL);
intent.setData(Uri.parse("tel:0431849876"));
startActivity(intent);
break;
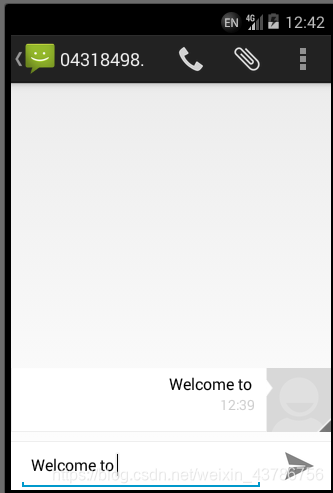
case R.id.bt2:
intent.setAction(intent.ACTION_SENDTO);
intent.setData(Uri.parse("smsto:0431849876"));
intent.putExtra("sms_body","Welcome to ");
startActivity(intent);
break;
}
}
};
}
manefests文件
    <!-- 开启打电话的权限-->
    <uses-permission android:name="android.permission.CALL_PHONE"/>
    <uses-permission android:name="android.permission.SEND_SMS"/>
- Action和Category
两者经常一起使用,通过它们可调用系统的activity或启动android系统的其他应用程序组件
Category用来对执行动作类别进行描述。
属性自行查看API。
实例:使用Intent模拟关闭谷歌地图返回系统桌面。
activity_main.xml文件
<?xml version="1.0" encoding="utf-8"?>
<RelativeLayout xmlns:android="http://schemas.android.com/apk/res/android"
    xmlns:tools="http://schemas.android.com/tools"
    android:layout_width="match_parent"
    android:layout_height="match_parent"
    android:paddingBottom="@dimen/activity_vertical_margin"
    android:paddingLeft="@dimen/activity_horizontal_margin"
    android:paddingRight="@dimen/activity_horizontal_margin"
    android:paddingTop="@dimen/activity_vertical_margin"
    tools:context="com.mingrisoft.goodle_intent.MainActivity">

    <Button
        android:id="@+id/button"
        android:layout_width="wrap_content"
        android:layout_height="wrap_content"
        android:background="#0000"
        android:textSize="20sp"
        android:layout_marginLeft="160dp"
        android:layout_marginBottom="70dp"
        android:layout_alignParentBottom="true"
        android:text="关闭" />
</RelativeLayout>
MainActivity.java文件
package com.mingrisoft.goodle_intent;

import android.content.Intent;
import android.support.v7.app.ActionBarActivity;
import android.os.Bundle;
import android.view.View;
import android.view.WindowManager;
import android.widget.Button;

public class MainActivity extends ActionBarActivity {

    @Override
    protected void onCreate(Bundle savedInstanceState) {
        super.onCreate(savedInstanceState);
        setContentView(R.layout.activity_main);
        getWindow().setFlags(WindowManager.LayoutParams.FLAG_FULLSCREEN,
                WindowManager.LayoutParams.FLAG_FULLSCREEN);
        Button bt= (Button) findViewById(R.id.button);
        bt.setOnClickListener(new View.OnClickListener() {
            @Override
            public void onClick(View view) {
                Intent intent=new Intent();
                //作为初始Activity启动
                intent.setAction(intent.ACTION_MAIN);
                //返回桌面
                intent.addCategory(intent.CATEGORY_HOME);
                //启动Intent9
                startActivity(intent);
            }
        });
    }
}
4.Extras属性
putExtras()方法:用来把Bundle作为附加数据进行添加。
getExtras()方法:获取保存的Bundle信息。
应用场景:
用于多个Activity进行数据交换时。
5.Flag属性:
①用来指示Android程序如何去启动另一个Activity,如让该Activity属于哪个Task。
Task:以栈的模式聚集在一起的Activity组件的结合。
②指示程序启动后如何处理,如:指示它是否为近期的Activity。
同样参考Android API找提供的常量来设置
                //让当前Activity不在历史栈中保留,用户一旦离开他,这个Activity自动关闭
                intent.setFlags(intent.FLAG_ACTIVITY_NO_HISTORY);
二、Intent种类
1.显式Intent
2.隐式Intent
显式Intent

创建Intent对象的语法格式:
Intent intent=new Intent (Context packageContext,Class<?>cls)
第一个参数一般为MainActivity.this,第二个参数为要启动的Activity的类,例如DeatailActivity.class。
隐式Intent

        Button button= (Button) findViewById(R.id.button);
        button.setOnClickListener(new View.OnClickListener() {
            @Override
            public void onClick(View view) {
                //隐式Intent
                Intent intent=new Intent();
                //把数据显示给用户
                intent.setAction(intent.ACTION_VIEW);
                intent.setData(Uri.parse("http://www.mingribook.com"));
                startActivity(intent);

            }
        });
显式Intent和隐式Intent的区别。
显式Intent:
- 直接指定目标组件的名称
- 多用于在应用程序内传递信息
隐式Intent:
- 不会用组件名称定义要激活的目标组件
- 多用于在不同应用程序之间传递信息。因为开发人员不清楚其他应用程序的组件名称。
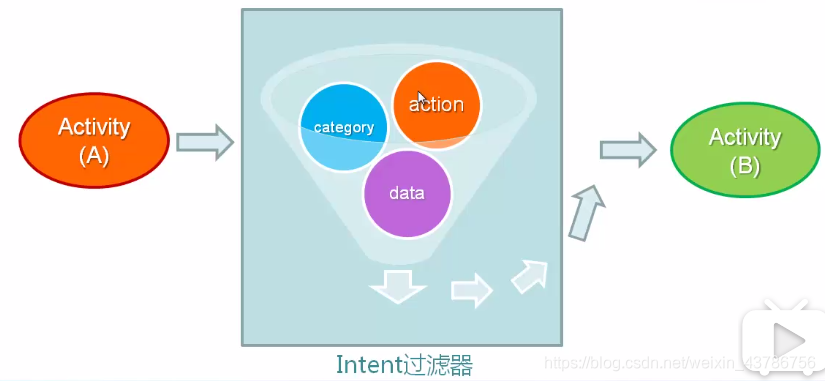
三、Intent过滤器
过滤器:一种根据某一个Intent的Action,Data以及Category等属性,对适合接受这个Intent的组件,进行匹配和筛选的机制。主要使用在使用隐式Intent启动activity时。
例子:
在ActivityA中调用startActivity()打开另一个目标组件,但不直接指定要打开的组件,而是设置一个过滤器,能通过过滤器的组件即要打开的组件。
设置过滤器
通过<intent-filter 标记在Manifest.xml文件中配置。
<intent-filter>
	//指定组件能响应的动作
	<action...../>
	//指定以哪种方式执行Intent请求的动作
	<category...../>
	//想action提供要操作的数据
	<data...../>
</intent-filter>
常用的两种过滤器:
1.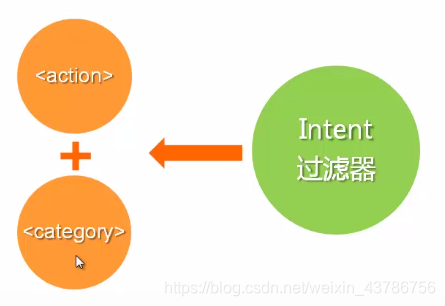
2.

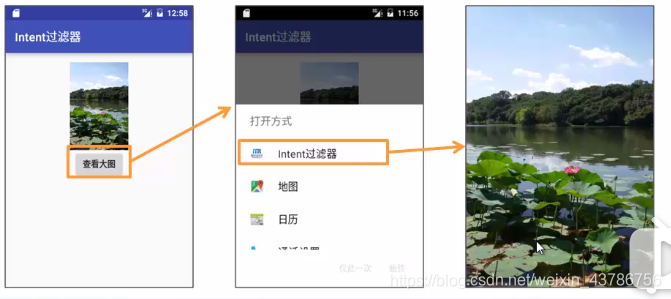
实例:在Activity中使用包含预定义动作的隐式Intent启动另一个Acticity。
效果:
activity_main.xml文件
<?xml version="1.0" encoding="utf-8"?>
<RelativeLayout xmlns:android="http://schemas.android.com/apk/res/android"
    xmlns:tools="http://schemas.android.com/tools"
    android:layout_width="match_parent"
    android:layout_height="match_parent"
    android:orientation="vertical"
    android:paddingBottom="@dimen/activity_vertical_margin"
    android:paddingLeft="@dimen/activity_horizontal_margin"
    android:paddingRight="@dimen/activity_horizontal_margin"
    android:paddingTop="@dimen/activity_vertical_margin"
    tools:context="com.mingrisoft.lookbigger.MainActivity">

    <ImageView
        android:layout_centerHorizontal="true"
        android:id="@+id/image"
        android:layout_width="150dp"
        android:layout_height="200dp"
        android:src="@drawable/t3"/>

    <Button
        android:id="@+id/button"
        android:layout_centerHorizontal="true"
        android:layout_marginTop="10dp"
        android:layout_width="wrap_content"
        android:layout_height="wrap_content"
        android:text="查看大图"
        android:layout_below="@+id/image"/>
</RelativeLayout>
MainActivity.java文件
package com.mingrisoft.lookbigger;

import android.content.Intent;
import android.support.v7.app.ActionBarActivity;
import android.os.Bundle;
import android.view.View;
import android.widget.Button;

public class MainActivity extends ActionBarActivity {

    @Override
    protected void onCreate(Bundle savedInstanceState) {
        super.onCreate(savedInstanceState);
        setContentView(R.layout.activity_main);
        Button button= (Button) findViewById(R.id.button);
        button.setOnClickListener(new View.OnClickListener() {
            @Override
            public void onClick(View view) {
                Intent intent=new Intent();
                intent.setAction(intent.ACTION_VIEW);
                startActivity(intent);
            }
        });
    }
}
activity_show.xml文件
<?xml version="1.0" encoding="utf-8"?>
<RelativeLayout xmlns:android="http://schemas.android.com/apk/res/android"
    xmlns:tools="http://schemas.android.com/tools"
    android:layout_width="match_parent"
    android:layout_height="match_parent"
    android:paddingBottom="@dimen/activity_vertical_margin"
    android:paddingLeft="@dimen/activity_horizontal_margin"
    android:paddingRight="@dimen/activity_horizontal_margin"
    android:paddingTop="@dimen/activity_vertical_margin"
    tools:context="com.mingrisoft.lookbigger.ShowActivity">

    <ImageView
        android:layout_width="match_parent"
        android:layout_height="match_parent"
        android:src="@drawable/t3"
        android:scaleType="fitXY"/>
</RelativeLayout>
ShowActivity.java文件不改变
