先看之前博客引用过的一张图:

(Window的view层级图)
平时写完一个xml布局文件,加载在Activity当中,运行并显示,此时手机显示画面的整体的布局结构大概就如上图所示。可见经常写的xml布局文件,仅仅是整体布局的一部分而已。运行Activity时,视图的加载与调用setContentView(@LayoutRes int layoutResID)方法密不可分,所以需要探究setContentView方法源码是如何实现的。
- Activity
public class MainActivity extends Activity {

    @Override
    protected void onCreate(@Nullable Bundle savedInstanceState) {
        super.onCreate(savedInstanceState);
        setContentView(R.layout.activity_main);

    }
}
点击setContentView方法,进入Activity的源码,如下:
public void setContentView(@LayoutRes int layoutResID) {
        getWindow().setContentView(layoutResID);
        initWindowDecorActionBar();
    }


    public void setContentView(View view) {
        getWindow().setContentView(view);
        initWindowDecorActionBar();
    }

    public void setContentView(View view, ViewGroup.LayoutParams params) {
        getWindow().setContentView(view, params);
        initWindowDecorActionBar();
    }

    public void addContentView(View view, ViewGroup.LayoutParams params) {
        getWindow().addContentView(view, params);
        initWindowDecorActionBar();
    }
Activity源码中有如上4个方法,调用的是用红色标记的方法。方法中调用了getWindow().setContentView(layoutResID),进入方法继续查看,发现Window类中的setContentView是一个抽象方法,那么需要在Activity源码中去找它的实现类。
Window类
public abstract void setContentView(@LayoutRes int layoutResID);
public class Activity extends ContextThemeWrapper
implements LayoutInflater.Factory2,
Window.Callback, KeyEvent.Callback,
OnCreateContextMenuListener, ComponentCallbacks2,
Window.OnWindowDismissedCallback, WindowControllerCallback { private Window mWindow;
……
public Window getWindow() {
return mWindow;
}
……
final void attach(Context context, ActivityThread aThread,
Instrumentation instr, IBinder token, int ident,
Application application, Intent intent, ActivityInfo info,
CharSequence title, Activity parent, String id,
NonConfigurationInstances lastNonConfigurationInstances,
Configuration config, String referrer, IVoiceInteractor voiceInteractor,
Window window) {
attachBaseContext(context);
mFragments.attachHost(null /*parent*/);
mWindow = new PhoneWindow(this, window);
mWindow.setWindowControllerCallback(this);
mWindow.setCallback(this);
mWindow.setOnWindowDismissedCallback(this);
mWindow.getLayoutInflater().setPrivateFactory(this);
……
}
}- PhoneWindow
   @Override
    public void setContentView(int layoutResID) {
        // Note: FEATURE_CONTENT_TRANSITIONS may be set in the process of installing the window
        // decor, when theme attributes and the like are crystalized. Do not check the feature
        // before this happens.
        if (mContentParent == null) {
            installDecor();
        } else if (!hasFeature(FEATURE_CONTENT_TRANSITIONS)) {
            mContentParent.removeAllViews();
        }

        if (hasFeature(FEATURE_CONTENT_TRANSITIONS)) {
            final Scene newScene = Scene.getSceneForLayout(mContentParent, layoutResID,
                    getContext());
            transitionTo(newScene);
        } else {
            mLayoutInflater.inflate(layoutResID, mContentParent);
        }
        mContentParent.requestApplyInsets();
        final Callback cb = getCallback();
        if (cb != null && !isDestroyed()) {
            cb.onContentChanged();
        }
        mContentParentExplicitlySet = true;
}- installDecor()
 // This is the top-level view of the window, containing the window decor.
    private DecorView mDecor;
private void installDecor() {
mForceDecorInstall = false;
if (mDecor == null) {
mDecor = generateDecor(-1);
mDecor.setDescendantFocusability(ViewGroup.FOCUS_AFTER_DESCENDANTS);
mDecor.setIsRootNamespace(true);
if (!mInvalidatePanelMenuPosted && mInvalidatePanelMenuFeatures != 0) {
mDecor.postOnAnimation(mInvalidatePanelMenuRunnable);
}
} else {
mDecor.setWindow(this);
}
if (mContentParent == null) {
mContentParent = generateLayout(mDecor);
……
}
……
} protected ViewGroup generateLayout(DecorView decor) {
// 根据当前的主题初始化数据.
…………
WindowManager.LayoutParams params = getAttributes();
…………
//根据设定好的features值选择不同的窗口修饰布局文件,得到layoutResource值
//把选中的窗口修饰布局文件添加到DecorView对象里,并且指定contentParent值
int layoutResource;
int features = getLocalFeatures();
…………
mDecor.startChanging();
mDecor.onResourcesLoaded(mLayoutInflater, layoutResource);
ViewGroup contentParent = (ViewGroup)findViewById(ID_ANDROID_CONTENT);
if (contentParent == null) {
throw new RuntimeException("Window couldn't find content container view");
}
if ((features & (1 << FEATURE_INDETERMINATE_PROGRESS)) != 0) {
ProgressBar progress = getCircularProgressBar(false);
if (progress != null) {
progress.setIndeterminate(true);
}
}
if ((features & (1 << FEATURE_SWIPE_TO_DISMISS)) != 0) {
registerSwipeCallbacks();
}
// Remaining setup -- of background and title -- that only applies
// to top-level windows.
…………
}
mDecor.finishChanging();
return contentParent;
}
引用网上一个实例,来观察下
布局文件:
<RelativeLayout xmlns:android="http://schemas.android.com/apk/res/android"
    android:layout_width="match_parent"
    android:layout_height="match_parent">

    <TextView android:text="@string/hello_world"
        android:layout_width="wrap_content"
        android:layout_height="wrap_content" />

</RelativeLayout>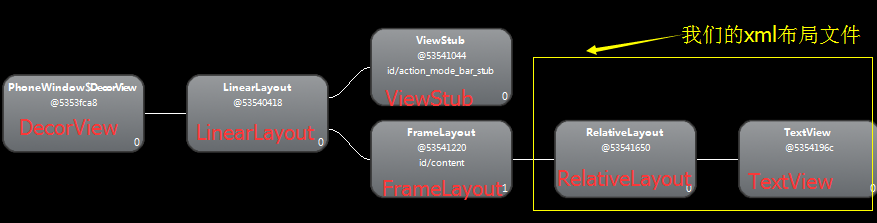
在写此片博客之前,查阅了很多资料,也受到了很多启发,想引用一些博客的资料做一个小结。
- 总结
- 应用Activity时设置的theme或者feature,有两种方法设置。
requestWindowFeature()设置的值通过generateLayout(DecorView decor)方法中getLocalFeature()获取的;而android:theme属性也是通过generateLayout(DecorView decor)方法中getWindowStyle()获取的。所以设置Activity的属性时必须在setContentView方法之前调用requestFeature()方法//通过java文件设置: requestWindowFeature(Window.FEATURE_NO_TITLE); //通过xml文件设置: android:theme="@android:style/Theme.NoTitleBar" - 将主题设置为NoTitleBar,所以在generateLayout方法中的layoutResource变量值为R.layout.screen_simple,布局文件内容如下(从上边给出的实例可以看出):
<LinearLayout xmlns:android="http://schemas.android.com/apk/res/android"
    android:layout_width="match_parent"
    android:layout_height="match_parent"
    android:fitsSystemWindows="true"
    android:orientation="vertical">
    <ViewStub android:id="@+id/action_mode_bar_stub"
              android:inflatedId="@+id/action_mode_bar"
              android:layout="@layout/action_mode_bar"
              android:layout_width="match_parent"
              android:layout_height="wrap_content"
              android:theme="?attr/actionBarTheme" />
    <FrameLayout
         android:id="@android:id/content"
         android:layout_width="match_parent"
         android:layout_height="match_parent"
         android:foregroundInsidePadding="false"
         android:foregroundGravity="fill_horizontal|top"
         android:foreground="?android:attr/windowContentOverlay" />
</LinearLayout>