声明:部分代码参考https://blog.csdn.net/Jesse_Mx/article/details/65634482
本文侧重于通过处理数据集来锻炼python的应用能力
本文所有代码已进行开源,读者可以前往:https://download.csdn.net/download/tanghong1996/10596440进行下载
下载数据集
博主打算将SSD算法用于检测车载视频,用到的是CITY数据集。
读者可以采用KITTI数据集,内容相似,本文主要针对数据进行前期处理,关于该数据集的说明本文就不进行介绍了。
进入官网,找到object一栏,准备下载数据集:
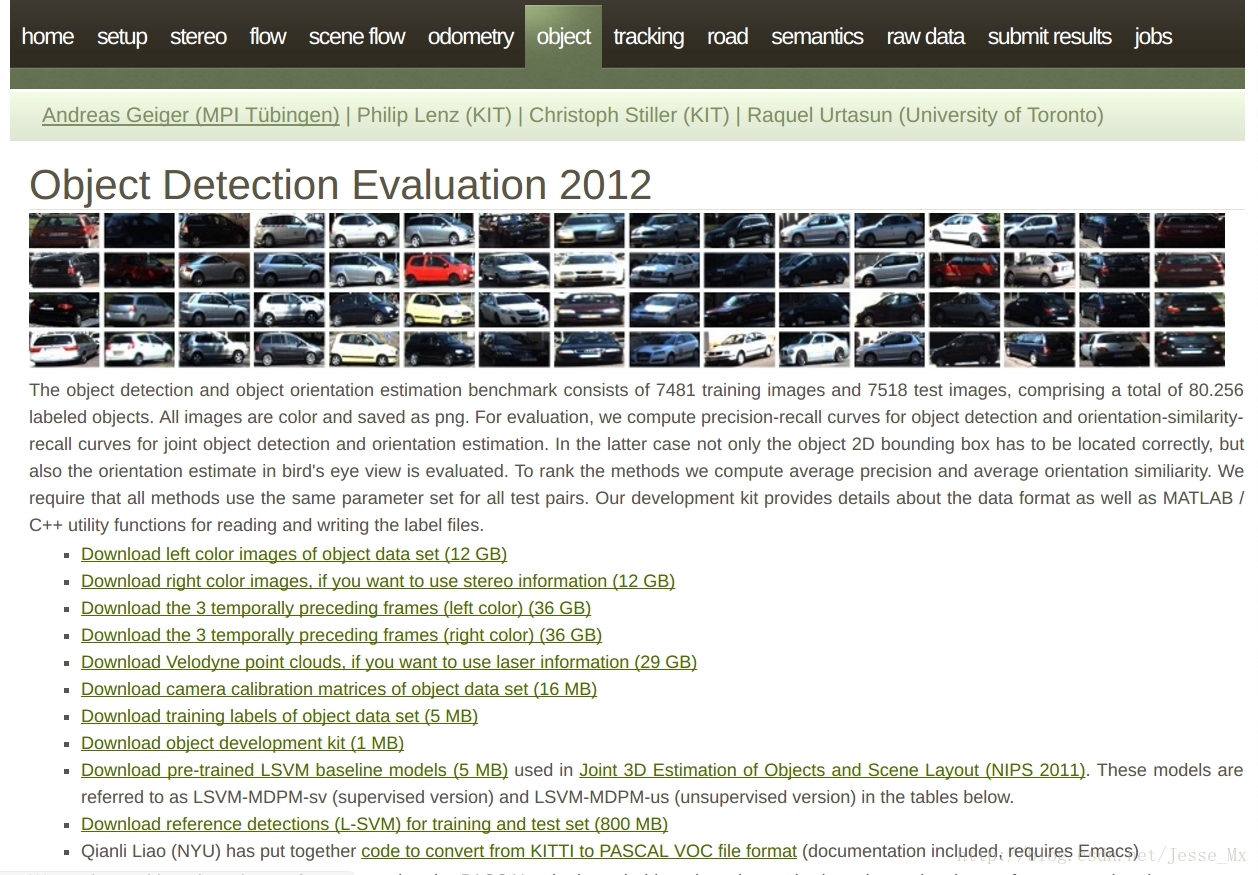
根据下载情况(博主把前四个都下载了,点开看过),进行SSD训练只需要下载第1个图片集 Download left color images of object data set (12 GB)和标注文件 Download training labels of object data set (5 MB) 就够了。然后将其解压,发现其中7481张训练图片有标注信息,而测试图片没有,这就是本次训练所使用的图片数量。由于SSD中训练脚本是基于VOC数据集格式的,所以我们需要把KITTI数据集做成PASCAL VOC的格式,其基本架构可以参看这篇博客:PASCAL VOC数据集分析 。根据SSD训练要求,博主在/home/th/data/中目录中建立一系列文件夹存放所需数据集和工具文件,具体如下:
PS.参看截图,数据要放在home目录下的data文件夹,不是caffe中的data文件夹,这个要注意,否则后续脚本出错。
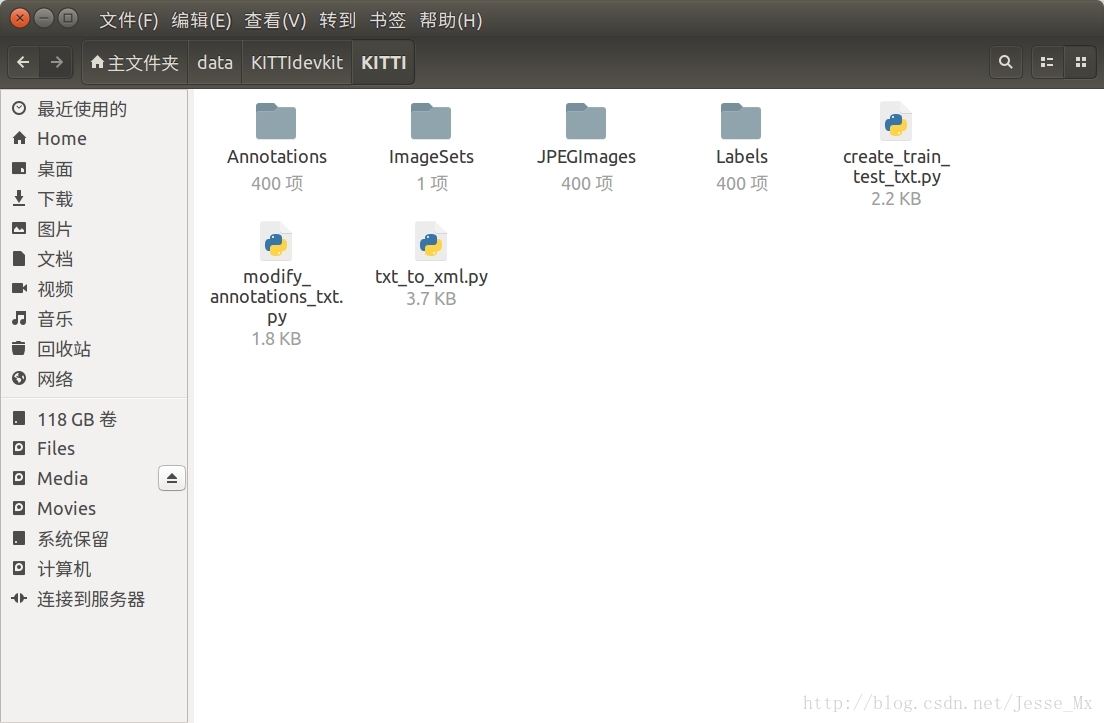
(截图来源于小规模试验,图片只有400张,本人实际测试了2万张)
转换数据集
为了方便SSD进行训练,我们需要将KITTI数据集转换成PASCAL VOC的格式,细心的朋友可能已经发现,KITTI官网提供了一个工具: code to convert from KITTI to PASCAL VOC file format ,为啥不用呢?因为我觉得很难用,缺乏灵活性,还不如自己的Python转换工具好使。
转换KITTI类别
KITTI数据集总共20个类别,如果用于特定场景,20个类别确实多了。此次博主为数据集设置1个类别 ‘Car’,只不过标注信息中还有其他类型的车和人,直接略过有点浪费,博主希望将 ‘Van’, ‘Truck’, ‘Tram’ 合并到 ‘Car’ 类别中去,将 ‘Person_sitting’,’Cyclist’,’Pedestrian’ 合并到 ‘Pedestrian’ 类别中去,并删除Pedestrian类。这里使用的是modify_annotations_txt.py工具,源码如下:
# modify_annotations_txt.py
import glob
import string

txt_list = glob.glob('./Labels/*.txt') # 存储Labels文件夹所有txt文件路径
def show_category(txt_list):
    category_list= []
    for item in txt_list:
        try:
            with open(item) as tdf:
                for each_line in tdf:
                    labeldata = each_line.strip().split(' ') # 去掉前后多余的字符并把其分开
                    category_list.append(labeldata[0]) # 只要第一个字段,即类别
        except IOError as ioerr:
            print('File error:'+str(ioerr))
    print(set(category_list)) # 输出集合

def merge(line):
    each_line=''
    for i in range(len(line)):
        if i!= (len(line)-1):
            each_line=each_line+line[i]+' '
        else:
            each_line=each_line+line[i] # 最后一条字段后面不加空格
    each_line=each_line+'\n'
    return (each_line)

print('before modify categories are:\n')
show_category(txt_list)

for item in txt_list:
    new_txt=[]
    try:
        with open(item, 'r') as r_tdf:
            for each_line in r_tdf:
                labeldata = each_line.strip().split(' ')
                if labeldata[0] in ['Truck','Van','Tram']: # 合并汽车类
                    labeldata[0] = labeldata[0].replace(labeldata[0],'Car')
                if labeldata[0] in ['Cyclist','Person_sitting']: # 合并行人类
                    labeldata[0] = labeldata[0].replace(labeldata[0],'Pedestrian')
                if labeldata[0] == 'DontCare': # 忽略Dontcare类
                    continue
                if labeldata[0] == 'Misc': # 忽略Misc类
                    continue
                new_txt.append(merge(labeldata)) # 重新写入新的txt文件
        with open(item,'w+') as w_tdf: # w+是打开原文件将内容删除,另写新内容进去
            for temp in new_txt:
                w_tdf.write(temp)

    except IOError as ioerr:
        print('File error:'+str(ioerr))

# 删除 Pedestrian行
for item in txt_list:
    try:
        with open(item, 'r') as r_tdf:
            lines = r_tdf.readlines()
        with open(item,'w+') as w_tdf: # w+是打开原文件将内容删除,另写新内容进去
            for line in lines:
                if "trian" in line:
                    continue
                w_tdf.write(line)
    except IOError as ioerr:
        print('File error:'+str(ioerr))

print('\nafter modify categories are:\n')
show_category(txt_list)博主申明:删除Pedestrian行运行时间较慢,应该有更好的思路,欢迎各位提出意见。
不过执行上述文件后,有些文件只有Pedestrian类,删除后就成为了空txt文件,此时需要删除txt文件以及对应的image图片,采用check_label_0.py,源代码如下:
# check_label_0.py
# -*- coding: utf-8 -*-
import os
import re

txt_path = "/home/th/data/CITYdevkit/CITY/Labels"
jpg_path = "/home/th/data/CITYdevkit/CITY/JPEGImages"
files = os.listdir(txt_path)
jpg_files = os.listdir(jpg_path)
f = open("/home/th/data/CITYdevkit/CITY/out.txt", 'w+')
i=1
os.chdir(txt_path)
for filename in files:
    # # print(portion[0])
    # 将文件名和缀名分成俩部分
    if os.path.isfile(filename):
        if filename.endswith('txt'):
            size = os.path.getsize(filename)
            if size == 0:
                portion = os.path.splitext(filename)
                os.remove(txt_path + '/' + filename)
                os.remove(jpg_path + '/' + str(portion[0]) + '.jpg')
                print(str(i) + '  ' + str(filename),file = f)
i = i+1执行命令:python check_label_0.py 来运行py程序
博主采用的CITY数据集,图片与txt的命名不是规范,例如1478019973687625979.txt或者11478019973687625979.jpg。因此,需要重新命名txt和jpg名字,改成000001.txt…对应的图片改成000001.jpg。这里采用的Label-jpg_rename.py,源代码如下:
# -*- coding: utf-8 -*-
import os
import re

txt_path = "/home/th/data/CITYdevkit/CITY/Labels"
jpg_path = "/home/th/data/CITYdevkit/CITY/JPEGImages"
files = os.listdir(txt_path)
jpg_files = os.listdir(jpg_path)

f = open("/home/th/data/CITYdevkit/CITY/all_out.txt", 'w+')
i=1

os.chdir(txt_path)
for filename in files:
    # print(portion[0])
    # 将文件名和缀名分成俩部分
    if os.path.isfile(filename):
        if filename.endswith('txt'):
            portion = os.path.splitext(filename)
            jpg_newname = jpg_path + '/' + str(i).zfill(6) + '.jpg'
            jpg_filename = jpg_path + '/' + str(portion[0]) + '.jpg'
            if os.path.exists(jpg_filename):
                os.rename(jpg_filename, jpg_newname)
                newname = str(i).zfill(6) + '.txt'
                # os.chdir(txt_path)
                os.rename(filename, newname)
                i = i + 1
            else:
                os.remove(filename)
博主申明:
因为txt文件多一个,所以应该没有找到对应的图片时,相应地应该删除txt文件。这里博主有个思考,若存在000002.txt,此时会原文件进行覆盖,因此,为了增强代码的鲁棒性,读者可以思考该问题,博主能力有限,读者不信,可以再次运行该.py会发现文件少了一半。同时,当重命名的文件达到10万以上,如果高效的完成数据集的处理也是一个难点。
执行命令:python3 Label-jpg_rename.py 来运行py程序
以下内容为转载内容,读者可根据自身需求修改文件路径以及修改jpg或者png格式
转载链接:https://blog.csdn.net/Jesse_Mx/article/details/65634482
转换txt标注信息为xml格式
对原始txt文件进行上述处理后,接下来需要将标注文件从txt转化为xml,并去掉标注信息中用不上的部分,只留下3类,还有把坐标值从float型转化为int型,最后所有生成的xml文件要存放在Annotations文件夹中。这里使用的是txt_to_xml.py工具,此处是由 KITTI_SSD 的代码修改而来,感谢作者的贡献。
# txt_to_xml.py
# encoding:utf-8
# 根据一个给定的XML Schema,使用DOM树的形式从空白文件生成一个XML
from xml.dom.minidom import Document
import cv2
import os

def generate_xml(name,split_lines,img_size,class_ind):
    doc = Document()  # 创建DOM文档对象

    annotation = doc.createElement('annotation')
    doc.appendChild(annotation)

    title = doc.createElement('folder')
    title_text = doc.createTextNode('KITTI')
    title.appendChild(title_text)
    annotation.appendChild(title)

    img_name=name+'.png'# 可修改为jpg

    title = doc.createElement('filename')
    title_text = doc.createTextNode(img_name)
    title.appendChild(title_text)
    annotation.appendChild(title)

    source = doc.createElement('source')
    annotation.appendChild(source)

    title = doc.createElement('database')
    title_text = doc.createTextNode('The KITTI Database')
    title.appendChild(title_text)
    source.appendChild(title)

    title = doc.createElement('annotation')
    title_text = doc.createTextNode('KITTI')
    title.appendChild(title_text)
    source.appendChild(title)

    size = doc.createElement('size')
    annotation.appendChild(size)

    title = doc.createElement('width')
    title_text = doc.createTextNode(str(img_size[1]))
    title.appendChild(title_text)
    size.appendChild(title)

    title = doc.createElement('height')
    title_text = doc.createTextNode(str(img_size[0]))
    title.appendChild(title_text)
    size.appendChild(title)

    title = doc.createElement('depth')
    title_text = doc.createTextNode(str(img_size[2]))
    title.appendChild(title_text)
    size.appendChild(title)

    for split_line in split_lines:
        line=split_line.strip().split()
        if line[0] in class_ind:
            object = doc.createElement('object')
            annotation.appendChild(object)

            title = doc.createElement('name')
            title_text = doc.createTextNode(line[0])
            title.appendChild(title_text)
            object.appendChild(title)

            bndbox = doc.createElement('bndbox')
            object.appendChild(bndbox)
            title = doc.createElement('xmin')
            title_text = doc.createTextNode(str(int(float(line[4]))))
            title.appendChild(title_text)
            bndbox.appendChild(title)
            title = doc.createElement('ymin')
            title_text = doc.createTextNode(str(int(float(line[5]))))
            title.appendChild(title_text)
            bndbox.appendChild(title)
            title = doc.createElement('xmax')
            title_text = doc.createTextNode(str(int(float(line[6]))))
            title.appendChild(title_text)
            bndbox.appendChild(title)
            title = doc.createElement('ymax')
            title_text = doc.createTextNode(str(int(float(line[7]))))
            title.appendChild(title_text)
            bndbox.appendChild(title)

    # 将DOM对象doc写入文件
    f = open('Annotations/'+name+'.xml','w')
    f.write(doc.toprettyxml(indent = ''))
    f.close()

if __name__ == '__main__':
    class_ind=('Pedestrian', 'Car', 'Cyclist')
    cur_dir=os.getcwd()
    labels_dir=os.path.join(cur_dir,'Labels')
    for parent, dirnames, filenames in os.walk(labels_dir): # 分别得到根目录,子目录和根目录下文件
        for file_name in filenames:
            full_path=os.path.join(parent, file_name) # 获取文件全路径
            f=open(full_path)
            split_lines = f.readlines()
            name= file_name[:-4] # 后四位是扩展名.txt,只取前面的文件名
            img_name=name+'.png'
            img_path=os.path.join('/home/mx/KITTI/train_image',img_name) # 路径需要自行修改
            img_size=cv2.imread(img_path).shape
            generate_xml(name,split_lines,img_size,class_ind)
print('all txts has converted into xmls')
- 1
- 2
- 3
- 4
- 5
- 6
- 7
- 8
- 9
- 10
- 11
- 12
- 13
- 14
- 15
- 16
- 17
- 18
- 19
- 20
- 21
- 22
- 23
- 24
- 25
- 26
- 27
- 28
- 29
- 30
- 31
- 32
- 33
- 34
- 35
- 36
- 37
- 38
- 39
- 40
- 41
- 42
- 43
- 44
- 45
- 46
- 47
- 48
- 49
- 50
- 51
- 52
- 53
- 54
- 55
- 56
- 57
- 58
- 59
- 60
- 61
- 62
- 63
- 64
- 65
- 66
- 67
- 68
- 69
- 70
- 71
- 72
- 73
- 74
- 75
- 76
- 77
- 78
- 79
- 80
- 81
- 82
- 83
- 84
- 85
- 86
- 87
- 88
- 89
- 90
- 91
- 92
- 93
- 94
- 95
- 96
- 97
- 98
- 99
- 100
- 101
- 102
- 103
- 104
- 105
- 106
执行命令:python3 txt_to_xml.py 来运行py程序,转换效果如下:
# 原始的000400.txt
Car 0.00 0 -1.67 642.24 178.50 680.14 208.68 1.38 1.49 3.32 2.41 1.66 34.98 -1.60
Car 0.00 0 -1.75 685.77 178.12 767.02 235.21 1.50 1.62 3.89 3.27 1.67 21.18 -1.60
Car 0.67 0 -2.15 885.80 160.44 1241.00 374.00 1.69 1.58 3.95 3.64 1.65 5.47 -1.59
Car 0.00 0 -1.89 755.82 101.65 918.16 230.75 3.55 2.56 7.97 7.06 1.63 23.91 -1.61
Car 0.00 1 -2.73 928.61 177.14 1016.83 209.77 1.48 1.36 3.51 17.33 1.71 34.63 -2.27
生成训练验证集和测试集列表
用于SSD训练的Pascal VOC格式的数据集总共就是三大块:首先是JPEGImages文件夹,放入了所有png图片;然后是Annotations文件夹,上述步骤已经生成了相应的xml文件;最后就是imagesSets文件夹,里面有一个Main子文件夹,这个文件夹存放的是训练验证集,测试集的相关列表文件,如下图所示:
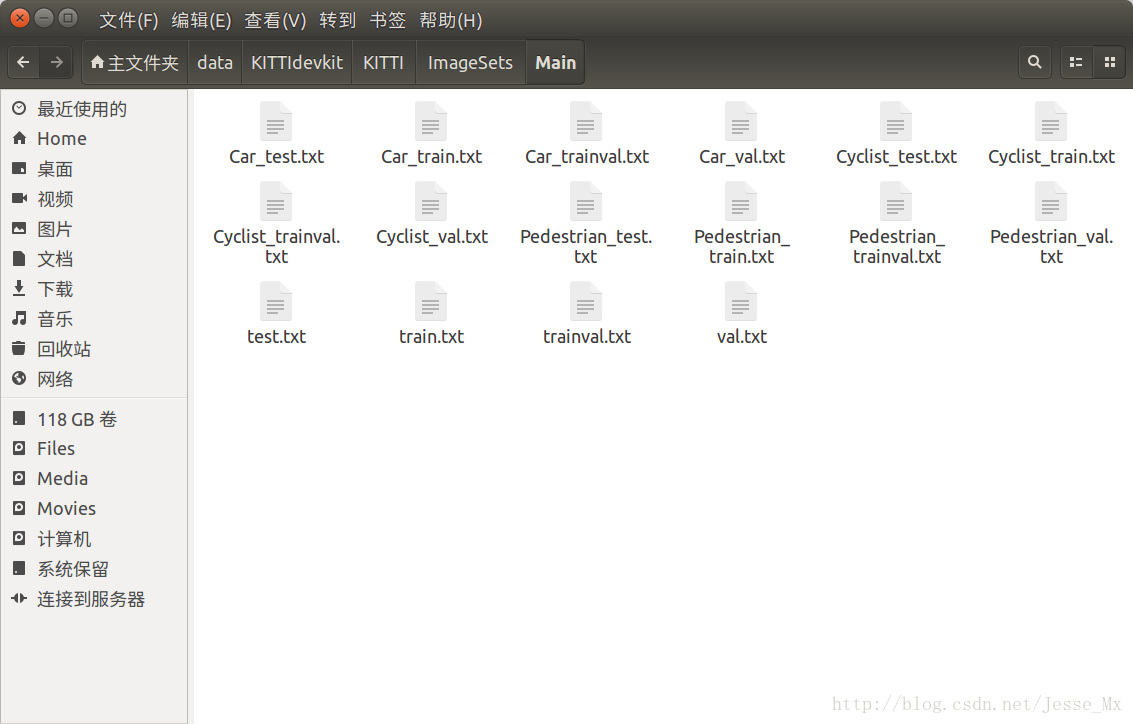
这里使用create_train_test_txt.py工具,自动生成上述16个txt文件,其中训练测试部分的比例可以自行修改,由于这个工具是用Python3写的,所以执行的时候应该是:
python3 create_train_test_txt.py
# create_train_test_txt.py
# encoding:utf-8
import pdb
import glob
import os
import random
import math

def get_sample_value(txt_name, category_name):
    label_path = './Labels/'
    txt_path = label_path + txt_name+'.txt'
    try:
        with open(txt_path) as r_tdf:
            if category_name in r_tdf.read():
                return ' 1'
            else:
                return '-1'
    except IOError as ioerr:
        print('File error:'+str(ioerr))

txt_list_path = glob.glob('./Labels/*.txt')
txt_list = []

for item in txt_list_path:
    temp1,temp2 = os.path.splitext(os.path.basename(item))
    txt_list.append(temp1)
txt_list.sort()
print(txt_list, end = '\n\n')

# 有博客建议train:val:test=8:1:1,先尝试用一下
num_trainval = random.sample(txt_list, math.floor(len(txt_list)*9/10.0)) # 可修改百分比
num_trainval.sort()
print(num_trainval, end = '\n\n')

num_train = random.sample(num_trainval,math.floor(len(num_trainval)*8/9.0)) # 可修改百分比
num_train.sort()
print(num_train, end = '\n\n')

num_val = list(set(num_trainval).difference(set(num_train)))
num_val.sort()
print(num_val, end = '\n\n')

num_test = list(set(txt_list).difference(set(num_trainval)))
num_test.sort()
print(num_test, end = '\n\n')

pdb.set_trace()

Main_path = './ImageSets/Main/'
train_test_name = ['trainval','train','val','test']
category_name = ['Car','Pedestrian','Cyclist']

# 循环写trainvl train val test
for item_train_test_name in train_test_name:
    list_name = 'num_'
    list_name += item_train_test_name
    train_test_txt_name = Main_path + item_train_test_name + '.txt'
    try:
        # 写单个文件
        with open(train_test_txt_name, 'w') as w_tdf:
            # 一行一行写
            for item in eval(list_name):
                w_tdf.write(item+'\n')
        # 循环写Car Pedestrian Cyclist
        for item_category_name in category_name:
            category_txt_name = Main_path + item_category_name + '_' + item_train_test_name + '.txt'
            with open(category_txt_name, 'w') as w_tdf:
                # 一行一行写
                for item in eval(list_name):
                    w_tdf.write(item+' '+ get_sample_value(item, item_category_name)+'\n')
    except IOError as ioerr:
        print('File error:'+str(ioerr))
- 1
- 2
- 3
- 4
- 5
- 6
- 7
- 8
- 9
- 10
- 11
- 12
- 13
- 14
- 15
- 16
- 17
- 18
- 19
- 20
- 21
- 22
- 23
- 24
- 25
- 26
- 27
- 28
- 29
- 30
- 31
- 32
- 33
- 34
- 35
- 36
- 37
- 38
- 39
- 40
- 41
- 42
- 43
- 44
- 45
- 46
- 47
- 48
- 49
- 50
- 51
- 52
- 53
- 54
- 55
- 56
- 57
- 58
- 59
- 60
- 61
- 62
- 63
- 64
- 65
- 66
- 67
- 68
- 69
- 70
- 71
- 72
执行程序过程中,如遇到pdb提示,可按c键,再按enter键。
如果想把标注数据全部作为trainval,而把未标注的数据(大约有7000多图片)作为test,需要重新修改脚本,待续。
数据集的后续处理
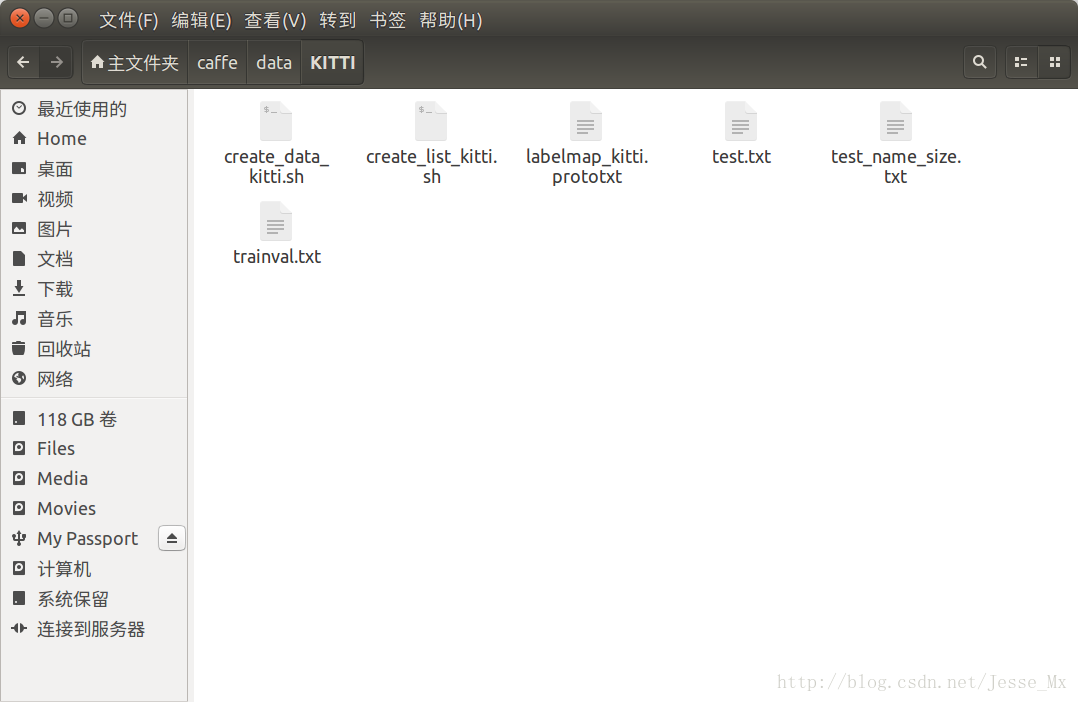
下面进行数据集的后续处理,在/home.mx/caffe/data之下新建KITTI文件夹,用于存放本次训练所需的脚本工具,如下图所示。
生成训练所需列表文件
SSD训练的时候除了需要LMDB格式的数据以外,还需要读取三个列表文件,分别是:trainval.txt,test.txt和test_name_size.txt。前两个txt文件存放训练、测试图片的png路径和xml路径,第三个txt文件存放测试图片的名称和尺寸。所需工具可以由/home/mx/caffe/data/VOC0712/create_list.sh脚本修改而来。
复制一份上述脚本,并重命名为create_list_kitti.sh,存放在KITTI文件夹中。经过修改后的脚本文件如下(双#号注释处为博主修改过的地方):
# create_list_kitti.sh
#!/bin/bash
root_dir=$HOME/data/KITTIdevkit/ ## 自行修改
sub_dir=ImageSets/Main
bash_dir="$(cd "</span><span class="hljs-variable">$(dirname "${BASH_SOURCE[0]}")" && pwd)"
for dataset in trainval test
do
dst_file=$bash_dir</span>/<span class="hljs-variable">$dataset.txt
if [ -f $dst_file ]
then
rm -f $dst_file
fi
for name in KITTI ## 自行修改
do
#if [[ $dataset == "test" && $name == "VOC2012" ]] ## 这段可以注释掉
#then
#continue
#fi
echo "Create list for $name $dataset..."
dataset_file=$root_dir</span>/<span class="hljs-variable">$name/$sub_dir</span>/<span class="hljs-variable">$dataset.txt
img_file=$bash_dir</span>/<span class="hljs-variable">$dataset"_img.txt"
cp $dataset_file</span> <span class="hljs-variable">$img_file
sed -i "s/^/$name\/JPEGImages\//g"</span> <span class="hljs-variable">$img_file
sed -i "s/$/.png/g"</span> <span class="hljs-variable">$img_file ## 从jpg改为png
label_file=$bash_dir</span>/<span class="hljs-variable">$dataset"_label.txt"
cp $dataset_file</span> <span class="hljs-variable">$label_file
sed -i "s/^/$name\/Annotations\//g"</span> <span class="hljs-variable">$label_file
sed -i "s/$/.xml/g"</span> <span class="hljs-variable">$label_file
paste -d' ' $img_file</span> <span class="hljs-variable">$label_file >> $dst_file
rm -f $label_file
rm -f $img_file
done
# Generate image name and size infomation.
if [ $dataset == "test" ]
then
$bash_dir</span>/../../build/tools/get_image_size <span class="hljs-variable">$root_dir $dst_file</span> <span class="hljs-variable">$bash_dir/$dataset"_name_size.txt"
fi
# Shuffle trainval file.
if [ $dataset == "trainval" ]
then
rand_file=$dst_file.random
cat $dst_file</span> | perl -<span class="hljs-constant">MList::Util</span>=shuffle -e <span class="hljs-string">'print shuffle(<STDIN>);'</span> > <span class="hljs-variable">$rand_file
mv $rand_file</span> <span class="hljs-variable">$dst_file
fi
done
- 1
- 2
- 3
- 4
- 5
- 6
- 7
- 8
- 9
- 10
- 11
- 12
- 13
- 14
- 15
- 16
- 17
- 18
- 19
- 20
- 21
- 22
- 23
- 24
- 25
- 26
- 27
- 28
- 29
- 30
- 31
- 32
- 33
- 34
- 35
- 36
- 37
- 38
- 39
- 40
- 41
- 42
- 43
- 44
- 45
- 46
- 47
- 48
- 49
- 50
- 51
执行下面命令,可在/home/mx/caffe/data/KITTI文件夹下生成3个训练所需txt文件。
$ cd ~/caffe
$ ./data/KITTI/create_list_kitti.sh
- 1
- 2
而生成的txt列表格式如下:
# trainval.txt和test.txt文件格式
KITTI/JPEGImages/000003.png KITTI/Annotations/000003.xml
KITTI/JPEGImages/000136.png KITTI/Annotations/000136.xml
KITTI/JPEGImages/000022.png KITTI/Annotations/000022.xml
KITTI/JPEGImages/000151.png KITTI/Annotations/000151.xml
......
- 1
- 2
- 3
- 4
- 5
- 6
# test_name_size.txt文件格式
000011 375 1242
000012 375 1242
000035 375 1242
000044 375 1242
......
- 1
- 2
- 3
- 4
- 5
- 6
准备标签映射文件
由于只有3类,所以可以仿照例子,写一个labelmap_kitti.prototxt文件,用于记录label和name的对应关系,存放在/home/mx/caffe/data/KITTI文件夹中,具体内容如下:
item {
  name: "none_of_the_above" label: 0 display_name: "background" }
item {
  name: "Car" label: 1 display_name: "Car" }
item {
  name: "Pedestrian" label: 2 display_name: "Pedestrian" }
item {
  name: "Cyclist" label: 3 display_name: "Cyclist" }
- 1
- 2
- 3
- 4
- 5
- 6
- 7
- 8
- 9
- 10
- 11
- 12
- 13
- 14
- 15
- 16
- 17
- 18
- 19
- 20
生成LMDB数据库
如果前面一切顺利,现在就可以生成LMDB文件了,所需工具可以由/home/mx/caffe/data/VOC0712/create_data.sh脚本修改而来。仍然复制一份上述脚本,并重命名为create_data_kitti.sh,存放在KITTI文件夹中。经过修改后的脚本文件如下:
# create_data_kitti.sh
cur_dir=$(<span class="hljs-built_in">cd</span> $( dirname ${BASH_SOURCE[0]} ) && pwd )
root_dir=$cur_dir/../..

cd $root_dir

redo=1
data_root_dir="$HOME/data/KITTIdevkit" ## 自行修改
dataset_name="KITTI" ## 自行修改
mapfile="$root_dir</span>/data/<span class="hljs-variable">$dataset_name/labelmap_kitti.prototxt" ## 自行修改
anno_type="detection"
db="lmdb"
min_dim=0
max_dim=0
width=0
height=0

extra_cmd="--encode-type=jpg --encoded"
if [ $redo ]
then
  extra_cmd="$extra_cmd --redo"
fi
for subset in test trainval
do
  python $root_dir</span>/scripts/create_annoset.py --anno-type=<span class="hljs-variable">$anno_type --label-map-file=$mapfile</span> --min-dim=<span class="hljs-variable">$min_dim --max-dim=$max_dim</span> --resize-width=<span class="hljs-variable">$width --resize-height=$height</span> --check-label <span class="hljs-variable">$extra_cmd $data_root_dir</span> <span class="hljs-variable">$root_dir/data/$dataset_name</span>/<span class="hljs-variable">$subset.txt $data_root_dir</span>/<span class="hljs-variable">$dataset_name/$db</span>/<span class="hljs-variable">$dataset_name"_"$subset</span><span class="hljs-string">"_"</span><span class="hljs-variable">$db examples/$dataset_name
done
- 1
- 2
- 3
- 4
- 5
- 6
- 7
- 8
- 9
- 10
- 11
- 12
- 13
- 14
- 15
- 16
- 17
- 18
- 19
- 20
- 21
- 22
- 23
- 24
- 25
- 26
执行命令 ./data/KITTI/create_data_kitti.sh 来运行脚本,将会生成两份LMDB文件,路径分别如下:
$ /home/mx/caffe/examples/KITTI/KITTI_test_lmdb
$ /home/mx/caffe/examples/KITTI/KITTI_trainval_lmdb
- 1
- 2
至此,训练数据可以说已经准备好了。