7.1 集群间数据拷贝
1)scp实现两个远程主机之间的文件复制
scp -r hello.txt root@hadoop103:/user/atguigu/hello.txt // 推 push
scp -r root@hadoop103:/user/atguigu/hello.txt hello.txt // 拉 pull
scp -r root@hadoop103:/user/atguigu/hello.txt root@hadoop104:/user/atguigu //是通过本地主机中转实现两个远程主机的文件复制;如果在两个远程主机之间ssh没有配置的情况下可以使用该方式。
2)采用discp命令实现两个hadoop集群之间的递归数据复制
[atguigu@hadoop102 hadoop-2.7.2]$ bin/hadoop distcp hdfs://haoop102:9000/user/atguigu/hello.txt hdfs://hadoop103:9000/user/atguigu/hello.txt
7.2 Hadoop存档
1)hdfs存储小文件弊端
每个文件均按块存储,每个块的元数据存储在NameNode的内存中,因此hadoop存储小文件会非常低效。因为大量的小文件会耗尽NameNode中的大部分内存。但注意,存储小文件所需要的磁盘容量和存储这些文件原始内容所需要的磁盘空间相比也不会增多。例如,一个1MB的文件以大小为128MB的块存储,使用的是1MB的磁盘空间,而不是128MB。
2)解决存储小文件办法之一
Hadoop存档文件或HAR文件,是一个更高效的文件存档工具,它将文件存入HDFS块,在减少NameNode内存使用的同时,允许对文件进行透明的访问。具体说来,Hadoop存档文件对内还是一个一个独立文件,对NameNode而言却是一个整体,减少了NameNode的内存。
3)案例实操

(1)需要启动yarn进程
[atguigu@hadoop102 hadoop-2.7.2]$ start-yarn.sh
(2)归档文件
把/user/atguigu目录里面的所有文件归档成一个叫myhar.har的归档文件,并把归档后文件存储到/user/my路径下。
[atguigu@hadoop102 hadoop-2.7.2]$ bin/hadoop archive -archiveName myhar.har -p /user/atguigu /user/my
(3)查看归档
[atguigu@hadoop102 hadoop-2.7.2]$ hadoop fs -lsr /user/my/myhar.har
[atguigu@hadoop102 hadoop-2.7.2]$ hadoop fs -lsr har:///myhar.har
(4)解归档文件
[atguigu@hadoop102 hadoop-2.7.2]$ hadoop fs -cp har:/// user/my/myhar.har /* /user/atguigu
7.3 快照管理
快照相当于对目录做一个备份。并不会立即复制所有文件,而是指向同一个文件。当写入发生时,才会产生新文件。
1)基本语法
(1)hdfs dfsadmin -allowSnapshot 路径 (功能描述:开启指定目录的快照功能)
(2)hdfs dfsadmin -disallowSnapshot 路径 (功能描述:禁用指定目录的快照功能,默认是禁用)
(3)hdfs dfs -createSnapshot 路径 (功能描述:对目录创建快照)
(4)hdfs dfs -createSnapshot 路径 名称 (功能描述:指定名称创建快照)
(5)hdfs dfs -renameSnapshot 路径 旧名称 新名称 (功能描述:重命名快照)
(6)hdfs lsSnapshottableDir (功能描述:列出当前用户所有可快照目录)
(7)hdfs snapshotDiff 路径1 路径2 (功能描述:比较两个快照目录的不同之处)
(8)hdfs dfs -deleteSnapshot <path> <snapshotName> (功能描述:删除快照)
2)案例实操
(1)开启/禁用指定目录的快照功能
[atguigu@hadoop102 hadoop-2.7.2]$ hdfs dfsadmin -allowSnapshot /user/atguigu/data
[atguigu@hadoop102 hadoop-2.7.2]$ hdfs dfsadmin -disallowSnapshot /user/atguigu/data
(2)对目录创建快照
[atguigu@hadoop102 hadoop-2.7.2]$ hdfs dfs -createSnapshot /user/atguigu/data
通过web访问hdfs://hadoop102:50070/user/atguigu/data/.snapshot/s…..// 快照和源文件使用相同数据块
[atguigu@hadoop102 hadoop-2.7.2]$ hdfs dfs -lsr /user/atguigu/data/.snapshot/
(3)指定名称创建快照
[atguigu@hadoop102 hadoop-2.7.2]$ hdfs dfs -createSnapshot /user/atguigu/data miao170508
(4)重命名快照
[atguigu@hadoop102 hadoop-2.7.2]$ hdfs dfs -renameSnapshot /user/atguigu/data/ miao170508 atguigu170508
(5)列出当前用户所有可快照目录
[atguigu@hadoop102 hadoop-2.7.2]$ hdfs lsSnapshottableDir
(6)比较两个快照目录的不同之处
[atguigu@hadoop102 hadoop-2.7.2]$ hdfs snapshotDiff /user/atguigu/data/ . .snapshot/atguigu170508
(7)恢复快照
[atguigu@hadoop102 hadoop-2.7.2]$ hdfs dfs -cp /user/atguigu/input/.snapshot/s20170708-134303.027 /user
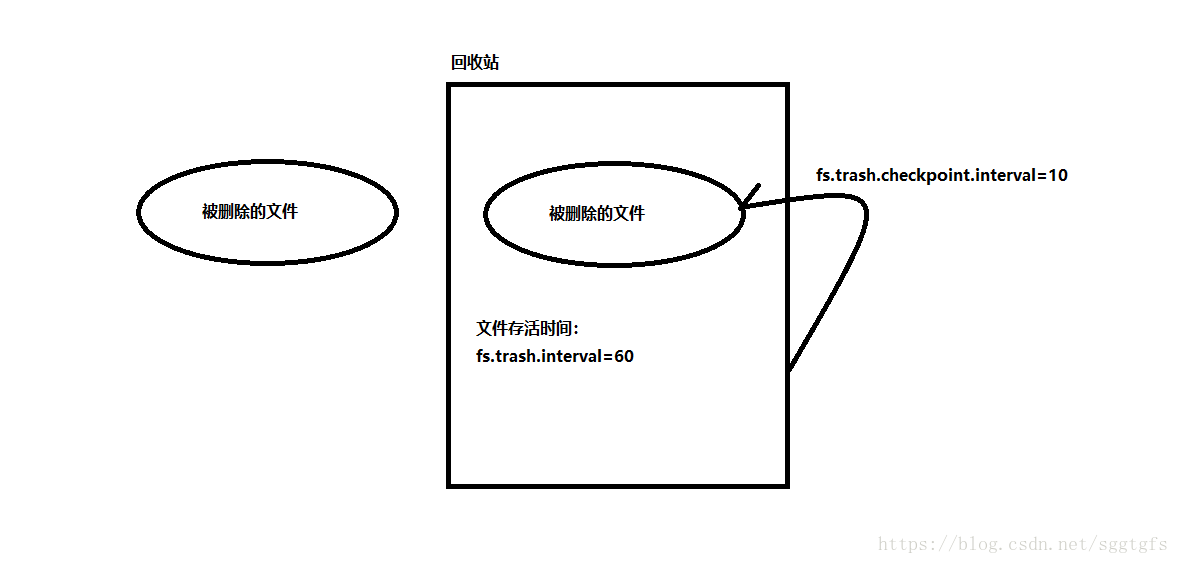
7.4 回收站
1)默认回收站
默认值fs.trash.interval=0,0表示禁用回收站,可以设置删除文件的存活时间。
默认值fs.trash.checkpoint.interval=0,检查回收站的间隔时间。如果该值为0,则该值设置和fs.trash.interval的参数值相等。
要求fs.trash.checkpoint.interval<=fs.trash.interval。
2)启用回收站
修改core-site.xml,配置垃圾回收时间为1分钟。
| <property> <name>fs.trash.interval</name> <value>1</value> </property> |
3)查看回收站
回收站在集群中的;路径:/user/atguigu/.Trash/….
4)修改访问垃圾回收站用户名称
进入垃圾回收站用户名称,默认是dr.who,修改为atguigu用户
[core-site.xml]
| <property> <name>hadoop.http.staticuser.user</name> <value>atguigu</value> </property> |
5)通过程序删除的文件不会经过回收站,需要调用moveToTrash()才进入回收站
Trash trash = New Trash(conf);
trash.moveToTrash(path);
6)恢复回收站数据
[atguigu@hadoop102 hadoop-2.7.2]$ hadoop fs -mv /user/atguigu/.Trash/Current/user/atguigu/input /user/atguigu/input
7)清空回收站
[atguigu@hadoop102 hadoop-2.7.2]$ hadoop fs -expunge
本教程由尚硅谷教育大数据研究院出品,如需转载请注明来源。