vim /etc/sysconfig/network-scripts/ifcfg-eth0
vim /etc/resolv.conf
systemctl restart network
vim /etc/yum.repos.d/rhel_dvd.repo
yum clean all1.重新启动系统
2.在系统启动阶段按上下健停止系统系统引导
3.选择启动引导标题,按“E”进行编辑
4.找到linux16引导条目这一行,从这行最后删除到ro选项,并把ro改为rw,然后添加rd.break选项
5.ctrl+x启动设定过后的系统引导条目
6.进入系统后执行chroot /sysroot切换到真实的系统环境
7.passwd root修改超级用户密码
8.touch /.autorelabel让系统从新扫描所有文件
9.exit两次使系统自动重新启动[root@server ~]# yum install targetcli -y ##安装策略共享编辑器
[root@server ~]# systemctl start target.service
enable
[root@server ~]# firewall-cmd --add-service=targetcli --zone=public
[root@server ~]# fdisk /dev/vdb ##新建一个2G的设备
[root@server ~]# partprobe ##手动更新分区
[root@server ~]# targetcli ##进入编辑器(进入ISCSI目标交互式配置模式)
server
[root@localhost ~]# pvcreate /dev/vdb1                  ##创建物理卷
  Physical volume "/dev/vdb1" successfully created
[root@localhost ~]# vgcreate iSCSI_vg /dev/vdb1              ##创建物理卷组
  Volume group "vg0" successfully created
[root@localhost ~]# lvcreate -L 100M -n disk1_lv iSCSI_vg         ##创建逻辑卷
  Logical volume "lv0" created
/> /backstores/block create westos:storage1 /dev/vdb1 ##给新建的设备起名字为 storage1(提供硬盘,创建储存设备)
Created block storage object westos:storage1 using /dev/vdb1.
/> /iscsi create iqn.2018-06.com.example:storage1 ##创建IGN(iscsi的限定名称)
Created target iqn.2018-06.com.example:storage1.
Created TPG 1.
/> /iscsi/iqn.2018-06.com.example:storage1/tpg1/acls create iqn.2018-06.com.example:westoskey ##创建IGN的密钥
Created Node ACL for iqn.2018-06.com.example:westoskey
/> /iscsi/iqn.2018-06.com.example:storage1/tpg1/luns create /backstores/block/westos:storage1 ##关联设备
Created LUN 0.
Created LUN 0->0 mapping in node ACL iqn.2018-06.com.example:westoskey
/> /iscsi/iqn.2018-06.com.example:storage1/tpg1/portals create 172.25.254.229 ##开启端口
Using default IP port 3260
Created network portal 172.25.254.229:3260.
/> exit ##保存退出开机自动挂载
【desktop】
[root@client westos]# yum install iscsi-initiator-utils.x86_64 -y ##安装iscsi共享资源
[root@client ~]# cd /etc/iscsi/
[root@client iscsi]# ls
initiatorname.iscsi iscsid.conf
[root@client iscsi]# vim initiatorname.iscsi ##密钥文件,填写密码
写入:
~ =iqn.2018-06.com.example:westoskey
[root@client iscsi]# systemctl restart iscsid.service
[root@client iscsi]# iscsiadm -m discovery -t st -p 172.25.254.229 ##查找iscsi服务的iscsi目标(门户)
(-t:发现网络设备类型)
172.25.254.229:3260,1 iqn.2018-06.com.example:storage1
[root@client iscsi]# iscsiadm -m node -T iqn.2018-06.com.example:storage1 -p 172.25.254.229 -l ##登陆服务器上的一个iscsi目标
(-m:动作)(-T:名称) (-p:主机) (-l:登陆)
Logging in to [iface: default, target: iqn.2018-06.com.example:storage1, portal: 172.25.254.229,3260] (multiple)
Login to [iface: default, target: iqn.2018-06.com.example:storage1, portal: 172.25.254.229,3260] successful.
**[root@client iscsi]# fdisk -l ##查看是否添加成功**
Disk /dev/sda: 2147 MB, 2147483648 bytes, 4194304 sectors ##成功
Units = sectors of 1 * 512 = 512 bytes
Sector size (logical/physical): 512 bytes / 512 bytes
I/O size (minimum/optimal): 512 bytes / 4194304 bytes
[root@client ~]# fdisk /dev/sda ##建立一个sda分区
Select (default p): p
Partition number (1-4, default 1): 1
First sector (8192-4194303, default 8192):
Using default value 8192
Last sector, +sectors or +size{K,M,G} (8192-4194303, default 4194303): +1G
Partition 1 of type Linux and of size 1 GiB is set
Command (m for help): p
Device Boot Start End Blocks Id System
/dev/sda1 8192 2105343 1048576 83 Linux
[root@client ~]# partprobe
[root@client ~]# mkfs.xfs /dev/sda1 ##格式化
meta-data=/dev/sda1 isize=256 agcount=8, agsize=32768 blks
[root@client ~]# mount /dev/sda1 /mnt/ ##手动挂载
[root@client ~]# vim /etc/fstab
写入:
11 /dev/sda1 /mnt xfs defaults,_netdev 0 0 ##开机自动永久挂载,先启动网络再挂载设备
[root@client ~]# reboot
Connection to 172.25.254.129 closed by remote host.
Connection to 172.25.254.129 closed.
[kiosk@foundation29 Desktop]$ ssh root@172.25.254.129
^C
[kiosk@foundation29 Desktop]$ rht-vmctl poweroff desktop ##第一次很难
Powering off desktop..
[kiosk@foundation29 Desktop]$ rht-vmctl start desktop
Starting desktop.
[kiosk@foundation29 Desktop]$ rht-vmctl view desktop
[kiosk@foundation29 Desktop]$ ssh root@172.25.254.129
root@172.25.254.129's password:
Last login: Sat Jun 2 23:53:15 2018 from 172.25.254.29
[root@client ~]# df
/dev/sda1 1038336 33056 1005280 4% /mnt
四、
a) 在 ser ver X 上设置服务开机自启动,防火墙允许此服务
[root@server ~]# yum install nfs-utils -y
[root@server ~]# systemctl start nfs
                           enable
[root@localhost ~]# firewall-cmd --add-service=nfs --zone=public
b)在 ser ver X 上共享本地目录/nfsshar e,desktopX 可以读写访问此共享,
并且开机自动挂载到/m nt/nfsshar e 目录上
[root@server ~]# vim /etc/exports
写入:
  1 /mnt/nfsshare   *(sync,rw)    ##读写

[root@server ~]# exportfs -rv
exporting *:/mnt
                  mkdir /mnt/nfsshare
[root@server ~]# chmod 777 /mnt/nfsshare[root@client ~]# yum install nfs-utils -y
[root@localhost ~]# firewall-cmd --add-service=nfs --zone=public
[root@client ~]# showmount -e 172.25.254.229 ##查看nfs共享状态
Export list for 172.25.254.229:
[root@client ~]# umount /mnt/
[root@client ~]# mount 172.25.254.229:/mnt/nfsshare /mnt/
[root@client ~]# df
172.25.254.229:/mnt 10473984 3158400 7315584 31% /mnt
[root@client ~]# cd /mnt/5.配 SM B 服务:
a) 在 ser ver X 上配置 sm b 共享服务,要求开机自启,防火墙允许此服务
[root@server ~]# yum install samba samba-client samba-common -y  ##下载服务
[root@server ~]# systemctl start smb  ##开启(森巴)服务
[root@server ~]# systemctl enable smb  ##开机自动开启
[root@localhost ~]# firewall-cmd --add-service=smb --zone=public
b) 创 建 共 享 目 录 为 /sm bshar e, 共 享 名 为sm bshar e, 工 作 组 为
W EST O S,m ar keting 组成员可以读写此共享,不属于 m ar keting 组的人
只能读
[root@station ~]# mkdir /home/smbshare ##创建目录
[root@station home]# chgrp westos /home/smbshare/ ##分配组
[root@station home]# chmod g+rw /home/smbshare/ ##给予读写权限
[root@station home]# chmod g+s /home/smbshare/ ##继承
[root@station home]# ls -ld /home/smbshare/ ##查看
drwxrwsr-x. 2 root sysadms 1024 Jan 31 02:41 /home/materials/
c)
创建 sam ba-only 用户 br ian 和 r ob,其中 br ian 用户属于 m ar keting
组,用户密码都是 w estos
[root@station ~]# useradd -G marketing brian
[root@station ~]# useradd -G marketing rob
[root@station ~]# passwd brian
[root@station ~]# passwd rob- 配置 M ar iadb 数据库服务:
a) 在 ser ver X 上安装 m ar iadb 数据库,开机自启动,防火墙允许此服务
[root@jane1 ~]# yum install mariadb-server -y            ##安装
[root@jane1 ~]# systemctl start mariadb      ##开启数据库
                           enable
[root@localhost ~]# firewall-cmd --add-service=mariadb --zone=public
b) 给 数 据 库 设 置 r oot 管 理 员 密 码 为 w estos, 限 制 r oot 用 户 只 能 从
localhost 登录,移除匿名用户,删除 test 库
[root@jane1 ~]# systemctl restart mariadb        ##重启数据库
[root@jane1 ~]# mysql_secure_installation        ##给数据库设定一个密码
/usr/bin/mysql_secure_installation: line 379: find_mysql_client: command not found

NOTE: RUNNING ALL PARTS OF THIS SCRIPT IS RECOMMENDED FOR ALL MariaDB
      SERVERS IN PRODUCTION USE!  PLEASE READ EACH STEP CAREFULLY!

In order to log into MariaDB to secure it, we'll need the current
password for the root user.  If you've just installed MariaDB, and
you haven't set the root password yet, the password will be blank,
so you should just press enter here.

Enter current password for root (enter for none):
OK, successfully used password, moving on...

Setting the root password ensures that nobody can log into the MariaDB
root user without the proper authorisation.

Set root password? [Y/n] y           ##是否建立超级用户的密码
New password:
Re-enter new password:   westos
Password updated successfully!
Reloading privilege tables..
 ... Success!


Remove anonymous users? [Y/n] y    ##是否让匿名用户登陆
 ... Success!

Normally, root should only be allowed to connect from 'localhost'.  This
ensures that someone cannot guess at the root password from the network.

Disallow root login remotely? [Y/n] y     ##是否让超级用户远程控制
 ... Success!


Remove test database and access to it? [Y/n] y     ##删除测试数据库并访问它
 - Dropping test database...
 ... Success!
 - Removing privileges on test database...
 ... Success!

Reloading the privilege tables will ensure that all changes made so far
will take effect immediately.

Reload privilege tables now? [Y/n] y      ##重新加载特权表
 ... Success!

Cleaning up...
c)
创建一个名为 r edhat 的库,并从备份文件中恢复数据到此数据库,备份
文件的位置在:
http://classr oom .exam ple.com /pub/m ater ials/m ar iadb/m ar iadb.dum p
[root@jane1 ~]# mysql -uroot -p     ##登陆
MariaDB [(none)]> SHOW DATABASES;      ##查看库
MariaDB [(none)]> CREATE DATABASE redhat;      ##创建一个westos的库
Query OK, 1 row affected (0.00 sec)
MariaDB [westos]> quit       ##退出


[root@jane1 ~]# mysqldump -uroot -pwestos --all-database                             ##备份表中的所有数据

[root@jane1 ~]# mysqldump -uroot -pwestos redhat > http://classr oom .exam ple.com /pub/m ater ials/m ar iadb/m ar iadb.dum p
              ##备份westos库并把数据保存到
d) 创建数据库用户 m ar y,对 r edhat 数据库具有查询、插入、更新、删除
权限,密码为 m ar y_passw d。 natasha 用户可以从 desktopX 上登录数据
库,对 r edhat 库拥有查询权限,密码为 natasha_passw d
[root@jane1 ~]# mysql -uroot -p     ##登陆
MariaDB [(none)]> CREATE USER redhat@'localhost' identified by 'mary_passwd';     ##建立密码为jane,名称为jane的用户
MariaDB [(none)]> GRANT SELECT on redhat.* to mary@localhost;     ##给jane可查看 为 westos.* 查看所有权限
MariaDB [(none)]> GRANT UPDATE on redhat.* mary@localhost;        ##给jane可修改 westos.* 修改所有权限


[root@jane1 ~]# yum install httpd php -y               ##下载阿帕奇  ,php
[root@jane1 ~]# yum install php-mysql.x86_64 -y         ##下载
[root@jane1 ~]# systemctl start httpd                 ##开启阿帕奇
[root@localhost ~]# firewall-cmd --add-service=http --zone=public
[root@jane1 html]# ls
phpMyAdmin-3.4.0-all-languages.tar.bz2
[root@jane1 html]# tar jxf phpMyAdmin-3.4.0-all-languages.tar.bz2      ##解压
[root@jane1 html]# ls
phpMyAdmin-3.4.0-all-languages  phpMyAdmin-3.4.0-all-languages.tar.bz2
[root@jane1 html]# rm -fr phpMyAdmin-3.4.0-all-languages.tar.bz2
[root@jane1 html]# ls
phpMyAdmin-3.4.0-all-languages
[root@jane1 html]# mv phpMyAdmin-3.4.0-all-languages/ mysqladmin       ##改名字
[root@jane1 html]# ll
total 4
drwxr-xr-x 10 root root 4096 May 11  2011 mysqladmin
[root@jane1 html]# cd mysqladmin
[root@jane1 mysqladmin]# ls
[root@jane1 mysqladmin]# cp config.sample.inc.php config.inc.php          ##按照网页要求进行复制
[root@jane1 mysqladmin]#

再在火狐中输入:172.25.254.129/mysqladmin

[root@jane1 ~]# mysql -uroot -p     ##登陆
MariaDB [(none)]> CREATE USER natasha@'localhost' identified by 'natasha_passwd';     ##建立密码为jane,名称为jane的用户
MariaDB [(none)]> GRANT SELECT on redhat.* to natasha@localhost;     ##给jane可查看 为 westos.* 查看所有权限
7.配置 w eb 服务:
a) 在 ser ver X 上安装 httpd 服务,要求开机自启动,防火墙允许此服务
[root@jane1 ~]# yum install httpd -y             ##安装阿帕奇
[root@jane1 ~]# systemctl start httpd           ##打开阿帕奇
[root@localhost ~]# firewall-cmd --list-all  ##看一哈是否有http
[root@localhost ~]# firewall-cmd --add-service=http --zone=public
b) 配置虚拟主机,监听default:80,默认发布目录在/var /w w w /htm l,日志位
置在 logs/default-vhost.log,日志格式为 com bined
虚拟机:
[root@jane1 httpd]# pwd
/etc/httpd
[root@jane1 httpd]# ls
apacheuser  conf  conf.d  conf.modules.d  logs  modules  run
[root@jane1 httpd]# cd conf.d/
[root@jane1 conf.d]# ls
autoindex.conf  README  userdir.conf  welcome.conf
[root@jane1 conf.d]# vim default.conf
写入:
 1 <VirtualHost _default_:80>
  2          DocumentRoot /var/www/html
  3          CustomLog "logs/default-vhost.log" combined
  4 </VirtualHost>
c)建立虚拟主机
w w w X.exam ple.com , 监 听 *:80, 默 认 发 布 目 录 在
/sr v/w w w X.exam ple.com /w w w ,日志存储在 logs/w w w X.exam ple.com .log,
日志格式为 com bined。
浏览器所在主机:(真机)
[kiosk@foundation29 ~]$ su - root
Password:
Last login: Sun May 20 16:36:40 CST 2018 on pts/3
ABRT has detected 1 problem(s). For more info run: abrt-cli list --since 1526805400
[root@foundation29 ~]# vim /etc/hosts
写入:
127.0.0.1   localhost localhost.localdomain localhost4 localhost4.localdomain4
::1         localhost localhost.localdomain localhost6 localhost6.localdomain6
172.25.254.250  content.example.com
172.25.254.129   w w w X.exam ple.com

[root@jane1 httpd]# pwd
/etc/httpd
[root@jane1 httpd]# ls
apacheuser  conf  conf.d  conf.modules.d  logs  modules  run
[root@jane1 httpd]# cd conf.d/
[root@jane1 conf.d]# ls
autoindex.conf  README  userdir.conf  welcome.conf
[root@jane1 conf.d]# vim default.conf
写入:
 1 <VirtualHost _default_:80>
  2          DocumentRoot /sr v/w w w X.exam ple.com /w w w
  3          CustomLog "logs/w w w X.exam ple.com .log" combined
  4 </VirtualHost>
d) 建立虚拟主机 w ebappX.exam ple.com ,监听*443,
默认发布目录/sr v/w ebappX.exam ple.com /w w w ,
C A 机构证书的位置:
http://classr oom .exam ple.com /pub/exam ple-ca.cr t,
w ebappX 站点证书和私钥位置在:
http://classr oom .exam ple.com /pub/tls/cer ts/w ebappX.cr t
http://classr oom .exam ple.com /pub/tls/pr ivate/w ebappX.key
私钥的权限是 0600
在访问 w ebappX.exam ple.com 的 80 端口时,会被重定向到 443 端口
下载文件:
http://classr oom .exam ple.com /pub/m ater ials/w ebapp.cgi
并在访问域名 https://w ebappX.exam ple.com 时直接可以看到其运行结
果
[root@jane1 conf.d]# yum install crypto-utils -y ##生成产生加密证书的命令
[root@jane1 conf.d]# yum install mod_ssl -y
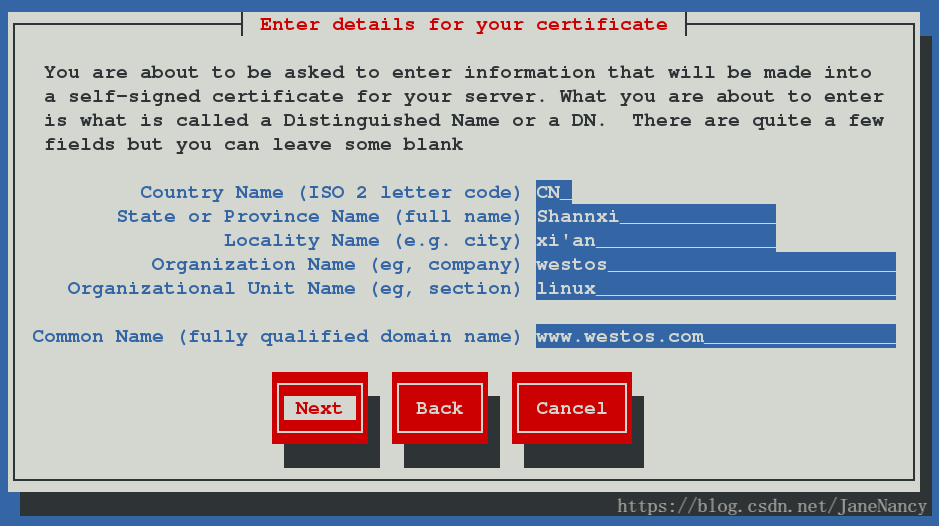
[root@jane1 conf.d]# genkey www.westos.com ##配置其证书信息
分别为加密的key和加密证书的文件及其位置,选择Next进行下一步
选择k此步为收集密码数据,速度较慢,此时需要在一个新的shell(虚拟机)命令行随机输入内容,速度会迅速加快ey文件的大小,建议选择1024适中
该步骤为是否向CA机构发送,选择NO,不发送
不需要钥匙
填写网站的基本信息,依次为国家、省份、所在城市、公司名称,所属部门,网站网址名称
完成后Next即可创建成功
获得了生成的key和密码证书
[root@jane1 conf.d]# genkey www.westos.com ##看截频操作
output will be written to /etc/pki/tls/certs/www.westos.com.crt
output key written to /etc/pki/tls/private/www.westos.com.key
[root@jane1 conf.d]# ls
autoindex.conf music.conf README tmprequest welcome.conf
default.conf news.conf ssl.conf userdir.conf
[root@jane1 conf.d]# vim ssl.conf
100 #SSLCertificateFile /etc/pki/tls/certs/localhost.crt
101
102 SSLCertificateFile /etc/pki/tls/certs/www.westos.com.crt
108 #SSLCertificateKeyFile /etc/pki/tls/private/localhost.key
109
110 SSLCertificateKeyFile /etc/pki/tls/private/www.westos.com.key
[root@jane1 conf.d]# systemctl restart httpd
在火狐浏览器地址栏输入 https://www.westos.com 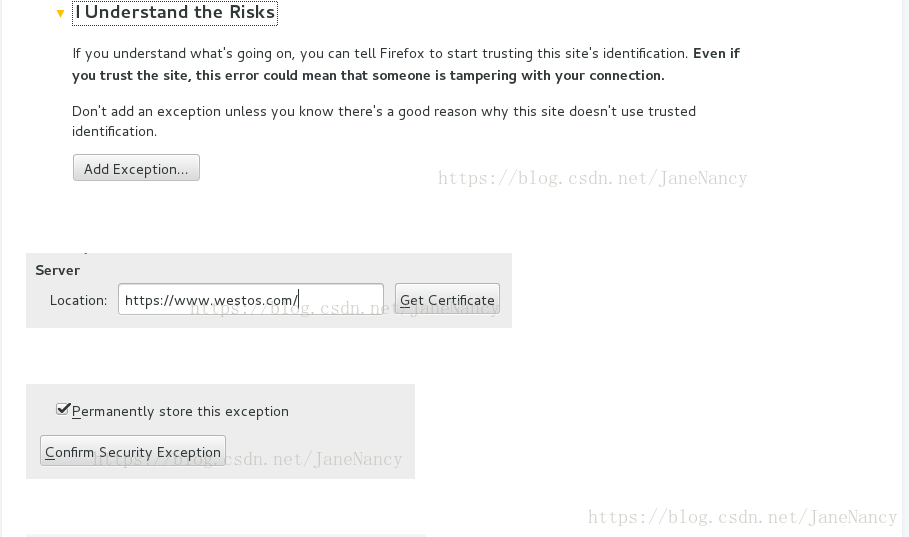
[root@jane1 conf.d]# ls
autoindex.conf  music.conf  README    tmprequest    welcome.conf
default.conf    news.conf   ssl.conf  userdir.conf
[root@jane1 conf.d]# cp news.conf login.conf
[root@jane1 conf.d]# vim login.conf
写入:
 1 <VirtualHost *:443>
  2           ServerName login.westos.com
  3           DocumentRoot "/var/www/virtual/westos.com/login/"
  4           CustomLog "logs/login.log" combined
  5           SSLEngine on
  6           SSLCertificateFile /etc/pki/tls/certs/www.westos.com.crt
  7           SSLCertificateKeyFile  /etc/pki/tls/private/www.westos.com.key
  8 </VirtualHost>
  9 <Directory "/var/www/virtual/westos.com/login/">
 10          Require all granted
 11 </Directory>
 12 <VirtualHost *:80>
 13           ServerName login.westos.com
 14           RewriteEngine on
 15           RewriteRule ^(/.*)$ https://%{HTTP_HOST}$1 [redirect=301]
 16 </VirtualHost>

[root@jane1 conf.d]# systemctl restart httpd
[root@jane1 conf.d]# mkdir -p /var/www/virtual/westos.com/login/
[root@jane1 conf.d]# vim /var/www/virtual/westos.com/login/index.html
写入:
  1 <h1>login's page</h1>

[root@jane1 conf.d]# systemctl restart httpd

在火狐地址栏输入: login.westos.com   http://login.westos.com  就直接调转到 https://