前言:
本文使用crnn网络识别验证码,使用的验证码数据集有三种,准确率都很高。
效果预览:

opencv验证码识别
搭建CRNN模型:
# crnn.py
import argparse, os
import torch
import torch.nn as nn


class BidirectionalLSTM(nn.Module):

    def __init__(self, nInput_size, nHidden, nOut):
        super(BidirectionalLSTM, self).__init__()

        self.lstm = nn.LSTM(nInput_size, nHidden, bidirectional=True)
        self.linear = nn.Linear(nHidden * 2, nOut)

    def forward(self, input):
        recurrent, (hidden, cell) = self.lstm(input)
        T, b, h = recurrent.size()
        t_rec = recurrent.view(T * b, h)

        output = self.linear(t_rec)  # [T * b, nOut]
        output = output.view(T, b, -1)  # 输出变换为[seq,batch,类别总数]

        return output


class CNN(nn.Module):

    def __init__(self, imageHeight, nChannel):
        super(CNN, self).__init__()
        assert imageHeight % 32 == 0, 'image Height has to be a multiple of 32'

        self.depth_conv0 = nn.Conv2d(in_channels=nChannel, out_channels=nChannel, kernel_size=3, stride=1, padding=1,
                                     groups=nChannel)
        self.point_conv0 = nn.Conv2d(in_channels=nChannel, out_channels=64, kernel_size=1, stride=1, padding=0,
                                     groups=1)
        self.relu0 = nn.ReLU(inplace=True)
        self.pool0 = nn.MaxPool2d(kernel_size=2, stride=2)

        self.depth_conv1 = nn.Conv2d(in_channels=64, out_channels=64, kernel_size=3, stride=1, padding=1, groups=64)
        self.point_conv1 = nn.Conv2d(in_channels=64, out_channels=128, kernel_size=1, stride=1, padding=0, groups=1)
        self.relu1 = nn.ReLU(inplace=True)
        self.pool1 = nn.MaxPool2d(kernel_size=2, stride=2)

        self.depth_conv2 = nn.Conv2d(in_channels=128, out_channels=128, kernel_size=3, stride=1, padding=1, groups=128)
        self.point_conv2 = nn.Conv2d(in_channels=128, out_channels=256, kernel_size=1, stride=1, padding=0, groups=1)
        self.batchNorm2 = nn.BatchNorm2d(256)
        self.relu2 = nn.ReLU(inplace=True)

        self.depth_conv3 = nn.Conv2d(in_channels=256, out_channels=256, kernel_size=3, stride=1, padding=1, groups=256)
        self.point_conv3 = nn.Conv2d(in_channels=256, out_channels=256, kernel_size=1, stride=1, padding=0, groups=1)
        self.relu3 = nn.ReLU(inplace=True)
        self.pool3 = nn.MaxPool2d(kernel_size=(2, 2), stride=(2, 1), padding=(0, 1))

        self.depth_conv4 = nn.Conv2d(in_channels=256, out_channels=256, kernel_size=3, stride=1, padding=1, groups=256)
        self.point_conv4 = nn.Conv2d(in_channels=256, out_channels=512, kernel_size=1, stride=1, padding=0, groups=1)
        self.batchNorm4 = nn.BatchNorm2d(512)
        self.relu4 = nn.ReLU(inplace=True)

        self.depth_conv5 = nn.Conv2d(in_channels=512, out_channels=512, kernel_size=3, stride=1, padding=1, groups=512)
        self.point_conv5 = nn.Conv2d(in_channels=512, out_channels=512, kernel_size=1, stride=1, padding=0, groups=1)
        self.relu5 = nn.ReLU(inplace=True)
        self.pool5 = nn.MaxPool2d(kernel_size=(2, 2), stride=(2, 1), padding=(0, 1))

        # self.conv6 = nn.Conv2d(in_channels=512, out_channels=512, kernel_size=2, stride=1, padding=0)
        self.depth_conv6 = nn.Conv2d(in_channels=512, out_channels=512, kernel_size=2, stride=1, padding=0, groups=512)
        self.point_conv6 = nn.Conv2d(in_channels=512, out_channels=512, kernel_size=1, stride=1, padding=0, groups=1)
        self.batchNorm6 = nn.BatchNorm2d(512)
        self.relu6 = nn.ReLU(inplace=True)

    def forward(self, input):
        depth0 = self.depth_conv0(input)
        point0 = self.point_conv0(depth0)
        relu0 = self.relu0(point0)
        pool0 = self.pool0(relu0)
        # print(pool0.size())

        depth1 = self.depth_conv1(pool0)
        point1 = self.point_conv1(depth1)
        relu1 = self.relu1(point1)
        pool1 = self.pool1(relu1)
        # print(pool1.size())

        depth2 = self.depth_conv2(pool1)
        point2 = self.point_conv2(depth2)
        batchNormal2 = self.batchNorm2(point2)
        relu2 = self.relu2(batchNormal2)
        # print(relu2.size())

        depth3 = self.depth_conv3(relu2)
        point3 = self.point_conv3(depth3)
        relu3 = self.relu3(point3)
        pool3 = self.pool3(relu3)
        # print(pool3.size())

        depth4 = self.depth_conv4(pool3)
        point4 = self.point_conv4(depth4)
        batchNormal4 = self.batchNorm4(point4)
        relu4 = self.relu4(batchNormal4)
        # print(relu4.size())

        depth5 = self.depth_conv5(relu4)
        point5 = self.point_conv5(depth5)
        relu5 = self.relu5(point5)
        pool5 = self.pool5(relu5)
        # print(pool5.size())

        depth6 = self.depth_conv6(pool5)
        point6 = self.point_conv6(depth6)
        batchNormal6 = self.batchNorm6(point6)
        relu6 = self.relu6(batchNormal6)
        # print(relu6.size())

        return relu6


class CRNN(nn.Module):
    def __init__(self, imgHeight, nChannel, nClass, nHidden):
        super(CRNN, self).__init__()

        self.cnn = nn.Sequential(CNN(imgHeight, nChannel))
        self.lstm = nn.Sequential(
            BidirectionalLSTM(512, nHidden, nHidden),
            BidirectionalLSTM(nHidden, nHidden, nClass),
        )

    def forward(self, input):
        conv = self.cnn(input)
        # pytorch框架输出结构为BCHW
        batch, channel, height, width = conv.size()
        assert height == 1, "the output height must be 1."
        # 将height==1的维度去掉-->BCW
        conv = conv.squeeze(dim=2)
        # 调整各个维度的位置(B,C,W)->(W,B,C),对应lstm的输入(seq,batch,input_size)
        conv = conv.permute(2, 0, 1)

        output = self.lstm(conv)

        return output


if __name__ == "__main__":
    x = torch.rand(1, 1, 32, 100)
    model = CRNN(imgHeight=32, nChannel=1, nClass=37, nHidden=256)

    y = model(x)

    print(y.shape)
验证码数据集制作:
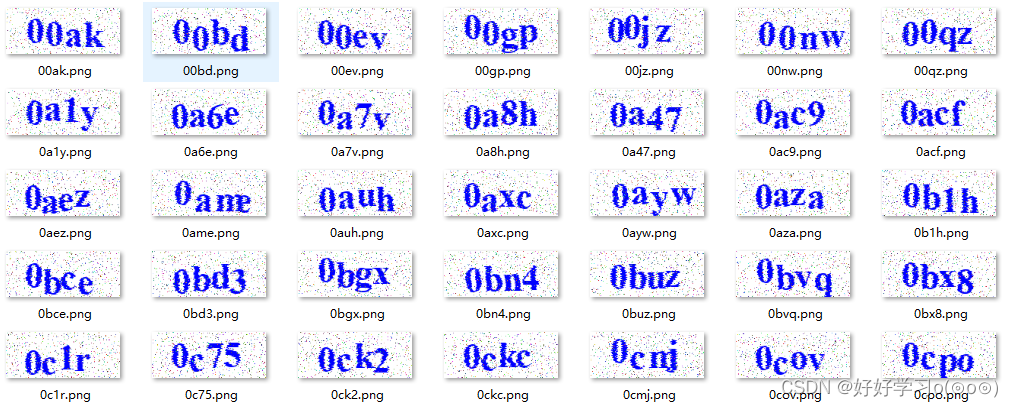
共有三种数据集,第一种数据集是captcha_images_v2,该数据集部分验证码图片如下所示:

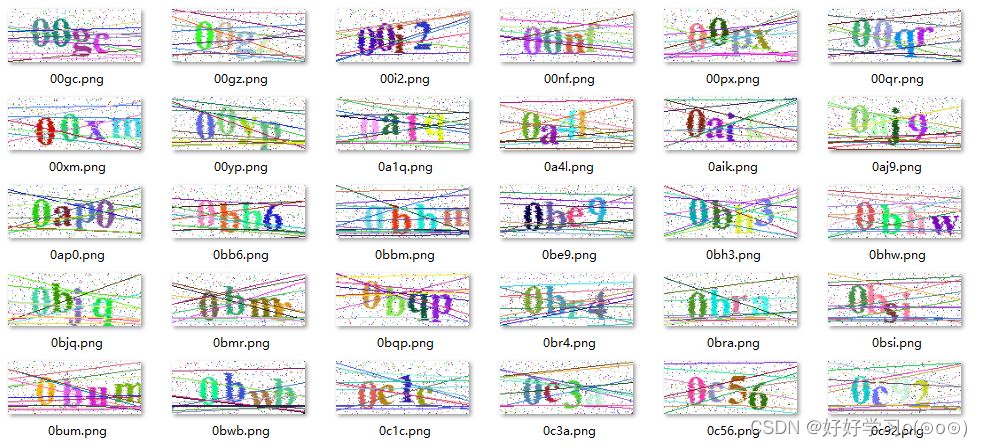
另外两种数据集是使用python自制的,其部分图像如下所示:
使用python生成验证码的代码如下所示:
# -*- coding: utf-8 -*-
"""
Created on Fri Nov 27 16:10:15 2020
@author: pistachio
"""
# 生成验证码图片
from PIL import Image, ImageDraw, ImageFont
import random
import string
import cv2
import numpy as np
import warnings
warnings.filterwarnings("ignore")


# 所有可能的字符,主要是英文字母和数字
characters = string.ascii_letters + string.digits
characters=characters.lower()


# 获取指定长度的字符串
def selectedCharacters(length):
    '''length:the number of characters to show'''
    result = ""
    for i in range(length):
        result += random.choice(characters)
    return result


def getColor():
    '''get a random color'''
    r = random.randint(0, 255)
    g = random.randint(0, 255)
    b = random.randint(0, 255)


    return (r, g, b)


def main(size=(200, 100), characterNumber=4, bgcolor=(255, 255, 255)):
    imageTemp = Image.new('RGB', size, bgcolor)
    # 设置字体和字号
    font = ImageFont.truetype('c:\\windows\\fonts\\TIMESBD.TTF', 48)
    draw = ImageDraw.Draw(imageTemp)
    text = selectedCharacters(characterNumber)
    width, heigth = draw.textsize(text, font)
    # 绘制验证码字符串
    offset =2
    for i in range(characterNumber):
        offset += width // characterNumber
        position = (offset, (size[1] - heigth) // 2 + random.randint(-5, 5))
        draw.text(xy=position, text=text[i], font=font, fill=getColor())
    # 对验证码图片进行简单变换,这里采取简单的点运算
    imageFinal = Image.new('RGB', size, bgcolor)
    pixelsFinal = imageFinal.load()
    pixelsTemp = imageTemp.load()
    for y in range(0, size[1]):
        offset = random.randint(-1, 1)
        for x in range(0, size[0]):
            newx = x + offset
            if newx >= size[0]:
                newx = size[0] - 1
            elif newx < 0:
                newx = 0
            pixelsFinal[newx, y] = pixelsTemp[x, y]
    draw = ImageDraw.Draw(imageFinal)
    # 绘制干扰噪点像素
    for i in range(int(size[0] * size[1] * 0.07)):
        draw.point((random.randint(0, size[0]), random.randint(0, size[1])), fill=getColor())
    #绘制干扰线条
    for i in range(8):
        start = (0, random.randint(0, size[1] - 1))
        end = (size[0], random.randint(0, size[1] - 1))
        draw.line([start, end], fill=getColor(), width=1)
    #绘制干扰弧线
    for i in range(8):
        start = (-50, 50)
        end = (size[0] + 10, random.randint(0, size[1] + 10))
        draw.arc(start + end, 0, 360, fill=getColor())
    # 保存验证码图片
    # imageFinal.save('result.jpg')
    # imageFinal.show()
    src=np.array(imageFinal)[...,::-1]
    # print(text)
    # cv2.imshow('a21',src)
    # cv2.waitKey(0)

    cv2.imwrite("./data3/"+text+'.png',src)


if __name__ == "__main__":

    for i in range(30000):
        main((150, 60), 4, (255, 255, 255))
模型训练:
训练代码如下所示:
from model import CRNN
from mydataset import CRNNDataSet
from torch.utils.data import DataLoader
import torch
from torch import optim
from tqdm import tqdm
import numpy as np
import matplotlib.pyplot as plt
import os
import random


def decode(preds):
    char_set = ['a', 'b', 'c', 'd', 'e', 'f', 'g', 'h', 'i', 'j', 'k', 'l', 'm', 'n',
                'o', 'p', 'q', 'r', 's', 't', 'u', 'v', 'w', 'x', 'y', 'z',
                '0', '1', '2', '3', '4', '5', '6', '7', '8', '9'] + [" "]
    preds=list(preds)


    pred_text = ''
    for i,j in enumerate(preds):
        if j==n_class-1:
            continue
        if i==0:
            pred_text+=char_set[j]
            continue
        if preds[i-1]!=j:
            pred_text += char_set[j]

    return pred_text
def getAcc(preds,labs):
    acc=0
    char_set = ['a', 'b', 'c', 'd', 'e', 'f', 'g', 'h', 'i', 'j', 'k', 'l', 'm', 'n',
                'o', 'p', 'q', 'r', 's', 't', 'u', 'v', 'w', 'x', 'y', 'z',
                '0', '1', '2', '3', '4', '5', '6', '7', '8', '9'] + [" "]

    labs=labs.cpu().detach().numpy()
    preds = preds.cpu().detach().numpy()
    preds=np.argmax(preds,axis=-1)
    preds=np.transpose(preds,(1,0))

    out=[]
    for pred in preds:
        out_txt=decode(pred)
        out.append(out_txt)

    ll=[]
    for lab in labs:
        a=lab[lab!=-1]
        b=[char_set[i] for i in a]
        b="".join(b)
        ll.append(b)
    for a1,a2 in zip(out,ll):
        if a1==a2:
            acc+=1
    return acc/batch_size

batch_size=32
n_class = 37

data_dir='data3'
datas=os.listdir(data_dir)

val_lines=random.sample(datas,k=int(len(datas)*0.1))
train_lines=list(set(datas)-set(val_lines))


trainData = CRNNDataSet(lines=train_lines,train=True,img_width=200,data_dir=data_dir)
trainLoader = DataLoader(dataset=trainData, batch_size=batch_size, shuffle=True, num_workers=1)
valData = CRNNDataSet(lines=val_lines,train=False,img_width=200,data_dir=data_dir)
valLoader = DataLoader(dataset=valData, batch_size=batch_size, shuffle=False, num_workers=1)


device = torch.device('cuda:0' if torch.cuda.is_available() else 'cpu')
net = CRNN(imgHeight=32, nChannel=1, nClass=n_class, nHidden=256)
net=net.to(device)
stcdics=torch.load('./my_model/data3/data3.pth')
net.load_state_dict(state_dict=stcdics)


loss_func = torch.nn.CTCLoss(blank=n_class - 1)  # 注意,这里的CTCLoss中的 blank是指空白字符的位置,在这里是第65个,也即最后一个
optimizer = torch.optim.Adam(net.parameters(), lr=0.0005, betas=(0.5, 0.999))
#学习率衰减
lr_scheduler  = optim.lr_scheduler.StepLR(optimizer, step_size=1, gamma=0.99)


#画图列表
trainLoss=[]
valLoss=[]
trainAcc=[]
valAcc=[]
if __name__ == '__main__':

    #设置迭代次数100次
    Epoch=50

    epoch_step = len(train_lines) // batch_size
    for epoch in range(1, Epoch + 1):

        net.train()

        train_total_loss = 0
        val_total_loss=0
        train_total_acc = 0
        val_total_acc = 0

        with tqdm(total=epoch_step, desc=f'Epoch {epoch}/{Epoch}', postfix=dict, mininterval=0.3) as pbar:
            for step, (features, label) in enumerate(trainLoader, 1):
                labels = torch.IntTensor([])
                for j in range(label.size(0)):
                    labels = torch.cat((labels, label[j]), 0)

                labels=labels[labels!=-1]

                features = features.to(device)
                labels = labels.to(device)
                loss_func=loss_func.to(device)
                batch_size = features.size()[0]


                out = net(features)

                log_probs = out.log_softmax(2).requires_grad_()

                targets = labels
                input_lengths = torch.IntTensor([out.size(0)] * int(out.size(1)))
                target_lengths = torch.where(label!=-1,1,0).sum(dim=-1)
                loss = loss_func(log_probs, targets, input_lengths, target_lengths)
                acc=getAcc(out,label)

                optimizer.zero_grad()
                loss.backward()
                optimizer.step()
                train_total_loss += loss
                train_total_acc += acc
                pbar.set_postfix(**{

    'loss': train_total_loss.item() / (step),
                                    'acc': train_total_acc/ (step), })
                pbar.update(1)
        trainLoss.append(train_total_loss.item()/step)
        trainAcc.append(train_total_acc/step)

        #保存模型
        torch.save(net.state_dict(), 'my_model/{}/{}.pth'.format(data_dir,data_dir))
        #验证
        net.eval()
        for step, (features, label) in enumerate(valLoader, 1):
            with torch.no_grad():
                labels = torch.IntTensor([])
                for j in range(label.size(0)):
                    labels = torch.cat((labels, label[j]), 0)

                labels = labels[labels != -1]

                features = features.to(device)
                labels = labels.to(device)
                loss_func = loss_func.to(device)
                batch_size = features.size()[0]

                out = net(features)

                log_probs = out.log_softmax(2).requires_grad_()

                targets = labels
                input_lengths = torch.IntTensor([out.size(0)] * int(out.size(1)))
                target_lengths = torch.where(label != -1, 1, 0).sum(dim=-1)
                loss = loss_func(log_probs, targets, input_lengths, target_lengths)
                acc = getAcc(out, label)
                val_total_loss+=loss
                val_total_acc+=acc

        valLoss.append(val_total_loss.item()/step)
        valAcc.append(val_total_acc/step)
        lr_scheduler.step()

    # print(trainLoss)
    # print(valLoss)
    """绘制loss acc曲线图"""
    plt.figure()
    plt.plot(trainLoss, 'r')
    plt.plot(valLoss, 'b')
    plt.title('Training and validation loss')
    plt.xlabel("Epochs")
    plt.ylabel("Loss")
    plt.legend(["Loss", "Validation Loss"])
    plt.savefig('loss.png')

    plt.figure()
    plt.plot(trainAcc, 'r')
    plt.plot(valAcc, 'b')
    plt.title('Training and validation acc')
    plt.xlabel("Epochs")
    plt.ylabel("Acc")
    plt.legend(["Acc", "Validation Acc"])
    plt.savefig('acc.png')
    # plt.show()
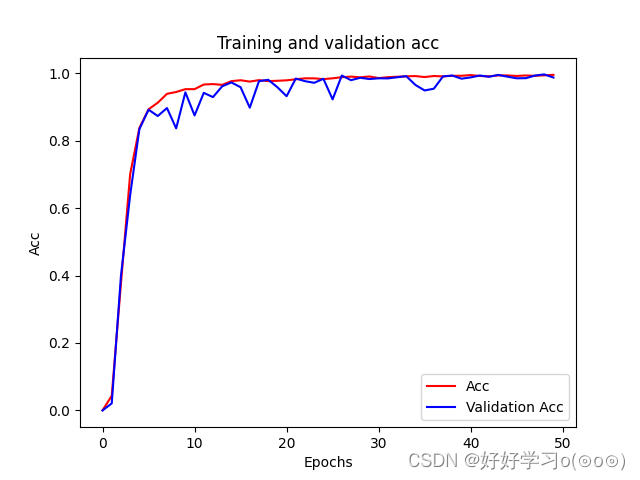
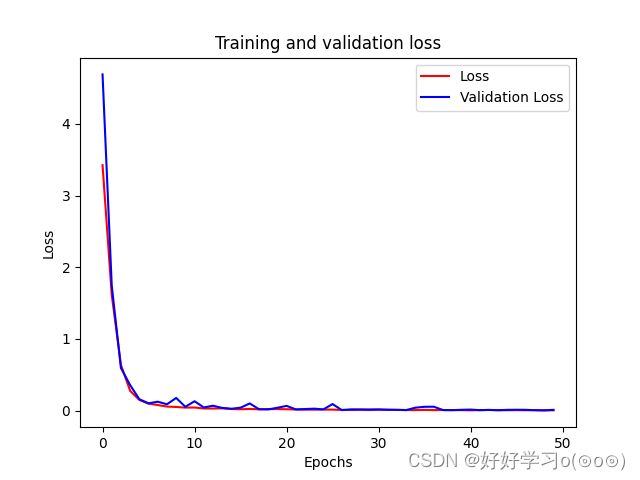
准确率与loss图像:
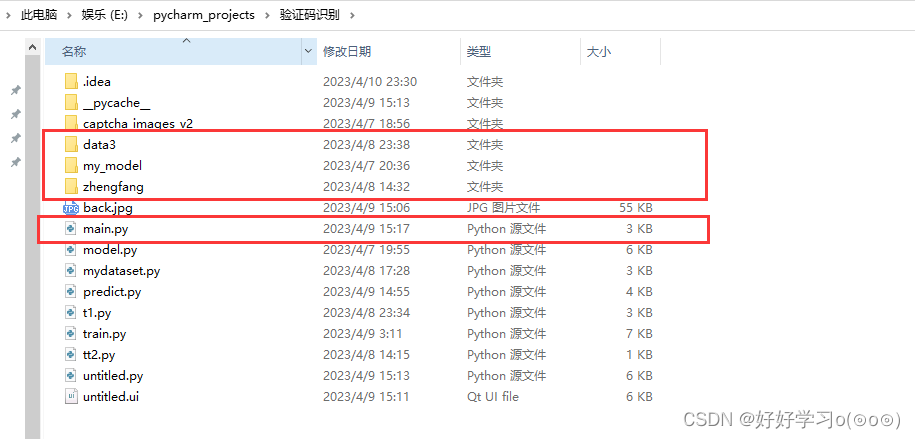
项目结构与源码下载:
如下图所示,三个文件夹中存放的分别是三个验证码数据集,运行main.py即可出现GUI界面。
GUI界面如下所示:

项目下载:下载地址