Dubbo是阿里巴巴SOA服务化治理方案的核心框架,是一个分布式服务框架,致力于提高性能和透明化的RPC远程服务调用方案,以及SOA服务治理方案。
SOA思想:面向服务的框架,给每一个模块暴露对应的ip和端口,当做一个服务进行运行重点在于服务的管理(负载均衡,容灾模式,服务的横向扩展),应用SOA的:webServices、dubbo、springCloud:微服务框架
ps:学习SpringCloud进度:spring2-->spring3-->spring4-->springboot-->springCloud
RPC:https://blog.csdn.net/wangyunpeng0319/article/details/78651998
Dubbo核心:
· 远程通信:提供对多种基于长连接的NIO框架的抽象封装,包括多种线程模型、序列化、以及“请求-响应”模型的信息交换方式。
· 集群容错:提供基于接口方法的透明远程过程调用,包括多协议支持,以及软负载均衡,失败容错,地址路由,动态配置等集群支持。
· 自动发现:基于注册中心目录服务,是服务消费方能动态的查找服务提供方,使地址透明,是服务提供方可以平滑增加或减少机器。
举例:
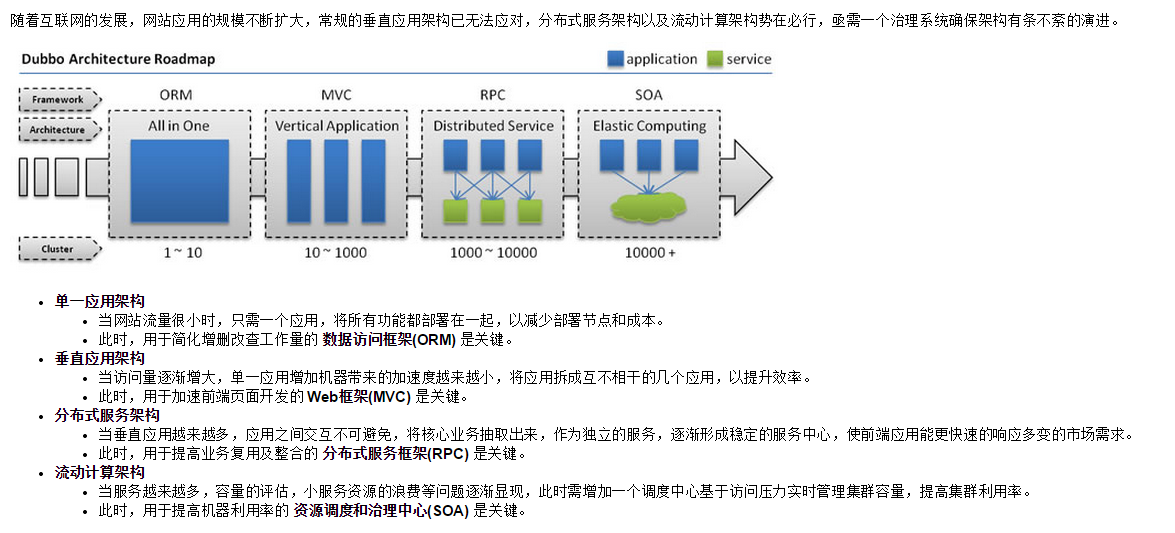
单一应用架构:基础的用户管理系统,单表的增删改查操作。

垂直应用架构:利用目前掌握的常用MVC框架操作不是太复杂的表。
分布式服务架构:将每一个功能创建一个项目。例如用户一个工程,轮播图一个项目。相互调用需要暴露接口和端口号
流动计算架构:加入用户特别多的话,也可以将用户模块拆分成多个项目,相互调用需要暴露接口和端口号
把项目中的每一个模块,拆分成若干个应用,通过服务的方式进行暴露,如果涉及到相互通信,通过RPC调用。
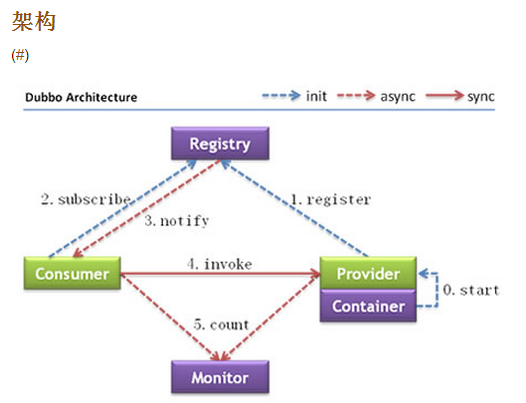
Provider:提供者,就是自己写的服务器端
Consumer:消费者,就是客户端,调用服务方法,意思为消费提供端提供的方法
Registry:注册中心:消费端和提供端的构建桥梁,提供端的信息会在注册中心做一个记录,消费端从注册中心拿数据,在远程调用,
Monitor:监听,看看调用服务多少次
入门案例:
工具:MyEclipse和linux系统上搭建的zookeeper
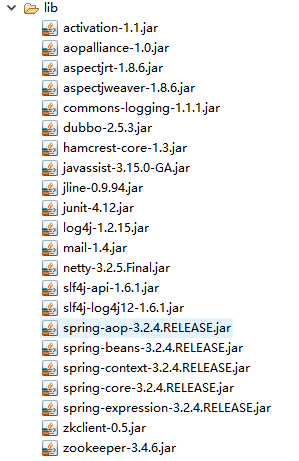
1、jar包
2、项目一:testdubbo_p(提供端)
2.1.1 配置文件:applicationContext.xml
<?xml version="1.0" encoding="UTF-8"?>
<beans xmlns="http://www.springframework.org/schema/beans"
       xmlns:aop="http://www.springframework.org/schema/aop"
       xmlns:tx="http://www.springframework.org/schema/tx"
       xmlns:dubbo="http://code.alibabatech.com/schema/dubbo"
	   xmlns:xsi="http://www.w3.org/2001/XMLSchema-instance"
	   xsi:schemaLocation="http://www.springframework.org/schema/beans
						   http://www.springframework.org/schema/beans/spring-beans-3.2.xsd
						   http://www.springframework.org/schema/aop
						   http://www.springframework.org/schema/aop/spring-aop-3.2.xsd
						   http://www.springframework.org/schema/tx
						   http://www.springframework.org/schema/tx/spring-tx-3.2.xsd
						   	http://code.alibabatech.com/schema/dubbo
						   	http://code.alibabatech.com/schema/dubbo/dubbo.xsd">

	<import resource="dubbo_p.xml"></import>
</beans>
2.1.2 配置文件2:dubbo_p.xml 头标签一样的
<!-- 配置应用名 -->
		<dubbo:application name="testdubbo_p"></dubbo:application>

		<!-- 指定注册中心 -->
		<dubbo:registry protocol="zookeeper" address="192.168.10.120:2181"></dubbo:registry>
		<!-- <dubbo:registry address="multicast://224.5.6.7:1234"></dubbo:registry> -->
		<!--指定服务提供者的端口和协议  -->

		<dubbo:protocol name="dubbo" port="9991"></dubbo:protocol>

		<!-- 暴露服务 -->
		<dubbo:service interface="com.services.UserService" ref="userService"></dubbo:service>
		<bean id="userService" class="com.services.UserServiceImpl"></bean>
2.2 写一个com.services.UserService接口
public interface UserService {
	public void insertUser(Integer id,String name);
	public String queryById(Integer id);
	public List<String> queryAll();
}
2.3 实现
public class UserServiceImpl implements UserService{

	@Override
	public void insertUser(Integer id, String name) {
		System.out.println("insert"+id+"-----"+name);
	}

	@Override
	public String queryById(Integer id) {
		System.out.println("querybyid"+id);
		return id+"aaaa";
	}

	@Override
	public List<String> queryAll() {
		System.out.println("queryall");
		return Arrays.asList("zxcv","bnm");
	}

}
2.4 测试
public static void main(String[] args) throws IOException {
		ClassPathXmlApplicationContext applicationContext = new ClassPathXmlApplicationContext("conf/applicationContext.xml");
		System.out.println("项目启动完成");
		//System.in返回的是InputStream指向命令行输入的字节流,它的read方法以字节流的方式来读取命令行的输入的数据。
		System.in.read();
	}
获得容器,保证服务在main下活着就行
3、项目二:testdubbo_c (消费端)
3.1 配置文件:dubbo_c.xml
<!-- 配置应用名 -->
		<dubbo:application name="testdubbo_c"></dubbo:application>

		<!-- 指定注册中心 -->
		<dubbo:registry protocol="zookeeper" address="192.168.10.120:2181"></dubbo:registry>
		<!-- <dubbo:registry address="multicast://224.5.6.7:1234"></dubbo:registry> -->
		<!--指定服务提供者的端口和协议  -->
		<dubbo:reference id="userService" interface="com.services.UserService"></dubbo:reference>
3.2 接口
如上,包名接口名需要相同
-----
3.3 jar包也是一样的
3.4 测试
public static void main(String[] args) {
		ClassPathXmlApplicationContext ac = new ClassPathXmlApplicationContext("conf/applicationContext.xml");
		UserService userService = ac.getBean("userService",UserService.class);
		//userService.insertUser(8, "name");
		userService.queryById(1);
	}
ps:zookeeper需要在linux系统上安装,并开启
./bin/zkServer.sh start /usr/zookeeper-3.4.8/conf/zoo.cfg
和
./bin/zkServer.sh start
效果一样
然后
[root@lucktomcat zookeeper-3.4.8]# ./bin/zkCli.sh -server 192.168.10.120:2181