目录
Line绘制直线
函数说明:根据给定的两点之间画一直线。超出图像范围的被裁剪。对于非抗锯齿的使用8-通道或4-通道算法。粗线条用圆角绘制两端。抗锯齿线使用高斯滤波绘制。
//函数原型1
void Line(InputOutputArray img,
    int pt1X,
    int pt1Y,
    int pt2X,
    int pt2Y,
    Scalar color,
    int thickness = 1,
    LineTypes lineType = LineTypes.Link8,
    int shift = 0)

//函数原型2
void Line(InputOutputArray img,
    Point pt1,
    Point pt2,
    Scalar color,
    int thickness = 1,
    LineTypes lineType = LineTypes.Link8,
int shift = 0)| 参数 | 说明 |
|---|---|
| InputOutputArray img | 待画直线的图像 |
| Point pt1 int pt1X,int pt1Y |
起点坐标 |
| Point pt2 int pt2X,int pt2Y |
终点坐标 |
| Scalar color | 直线的颜色 |
| int thickness | 直线的线宽(>0 && <=32767),不能为-1 |
| LineTypes lineType | 线类型 |
| int shift | 坐标向右位移量(缩小的倍数) |
LineType为不同值时的绘制结果
AntiAlias:抗锯齿(用高斯模糊)
Link4与Link8的绘制效果

实际绘制效果,红色(AntiAlias)、蓝色(Link4)、绿色(Link8)
/// <summary>
/// 测试Line的LinkType参数
/// </summary>
private void Test_Line_LinkType()
{
    //Line LinkType参数测试
    using (Mat canvas = Mat.Zeros(w / 4, w / 4, MatType.CV_8UC3))
    {
        var winName = "Test LineTypes";
        Cv2.NamedWindow(winName, WindowFlags.Normal);
        Cv2.ResizeWindow(winName, new Size(w * 4, w * 4));

        //不同LineType画线
        In_Test_Line_LinkType(canvas, winName, LineTypes.AntiAlias, Scalar.Red);
        In_Test_Line_LinkType(canvas, winName, LineTypes.Link4, Scalar.Blue);
        In_Test_Line_LinkType(canvas, winName, LineTypes.Link8, Scalar.Green);

        Cv2.DestroyAllWindows();
    }
}

//偏移坐标用
private int index = 0;
/// <summary>
/// 绘制直线和LinkType
/// </summary>
/// <param name="canvas"></param>
/// <param name="winName"></param>
/// <param name="lineType"></param>
/// <param name="color"></param>
private void In_Test_Line_LinkType(Mat canvas, string winName, LineTypes lineType, Scalar color)
{
    int x1 = 11, y1 = 13, x2 = 78, y2 = 96;
    Cv2.Line(canvas, x1, y1, x2, y2, color, 1, lineType);
    Cv2.PutText(canvas, lineType.ToString(), new Point(15 + index * 10, 15 + index * 10), HersheyFonts.HersheySimplex, 0.4, color);
    Cv2.ImShow(winName, canvas);
    Cv2.WaitKey();
    index++;
}
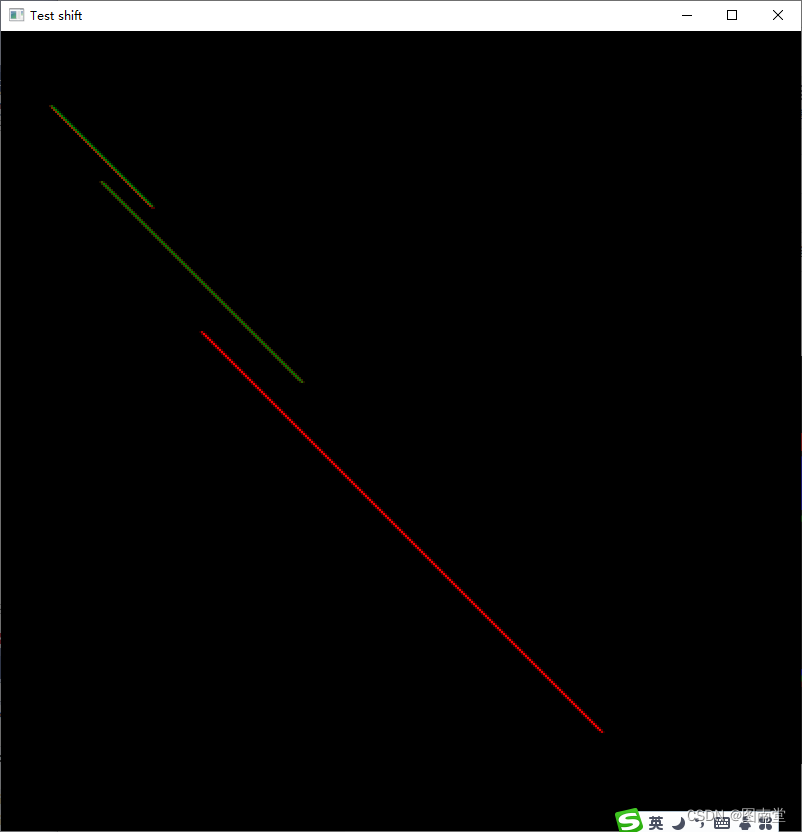
坐标一样,shift参数分别2,1,0时的绘制结果
/// <summary>
/// 测试Line的shift参数
/// </summary>
private void Test_Line_Shift()
{
    //Line Shift参数测试
    using (Mat canvas = Mat.Zeros(w, w, MatType.CV_8UC3))
    {
        int x1 = 100, y1 = 150, x2 = 300, y2 = 350;

        LineTypes lineTypes = LineTypes.AntiAlias;
        Cv2.Line(canvas, x1, y1, x2, y2, Scalar.Red, 1, lineTypes, 0);

        //shift参数测试
        int shift = 1;
        Cv2.Line(canvas, x1, y1, x2, y2, Scalar.Red, 1, lineTypes, shift);
        //基本等价于下面
        Cv2.Line(canvas, x1 >> shift, y1 >> shift, x2 >> shift, y2 >> shift, Scalar.Green, 1, lineTypes, 0);

        shift = 2;
        Cv2.Line(canvas, x1, y1, x2, y2, Scalar.Red, 1, lineTypes, shift);
        //基本等价于下面
        Cv2.Line(canvas, x1 >> shift, y1 >> shift, x2 >> shift, y2 >> shift, Scalar.Green, 1, lineTypes, 0);
        var winName = "Test shift";
        Cv2.NamedWindow(winName, WindowFlags.Normal);
        Cv2.ResizeWindow(winName, new Size(w * 2, w * 2));
        Utils.ShowWaitDestroy(canvas, winName, WindowFlags.AutoSize);
    }
}
Ellipse绘制或填充椭圆轮廓、椭圆
函数说明:可绘制椭圆轮廓、填充圆、椭圆弧或填充椭圆扇区。
//函数原型1
void Ellipse(InputOutputArray img,
    Point center,
    Size axes,
    double angle,
    double startAngle,
    double endAngle,
    Scalar color,
    int thickness = 1,
    LineTypes lineType = LineTypes.Link8,
    int shift = 0)

//函数原型2
void Ellipse(InputOutputArray img,
    RotatedRect box,
    Scalar color,
    int thickness = 1,
LineTypes lineType = LineTypes.Link8)| 参数 | 说明 |
|---|---|
| InputOutputArray img | 待绘制图像 |
| Point center | 椭圆中心点 |
| Size axes | 椭圆长、短轴的一半 |
| RotaedRect box | 椭圆的外接矩形大小 |
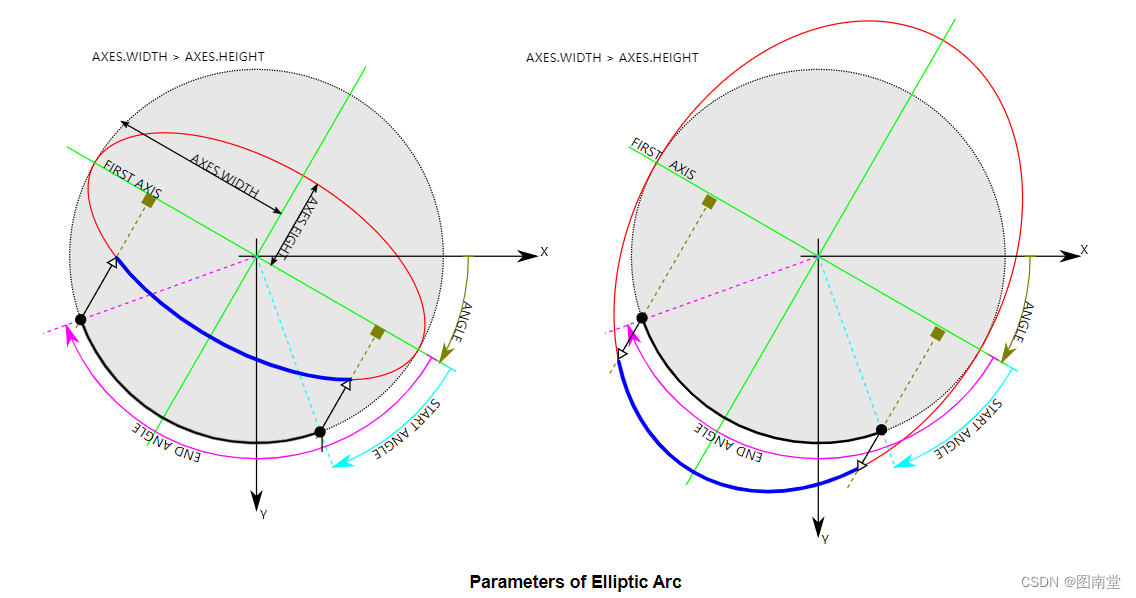
| double angle | 椭圆偏转角度,>0顺时针,<0逆时针 |
| double startAngle | 椭圆轮廓的起始角度(从偏转角算起) |
| double endAngle | 椭圆轮廓的终止角度(从偏转角算起)(画椭圆的话,startAngle=0,endAngle=360) |
| Scalar color | 椭圆线条颜色 |
| int thickness | 椭圆线宽。负数表示填充 |
| LineTypes lineType | 椭圆的线型 |
| int shift | center与axes值的向右位移量(缩小倍数) |
画椭圆弧时各参数的意义(图片来源于官网)
/// <summary>
/// 测试Ellipse
/// </summary>
private void Test_Ellipse()
{
    using (Mat canvas = Mat.Zeros(w, w, MatType.CV_8UC3))
    {
        var center = new Point(w / 2, w / 2);
        var axes = new Size(150, 100);
        var angle = 45;

        //画椭圆的辅助线
        DrawEllipseAuxiliaryLine(canvas, center, axes, angle);

        //画椭圆弧
        Cv2.Ellipse(canvas, center, axes, angle, 90, 360, Scalar.Red);

        //画椭圆,角度不同
        Cv2.Ellipse(canvas, new RotatedRect(new Point2f(center.X, center.Y), new Size2f(axes.Width * 2, axes.Height * 2), -angle), Scalar.Blue

        var winName = "Test Ellipse";
        Cv2.NamedWindow(winName, WindowFlags.Normal);
        Cv2.ResizeWindow(winName, new Size(w * 2, w * 2));
        Utils.ShowWaitDestroy(canvas, winName, WindowFlags.AutoSize);
    }
}

/// <summary>
/// 绘制椭圆的外接矩形
/// </summary>
/// <param name="canvas"></param>
/// <param name="center">中心点</param>
/// <param name="axes">椭圆长短轴大小的一半</param>
/// <param name="angle">椭圆偏转角度</param>
private void DrawEllipseAuxiliaryLine(Mat canvas, Point center,Size axes,double angle)
{
    Scalar color = Scalar.Green;
    //X轴
    Cv2.Line(canvas, new Point(center.X - axes.Width, center.Y), new Point(center.X + axes.Width, center.Y), color);
    //Y轴
    Cv2.Line(canvas, new Point(center.X, center.Y - axes.Height), new Point(center.X, center.Y + axes.Height), color);

    //AXES BOX
    Cv2.Rectangle(canvas,
                  new Point(center.X - axes.Width, center.Y - axes.Height),
                  new Point(center.X + axes.Width, center.Y + axes.Height),
                  color);
    var rotat = Cv2.GetRotationMatrix2D(center, -angle, 1);//注意,这里的角度与椭圆角度相反

    //将画布旋转
    Cv2.WarpAffine(canvas, canvas, rotat, canvas.Size());
}
Rectangle绘制或填充矩形
函数说明:根据给定的对角点坐标绘制空心或实心的矩形。
//函数原型1
void Rectangle(InputOutputArray img,
    Point pt1,
    Point pt2,
    Scalar color,
    int thickness = 1,
    LineTypes lineType = LineTypes.Link8,
    int shift = 0)

//函数原型2
void Rectangle(InputOutputArray img,
    Rect rect,
    Scalar color,
    int thickness = 1,
    LineTypes lineType = LineTypes.Link8,
    int shift = 0)

//函数原型3
void Rectangle(Mat img,
    Point pt1,
    Point pt2,
    Scalar color,
    int thickness = 1,
    LineTypes lineType = LineTypes.Link8,
    int shift = 0)

//函数原型4
void Rectangle(Mat img,
    Rect rect,
    Scalar color,
    int thickness = 1,
    LineTypes lineType = LineTypes.Link8,
int shift = 0)| 参数 | 说明 |
|---|---|
| InputOutputArray img Mat img |
待绘制的图像 |
| Point pt1 | 矩形的一个顶点 |
| Point pt2 | pt1的对角点 |
| Rect rect | 矩形 |
| Scalar color | 矩形颜色 |
| int thickness | 矩形的线宽。若小于0,表示填充。 |
| LineTypes lineType | 线型 |
| int shift | 坐标值的向右位移量(缩小倍数) |
private void Test_Rectangle()
{
    using (Mat canvas = Mat.Zeros(w, w, MatType.CV_8UC3))
    {

        int bias = 50;
        //左上,右下,两个点,shift=0
        Point p1 = new Point(bias, bias);
        Point p2 = new Point(w - bias, w - bias);

        DrawRectangle(canvas, p1, p2, 0);

        //左下,右上,两个点,shift=1
        p1 = new Point(bias, w - bias);
        p2 = new Point(w - bias, bias);
        DrawRectangle(canvas, p1, p2, 1);

        Utils.ShowWaitDestroy(canvas, "Test Rectangle", WindowFlags.AutoSize);
    }
}
/// <summary>
/// 绘制矩形及对角点
/// </summary>
/// <param name="canvas"></param>
/// <param name="p1"></param>
/// <param name="p2"></param>
/// <param name="shift"></param>
private void DrawRectangle(Mat canvas,Point p1,Point p2,int shift)
{
    Scalar colorRect = Scalar.Red;
    Cv2.Rectangle(canvas, p1, p2, colorRect, shift: shift);
    Scalar colorPoint = Scalar.Green;
    Cv2.Circle(canvas, p1.X >> shift, p1.Y >> shift, 5, colorPoint, -1);
    Cv2.Circle(canvas, p2.X >> shift, p2.Y >> shift, 5, colorPoint, -1);
}
Circle绘制或填充圆
函数说明:根据圆心和半径绘制一个空心或实心圆。
//函数原型1
void Circle(InputOutputArray img,
    int centerX,
    int centerY,
    int radius,
    Scalar color,
    int thickness = 1,
    LineTypes lineType = LineTypes.Link8,
    int shift = 0)

//函数原型2
void Circle(InputOutputArray img,
    Point center,
    int radius,
    Scalar color,
    int thickness = 1,
    LineTypes lineType = LineTypes.Link8,
int shift = 0)| 参数 | 说明 |
|---|---|
| InputOutputArray img | 待绘制的图像 |
| int centerX int centerY Point center |
圆心坐标 |
| int radius | 圆的半径 |
| Scalar color | 圆的颜色 |
| int thickness | 圆的线宽。负数表示填充 |
| LineTypes lineType | 圆的线型 |
| int shift | center与radius向右位移量(缩小倍数) |
/// <summary>
/// 测试Circle
/// </summary>
private void Test_Circle()
{
    using (Mat canvas = Mat.Zeros(w, w, MatType.CV_8UC3))
    {
        var center = new Point(w / 2, w / 2);
        //画圆
        Cv2.Circle(canvas, center, w / 4, Scalar.Red);

        //填充,shift=1
        Cv2.Circle(canvas, center, w / 4, Scalar.Green, -1, shift: 1);

        Utils.ShowWaitDestroy(canvas, "Test Circle", WindowFlags.AutoSize);
    }
}
FillPoly填充多边形
函数说明:根据给定的边界填充一个或多个多边形。可填充复杂区域,如有孔洞的、自相交
的。
//函数原型1
void FillPoly(InputOutputArray img,
    InputArray pts,
    Scalar color,
    LineTypes lineType = LineTypes.Link8,
    int shift = 0,
    Point? offset = null)

//函数原型2
void FillPoly(Mat img,
    IEnumerable<IEnumerable<Point>> pts,
    Scalar color,
    LineTypes lineType = LineTypes.Link8,
    int shift = 0,
Point? offset = null)| 参数 | 说明 |
|---|---|
| InputOutputArray img Mat img |
待绘制的图像 |
| InputArray pts IEnumerable<IEnumerable<Point>> pts |
待填充的多边形轮廓坐标集 |
| Scalar color | 待填充的颜色 |
| LineTypes lineType | 填充线型 |
| int shift | 点集坐标向右位移量(缩小的倍数) |
| Point? offset | 整体坐标集的偏移量。如轮廓是基于某大图的部分区域坐标时十分有用。 |
/// <summary>
/// 测试FillPoly
/// </summary>
private void Test_FillPoly()
{
    using (Mat canvas = Mat.Zeros(w, w, MatType.CV_8UC3))
    {
        LineTypes lineType = LineTypes.Link8;
        Point[][] points = new Point[1][];
        points[0] = new Point[4];
        points[0][0] = new Point(w / 8, w / 8);
        points[0][1] = new Point(w / 8 * 3, w / 8 * 3);
        points[0][2] = new Point(w / 8 * 3, w / 8);
        points[0][3] = new Point(w / 8, w / 8 * 3);

        Cv2.FillPoly(canvas, points, new Scalar(255, 0, 0), lineType);

        //shift =2
        Cv2.FillPoly(canvas, points, new Scalar(0, 0, 255), lineType, shift: 2);

        points[0][2] = new Point(w / 8, w / 8 * 3);
        points[0][3] = new Point(w / 8 * 3, w / 8);
        //坐标偏移w/4
        Cv2.FillPoly(canvas, points, new Scalar(0, 255, 0), lineType, offset: new Point(w / 4, w / 4));

        Utils.ShowWaitDestroy(canvas, "Test FillPoly", WindowFlags.AutoSize);
    }
}
OpenCvSharp函数示例(目录)
参考