一.后台管理侧边栏路由的跳转
以下代码仅供参考,建议自己多敲
1.用vue create xxx 命令新建一个文件(前提你的电脑上已经安装过vue)
2.写这个后台我们需要用element-ui,不懂的一定要去官方文档看一哈,本节的内容主要是先生成一个最基本的框架,实现子路由的页面跳转
写这个后台肯定会涉及到很多路由,
每个文件夹存放的文件
src/router/index: 存放、引入路由
src/views/ 新建每个页面的路由
plugins/ element下载后自动生成的
手把手教你用vue(x)写后台管理系统(二)-菜单渲染
1.登陆页
1.1 登陆页(页面,后面再做功能)
router文件里的index.js 是存放路由文件的
  {
    path:'/login',
    component:login
  }
]
1.2 view中新建一个登陆路由login.vue
  <div>登陆</div>
</template>
1.3 在router-index.js 中引入
import login from '@/views/login.vue'
引入之后把项目启动
1.4 首页
登陆页面做好后之后,我们就要进去首页
在router-index.js中 引入首页路由
    path:'/',
    component:index
  }
1.4.1 404页面不存在
接着和登陆路由一样,在views中新建index.vue,然后在router-index.js中引入
ps:如果我们访问了一个不存在的页面呢? 这就需要新建一个404页面,当我们访问不存在的路由时,将页面跳转到404
   path:'/*',
   component:()=>import('@/views/error/404.vue')
注意: /* 的意思是匹配所有,不能把这个放在其他路径的上面,一旦把这个放上面 就会匹配不到其他的路由了,前面的优先级更高
2.布局
首页中搭建我们想要的结构,在src新建一个lauout(布局)文件夹
我们要清楚,我们要的页面布局是什么样的,是整体上下左右布局还是其它,然后在element-ui中找布局
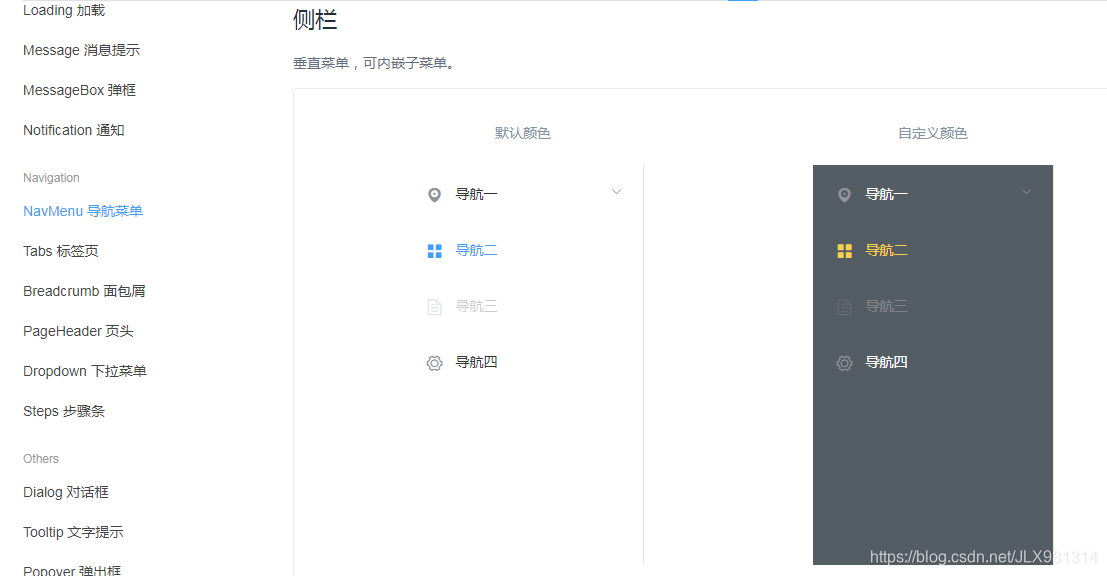
Container布局容器:
el-container:外层容器。当子元素中包含 或 时,全部子元素会垂直上下排列,否则会水平左右排列。(具体查element-ui 文档)
el-header:顶栏容器。
el-aside:侧边栏容器。
el-main:主要区域容器。
el-footer:底栏容器.
2.1 然后在新建的Layout中新建一个index.vue,然后利用 局部注册 ,在首页路由中
import Layout from '@/Layout'   //index比较特殊,在这里可以省略
components:{
    Layout
  }
记得写<Layout></Layout>标签
2.2 接下来我们只需要在/Layout/index.vue中写布局了(提前下载好element组件,最新命令: vue add element,下载好后,把自动生成的app.vue里的东西删了)
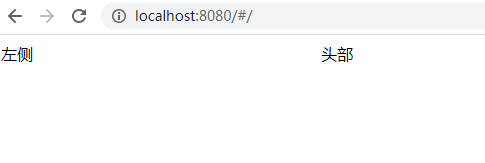
<!-- 外层容器 -->
  <el-container>
    <!-- 侧边栏容器 -->
    <el-aside> 左侧</el-aside>
    <!-- 外层容器 -->
  <el-container>
    <!-- 顶栏容器 -->
    <el-header>头部</el-header>
    <!-- 主要区域容器 -->
    <el-main></el-main>
  </el-container>
  </el-container>
2.3 在layout/index.vue/中, 找到er-main标签 ,因为这里面的内容未来要切换,所以要给他加上keep-alive标签
<keep-alive></keep-alive>
keep-alive用法:
activated:   keep-alive组件激活时调用
deactivated: keep-alive组件停用时调用
<keep-alive> 包裹动态组件时,会缓存不活动的组件实例,而不是销毁它们
<keep-alive> 是一个抽象组件:它自身不会渲染一个DOM元素,也不会出现在父组件链中
当组件在<keep-alive>内被切换,它的activated和deactivated这两个生命周期钩子函数将会被对应执行
<el-main>
       <keep-alive>
        <!-- 这个router-view里的内容未来要切换,所以给他加上keep-alive -->
        <router-view :key="$router.fullPath"></router-view>
      </keep-alive>
</el-main>
2.5做到这里后,就会产生很多细节错误,比如页面的高度不准确,这时我们要在/App.vue加入sass
<style>
body{
  margin:0;
}
</style>
给el-container 加一个类名
<el-container class="layout">
设置他的高度
<style>
.layout{
  height:100vh;
}
</style>
这时,终端可能会报错,说缺少模块,它缺什么、让我们下载什么,我们就下载什么(每个人写的代码都不一样,缺什么模块就下载什么)
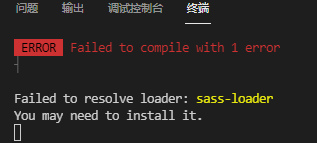
下载sass模块和sass-loader


3.菜单栏
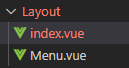
3.1左侧菜单栏
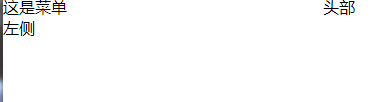
我们还在Layout文件里新建一个Menu.vue ,这是菜单栏的内容,那么这个菜单栏在页面的哪个位置呢?应该在左侧栏里,所以,我们要把菜单栏的路由(Menu.vue)引入到Layout/index.vue中的el-aside标签里
 <!-- 侧边栏容器 -->
    <el-aside>
      <Menu></Menu>
      左侧</el-aside>
      <script>
   		 import Menu from "./Menu.vue"
		export default {
 		 components:{
    		 Menu
 		 }
		}
		 </script>
index.vue (首页)和 Menu.vue(菜单栏) 同级
页面效果
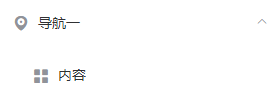
接着根据element-ui的文档在Menu.vue中写菜单栏(可手写,可复制)
<template>
  <el-menu>
    <!-- 二级菜单 -->
    <el-submenu>
      <template v-slot:title>
        <!-- 相关图标 -->
        <i class="el-icon-location"></i>
        <span>导航一</span>
      </template>
      <el-menu-item>
        <i class="el-icon-menu"></i>
        <template v-slot:title>内容</template>
      </el-menu-item>
    </el-submenu>
  </el-menu>
</template>
效果
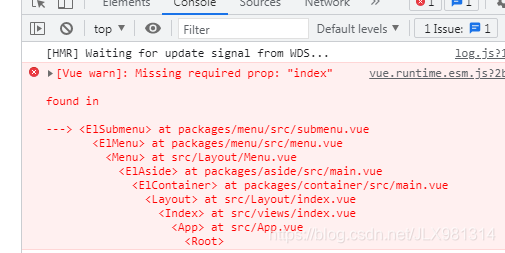
ps:如果页面报这个错误,先不用管,或者先给二级菜单el-submenu 加上index=“1”
,el-menu-item index=“1-1”,刷新页面就不会报错了
然后改下背景颜色,字体颜色,消除一些空格,并再复制一下二级菜单,最后的样式如下,菜单名称可换
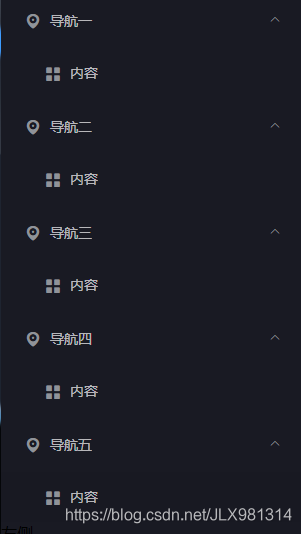
在Menu.vue中的代码如下:
<template>
  <el-menu
  class="layout-menu"
  text-color="rgba(255,255,255,0.7)"
  active-text-color="#fff"
  background-color="#191a23">
    <!-- 二级菜单   复制这个二级菜单,实现上图样式-->
    <el-submenu index="1">
      <template v-slot:title>
        <!-- 相关图标 -->
        <i class="el-icon-location"></i>
        <span>导航一</span>
      </template>
      <el-menu-item index="1-1">
        <i class="el-icon-menu"></i>
        <template v-slot:title>内容</template>
      </el-menu-item>
    </el-submenu>
  </el-menu>
</template>
<script>
export default {};
</script>

<style>
/* 消除menu的右侧边框 */
.layout-menu{
  border-right:none!important;
}
.layout-menu .el-menu-item.is-active{
  background:#2d8cf0 !important;
}
</style>
在index.vue中稍微修改下
<!-- 外层容器 -->
  <el-container class="layout">
    <!-- 侧边栏容器 -->
    <el-aside class="aside">
    ----------------------------------------------------
 <style>
	.layout{
 	 height:100vh;
	}
	.aside{
 	 background:#191a23;
	}
</style>
菜单后期可以用路由渲染,这里先不管
3.2菜单路由
我们点击菜单的 主控台、监控页和工作台时,能呈现出不同的页面,但它们三个在同一个路由下边,让它们渲染在同一个父路由里,那么,我们也不需要index首页了,直接把Layout当做我们的首页,效果是一样的,我们可以在router/index.js中把 index 改成 Layout,并给首页添加三个子路由,以便实现点击监控页等能实现路由的跳转
import Layout from '@/Layout'               //引入首页
 {
    path:'/dashboard',
    component:Layout,      //把以前的index改成Layout
    children:[
      // console、monitor、workplace
      {
        path:'/dashboard/console' //控制台路由
      },
      {
        path:'/dashboard/monitor' //监控页路由
      },
      {
        path:'/dashboard/workplace'   // 工作台路由
      }
    ]
  },
还记得刚才的页面因为 index 报错么,这时,我们可以把 index="1"和index ="1-1"改成相应的路由,比如
//先开启router
<el-menu  router>

<el-submenu index="/dashboard">
//还有三个子路由改成对应的名称
<el-menu-item index="/dashboard/console">
<el-menu-item index="/dashboard/monitor">
 <el-menu-item index="/dashboard/workplace">
这时,我们点击不同的菜单,路由也会实现变更
ps:我修改了部分菜单的名称,并复制粘贴三次<el-menu-item>标签 ,导航一 改成了Dashboard
然后在views中新建一个Dashboard文件夹,新建三个路由
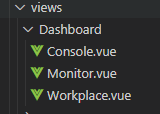
每个路由里都生成最基本的框架,另外两个也是
<template>
  <div>主控台</div>    		//监控页、工作台
</template>
<script>
export default {
}
</script>
<style>
</style>
因为这三个是/dashboard的子路由,所以要在Dashboard下边用children 引入
{
    path:'/dashboard',
    component:Layout,
    children:[
      // console、monitor、workplace 三个
      {
        path:'/dashboard/console' ,//控制台路由
        component:()=>import('@/views/Dashboard/Console')
      },
      {
        path:'/dashboard/monitor' ,//监控页路由
        component:()=>import('@/views/Dashboard/Monitor')
      },
      {
        path:'/dashboard/workplace' ,  // 工作台路由
        component:()=>import('@/views/Dashboard/Workplace')
      }
    ]
  }
3.4菜单栏的跳转(重点)
侧边栏跳转的重点!!!重点!!!!
要在el-menu标签里添加
:default-active="$route.fullPath
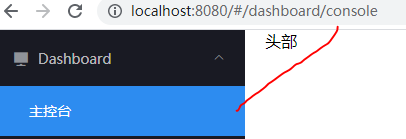
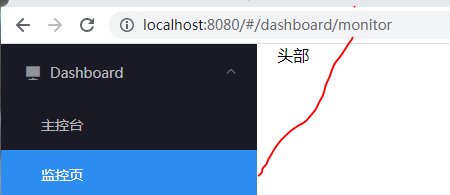
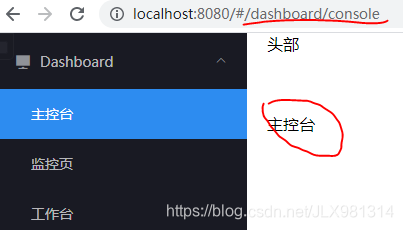
之后,我们看页面 当你点击主控台,页面的内容就是主控台,地址栏的路由也是/dashboard/console,另外两个同理
4.以上便是 后台管理的侧边栏跳转和基本样式,下面是全部代码(记得自己下载模块)
4.1/Layout/index.vue
<template>
                  <!-- / 布局 -->
  <!-- 外层容器 -->
  <el-container class="layout">
    <!-- 侧边栏容器 -->
    <el-aside class="aside" width="256px">
      <Menu></Menu>
      </el-aside>
    <!-- 外层容器 -->
  <el-container>
    <!-- 顶栏容器 -->
    <el-header>头部
    </el-header>
    <!-- 主要区域容器 -->
    <el-main>
       <keep-alive>
        <!-- 这个router-view里的内容未来要切换,所以给他加上keep-alive -->
        <router-view :key="$router.fullPath"></router-view>
      </keep-alive>
    </el-main>
  </el-container>
  </el-container>
</template>
<script>
import Menu from "./Menu"
export default {
  components:{
     Menu
  }
}
</script>
<style>
.layout{
  height:100vh;
}
.aside{
  background:#191a23;
}
</style>
4.2/Layout/Menu.vue
<template>
<!-- 开启路由router模式 -->
  <el-menu
  :default-active="$route.fullPath"
  router
  class="layout-menu"
  text-color="rgba(255,255,255,0.7)"
  active-text-color="#fff"
  background-color="#191a23">
    <!-- 二级菜单 -->
    <el-submenu index="/dashboard">
      <template v-slot:title>
        <!-- 相关图标 -->
        <i class="el-icon-s-platform"></i>
        <span>Dashboard</span>
      </template>
      <el-menu-item index="/dashboard/console">
        <!-- <i class="el-icon-menu"></i> -->
        <template v-slot:title>主控台</template>
      </el-menu-item>
       <el-menu-item index="/dashboard/monitor">
        <!-- <i class="el-icon-menu"></i> -->
        <template v-slot:title>监控页</template>
      </el-menu-item>
       <el-menu-item index="/dashboard/workplace">
        <!-- <i class="el-icon-menu"></i> -->
        <template v-slot:title>工作台</template>
      </el-menu-item>
    </el-submenu>
     <el-submenu index="2">
      <template v-slot:title>
        <!-- 相关图标 -->
        <i class="el-icon-location"></i>
        <span>导航二</span>
      </template>
      <el-menu-item index="2-1">
        <i class="el-icon-menu"></i>
        <template v-slot:title>内容</template>
      </el-menu-item>
    </el-submenu>
     <el-submenu index="3">
      <template v-slot:title>
        <!-- 相关图标 -->
        <i class="el-icon-location"></i>
        <span>导航三</span>
      </template>
      <el-menu-item index="3-1">
        <i class="el-icon-menu"></i>
        <template v-slot:title>内容</template>
      </el-menu-item>
    </el-submenu>
     <el-submenu index="4">
      <template v-slot:title>
        <!-- 相关图标 -->
        <i class="el-icon-location"></i>
        <span>导航四</span>
      </template>
      <el-menu-item index="4-1">
        <i class="el-icon-menu"></i>
        <template v-slot:title>内容</template>
      </el-menu-item>
    </el-submenu>
     <el-submenu index="5">
      <template v-slot:title>
        <!-- 相关图标 -->
        <i class="el-icon-location"></i>
        <span>导航五</span>
      </template>
      <el-menu-item index="5-1">
        <i class="el-icon-menu"></i>
        <template v-slot:title>内容</template>
      </el-menu-item>
    </el-submenu>
  </el-menu>
</template>

<script>
export default {};
</script>

<style>
/* 消除menu的右侧边框 */
.layout-menu{
  border-right:none!important;
}
.layout-menu .el-menu-item.is-active{
  background:#2d8cf0 !important;
}
</style>
4.3 /router/index.js
import Vue from 'vue'
import VueRouter from 'vue-router'
import login from '@/views/login.vue'
// import index from '@/views/index.vue'
// 首页
import Layout from '@/Layout'
// import { component } from 'vue/types/umd'
Vue.use(VueRouter)
const routes = [
  {
    path:'/login',
    component:login
  },
  {
    path:'/dashboard',
    component:Layout,
    children:[
      // console、monitor、workplace
      {
        path:'/dashboard/console' ,//控制台路由
        component:()=>import('@/views/Dashboard/Console')
      },
      {
        path:'/dashboard/monitor' ,//监控页路由
        component:()=>import('@/views/Dashboard/Monitor')
      },
      {
        path:'/dashboard/workplace' ,  // 工作台路由
        component:()=>import('@/views/Dashboard/Workplace')
      }
    ]
  },
  {
    path:'/*',
    component:()=>import('@/views/error/404.vue')
  }
]
const router = new VueRouter({
  routes
})
export default router
4.4 /views/Dashboard/Console.vue
<template>
  <div>主控台</div>
</template>
<script>
export default {
}
</script>
<style>
</style>
另外两个路由写法和这个一样,登陆页和首页的路由刚开始已经写过了,以上便是 侧边菜单栏路由的跳转
手把手教你用vue(x)写后台管理系统(二)-菜单渲染