十四、灰度化处理
# 图像灰度化的通道数变化
import numpy as np
img1 = cv2.imread('car.jpg')
print(img1.shape, img1.size, img1.dtype)
img = cv2.imread('car.jpg',cv2.IMREAD_GRAYSCALE)
img = cv2.resize(img, (300,300))
img1 = cv2.resize(img1, (300,300))
print(img1.shape, img1.size, img1.dtype)
img11 = cv2.cvtColor(img1, cv2.COLOR_BGR2GRAY)
print(img11.shape, img11.size, img11.dtype)
print(img11[:, :5])
print(img.shape, img.size, img.dtype)
print(img[:, :5])
cv2.imshow('0', img1)
cv2.imshow('1', img11)
cv2.waitKey(0)
cv2.destroyAllWindows()
十五、Canny边缘检测
Canny边缘检测:
·1)使用高斯滤波器,以平滑图像,滤除噪声。
·2)计算图像中每个像素点的梯度强度和方向。
·3)应用非极大值(Non-Maximum Suppression)抑制,以消除边缘检测带来的杂散响应。
·4)应用双阈值(Double-Threshold)检测来确定真实和潜在的边缘
·5)通过抑制孤立的弱边缘最终完成边缘检测
# Canny边缘检测
import numpy as np
img = cv2.imread('car.jpg', cv2.IMREAD_GRAYSCALE)
img = cv2.resize(img, (300,300))
v1 = cv2.Canny(img, 80, 150)
v2 = cv2.Canny(img, 50, 100)
res = np.hstack((img, v1, v2))
cv2.imshow('0', res)
cv2.waitKey(0)
cv2.destroyAllWindows()
上方为梯度计算的效果图,下方为canny边缘检测的效果图

十六、图像金字塔
金字塔:对图像进行特征提取(放大和缩小各一倍)
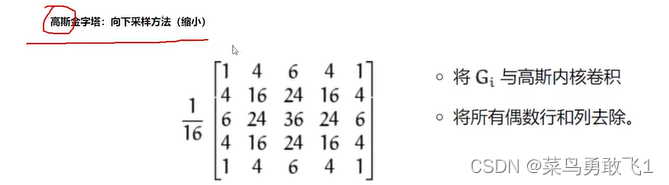
1、高斯金字塔
向下采样
向上采样

# 高斯金字塔
import numpy as np
img = cv2.imread('car.jpg', cv2.IMREAD_GRAYSCALE)
img = cv2.resize(img, (300,300))
cv2.imshow('img', img)
# 向上采样
up = cv2.pyrUp(img)
cv2.imshow('up', up)
# 向下采样
down = cv2.pyrDown(img)
cv2.imshow('down', down)
# 先向上再向下
ud = cv2.pyrDown(up)
# 先向下再向上
du = cv2.pyrUp(down)
res = np.hstack((img, ud, du))
cv2.imshow('res', res)
cv2.waitKey(0)
cv2.destroyAllWindows() 
2、拉普拉斯金字塔
结果 = 原始图像 - 向上(向下)

# 拉普拉斯金字塔
import numpy as np
img = cv2.imread('car.jpg', cv2.IMREAD_GRAYSCALE)
img = cv2.resize(img, (300,300))
up = cv2.pyrUp(img)
# 先向上再向下
ud = cv2.pyrDown(up)
# 原始图像 - 先向上再向下
result = img - ud
res = np.hstack((img, result))
cv2.imshow('res', res)
cv2.waitKey(0)
cv2.destroyAllWindows()
十七、轮廓检测
轮廓与边缘的区别是:轮廓是连在一起的,而边缘可以是零散的点,线段
轮廓特征、轮廓近似

# 图像轮廓检测
import numpy as np
img = cv2.imread('ellipse.png')
img = cv2.resize(img, (300,300))
# 为了更高的准确率,使用二值化图像
gray = cv2.cvtColor(img, cv2.COLOR_BGR2GRAY)   # 灰度化
ret, thresh = cv2.threshold(gray, 127, 255, cv2.THRESH_BINARY)   # 二值化
# 找出轮廓
contours, hierarchy = cv2.findContours(thresh, cv2.RETR_TREE, cv2.CHAIN_APPROX_NONE)   # 新版返回两个值
# binary, contours, hierarchy = cv2.findContours(thresh, cv2.RETR_TREE, cv2.CHAIN_APPROX_NONE) # 旧版opencv返回三个值(二值化结果,轮廓信息(list类型),层级)
draw_img = img.copy()   # 复制一个新对象,不然轮廓会画在原图像上面
# 画出轮廓,参数(传入绘制图像,轮廓信息,轮廓索引(-1代表绘制出全部轮廓),颜色模式(BGR),线条厚度)
res = cv2.drawContours(img, contours, -1, (0, 0, 255), 2)
# 取第一个轮廓
cnt = contours[0]
# print(contours)
# 求面积
print(cv2.contourArea(cnt))
# 求周长
print(cv2.arcLength(cnt, True))
# 轮廓近似
epsilon = 0.1*cv2.arcLength(cnt, True)
approx = cv2.approxPolyDP(cnt, epsilon, True)
draw_img1 = img.copy()
res1 = cv2.drawContours(draw_img1, [approx], -1, (0, 0, 255), 2)
cv2.imshow('res1', res1)
cv2.waitKey(0)
cv2.destroyAllWindows()