目录
-> 1.2 版本说明 · alibaba/spring-cloud-alibaba Wiki
---> 1.4.4 数据库创建seata 和 undo_log 表
---> 1.4.5 seata-push.sh/.bat修改
====> linux版本: ./seata-push.sh
---> 1.5.1 windows 执行 seata-server.bat
---> 1.5.2 linux 执行seata-server.sh
2. 下文预告: springcloud中引入seata-at实现分布式事务
前言简介:
Seata AT(分布式事务解决方案)的优势包括:
1、高可用性:Seata AT采用分布式架构,可以实现高可用性。同时,Seata AT也支持多种存储和注册中心,可以基于不同的需求进行选择。
2、高性能:Seata AT在事务控制方面采用了高效的算法和优化策略,可以实现高性能。
3、易于集成:Seata AT提供了丰富的客户端API和文档,使得它可以很容易地集成到现有的应用中。
4、支持多种场景:Seata AT适用于多种场景,包括微服务、分布式事务、数据一致性等。
5、开源社区支持:Seata AT是一个开源项目,有一个活跃的社区在维护和支持它,用户可以获得充分的技术支持和社区资源。
分布式事务, 我就不写那些工程内测试代码了, 一搜一大堆, 后期有时间再补
这里只写安装配置和使用
真实场景测试, 服务器部署等, 基本坑都填了 如遇问题, 请在评论区指出
1. 安装seata-at
-> 1.1 先看版本, 全局搜一下

![]()
-> 1.2 版本说明 · alibaba/spring-cloud-alibaba Wiki
每个 Spring Cloud Alibaba 版本及其自身所适配的各组件对应版本如下表所示(注意,Spring Cloud Dubbo 从 2021.0.1.0 起已被移除出主干,不再随主干演进):
| 2022.0.0.0-RC2 |
1.8.6 |
2.2.1 |
4.9.4 |
~ |
1.7.0-native-rc2 |
| 2021.0.5.0 |
1.8.6 |
2.2.0 |
4.9.4 |
~ |
1.6.1 |
| 2.2.10-RC1 |
1.8.6 |
2.2.0 |
4.9.4 |
~ |
1.6.1 |
| 2022.0.0.0-RC1 |
1.8.6 |
2.2.1-RC |
4.9.4 |
~ |
1.6.1 |
| 2.2.9.RELEASE |
1.8.5 |
2.1.0 |
4.9.4 |
~ |
1.5.2 |
| 2021.0.4.0 |
1.8.5 |
2.0.4 |
4.9.4 |
~ |
1.5.2 |
| 2.2.8.RELEASE |
1.8.4 |
2.1.0 |
4.9.3 |
~ |
1.5.1 |
| 2021.0.1.0 |
1.8.3 |
1.4.2 |
4.9.2 |
~ |
1.4.2 |
| 2.2.7.RELEASE |
1.8.1 |
2.0.3 |
4.6.1 |
2.7.13 |
1.3.0 |
| 2.2.6.RELEASE |
1.8.1 |
1.4.2 |
4.4.0 |
2.7.8 |
1.3.0 |
| 2021.1 or 2.2.5.RELEASE or 2.1.4.RELEASE or 2.0.4.RELEASE |
1.8.0 |
1.4.1 |
4.4.0 |
2.7.8 |
1.3.0 |
| 2.2.3.RELEASE or 2.1.3.RELEASE or 2.0.3.RELEASE |
1.8.0 |
1.3.3 |
4.4.0 |
2.7.8 |
1.3.0 |
| 2.2.1.RELEASE or 2.1.2.RELEASE or 2.0.2.RELEASE |
1.7.1 |
1.2.1 |
4.4.0 |
2.7.6 |
1.2.0 |
| 2.2.0.RELEASE |
1.7.1 |
1.1.4 |
4.4.0 |
2.7.4.1 |
1.0.0 |
| 2.1.1.RELEASE or 2.0.1.RELEASE or 1.5.1.RELEASE |
1.7.0 |
1.1.4 |
4.4.0 |
2.7.3 |
0.9.0 |
| 2.1.0.RELEASE or 2.0.0.RELEASE or 1.5.0.RELEASE |
1.6.3 |
1.1.1 |
4.4.0 |
2.7.3 |
0.7.1 |
-> 1.3 选择seata-at版本
我这里是seata-at:1.3.0 版本

下载地址(官网资源): Release v1.3.0 · seata/seata
下载地址 (pzy资源): 设的免费: https://download.csdn.net/download/pingzhuyan/87803297
[需要审核一段时间]
-> 1.4 下载后按照下图进行创建文件

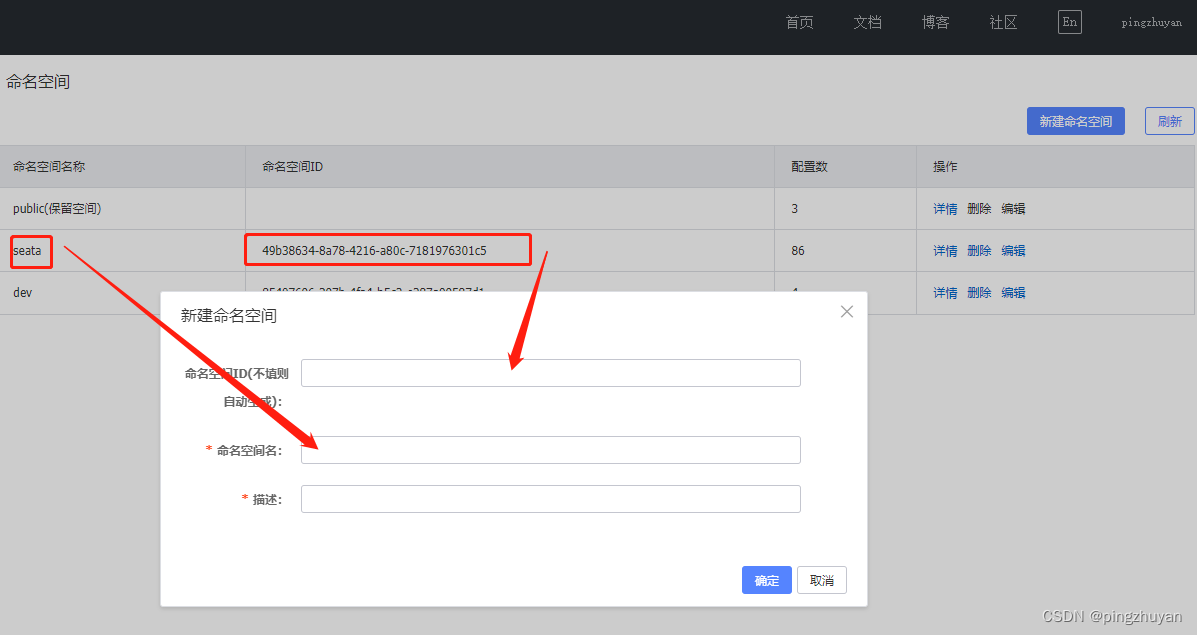
---> 1.4.0 先在nacos创建命名空间seata
---> 1.4.1 registry.conf修改
registry {
  # file 、nacos 、eureka、redis、zk、consul、etcd3、sofa
  type = "nacos"

  nacos {
    application = "seata-server"
    serverAddr = "172.26.2.*:8848"
    group = "SEATA_GROUP"
    namespace = "3afe4eb9-0550-4271-96c1-c005ac0ea174"
    cluster = "default"
    username = "nacos"
    password = "nacos"
  }
  eureka {
    serviceUrl = "http://localhost:8761/eureka"
    application = "default"
    weight = "1"
  }
  redis {
    serverAddr = "localhost:6379"
    db = 0
    password = ""
    cluster = "default"
    timeout = 0
  }
  zk {
    cluster = "default"
    serverAddr = "127.0.0.1:2181"
    sessionTimeout = 6000
    connectTimeout = 2000
    username = ""
    password = ""
  }
  consul {
    cluster = "default"
    serverAddr = "127.0.0.1:8500"
  }
  etcd3 {
    cluster = "default"
    serverAddr = "http://localhost:2379"
  }
  sofa {
    serverAddr = "127.0.0.1:9603"
    application = "default"
    region = "DEFAULT_ZONE"
    datacenter = "DefaultDataCenter"
    cluster = "default"
    group = "SEATA_GROUP"
    addressWaitTime = "3000"
  }
  file {
    name = "file.conf"
  }
}

config {
  # file、nacos 、apollo、zk、consul、etcd3
  type = "nacos"

  nacos {
    serverAddr = "172.26.2.*:8848"
    namespace = "3afe4eb9-0550-4271-96c1-c005ac0ea174"
    group = "SEATA_GROUP"
    username = "nacos"
    password = "nacos"
  }
  consul {
    serverAddr = "127.0.0.1:8500"
  }
  apollo {
    appId = "seata-server"
    apolloMeta = "http://192.168.1.204:8801"
    namespace = "application"
  }
  zk {
    serverAddr = "127.0.0.1:2181"
    sessionTimeout = 6000
    connectTimeout = 2000
    username = ""
    password = ""
  }
  etcd3 {
    serverAddr = "http://localhost:2379"
  }
  file {
    name = "file.conf"
  }
}
---> 1.4.2 file.conf修改
## transaction log store, only used in seata-server
store {
  ## store mode: file、db、redis
  mode = "db"

  ## file store property
  file {
    ## store location dir
    dir = "sessionStore"
    # branch session size , if exceeded first try compress lockkey, still exceeded throws exceptions
    maxBranchSessionSize = 16384
    # globe session size , if exceeded throws exceptions
    maxGlobalSessionSize = 512
    # file buffer size , if exceeded allocate new buffer
    fileWriteBufferCacheSize = 16384
    # when recover batch read size
    sessionReloadReadSize = 100
    # async, sync
    flushDiskMode = async
  }

  ## database store property
  db {
    ## the implement of javax.sql.DataSource, such as DruidDataSource(druid)/BasicDataSource(dbcp)/HikariDataSource(hikari) etc.
    datasource = "druid"
    ## mysql/oracle/postgresql/h2/oceanbase etc.
    dbType = "mysql"
    driverClassName = "com.mysql.jdbc.Driver"
    url = "jdbc:mysql://172.26.2.*:3306/seata"
    user = "root"
    password = "root"
    minConn = 5
    maxConn = 30
    globalTable = "global_table"
    branchTable = "branch_table"
    lockTable = "lock_table"
    queryLimit = 100
    maxWait = 5000
  }

  ## redis store property
  redis {
    host = "127.0.0.1"
    port = "6379"
    password = ""
    database = "0"
    minConn = 1
    maxConn = 10
    queryLimit = 100
  }

}
-> 1.4.3 修改config.txt 文件
最关键的配置是(巨坑的位置): service.vgroupMapping 这个要注意
其他位置只需要改db数据库即可
transport.type=TCP
transport.server=NIO
transport.heartbeat=true
transport.enableClientBatchSendRequest=false
transport.threadFactory.bossThreadPrefix=NettyBoss
transport.threadFactory.workerThreadPrefix=NettyServerNIOWorker
transport.threadFactory.serverExecutorThreadPrefix=NettyServerBizHandler
transport.threadFactory.shareBossWorker=false
transport.threadFactory.clientSelectorThreadPrefix=NettyClientSelector
transport.threadFactory.clientSelectorThreadSize=1
transport.threadFactory.clientWorkerThreadPrefix=NettyClientWorkerThread
transport.threadFactory.bossThreadSize=1
transport.threadFactory.workerThreadSize=default
transport.shutdown.wait=3

# 此处可以修改为自己项目的分组
#service.vgroup_mapping.my_test_tx_group=default
## 1.0之后需要换成  vgroupMapping
## 可以写多个配置,只需要相关联的group统一就行


service.vgroupMapping.seata_group=default

service.default.grouplist=127.0.0.1:8091
service.enableDegrade=false
service.disableGlobalTransaction=false
client.rm.asyncCommitBufferLimit=10000
client.rm.lock.retryInterval=10
client.rm.lock.retryTimes=30
client.rm.lock.retryPolicyBranchRollbackOnConflict=true
client.rm.reportRetryCount=5
client.rm.tableMetaCheckEnable=false
client.rm.tableMetaCheckerInterval=60000
client.rm.sqlParserType=druid
client.rm.reportSuccessEnable=false
client.rm.sagaBranchRegisterEnable=false
client.tm.commitRetryCount=5
client.tm.rollbackRetryCount=5
client.tm.defaultGlobalTransactionTimeout=60000
client.tm.degradeCheck=false
client.tm.degradeCheckAllowTimes=10
client.tm.degradeCheckPeriod=2000

#此处配置file.conf一致
store.mode=db

store.publicKey=
store.file.dir=file_store/data
store.file.maxBranchSessionSize=16384
store.file.maxGlobalSessionSize=512
store.file.fileWriteBufferCacheSize=16384
store.file.flushDiskMode=async
store.file.sessionReloadReadSize=100

store.db.datasource=druid
store.db.dbType=mysql
#配置数据库相关信息
##store.db.driverClassName=com.mysql.cj.jdbc.Driver
store.db.driverClassName=com.mysql.jdbc.Driver
store.db.url=jdbc:mysql://172.26.4.*:3306/seata?useUnicode=true
store.db.user=root
store.db.password=*3
icKeyRetrieval=true
store.db.minConn=5
store.db.maxConn=30
store.db.globalTable=global_table
store.db.branchTable=branch_table
store.db.queryLimit=100
store.db.lockTable=lock_table
store.db.maxWait=5000

store.redis.mode=single
store.redis.single.host=127.0.0.1
store.redis.single.port=6379
store.redis.maxConn=10
store.redis.minConn=1
store.redis.maxTotal=100
store.redis.database=0
store.redis.password=
store.redis.queryLimit=100
server.recovery.committingRetryPeriod=1000
server.recovery.asynCommittingRetryPeriod=1000
server.recovery.rollbackingRetryPeriod=1000
server.recovery.timeoutRetryPeriod=1000
server.maxCommitRetryTimeout=-1
server.maxRollbackRetryTimeout=-1
server.rollbackRetryTimeoutUnlockEnable=false
client.undo.dataValidation=true
client.undo.logSerialization=jackson
client.undo.onlyCareUpdateColumns=true
server.undo.logSaveDays=7
server.undo.logDeletePeriod=86400000
client.undo.logTable=undo_log
client.undo.compress.enable=true
client.undo.compress.type=zip
client.undo.compress.threshold=64k
log.exceptionRate=100
transport.serialization=seata
transport.compressor=none
metrics.enabled=false
metrics.registryType=compact
metrics.exporterList=prometheus
metrics.exporterPrometheusPort=9898
---> 1.4.4 数据库创建seata 和 undo_log 表
seata的sql如下:
/*
Navicat MySQL Data Transfer
Source Server         : mysql
Source Server Version : 80020
Source Host           : localhost:3306
Source Database       : seata
Target Server Type    : MYSQL
Target Server Version : 80020
File Encoding         : 65001
Date: 2022-07-27 18:35:46
*/

SET FOREIGN_KEY_CHECKS=0;

-- ----------------------------
-- Table structure for `branch_table`
-- ----------------------------
DROP TABLE IF EXISTS `branch_table`;
CREATE TABLE `branch_table` (
  `branch_id` bigint NOT NULL,
  `xid` varchar(128) NOT NULL,
  `transaction_id` bigint DEFAULT NULL,
  `resource_group_id` varchar(32) DEFAULT NULL,
  `resource_id` varchar(256) DEFAULT NULL,
  `branch_type` varchar(8) DEFAULT NULL,
  `status` tinyint DEFAULT NULL,
  `client_id` varchar(64) DEFAULT NULL,
  `application_data` varchar(2000) DEFAULT NULL,
  `gmt_create` datetime(6) DEFAULT NULL,
  `gmt_modified` datetime(6) DEFAULT NULL,
  PRIMARY KEY (`branch_id`),
  KEY `idx_xid` (`xid`)
) ENGINE=InnoDB DEFAULT CHARSET=utf8;

-- ----------------------------
-- Records of branch_table
-- ----------------------------

-- ----------------------------
-- Table structure for `global_table`
-- ----------------------------
DROP TABLE IF EXISTS `global_table`;
CREATE TABLE `global_table` (
  `xid` varchar(128) NOT NULL,
  `transaction_id` bigint DEFAULT NULL,
  `status` tinyint NOT NULL,
  `application_id` varchar(32) DEFAULT NULL,
  `transaction_service_group` varchar(32) DEFAULT NULL,
  `transaction_name` varchar(128) DEFAULT NULL,
  `timeout` int DEFAULT NULL,
  `begin_time` bigint DEFAULT NULL,
  `application_data` varchar(2000) DEFAULT NULL,
  `gmt_create` datetime DEFAULT NULL,
  `gmt_modified` datetime DEFAULT NULL,
  PRIMARY KEY (`xid`),
  KEY `idx_gmt_modified_status` (`gmt_modified`,`status`),
  KEY `idx_transaction_id` (`transaction_id`)
) ENGINE=InnoDB DEFAULT CHARSET=utf8;

-- ----------------------------
-- Records of global_table
-- ----------------------------

-- ----------------------------
-- Table structure for `lock_table`
-- ----------------------------
DROP TABLE IF EXISTS `lock_table`;
CREATE TABLE `lock_table` (
  `row_key` varchar(128) NOT NULL,
  `xid` varchar(96) DEFAULT NULL,
  `transaction_id` bigint DEFAULT NULL,
  `branch_id` bigint NOT NULL,
  `resource_id` varchar(256) DEFAULT NULL,
  `table_name` varchar(32) DEFAULT NULL,
  `pk` varchar(36) DEFAULT NULL,
  `gmt_create` datetime DEFAULT NULL,
  `gmt_modified` datetime DEFAULT NULL,
  PRIMARY KEY (`row_key`),
  KEY `idx_branch_id` (`branch_id`)
) ENGINE=InnoDB DEFAULT CHARSET=utf8;

-- ----------------------------
-- Records of lock_table
-- ----------------------------
undo_log的sql如下
<在哪用分布式事务就在哪个库里创建>
-- the table to store seata xid data
-- 0.7.0+ add context
-- you must to init this sql for you business databese. the seata server not need it.
-- 此脚本必须初始化在你当前的业务数据库中,用于AT 模式XID记录。与server端无关(注:业务数据库)
-- 注意此处0.3.0+ 增加唯一索引 ux_undo_log

-- drop table `undo_log`;
CREATE TABLE `undo_log` (
  `id` bigint(20) NOT NULL AUTO_INCREMENT,
  `branch_id` bigint(20) NOT NULL,
  `xid` varchar(100) NOT NULL,
  `context` varchar(128) NOT NULL,
  `rollback_info` longblob NOT NULL,
  `log_status` int(11) NOT NULL,
  `log_created` datetime NOT NULL,
  `log_modified` datetime NOT NULL,
  `ext` varchar(100) DEFAULT NULL,
  PRIMARY KEY (`id`),
  UNIQUE KEY `ux_undo_log` (`xid`,`branch_id`)
) ENGINE=InnoDB AUTO_INCREMENT=1 DEFAULT CHARSET=utf8;
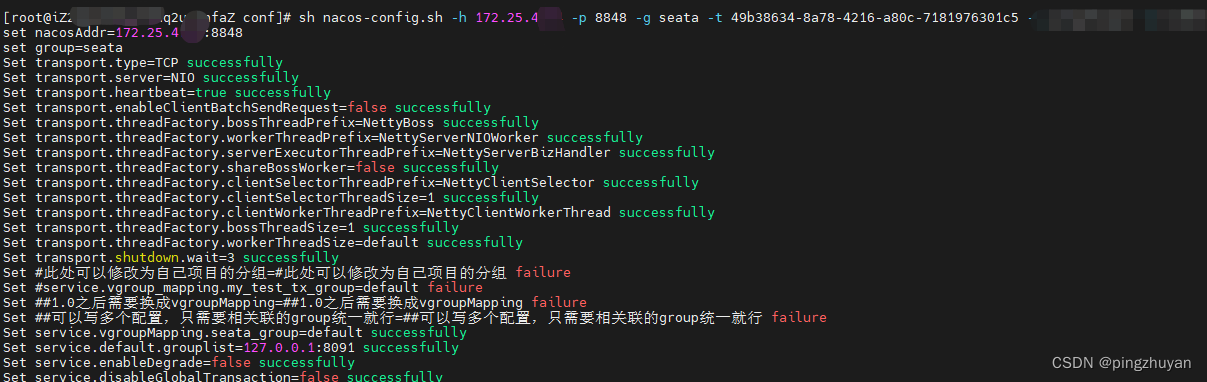
---> 1.4.5 seata-push.sh/.bat修改
sh nacos-config.sh -h 172.26.2.* -p 8848 -g SEATA_GROUP -t 3afe4eb9-0550-4271-96c1-c005ac0ea174 -u nacos -w nacos
-h IP地址(服务器内 内网ip即可 windows本地即可 远端 公网ip即可);-p 指定nacos的端口号;
-g 指定配置的分组,注意,是配置的分组<必须是SEATA_GROUP>(下午介绍);
-t 指定命名空间id,nacos上创建的默认id;
-u -w指定nacos的用户名和密码,开启了nacos注册和配置认证的才需要指定。
====> windows版: 使用git bash 操作
不能用bat 复制文件, 如下图所示 git bash here 控制台进行操作
[显着整齐一点嘿嘿]

====> linux版本: ./seata-push.sh
如果不能用sh 复制文件, 在linux控制台进行操作 (如图所示)
-> 1.5 配置结束 运行seata -at
---> 1.5.1 windows 执行 seata-server.bat

---> 1.5.2 linux 执行seata-server.sh
前台启动: ./seata-server.sh
后台启动: nohup ./seata-server.sh >log.out 2>1 &

到此 seata-at 全部配置 结束
2. 下文预告: springcloud中引入seata-at实现分布式事务
配置文件 xml 基础代码等
传送门: => 微服务: Seata AT springCloud整合分布式事务以配置方式(中篇)
3. 下下文预告: AT 遇到异常的解决方式
遇到异常的解决方案 部分源码解析(大多数问题都能修复)