本项目使用python-opencv打开Azure-Kincet DK相机,并显示RGB,深度图和点云图和KCF目标跟踪算法
附上实现的代码地址与已经测试成功的系统
本文代码地址:open_azure_kinect
已经测试成功的操作系统:windows10,和jetson-nano(Ubuntu)。
参考文章:1.最新一代Kinect DK的python接口实现(深度图+RGB+IMU)
2.基于Azure Kinect DK相机的安装配置,获取并保存RGB、Depth、IR图、点云,点云融合(Windows)
3.Azure Kinect DK 深度相机,Ubuntu 18.04系统安装SDK
4.Ubuntu18.04下Azure Kinect DK 调试(SDK源码+ROS)无比详细踩坑教程
5.python调用opencv库中的KCF等跟踪算法
一、在系统上安装Azure Kinect 传感器 SDK (Windows或linux)
Azure Kinect 传感器 SDK 下载,官方说明文档:Azure Kinect 传感器 SDK
linux上安装所需文件如下图安装参考文章3和4连接(https://blog.csdn.net/denkywu/article/details/103177559):

安装完成后,将相机插入电脑USB3.0接口,若为windows系统 则在开始菜单下找到Azure Kinect SDK v1.4.1,然后点击打开,能搜索到设备并成功启动即可。若为linux系统,则在安装完成后,执行
sudo ./k4aviewer
命令即可打开相机。
二、环境配置
ctypes:读取底层库
numpy
opencv-python
open3d:用来显示点云图
这里大家可以根据网上的相关教程进行配置。安装教程很多,并不复杂。
三、完成显示和跟踪功能
这是本次项目中用到的文件,下面对这几个文件分别做一个介绍。
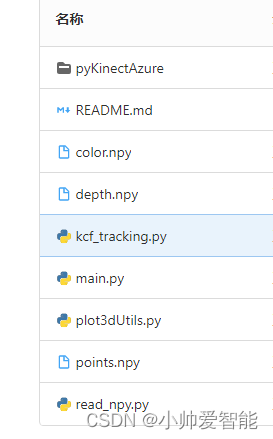
首先,pyKinectAzure文件夹中都是为打开相机所调用的python接口函数,这里主要参考了大佬代码:
https://github.com/ibaiGorordo/pyKinectAzure
ps:对于有些源码看不懂可以看微软c的源码:
https://microsoft.github.io/Azure-Kinect-Sensor-SDK/master/structk4a__device__configuration__t.html
kcf_tracking.py实现kcf算法的目标跟踪;plot3dUtils.py是绘制点云图;三个.npy文件分别保存了RGB、深度图以及点云图的信息,read_npy.py文件就是读取这三个文件并显示图像;main.py是主函数,程序运行这一个文件即可实现显示与跟踪功能。
main.py主函数代码如下(注意windows和linux系统中Azure Kinect SDK 路径的区别):
import sys
import numpy
sys.path.insert(1, './pyKinectAzure/')

import numpy as np
from pyKinectAzure import pyKinectAzure, _k4a
import cv2
import kcf_tracking
# 添加 Azure Kinect SDK 路径
modulePath = 'C:\\Program Files\\Azure Kinect SDK v1.4.1\\sdk\\windows-desktop\\amd64\\release\\bin\\k4a.dll'
#modulePath = r'/usr/lib/aarch64-linux-gnu/libk4a.so' 对于linux系统的SDK路径
import plot3dUtils
#对获取的深度图像进行颜色处理
def color_depth_image(depth_image):
    depth_color_image = cv2.convertScaleAbs(depth_image,
                                            alpha=0.05)  # alpha is fitted by visual comparison with Azure k4aviewer results
    depth_color_image = cv2.applyColorMap(depth_color_image, cv2.COLORMAP_JET)

    return depth_color_image
def save_npy(color_image_list1,depth_image_list2,points_list3):
    a = numpy.array(color_image_list1)
    b = numpy.array(depth_image_list2)
    c = numpy.array(points_list3)

    numpy.save('color.npy', a)
    numpy.save('depth.npy', b)
    numpy.save('points.npy', c)
def display_all():
    # 初始化
    pyK4A = pyKinectAzure(modulePath)
    pyK4A.device_open()
    device_config = pyK4A.config
    device_config.color_format = _k4a.K4A_IMAGE_FORMAT_COLOR_BGRA32
    device_config.color_resolution = _k4a.K4A_COLOR_RESOLUTION_720P
    device_config.depth_mode = _k4a.K4A_DEPTH_MODE_WFOV_2X2BINNED
    print(device_config)

    # 开启摄像头
    pyK4A.device_start_cameras(device_config)
    #获取相机序列号
    serial_number=pyK4A.device_get_serialnum()
    print(serial_number)

    k = 0
    open3dVisualizer = plot3dUtils.Open3dVisualizer()
    list1=[] #保存RGB图像
    list2=[] #保存深度图像
    list3=[] #保存点云图
    encode_param = [int(cv2.IMWRITE_JPEG_QUALITY), 30]
    while True:
            # Get capture
            # starttime = time.time()
            pyK4A.device_get_capture()

            # 获取深度图像
            depth_image_handle = pyK4A.capture_get_depth_image()

            # 获取RGB图像
            color_image_handle = pyK4A.capture_get_color_image()
            # print(depth_image_handle)
            # 将深度图转为点云图
            point_cloud = pyK4A.transform_depth_image_to_point_cloud(depth_image_handle)
            # print(1)
            # 检查图像是否读取成功
            if depth_image_handle and color_image_handle:

                # 将获取到的图像转换为nummpy矩阵
                color_image = pyK4A.image_convert_to_numpy(color_image_handle)[:, :, :3]
                depth_image = pyK4A.image_convert_to_numpy(depth_image_handle)

                ret, point_cloud_image = pyK4A.image_convert_to_numpy(point_cloud)
                points = point_cloud_image

                points = points.reshape((-1, 3))
                depth_image = color_depth_image(depth_image)

                list1.append(color_image)
                list2.append(depth_image)
                list3.append(points)
                        # 图像显示
                open3dVisualizer(points)
                cv2.namedWindow(' Color Image', cv2.WINDOW_NORMAL)
                cv2.imshow(' Color Image', color_image)

                cv2.namedWindow(' Depth Image', cv2.WINDOW_NORMAL)
                cv2.imshow(' Depth Image', depth_image)
                k = cv2.waitKey(25)
                if k == 27:  # Esc
                    break
            pyK4A.image_release(depth_image_handle)
            pyK4A.image_release(color_image_handle)
            pyK4A.capture_release()
    save_npy(list1, list2, list3)
    pyK4A.device_stop_cameras()
    pyK4A.device_close()

def track():
    pyK4A = pyKinectAzure(modulePath)
    pyK4A.device_open()
    device_config = pyK4A.config
    device_config.color_format = _k4a.K4A_IMAGE_FORMAT_COLOR_BGRA32
    device_config.color_resolution = _k4a.K4A_COLOR_RESOLUTION_720P
    device_config.depth_mode = _k4a.K4A_DEPTH_MODE_WFOV_2X2BINNED
    print(device_config)

    # 开启摄像头
    pyK4A.device_start_cameras(device_config)
    # 获取相机序列号
    serial_number = pyK4A.device_get_serialnum()
    print(serial_number)

    k = 0
    # 选择 框选帧
    print("按 n 选择下一帧,按 y 选取当前帧")
    while True:
        # Get capture
        pyK4A.device_get_capture()

        # Get the depth image from the capture
        depth_image_handle = pyK4A.capture_get_depth_image()

        # Get the color image from the capture
        color_image_handle = pyK4A.capture_get_color_image()

        # Check the image has been read correctly
        if depth_image_handle and color_image_handle:

            # Read and convert the image data to numpy array:
            color_image = pyK4A.image_convert_to_numpy(color_image_handle)[:, :, :3]
            # depth_image=pyK4A.image_convert_to_numpy(depth_image_handle)
            # depth_image=color_depth_image(depth_image)

            _key = cv2.waitKey(0) & 0xFF
            if (_key == ord('n')):
                color_image_handle = pyK4A.capture_get_color_image()
                color_image = pyK4A.image_convert_to_numpy(color_image_handle)[:, :, :3]
            if (_key == ord('y')):
                break

            # cv2.namedWindow(' Color Image', cv2.WINDOW_NORMAL)
            color_image = cv2.resize(color_image, (1280, 720))
            cv2.rectangle(color_image, (30, 30), (100, 100), (255, 0, 0), 2, 1)
            cv2.imshow(' Color Image', color_image)
            # cv2.namedWindow(' Depth Image', cv2.WINDOW_NORMAL)
            # cv2.imshow(' Depth Image', depth_image)

            k = cv2.waitKey(25)
            if k == 27:  # Esc
                break

        pyK4A.image_release(depth_image_handle)
        pyK4A.image_release(color_image_handle)
        pyK4A.capture_release()

    cv2.destroyWindow("pick frame")
    gROI = cv2.selectROI("ROI frame", color_image, False)
    if (not gROI):
        print("空框选,退出")
        quit()

    gTracker = kcf_tracking.Tracker(tracker_type="KCF")
    gTracker.initWorking(color_image, gROI)
    while True:
        # Get capture
        pyK4A.device_get_capture()

        # Get the color image from the capture
        color_image_handle = pyK4A.capture_get_color_image()

        if color_image_handle:
            color_image = pyK4A.image_convert_to_numpy(color_image_handle)[:, :, :3]
            color_image = cv2.resize(color_image, (1280, 720))
            _item, p1, p2 = gTracker.track(color_image)
            cv2.imshow("track result", _item.getFrame())
            if _item.getMessage():
                # 打印跟踪数据
                print(_item.getMessage())
            else:
                # 丢失,重新用初始ROI初始
                print("丢失,重新使用初始ROI开始")
                gTracker = kcf_tracking.Tracker(tracker_type="KCF")
                # gTracker = Tracker(tracker_type="MOSSE")
                gTracker.initWorking(color_image, gROI)

            _key = cv2.waitKey(1) & 0xFF
            if (_key == ord('q')) | (_key == 27):
                break
            if (_key == ord('r')):
                # 用户请求用初始ROI
                print("用户请求用初始ROI")
                gTracker = kcf_tracking.Tracker(tracker_type="KCF")
                # gTracker = Tracker(tracker_type="MOSSE")
                gTracker.initWorking(color_image, gROI)
        # pyK4A.image_release(depth_image_handle)
        pyK4A.image_release(color_image_handle)

        pyK4A.capture_release()
    pyK4A.device_stop_cameras()
    pyK4A.device_close()
if __name__ == '__main__':

    display_all()
    #track()