文章目录
ProxySQL是灵活强大的MySQL代理层, 是一个能实实在在用在生产环境的MySQL中间件,可以实现读写分离,支持 Query 路由功能,支持动态指定某个 SQL 进行 cache,支持动态加载配置、故障切换和一些 SQL的过滤功能。还有一些同类产品比如 DBproxy、MyCAT、OneProxy 等。但经过反复对比和测试之后,还是觉得ProxySQL是一款性能不谙,靠谱稳定的MySQL 中间件产品.它有官方版和 percona 版两种.percona版是在官方版的基础上修改的,添加了几个比较实用的工具。生产环境建议用官方版。ProxySQL 是用 C++ 语言开发的,虽然也是一个轻量级产品

主要实现的功能包括:
- 读写分离
- 负载均衡
- 连接池
- 自动摘除宕机的DB
- 动态加载配置
- 访问控制
- 查询缓存
- ProxySQL集群
ProxySQL运行机制
- runtime:运行中使用的配置文件
- memory:提供用户动态修改配置文件
- disk:将修改的配置保存到磁盘SQLit表中(即:proxysql.db)
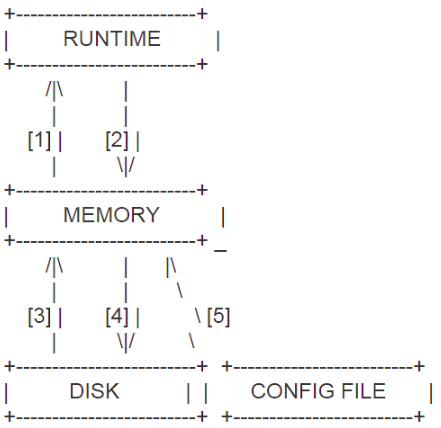
RUNTIME层
代表的是ProxySQL当前生效的配置,包括 global_variables, mysql_servers, mysql_users, mysql_query_rules。无法直接修改这里的配置,必须要从下一层load进来。
MEMORY层
是平时在mysql命令行修改的 main 里头配置,可以认为是SQLite数据库在内存的镜像。我们通过Set修改配置也是先修改此层的内容。
DISK层
持久存储的那份配置,一般在$(DATADIR)/proxysql.db,在重启的时候会从硬盘里加载。 /etc/proxysql.cnf文件只在第一次初始化的时候用到,完了后,如果要修改监听端口等,还是需要在管理命令行里修改,再save到硬盘。
ProxySQL安装
## 配置proxysql源
[root@localhost yum.repos.d]# vim ProxySQL.repo

[proxysql_repo]
name=ProxySQL
baseurl=http://repo.proxysql.com/ProxySQL/proxysql-2.0.x/centos/8
gpgcheck=1
gpgkey=http://repo.proxysql.com/ProxySQL/repo_pub_key

[root@localhost ~]# rpm -ivh proxysql-2.0.15-1-centos8.x86_64.rpm
warning: proxysql-2.0.15-1-centos8.x86_64.rpm: Header V4 RSA/SHA256 Signature, key ID 79953b49: NOKEY
Verifying...                          ################################# [100%]
Preparing...                          ################################# [100%]
Updating / installing...
   1:proxysql-2.0.15-1                warning: group proxysql does not exist - using root
warning: group proxysql does not exist - using root
################################# [100%]
Created symlink /etc/systemd/system/multi-user.target.wants/proxysql.service → /etc/systemd/system/proxysql.service.

## 启动proxysql服务
[root@localhost ~]# systemctl enable --now proxysql
[root@localhost yum.repos.d]# ss -antl
State          Recv-Q         Send-Q                   Local Address:Port                   Peer Address:Port
LISTEN         0              128                            0.0.0.0:111                         0.0.0.0:*
LISTEN         0              128                            0.0.0.0:6032                        0.0.0.0:*
LISTEN         0              128                            0.0.0.0:6033                        0.0.0.0:*
LISTEN         0              128                            0.0.0.0:6033                        0.0.0.0:*
LISTEN         0              128                            0.0.0.0:6033                        0.0.0.0:*
LISTEN         0              128                            0.0.0.0:6033                        0.0.0.0:*
LISTEN         0              128                            0.0.0.0:22                          0.0.0.0:*
LISTEN         0              128                               [::]:111                            [::]:*
LISTEN         0              128                               [::]:22                             [::]:*
ProxySQL的Admin管理接口
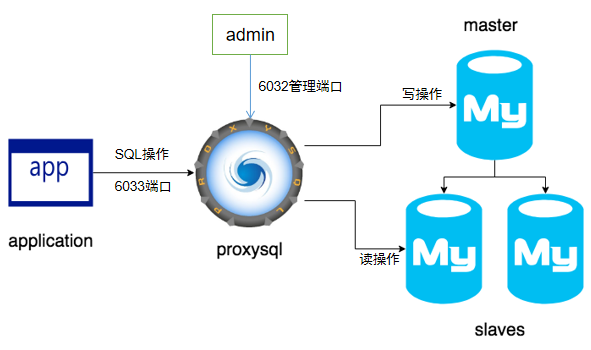
当Proxysql启动后,将监听两个端口:
- admin管理接口,默认端口为6032。该端口用于查看、配置ProxySQL
- 接收SQL语句的接口,默认端口为6033,这个接口类似于MySQL的3306端口
本地使用admin管理ProxySQL(admin是默认管理用户,只允许本地登录)
[root@localhost ~]# mysql -uadmin -padmin -h127.0.0.1 -P6032
Welcome to the MariaDB monitor.  Commands end with ; or \g.
Your MySQL connection id is 1
Server version: 5.5.30 (ProxySQL Admin Module)

Copyright (c) 2000, 2018, Oracle, MariaDB Corporation Ab and others.

Type 'help;' or '\h' for help. Type '\c' to clear the current input statement.

MySQL [(none)]>


## 查看sqlite库中数据库
MySQL [(none)]> show databases;
+-----+---------------+-------------------------------------+
| seq | name          | file                                |
+-----+---------------+-------------------------------------+
| 0   | main          |                                     |
| 2   | disk          | /var/lib/proxysql/proxysql.db       |
| 3   | stats         |                                     |
| 4   | monitor       |                                     |
| 5   | stats_history | /var/lib/proxysql/proxysql_stats.db |
+-----+---------------+-------------------------------------+
5 rows in set (0.001 sec)
由于 ProxySQL 的配置全部保存在几个自带的库中,所以通过管理接口,可以非常方便地通过发送一些SQL命令去修改 ProxySQL 的配置。 ProxySQL 会解析通过该接口发送的某些对ProxySQL 有效的特定命令,并将其合理转换后发送给内嵌的 SQLite3 数据库引擎去运行
ProxySQL 的配置几乎都是通过管理接口来操作的,通过 Admin 管理接口,可以在线修改几乎所有的配置并使其生效。只有两个变量的配置是必须重启 ProxySQL 才能生效的,它们是:
mysql-threads 和 mysql-stacksize
和admin管理接口相关的变量
admin-admin_credentials
admin-admin_credentials 变量控制的是admin管理接口的管理员账户。默认的管理员账户和密码为admin:admin,但是这个默认的用户只能在本地使用。如果想要远程连接到ProxySQL,例如用windows上的navicat连接Linux上的ProxySQL管理接口,必须自定义一个管理员账户。
添加管理员帐户

mysql> select @@admin-admin_credentials;
+---------------------------+
| @@admin-admin_credentials |
+---------------------------+
| admin:admin               |
+---------------------------+
1 row in set (0.00 sec)

//设置管理员帐号myadmin,密码yei123!
mysql> set admin-admin_credentials='admin:admin;myadmin:yei123!';
Query OK, 1 row affected (0.00 sec)

mysql> select @@admin-admin_credentials;
+-----------------------------+
| @@admin-admin_credentials   |
+-----------------------------+
| admin:admin;myadmin:yei123! |
+-----------------------------+
1 row in set (0.00 sec)

mysql> load admin variables to runtime;
Query OK, 0 rows affected (0.00 sec)

mysql> save admin variables to disk;
Query OK, 35 rows affected (0.00 sec)

修改后,就可以使用该用户名和密码连接管理接口

[root@xian ~]# mysql -umyadmin -pyei123! -h192.168.116.180 -P6032
mysql: [Warning] Using a password on the command line interface can be insecure.
Welcome to the MySQL monitor.  Commands end with ; or \g.
Your MySQL connection id is 2
Server version: 5.5.30 (ProxySQL Admin Module)

Copyright (c) 2000, 2020, Oracle and/or its affiliates. All rights reserved.

Oracle is a registered trademark of Oracle Corporation and/or its
affiliates. Other names may be trademarks of their respective
owners.

Type 'help;' or '\h' for help. Type '\c' to clear the current input statement.

mysql>

所有的配置操作都是在修改main库中对应的表

mysql> select * from global_variables where variable_name='admin-admin_credentials';
+-------------------------+-----------------------------+
| variable_name           | variable_value              |
+-------------------------+-----------------------------+
| admin-admin_credentials | admin:admin;myadmin:yei123! |
+-------------------------+-----------------------------+
1 row in set (0.01 sec)
必须要区分admin管理接口的用户名和mysql_users中的用户名
admin管理接口的用户是连接到管理接口(默认端口6032)上用来管理、配置ProxySQL的
mysql_users表中的用户名是应用程序连接ProxySQL(默认端口6033),以及ProxySQL连接后端MySQL Servers使用的用户。它的作用是发送、路由SQL语句,类似于MySQL Server的3306端口。所以,这个表中的用户必须已经在后端MySQL Server上存在且授权了
admin管理接口的用户必须不能存在于mysql_users中,这是出于安全的考虑,防止通过admin管理接口用户猜出mysql_users中的用户
admin-stats_credentials
admin-stats_credentials 变量控制admin管理接口的普通用户,这个变量中的用户没有超级管理员权限,只能查看monitor库和main库中关于统计的数据,其它库都是不可见的,且没有任何写权限
默认的普通用户名和密码均为 stats ,与admin一样,它默认也只能用于本地登录,若想让人远程查看则要添加查看的专有用户
mysql> select @@admin-stats_credentials;
+---------------------------+
| @@admin-stats_credentials |
+---------------------------+
| stats:stats               |
+---------------------------+
1 row in set (0.00 sec)

//添加专有的查看用户
mysql> set admin-stats_credentials='stats:stats;mystats:yei123!';
Query OK, 1 row affected (0.00 sec)

mysql> select @@admin-stats_credentials;
+-----------------------------+
| @@admin-stats_credentials   |
+-----------------------------+
| stats:stats;mystats:yei123! |
+-----------------------------+
1 row in set (0.00 sec)

mysql> load admin variables to runtime;
Query OK, 0 rows affected (0.00 sec)

mysql> save admin variables to disk;
Query OK, 35 rows affected (0.00 sec)

同样,这个变量中的用户必须不能存在于mysql_users表中
使用mystats用户远程连接查看

[root@yeqixian ~]# mysql -umystats -pyei123! -h192.168.116.180 -P6032
mysql: [Warning] Using a password on the command line interface can be insecure.
Welcome to the MySQL monitor.  Commands end with ; or \g.
Your MySQL connection id is 4
Server version: 5.5.30 (ProxySQL Admin Module)

Copyright (c) 2000, 2020, Oracle and/or its affiliates. All rights reserved.

Oracle is a registered trademark of Oracle Corporation and/or its
affiliates. Other names may be trademarks of their respective
owners.

Type 'help;' or '\h' for help. Type '\c' to clear the current input statement.

mysql>

mysql> show tables from main;
+----------------------------------------------------+
| tables                                             |
+----------------------------------------------------+
| global_variables                                   |
| mysql_aws_aurora_hostgroups                        |
| mysql_collations                                   |
| mysql_firewall_whitelist_rules                     |
| mysql_firewall_whitelist_sqli_fingerprints         |
| mysql_firewall_whitelist_users                     |
| mysql_galera_hostgroups                            |
| mysql_group_replication_hostgroups                 |
| mysql_query_rules                                  |
| mysql_query_rules_fast_routing                     |
| mysql_replication_hostgroups                       |
| mysql_servers                                      |
| mysql_users                                        |
| proxysql_servers                                   |
| restapi_routes                                     |
| runtime_checksums_values                           |
| runtime_global_variables                           |
| runtime_mysql_aws_aurora_hostgroups                |
| runtime_mysql_firewall_whitelist_rules             |
| runtime_mysql_firewall_whitelist_sqli_fingerprints |
| runtime_mysql_firewall_whitelist_users             |
| runtime_mysql_galera_hostgroups                    |
| runtime_mysql_group_replication_hostgroups         |
| runtime_mysql_query_rules                          |
| runtime_mysql_query_rules_fast_routing             |
| runtime_mysql_replication_hostgroups               |
| runtime_mysql_servers                              |
| runtime_mysql_users                                |
| runtime_proxysql_servers                           |
| runtime_restapi_routes                             |
| runtime_scheduler                                  |
| scheduler                                          |
+----------------------------------------------------+
32 rows in set (0.00 sec)
admin-mysql_ifaces
admin-mysql_ifaces 变量指定admin接口的监听地址,格式为冒号分隔的hostname:port列表。默认监听在 0.0.0.0:6032
注意,允许使用UNIX的domain socket进行监听,这样本主机内的应用程序就可以直接被处理。
例如:
mysql> SET admin-mysql_ifaces='0.0.0.0:6032;/tmp/proxysql_admin.sock';
Query OK, 1 row affected (0.00 sec)

mysql> load admin variables to runtime;
Query OK, 0 rows affected (0.00 sec)

mysql> load admin variables to runtime;
Query OK, 0 rows affected (0.00 sec)
读写分离
数据库中间件最基本的功能是实现读写分离,ProxySQL当然也支持。ProxySQL可以非常有效、非常弹性地对各种查询进行选择性地路由。路由配置规则如下几种:
1、配置基于端口的读/写分离
基于端口进行读写分离局限性很大,应用程序需要内置读写能力,以便区分读和写,和当前业务现状基本相同。
2、使用正则表达式实现基本的读/写分离
在路由表中创建对应的路由规则,实现自己想要读写分离。比如所有select走从库、select for update 走主库,其他所有查询走主库等等。
3、使用正则表达式和digest配置读写分离
只发送那些想要发送给slaves/readers的查询,而不仅仅通过SELECT语句来判断。所有请求都走主库,通过ProxySQL中stats_mysql_query_digest表找出开销最大的select语句,然后决定这些开销大的语句路由给负责读节点,开始配置mysql_query_rules规则表。
例子:
环境信息
| 主机IP | 角色 | 主机服务 |
|---|---|---|
| 192.168.197.141 | 数据库代理主机 | proxysql |
| 192.168.197.150 | 主数据库master | mysql |
| 192.168.197.154 | 从数据库slave1 | mysql |
| 192.168.197.155 | 从数据库slave2 | mysql |
部署步骤
- 配置数据库主从
## 全部安装mysql或者mairadb服务

[root@localhost ~]# yum install -y mariadb*
......

[root@localhost ~]# systemctl start mariadb
[root@localhost ~]# ss -antl
State  Recv-Q Send-Q   Local Address:Port   Peer Address:Port
LISTEN 0      80             0.0.0.0:3306        0.0.0.0:*
LISTEN 0      128            0.0.0.0:22          0.0.0.0:*
LISTEN 0      128               [::]:22             [::]:*


## master端创建slave主从用户
MariaDB [mysql]> grant replication slave ON *.* TO 'repli'@'192.168.197.154' identified by '123456';
Query OK, 0 rows affected (0.000 sec)

MariaDB [mysql]> grant replication slave ON *.* TO 'repli'@'192.168.197.155' identified by '123456';
Query OK, 0 rows affected (0.000 sec)

MariaDB [mysql]> flush privileges;
Query OK, 0 rows affected (0.001 sec)


## 两个slave测试登录数据库
[root@slave1 ~]# mysql -urepli -p123456 -h192.168.197.150
......
MariaDB [(none)]>

[root@slave2 ~]# mysql -urepli -p123456 -h192.168.197.150
......
MariaDB [(none)]>


## 开启master端二进制日志
[root@master ~]#vim /etc/my.cnf
[mysqld]
log-bin=mysql-bin
server-id=10
#
......


## 查看master节点位置
MariaDB [(none)]> show master status;
+------------------+----------+--------------+------------------+
| File             | Position | Binlog_Do_DB | Binlog_Ignore_DB |
+------------------+----------+--------------+------------------+
| mysql-bin.000001 |      328 |              |                  |
+------------------+----------+--------------+------------------+
1 row in set (0.000 sec)


## 开启slave中继日志
[root@slave1 ~]# vim /etc/my.cnf
[mysqld]
server-id=20
relay-log=mysql-relay-bin
......

[root@slave2 ~]# vim /etc/my.cnf
[mysqld]
server-id=30
relay-log=mysql-relay-bin


## 两个slave重启服务
[root@slave1 ~]# systemctl restart mariadb
[root@slave2 ~]# systemctl restart mariadb
注:无论主从,server-id必须唯一,且slave服务器上的id必须比master服务器上的id大
## 配置并启动主从复制
[root@slave1 ~]# mysql
......
MariaDB [(none)]> change master to
    -> master_host='192.168.197.150',
    -> master_user='repli',
    -> master_password='123456',
    -> master_log_file='mysql-bin.000001',
    -> master_log_pos=996;

MariaDB [(none)]> change master to master_host='192.168.197.150', master_user='repli', master_password='123456', master_log_file='mysql-bin.000001', master_log_pos=996;
Query OK, 0 rows affected (0.005 sec)

MariaDB [(none)]> start slave;
Query OK, 0 rows affected (0.001 sec)

MariaDB [(none)]> show slave status\G
*************************** 1. row ***************************
                Slave_IO_State: Waiting for master to send event
                   Master_Host: 192.168.197.150
                   Master_User: repli
                   Master_Port: 3306
                 Connect_Retry: 60
               Master_Log_File: mysql-bin.000001
           Read_Master_Log_Pos: 996
                Relay_Log_File: mysql-relay-bin.000002
                 Relay_Log_Pos: 555
         Relay_Master_Log_File: mysql-bin.000001
              Slave_IO_Running: Yes
             Slave_SQL_Running: Yes
......


[root@slave2 ~]# mysql
......
MariaDB [(none)]> change master to
    -> master_host='192.168.197.150',
    -> master_user='repli',
    -> master_password='123456',
    -> master_log_file='mysql-bin.000001',
    -> master_log_pos=996;

MariaDB [(none)]> change master to master_host='192.168.197.150', master_user='repli', master_password='123456', master_log_file='mysql-bin.000001', master_log_pos=996;
Query OK, 0 rows affected (0.005 sec)

MariaDB [(none)]> start slave;
Query OK, 0 rows affected (0.001 sec)

MariaDB [(none)]> show slave status\G
*************************** 1. row ***************************
                Slave_IO_State: Waiting for master to send event
                   Master_Host: 192.168.197.150
                   Master_User: repli
                   Master_Port: 3306
                 Connect_Retry: 60
               Master_Log_File: mysql-bin.000001
           Read_Master_Log_Pos: 996
                Relay_Log_File: mysql-relay-bin.000002
                 Relay_Log_Pos: 555
         Relay_Master_Log_File: mysql-bin.000001
              Slave_IO_Running: Yes
             Slave_SQL_Running: Yes
......
- 测试主从
## master创建新数据库
MariaDB [(none)]> create database test_db;
Query OK, 1 row affected (0.001 sec)


## slave1库查看
MariaDB [(none)]> show databases;
+--------------------+
| Database           |
+--------------------+
| information_schema |
| mysql              |
| performance_schema |
| test_db            |
+--------------------+

## slave2库查看
MariaDB [(none)]> show databases;
+--------------------+
| Database           |
+--------------------+
| information_schema |
| mysql              |
| performance_schema |
| test_db            |
+--------------------+
4 rows in set (0.001 sec)
- master上为proxysql主机创建读写账号
MariaDB [(none)]> grant all on *.* to 'proxysql'@'192.168.197.141' identified by '123456';
Query OK, 0 rows affected (0.001 sec)

MariaDB [(none)]> flush privileges;
Query OK, 0 rows affected (0.001 sec)
- proxysql登录6032管理端
[root@proxysql ~]# mysql -uadmin -padmin -h127.0.0.1 -P6032;
Welcome to the MariaDB monitor.  Commands end with ; or \g.
Your MySQL connection id is 3
Server version: 5.5.30 (ProxySQL Admin Module)

Copyright (c) 2000, 2018, Oracle, MariaDB Corporation Ab and others.

Type 'help;' or '\h' for help. Type '\c' to clear the current input statement.

MySQL [(none)]>
- 向mysql_servers表中插入数据
## 首先查看mysql_servers表结构
MySQL [main]> pragma table_info("mysql_servers");
+-----+---------------------+--------------+---------+------------+----+
| cid | name                | type         | notnull | dflt_value | pk |
+-----+---------------------+--------------+---------+------------+----+
| 0   | hostgroup_id        | INT          | 1       | 0          | 1  |
| 1   | hostname            | VARCHAR      | 1       | NULL       | 2  |
| 2   | port                | INT          | 1       | 3306       | 3  |
| 3   | gtid_port           | INT          | 1       | 0          | 0  |
| 4   | status              | VARCHAR      | 1       | 'ONLINE'   | 0  |
| 5   | weight              | INT          | 1       | 1          | 0  |
| 6   | compression         | INT          | 1       | 0          | 0  |
| 7   | max_connections     | INT          | 1       | 1000       | 0  |
| 8   | max_replication_lag | INT          | 1       | 0          | 0  |
| 9   | use_ssl             | INT          | 1       | 0          | 0  |
| 10  | max_latency_ms      | INT UNSIGNED | 1       | 0          | 0  |
| 11  | comment             | VARCHAR      | 1       | ''         | 0  |
+-----+---------------------+--------------+---------+------------+----+
12 rows in set (0.000 sec)

## 插入数据
MySQL [main]> insert into mysql_servers(hostgroup_id,hostname,port,weight,comment) values(10,'192.168.197.150',3306,1,'Write Group Master');
Query OK, 1 row affected (0.000 sec)

MySQL [main]> insert into mysql_servers(hostgroup_id,hostname,port,weight,comment) values(20,'192.168.197.154',3306,1,'Read Group Slave1');
Query OK, 1 row affected (0.000 sec)

MySQL [main]> insert into mysql_servers(hostgroup_id,hostname,port,weight,comment) values(30,'192.168.197.155',3306,1,'Read Group Slave2');
Query OK, 1 row affected (0.000 sec)

## 查看表内数据
MySQL [main]> select * from mysql_servers\G
*************************** 1. row ***************************
       hostgroup_id: 10
           hostname: 192.168.197.150
               port: 3306
          gtid_port: 0
             status: ONLINE
             weight: 1
        compression: 0
    max_connections: 1000
max_replication_lag: 0
            use_ssl: 0
     max_latency_ms: 0
            comment: Write Group Master
*************************** 2. row ***************************
       hostgroup_id: 20
           hostname: 192.168.197.154
               port: 3306
          gtid_port: 0
             status: ONLINE
             weight: 1
        compression: 0
    max_connections: 1000
max_replication_lag: 0
            use_ssl: 0
     max_latency_ms: 0
            comment: Read Group Slave1
*************************** 3. row ***************************
       hostgroup_id: 30
           hostname: 192.168.197.155
               port: 3306
          gtid_port: 0
             status: ONLINE
             weight: 1
        compression: 0
    max_connections: 1000
max_replication_lag: 0
            use_ssl: 0
     max_latency_ms: 0
            comment: Read Group Slave2
3 rows in set (0.000 sec)

## 加载到runtime层,并持久保存到disk中
MySQL [main]> load mysql servers to run;
Query OK, 0 rows affected (0.004 sec)

MySQL [main]> save mysql servers to disk;
Query OK, 0 rows affected (0.121 sec)
- 在mysql_users表中添加此前在master上创建的管理员用户
## 查看mysql_users表结构
MySQL [main]>  pragma table_info("mysql_users");
+-----+------------------------+---------+---------+------------+----+
| cid | name                   | type    | notnull | dflt_value | pk |
+-----+------------------------+---------+---------+------------+----+
| 0   | username               | VARCHAR | 1       | NULL       | 1  |
| 1   | password               | VARCHAR | 0       | NULL       | 0  |
| 2   | active                 | INT     | 1       | 1          | 0  |
| 3   | use_ssl                | INT     | 1       | 0          | 0  |
| 4   | default_hostgroup      | INT     | 1       | 0          | 0  |
| 5   | default_schema         | VARCHAR | 0       | NULL       | 0  |
| 6   | schema_locked          | INT     | 1       | 0          | 0  |
| 7   | transaction_persistent | INT     | 1       | 1          | 0  |
| 8   | fast_forward           | INT     | 1       | 0          | 0  |
| 9   | backend                | INT     | 1       | 1          | 2  |
| 10  | frontend               | INT     | 1       | 1          | 0  |
| 11  | max_connections        | INT     | 1       | 10000      | 0  |
| 12  | comment                | VARCHAR | 1       | ''         | 0  |
+-----+------------------------+---------+---------+------------+----+

## 添加用户
insert into mysql_users(username,password,default_hostgroup,transaction_persistent) values('proxysql','123456',10,1);

## 查看
MySQL [main]> select * from mysql_users\G
*************************** 1. row ***************************
              username: proxysql
              password: 123456
                active: 1
               use_ssl: 0
     default_hostgroup: 10
        default_schema: NULL
         schema_locked: 0
transaction_persistent: 1
          fast_forward: 0
               backend: 1
              frontend: 1
       max_connections: 10000
               comment:
1 row in set (0.000 sec)
- master上添加健康检查的只读权限用户
MariaDB [(none)]> grant select on *.* to 'monitor'@'192.168.197.%' IDENTIFIED BY '123456';
Query OK, 0 rows affected (0.001 sec)

mysql> flush privileges;
Query OK, 0 rows affected (0.00 sec)
- proxysql上修改此用户变量值
MySQL [main]> select @@mysql-monitor_username;
+--------------------------+
| @@mysql-monitor_username |
+--------------------------+
| monitor                  |
+--------------------------+
1 row in set (0.001 sec)

MySQL [main]> select @@mysql-monitor_password;
+--------------------------+
| @@mysql-monitor_password |
+--------------------------+
| monitor                  |
+--------------------------+
1 row in set (0.001 sec)

## 修改monitor密码
MySQL [main]> set mysql-monitor_password='123456';
Query OK, 1 row affected (0.000 sec)

MySQL [main]> load mysql variables to run;
Query OK, 0 rows affected (0.001 sec)

## 加载,保存并查看
MySQL [main]> save mysql variables to disk;
Query OK, 137 rows affected (0.004 sec)

MySQL [main]> select @@mysql-monitor_password;
+--------------------------+
| @@mysql-monitor_password |
+--------------------------+
| 123456                   |
+--------------------------+
1 row in set (0.001 sec)
- proxysql添加读写分离的路由规则
MySQL [main]> pragma table_info("mysql_query_rules");
+-----+-----------------------+--------------+---------+------------+----+
| cid | name                  | type         | notnull | dflt_value | pk |
+-----+-----------------------+--------------+---------+------------+----+
| 0   | rule_id               | INTEGER      | 1       | NULL       | 1  |
| 1   | active                | INT          | 1       | 0          | 0  |
| 2   | username              | VARCHAR      | 0       | NULL       | 0  |
| 3   | schemaname            | VARCHAR      | 0       | NULL       | 0  |
| 4   | flagIN                | INT          | 1       | 0          | 0  |
| 5   | client_addr           | VARCHAR      | 0       | NULL       | 0  |
| 6   | proxy_addr            | VARCHAR      | 0       | NULL       | 0  |
| 7   | proxy_port            | INT          | 0       | NULL       | 0  |
| 8   | digest                | VARCHAR      | 0       | NULL       | 0  |
| 9   | match_digest          | VARCHAR      | 0       | NULL       | 0  |
| 10  | match_pattern         | VARCHAR      | 0       | NULL       | 0  |
| 11  | negate_match_pattern  | INT          | 1       | 0          | 0  |
| 12  | re_modifiers          | VARCHAR      | 0       | 'CASELESS' | 0  |
| 13  | flagOUT               | INT          | 0       | NULL       | 0  |
| 14  | replace_pattern       | VARCHAR      | 0       | NULL       | 0  |
| 15  | destination_hostgroup | INT          | 0       | NULL       | 0  |
| 16  | cache_ttl             | INT          | 0       | NULL       | 0  |
| 17  | cache_empty_result    | INT          | 0       | NULL       | 0  |
| 18  | cache_timeout         | INT          | 0       | NULL       | 0  |
| 19  | reconnect             | INT          | 0       | NULL       | 0  |
| 20  | timeout               | INT UNSIGNED | 0       | NULL       | 0  |
| 21  | retries               | INT          | 0       | NULL       | 0  |
| 22  | delay                 | INT UNSIGNED | 0       | NULL       | 0  |
| 23  | next_query_flagIN     | INT UNSIGNED | 0       | NULL       | 0  |
| 24  | mirror_flagOUT        | INT UNSIGNED | 0       | NULL       | 0  |
| 25  | mirror_hostgroup      | INT UNSIGNED | 0       | NULL       | 0  |
| 26  | error_msg             | VARCHAR      | 0       | NULL       | 0  |
| 27  | OK_msg                | VARCHAR      | 0       | NULL       | 0  |
| 28  | sticky_conn           | INT          | 0       | NULL       | 0  |
| 29  | multiplex             | INT          | 0       | NULL       | 0  |
| 30  | gtid_from_hostgroup   | INT UNSIGNED | 0       | NULL       | 0  |
| 31  | log                   | INT          | 0       | NULL       | 0  |
| 32  | apply                 | INT          | 1       | 0          | 0  |
| 33  | comment               | VARCHAR      | 0       | NULL       | 0  |
+-----+-----------------------+--------------+---------+------------+----+
34 rows in set (0.000 sec)
- 添加路由规则(基于SQL语句)
MySQL [main]>  insert into mysql_query_rules(rule_id,active,match_digest,destination_hostgroup,apply)values(10,1,'^(update|insert|delete)',10,1);
Query OK, 1 row affected (0.000 sec)

MySQL [main]> insert into mysql_query_rules(rule_id,active,match_digest,destination_hostgroup,apply)values(15,1,'^select.*from.*test_table',20,1);
Query OK, 1 row affected (0.000 sec)

MySQL [main]> insert into mysql_query_rules(rule_id,active,match_digest,destination_hostgroup,apply)values(20,1,'^(select|show|desc)',30,1);
Query OK, 1 row affected (0.000 sec)


## 加载并保存
MySQL [main]> load mysql query rules to runtime;
Query OK, 0 rows affected (0.001 sec)

MySQL [main]> save mysql query rules to disk;
Query OK, 0 rows affected (0.357 sec)

## 查看表数据
MySQL [main]> select * from mysql_query_rules\G
*************************** 1. row ***************************
              rule_id: 10
               active: 1
             username: NULL
           schemaname: NULL
               flagIN: 0
          client_addr: NULL
           proxy_addr: NULL
           proxy_port: NULL
               digest: NULL
         match_digest: ^(update|insert|delete)
        match_pattern: NULL
 negate_match_pattern: 0
         re_modifiers: CASELESS
              flagOUT: NULL
      replace_pattern: NULL
destination_hostgroup: 10
 ......
                apply: 1
              comment: NULL
*************************** 2. row ***************************
              rule_id: 15
               active: 1
             username: NULL
           schemaname: NULL
               flagIN: 0
          client_addr: NULL
           proxy_addr: NULL
           proxy_port: NULL
               digest: NULL
         match_digest: ^select.*from.*test_table
        match_pattern: NULL
 negate_match_pattern: 0
         re_modifiers: CASELESS
              flagOUT: NULL
      replace_pattern: NULL
destination_hostgroup: 20
......
                apply: 1
              comment: NULL
*************************** 3. row ***************************
              rule_id: 20
               active: 1
             username: NULL
           schemaname: NULL
               flagIN: 0
          client_addr: NULL
           proxy_addr: NULL
           proxy_port: NULL
               digest: NULL
         match_digest: ^(select|show|desc)
        match_pattern: NULL
 negate_match_pattern: 0
         re_modifiers: CASELESS
              flagOUT: NULL
      replace_pattern: NULL
destination_hostgroup: 30
......
                apply: 1
              comment: NULL
3 rows in set (0.000 sec)
- proxysql本地登录
[root@proxysql ~]# mysql -uproxysql -p123456 -h127.0.0.1 -P3306;
Welcome to the MariaDB monitor.  Commands end with ; or \g.
Your MariaDB connection id is 232
Server version: 10.3.17-MariaDB-log MariaDB Server

Copyright (c) 2000, 2018, Oracle, MariaDB Corporation Ab and others.

Type 'help;' or '\h' for help. Type '\c' to clear the current input statement.

MariaDB [(none)]>
- 查询test_table这张表
MySQL [(none)]> select * from test_db.test_table;
Empty set (0.010 sec)
- proxysql主机进入6032端口管理
[root@proxysql ~]# mysql -padmin -uadmin -h127.0.0.1 -P6032;
Welcome to the MariaDB monitor.  Commands end with ; or \g.
Your MySQL connection id is 12
Server version: 5.5.30 (ProxySQL Admin Module)

Copyright (c) 2000, 2018, Oracle, MariaDB Corporation Ab and others.

Type 'help;' or '\h' for help. Type '\c' to clear the current input statement.

MySQL [(none)]> select * from stats_mysql_query_digest\G      ## 此表用来统计路由信息

MySQL [(none)]> select * from stats_mysql_query_digest\G
*************************** 1. row ***************************
        hostgroup: 20                      ## hostgroup组为20,也就是slave1主机,正好对应了select规则
       schemaname: information_schema
         username: proxysql
   client_address:
           digest: 0x23E7E13566F1C0BF
      digest_text: select * from test_db.test_table
       count_star: 1
       first_seen: 1609244618
        last_seen: 1609244618
         sum_time: 8958
         min_time: 8958
         max_time: 8958
sum_rows_affected: 0
    sum_rows_sent: 0

*************************** 3. row ***************************
        hostgroup: 30                        ## show 命令对应id为30的group,也就是slave2主机
       schemaname: information_schema
         username: proxysql
   client_address:
           digest: 0x02033E45904D3DF0
      digest_text: show databases
       count_star: 1
       first_seen: 1609244445
        last_seen: 1609244445
         sum_time: 7690
         min_time: 7690
         max_time: 7690
sum_rows_affected: 0
    sum_rows_sent: 4
由于设定了查询test_table这张表必须由slave1来执行,所以第一个查询由hostgroup=20的主机运行。
show,select,desc这3个查阅命令统一交给slave2执行,所以这里hostgroup=30
- 创建一张新表,添加数据,并删除一条数据
[root@proxysql ~]# mysql -uproxysql -p123456 -h127.0.0.1 -P3306
Welcome to the MariaDB monitor.  Commands end with ; or \g.
Your MySQL connection id is 13
Server version: 5.5.30 (ProxySQL)

Copyright (c) 2000, 2018, Oracle, MariaDB Corporation Ab and others.

Type 'help;' or '\h' for help. Type '\c' to clear the current input statement.

MySQL [(none)]> use test_db;
Reading table information for completion of table and column names
You can turn off this feature to get a quicker startup with -A

Database changed
MySQL [test_db]> create table student (id int not null,name varchar(100) not null,age tinyint);
Query OK, 0 rows affected (0.020 sec)


## 添加一条数据
MySQL [test_db]> insert into student (id,name,age) value(1,'tom',20);
Query OK, 1 row affected (0.007 sec)


## 删除这条数据
## MySQL [test_db]> delete from student where id=1;
Query OK, 1 row affected (0.005 sec)
- 进入admin控制端口,查看记录
MySQL [(none)]> select * from stats_mysql_query_digest\G;
*************************** 9. row ***************************
        hostgroup: 10
       schemaname: test_db
         username: proxysql
   client_address:
           digest: 0x25502B06F2A2F4A4
      digest_text: create table student (id int not null,name varchar(?) not null,age tinyint)
       count_star: 1
       first_seen: 1609245630
        last_seen: 1609245630
         sum_time: 18922
         min_time: 18922
         max_time: 18922
sum_rows_affected: 0
    sum_rows_sent: 0

*************************** 1. row ***************************
        hostgroup: 10
       schemaname: test_db
         username: proxysql
   client_address:
           digest: 0x728E984EDA5CFAE6
      digest_text: insert into student (id,name,age) value(?,?,?)
       count_star: 1
       first_seen: 1609245834
        last_seen: 1609245834
         sum_time: 5892
         min_time: 5892
         max_time: 5892
sum_rows_affected: 1
    sum_rows_sent: 0

        hostgroup: 10
       schemaname: test_db
         username: proxysql
   client_address:
           digest: 0xED5AABA3AB8F6C15
      digest_text: delete from student where id=?
       count_star: 1
       first_seen: 1609245917
        last_seen: 1609245917
         sum_time: 4328
         min_time: 4328
         max_time: 4328
sum_rows_affected: 1
    sum_rows_sent: 0
这里由于create,insert,delete都是写操作,且规则所属hostgroup=10,所以都是在master主机上运行,从而达到读写分离的效果
负载均衡
负载均衡的主要作用是使各DB服务器的负载大致相当。
Proxy可通过各DB的当前连接数,请求时间,重连次数,DB系统状态(status,variables等),DB机器状态等情况选择当前请求选择的连接。
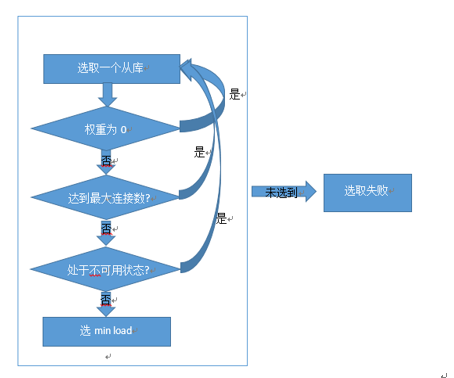
图 1-2 负载均衡
如上图所示,当前负载均衡的策略是:
-
基本原则是在所有备选DB服务器中选择当前连接数/权重系数最小的进行连接。
-
如果总权重大于0,且当前DB服务器的权重等于0,则跳过此DB服务器。
-
如果当前DB服务器达到了最大连接数上限,则跳过此DB服务器
连接池
客户端连接关闭时,ProxySQL检查到DB服务器的连接是否可重用,如果不可复用,则断开连接,如果可复用,则并不断开到DB服务器的连接,而是把连接放到连接池,下次客户端再连接ProxySQL时,ProxySQL从连接池中获取一个连接给客户端使用。如果连接池中没有可用的连接,则建立新连接。
ProxySQL支持多路路由(multiplexing),作用是将语句分多路路由。开启了multiplexing开关,读/写分离、按规则路由才能进行。但有时候,有些语句要求路由到同一个主机组,甚至是同一个主机组中的同一个节点上。这时会自动禁用multiplexing。禁用multiplexing后,语句会根据同一个连接进行路由。如:激活事务时、锁表等。
自动摘除宕机的DB
Monitor模块用于定期检查后端的各项指标。当前支持4种类型的指标检查connect、ping、replication lag、read only;可以自行更新mysql拓扑、进行故障处理和感知。ProxySQL在以下几种情况自动感知故障从库,并将其剔除,具体情况:
1、延迟超过阀值
2、ping 延迟超过阀值
3、网络不通或宕机
4、连接数打满
动态加载配置
ProxySQL有管理端口,热修改配置(内存修改),即在线修改。唯有mysql-interfaces,mysql-threads 和 mysql-stacksize 三个参数修改需要重启实例。
访问控制

密码加密:安全考虑,本地配置(sqlite)中通过加密函数将密码加密,不显示写明文密码。
SQL过滤:可以自动根据执行的频率,执行的时间来自动的添加,其中频率时间,都是可以根据自己的需求动态修改的;支持对query的路由,可以针对某个语句进行分配去哪个实例执行。

图1.3 安全认证流程
IP白名单:用户IP限制,限制了用户的host地址,该功能提供用户对连接ProxySQL的用户的ip进行限制的功能;ProxySQL路由表中可提供一个全局白名单,同时各个用户也可以配置各自用户的私有白名单。
独立账号:从库流量配置,可以指定某一个用户只能访问某几个从库,或者反过来说某几个从库只允许某几个用户访问,这样可能在一个更细的力度上对数据库的资源进行分配。
查询缓存
一个非常常见的场景,识别出那些引起数据库负载加重的非最优化SELECT语句,这些非最优化查询的结果应当被缓存个几秒钟,在路由表中创建匹配规则,并设置缓存时长即可。
ProxySQL 集群
原生集群功能还处于试验阶段,即不通过外部工具实现扩展的多个节点同构。

上图几个注意点:
负载软件层,也可以使用ProxySQL对ProxySQL集群进行负载均衡,因为ProxySQL自身就是一个代理,而且是专门负责MySQL协议的代理。
在负载均衡层,要保证事务持久,不能让一个事务内的不同语句路由到不同的目标上,也就是说负载的目标是"有状态"的。因此在使用lvs/haproxy时,必须想办法保证事务持久性。通用性方法是,从多个ProxySQL节点中取出一个作为逻辑写节点(可以有backup),haproxy/lvs通过端口(也可以用户名,但通常采用端口)代理的方式,强制将所有写语句路由到这个固定的ProxySQL节点上。
而通过ProxySQL来代理ProxySQL集群,因为ProxySQL内部支持事务持久(在mysql_users表中字段transaction_persistent控制持久性)。