文章目录
提示:以下是本篇文章正文内容,下面案例可供参考
一、wxjava是什么
WxJava - 微信开发 Java SDK,支持微信支付、开放平台、公众号、企业号/企业微信、小程序等的后端开发。
官方的gitee仓库地址
官方的github仓库地址
官方的关于微信小程序的demo
二、使用步骤
1.引入依赖
导入wxjava的maven依赖
<dependency>
  <groupId>com.github.binarywang</groupId>
  <artifactId>weixin-java-miniapp</artifactId>
  <version>4.3.0</version>
</dependency>
2.配置yml
wx:
  miniapp:
    configs:
      - appid: #微信小程序的appid
        secret: #微信小程序的Secret
        token: #微信小程序消息服务器配置的token
        aesKey: #微信小程序消息服务器配置的EncodingAESKey
        msgDataFormat: JSON
3.小程序的配置
WxMaProperties 用于读取yml配置的信息
import lombok.Data;
import org.springframework.boot.context.properties.ConfigurationProperties;

import java.util.List;

@Data
@ConfigurationProperties(prefix = "wx.miniapp")
public class WxMaProperties {


    private List<Config> configs;

    @Data
    public static class Config {


        /**
         * 设置微信小程序的appid
         */
        private String appid;

        /**
         * 设置微信小程序的Secret
         */
        private String secret;

        /**
         * 设置微信小程序消息服务器配置的token
         */
        private String token;

        /**
         * 设置微信小程序消息服务器配置的EncodingAESKey
         */
        private String aesKey;

        /**
         * 消息格式,XML或者JSON
         */
        private String msgDataFormat;
    }

}
WxMaConfiguration
import cn.binarywang.wx.miniapp.api.WxMaService;
import cn.binarywang.wx.miniapp.api.impl.WxMaServiceImpl;
import cn.binarywang.wx.miniapp.bean.WxMaKefuMessage;
import cn.binarywang.wx.miniapp.bean.WxMaSubscribeMessage;
import cn.binarywang.wx.miniapp.config.impl.WxMaDefaultConfigImpl;
import cn.binarywang.wx.miniapp.message.WxMaMessageHandler;
import cn.binarywang.wx.miniapp.message.WxMaMessageRouter;
import com.google.common.collect.Lists;
import lombok.extern.slf4j.Slf4j;
import me.chanjar.weixin.common.bean.result.WxMediaUploadResult;
import me.chanjar.weixin.common.error.WxErrorException;
import me.chanjar.weixin.common.error.WxRuntimeException;
import org.springframework.beans.factory.annotation.Autowired;
import org.springframework.boot.context.properties.EnableConfigurationProperties;
import org.springframework.context.annotation.Bean;
import org.springframework.context.annotation.Configuration;

import java.io.File;
import java.util.List;
import java.util.stream.Collectors;

@Slf4j
@Configuration
@EnableConfigurationProperties(WxMaProperties.class)
public class WxMaConfiguration {


    private final WxMaProperties properties;

    @Autowired
    public WxMaConfiguration(WxMaProperties properties) {


        this.properties = properties;
    }

    @Bean
    public WxMaService wxMaService() {


        List<WxMaProperties.Config> configs = this.properties.getConfigs();
        if (configs == null) {


            throw new WxRuntimeException("大哥,拜托先看下项目首页的说明(readme文件),添加下相关配置,注意别配错了!");
        }
        WxMaService maService = new WxMaServiceImpl();
        maService.setMultiConfigs(
            configs.stream()
                .map(a -> {


                    WxMaDefaultConfigImpl config = new WxMaDefaultConfigImpl();
//                WxMaDefaultConfigImpl config = new WxMaRedisConfigImpl(new JedisPool());
                    // 使用上面的配置时,需要同时引入jedis-lock的依赖,否则会报类无法找到的异常
                    config.setAppid(a.getAppid());
                    config.setSecret(a.getSecret());
                    config.setToken(a.getToken());
                    config.setAesKey(a.getAesKey());
                    config.setMsgDataFormat(a.getMsgDataFormat());
                    return config;
                }).collect(Collectors.toMap(WxMaDefaultConfigImpl::getAppid, a -> a, (o, n) -> o)));
        return maService;
    }

    @Bean
    public WxMaMessageRouter wxMaMessageRouter(WxMaService wxMaService) {


        final WxMaMessageRouter router = new WxMaMessageRouter(wxMaService);
        router
            .rule().handler(logHandler).next()
            .rule().async(false).content("订阅消息").handler(subscribeMsgHandler).end()
            .rule().async(false).content("文本").handler(textHandler).end()
            .rule().async(false).content("图片").handler(picHandler).end()
            .rule().async(false).content("二维码").handler(qrcodeHandler).end();
        return router;
    }

    private final WxMaMessageHandler subscribeMsgHandler = (wxMessage, context, service, sessionManager) -> {


        service.getMsgService().sendSubscribeMsg(WxMaSubscribeMessage.builder()
            .templateId("此处更换为自己的模板id")
            .data(Lists.newArrayList(
                new WxMaSubscribeMessage.MsgData("keyword1", "339208499")))
            .toUser(wxMessage.getFromUser())
            .build());
        return null;
    };

    private final WxMaMessageHandler logHandler = (wxMessage, context, service, sessionManager) -> {


        log.info("收到消息:" + wxMessage.toString());
        service.getMsgService().sendKefuMsg(WxMaKefuMessage.newTextBuilder().content("收到信息为:" + wxMessage.toJson())
            .toUser(wxMessage.getFromUser()).build());
        return null;
    };

    private final WxMaMessageHandler textHandler = (wxMessage, context, service, sessionManager) -> {


        service.getMsgService().sendKefuMsg(WxMaKefuMessage.newTextBuilder().content("回复文本消息")
            .toUser(wxMessage.getFromUser()).build());
        return null;
    };

    private final WxMaMessageHandler picHandler = (wxMessage, context, service, sessionManager) -> {


        try {


            WxMediaUploadResult uploadResult = service.getMediaService()
                .uploadMedia("image", "png",
                    ClassLoader.getSystemResourceAsStream("tmp.png"));
            service.getMsgService().sendKefuMsg(
                WxMaKefuMessage
                    .newImageBuilder()
                    .mediaId(uploadResult.getMediaId())
                    .toUser(wxMessage.getFromUser())
                    .build());
        } catch (WxErrorException e) {


            e.printStackTrace();
        }

        return null;
    };

    private final WxMaMessageHandler qrcodeHandler = (wxMessage, context, service, sessionManager) -> {


        try {


            final File file = service.getQrcodeService().createQrcode("123", 430);
            WxMediaUploadResult uploadResult = service.getMediaService().uploadMedia("image", file);
            service.getMsgService().sendKefuMsg(
                WxMaKefuMessage
                    .newImageBuilder()
                    .mediaId(uploadResult.getMediaId())
                    .toUser(wxMessage.getFromUser())
                    .build());
        } catch (WxErrorException e) {


            e.printStackTrace();
        }

        return null;
    };

}
这个是官方demo里面的,就是读取application.yml配置的信息进行初始化
其实里面很多内容你自己可以提取出来单独封装。后面会一一实现
4.后端的业务逻辑代码
controller
import cn.binarywang.wx.miniapp.api.WxMaService;
import cn.binarywang.wx.miniapp.bean.WxMaJscode2SessionResult;
import cn.binarywang.wx.miniapp.bean.WxMaUserInfo;
import com.example.wxjava.common.result.R;
import com.example.wxjava.domain.dto.WxUserInfo;
import com.example.wxjava.service.UserInfoService;
import lombok.RequiredArgsConstructor;
import lombok.extern.slf4j.Slf4j;
import org.springframework.beans.factory.annotation.Autowired;
import org.springframework.web.bind.annotation.*;

/**
 * @author 成大事
 * @since 2022/7/27 22:44
 */
@Slf4j
@RestController
@RequestMapping("/wx/user")
@RequiredArgsConstructor(onConstructor_ = @Autowired)
public class WxUserInfoController {


    private final WxMaService wxMaService;

    private final UserInfoService userInfoService;

    /**
     * 登陆接口
     */
    @GetMapping("/login")
    public R<WxMaJscode2SessionResult> login(@RequestParam("code") String code) {


        return userInfoService.login(code);
    }

    /**
     * <pre>
     * 获取用户信息接口
     * </pre>
     */
    @PostMapping("/getUserInfo")
    public R<WxMaUserInfo> getUserInfo(@RequestBody WxUserInfo userInfo) {


        return userInfoService.getUserInfo(userInfo);
    }
}
R 是我自己封装的统一返回类。大家可以自行设置返回类型
service
import cn.binarywang.wx.miniapp.bean.WxMaJscode2SessionResult;
import cn.binarywang.wx.miniapp.bean.WxMaUserInfo;
import com.example.wxjava.common.result.R;
import com.example.wxjava.domain.dto.WxUserInfo;

/**
 * @author 成大事
 * @since 2022/7/27 22:47
 */
public interface UserInfoService {


    /**
     * 登录
     * @param code code
     * @return   WxMaJscode2SessionResult
     */
    R<WxMaJscode2SessionResult> login(String code);

    /**
     * 获取用户信息
     * @param userInfo  包含一些加密的信息
     * @return  WxMaUserInfo
     */
    R<WxMaUserInfo> getUserInfo(WxUserInfo userInfo);
}
impl
import cn.binarywang.wx.miniapp.api.WxMaService;
import cn.binarywang.wx.miniapp.bean.WxMaJscode2SessionResult;
import cn.binarywang.wx.miniapp.bean.WxMaUserInfo;
import cn.binarywang.wx.miniapp.util.WxMaConfigHolder;
import com.example.wxjava.common.result.R;
import com.example.wxjava.domain.dto.WxUserInfo;
import com.example.wxjava.service.UserInfoService;
import lombok.RequiredArgsConstructor;
import lombok.extern.slf4j.Slf4j;
import me.chanjar.weixin.common.error.WxErrorException;
import org.springframework.beans.factory.annotation.Autowired;
import org.springframework.stereotype.Service;

/**
 * @author 成大事
 * @since 2022/7/27 22:48
 */
@Slf4j
@Service
@RequiredArgsConstructor(onConstructor_ = @Autowired)
public class UserInfoServiceImpl implements UserInfoService {


    private final WxMaService wxMaService;

    /**
     * 登录
     * @param code code
     * @return   WxMaJscode2SessionResult
     */
    @Override
    public R<WxMaJscode2SessionResult> login(String code) {


        try {


            WxMaJscode2SessionResult session = wxMaService.getUserService().getSessionInfo(code);
            log.info(session.getSessionKey());
            log.info(session.getOpenid());
            //TODO 可以增加自己的逻辑,关联业务相关数据
            return R.ok(session);
        } catch (WxErrorException e) {


            log.error(e.getMessage(), e);
            return R.error(e.toString());
        } finally {


            WxMaConfigHolder.remove();//清理ThreadLocal
        }
    }

    @Override
    public R<WxMaUserInfo> getUserInfo(WxUserInfo userInfo) {


        // 用户信息校验
        if (!wxMaService.getUserService().checkUserInfo(userInfo.getSessionKey(), userInfo.getRawData(), userInfo.getSignature())) {


            WxMaConfigHolder.remove();//清理ThreadLocal
            return R.error("user check failed");
        }

        // 解密用户信息
        WxMaUserInfo wxMaUserInfo = wxMaService.getUserService().getUserInfo(userInfo.getSessionKey(), userInfo.getEncryptedData(), userInfo.getIv());
        WxMaConfigHolder.remove();//清理ThreadLocal
        return R.ok(wxMaUserInfo);
    }
}
dto
这个其实是我测试的时候,一个对象,测试wxjava解密用户的信息。因为后端接收json对象需要对象或者map接收。
@Data
@Accessors(chain = true)
public class WxUserInfo implements Serializable {


    private String appid;
    private String sessionKey;
    /**
     * 签名信息
     */
    private String signature;
    /**
     * 非敏感的用户信息
     */
    private String rawData;
    /**
     * 加密的数据
     */
    private String encryptedData;
    /**
     * 加密密钥
     */
    private String iv;
}
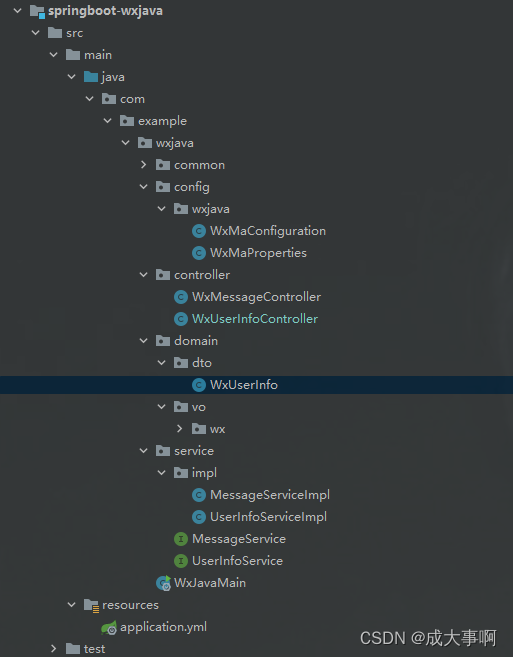
目录结构
5.前端的业务逻辑代码
因为我前端也不是很好。所以就一个简单的demo
前端使用的是uniapp。大家可以去官网学习查看uniapp
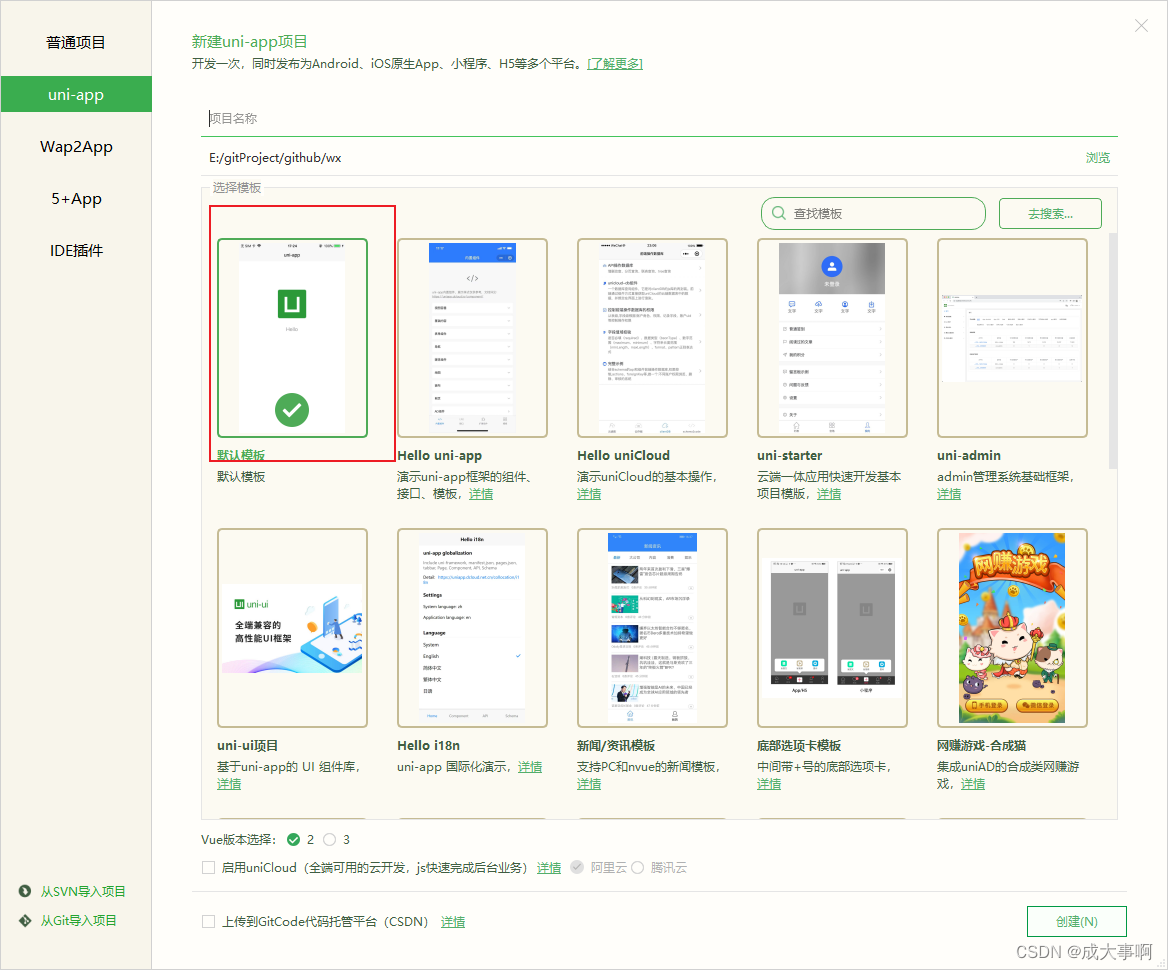
新建项目
使用HBuilder X 新建一个uniapp的项目
然后在index.vue编写逻辑代码
大家可以将我这个拷贝过去。完美匹配我上面的后端代码
<template>
	<view class="content">
		<button @click="login()">微信登录</button>
	</view>
</template>

<script>
	export default {


		data() {


			return {


				title: 'Hello',
				sessionKey: ''
			}
		},
		onLoad() {


		},
		methods: {


			async login(){


				let that = this //保存当前作用域

				await uni.login({

       //直接用这个调用微信接口
					onlyAuthorize:true,
					success:function(response){

       // 用微信登录的话就要去微信开发工具
						console.log(response) //这里打印就说明接口调用成功了,然后看message login :ok
						//微信登录就完了,后面就是获取用户信息
						uni.request({


							url: 'http://localhost:8888/wx/user/login',
							data: {


								code: response.code
							},
							success(res) {


								console.log("sessionkey",res)
								that.sessionKey = res.data.data.sessionKey
							}
						})

					}
				})
				await uni.getUserProfile({


					desc:'测试用例',
					success:function(res){


						console.log("res",res)
						uni.request({


							url: 'http://localhost:8888/wx/user/getUserInfo',
							method: 'POST',
							dataType: 'json',
							data: {


								rawData: res.rawData,
								signature: res.signature,
								encryptedData: res.encryptedData,
								iv: res.iv,
								sessionKey: that.sessionKey
							},
							success(resc) {


								console.log("登录成功",resc)
							}
						})
					}
				})

			}
		}
	}
</script>

<style>

</style>
微信开发者工具
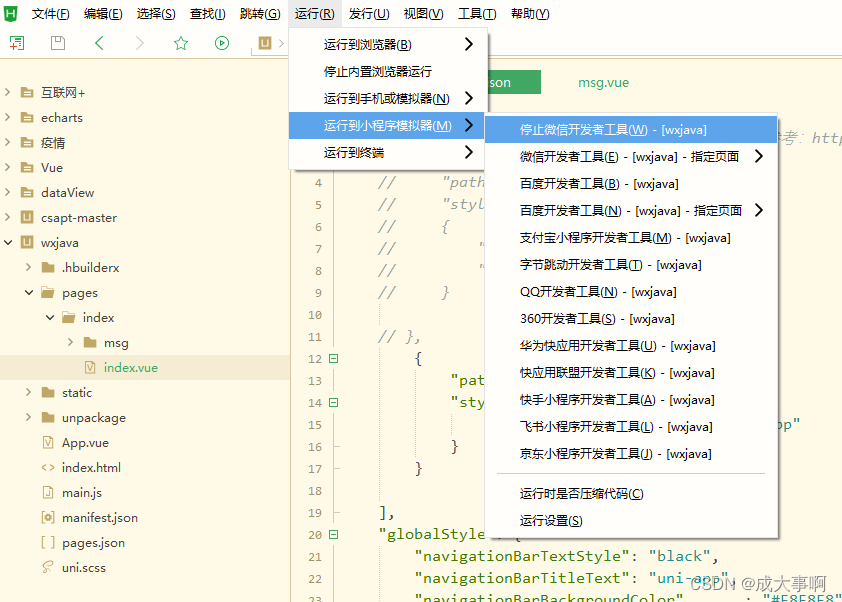
直接选择运行到微信开发者工具
然后在微信开发者工具
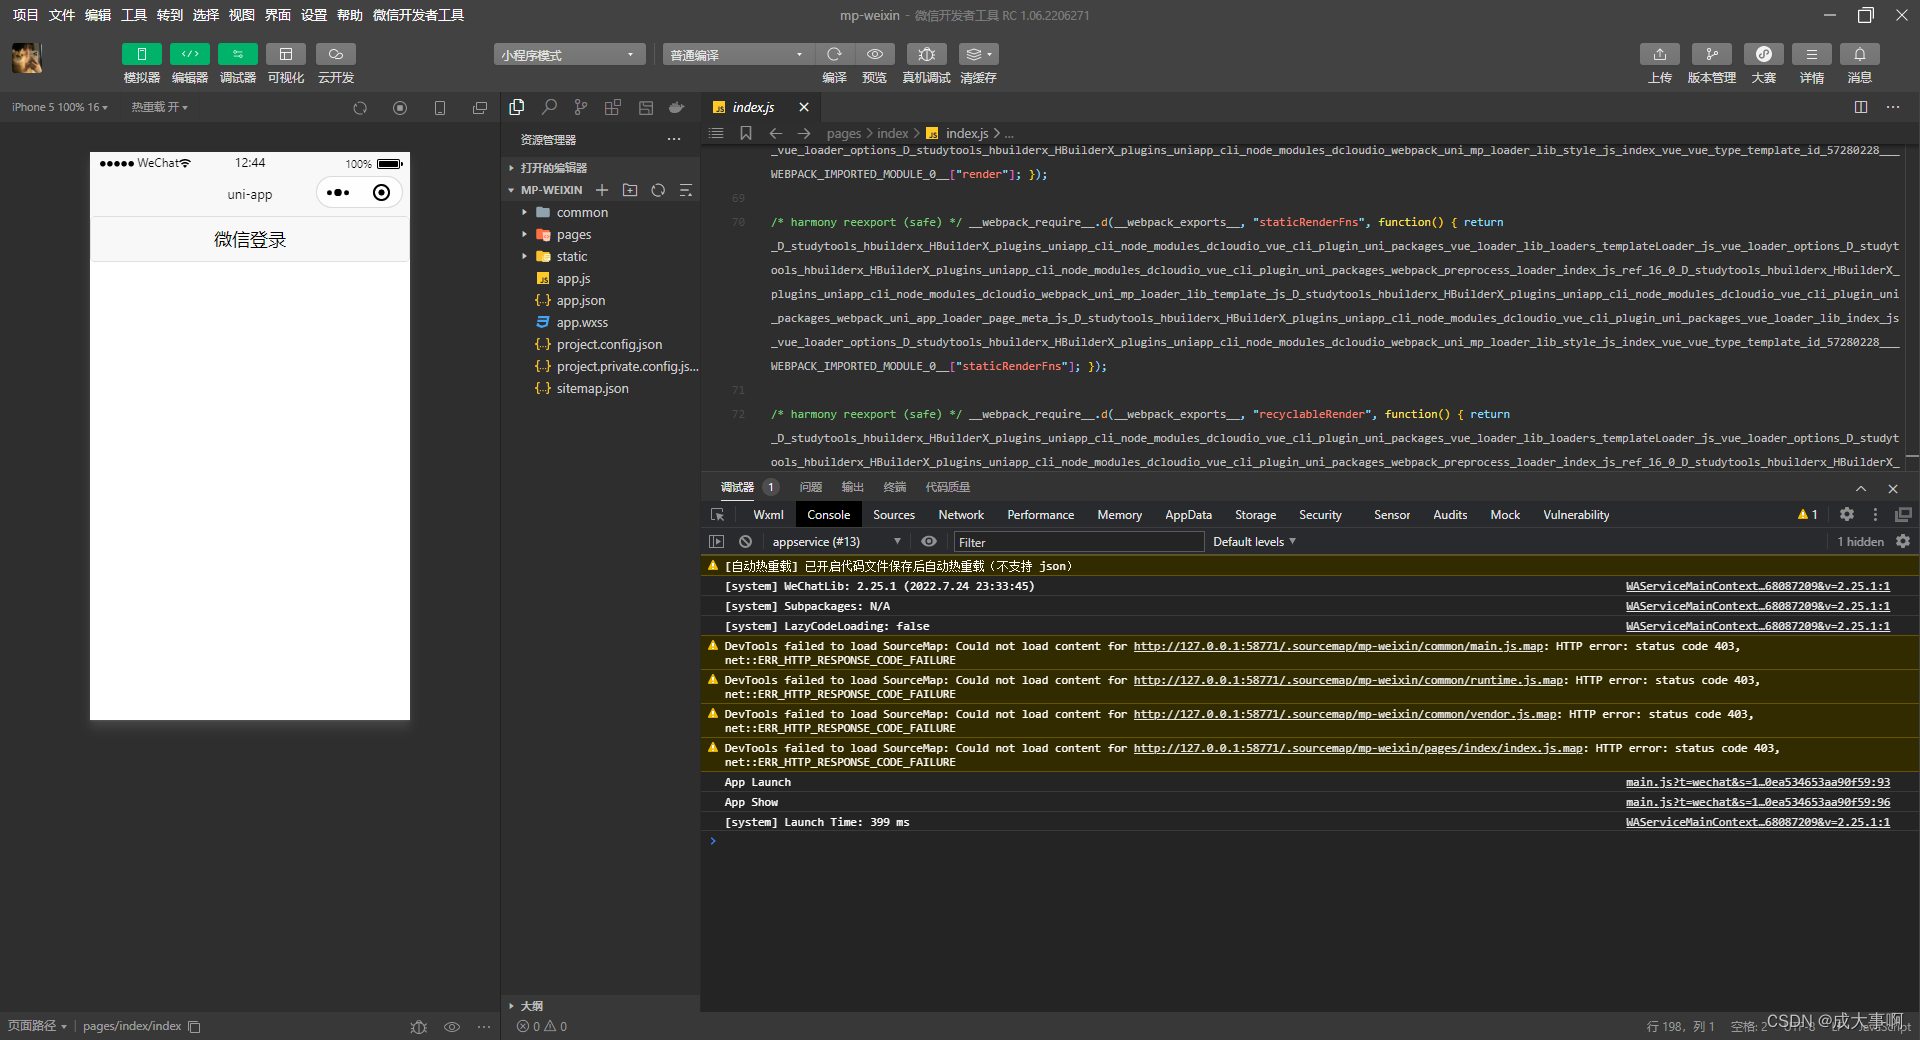
点击测试:
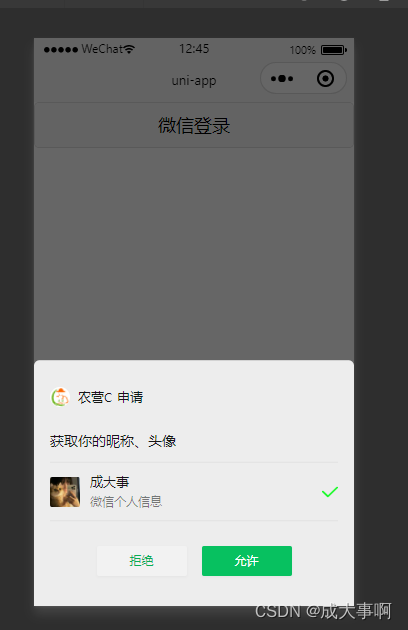
可以看到。调用起来了。
然后看控制台:
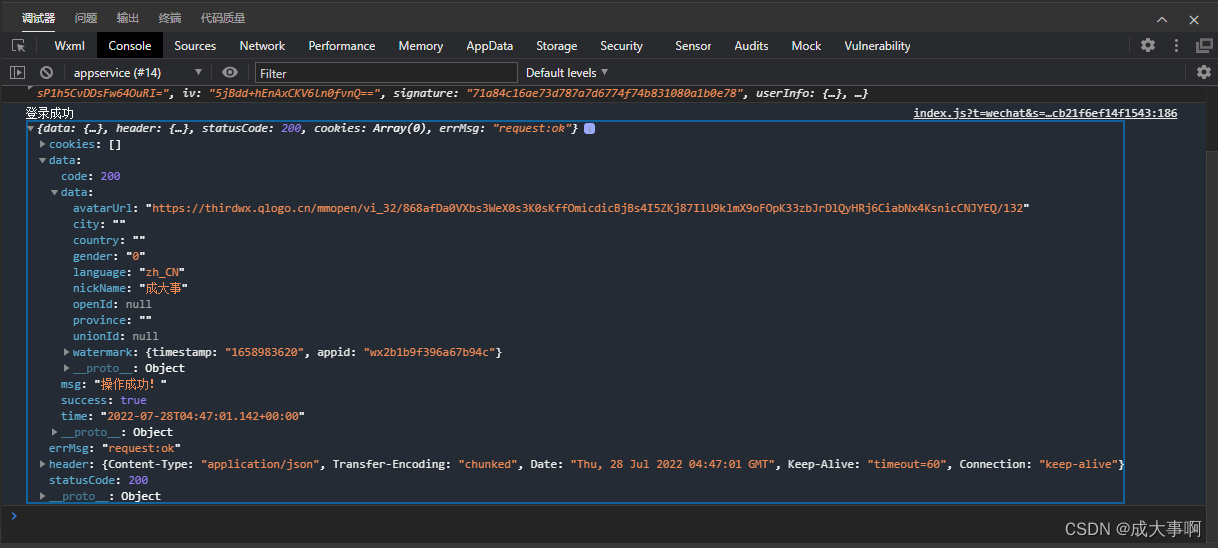
我们的第二个接口也完美调用。返回了用户的信息。虽然uniapp的接口可以直接获取用户的信息。
但是如果后端想要获取到这些信息。
- 一种是前端发过来。
- 一种是先登录。然后返回前端一个sessionkey。然后前端将rawData,signature,encryptedData,还有iv发过了。我们自己使用wxjava进行解析。
ok,到这儿就结束了。