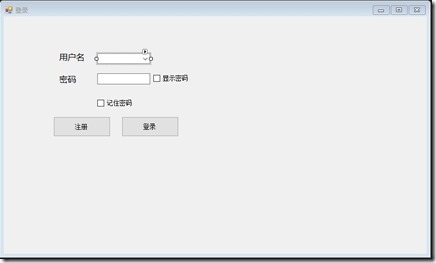
本来玩这个的初衷是做一下Textbox,Button之间的光标跳动,即实现按 Enter键 动态将光标定位到下一个TextBox的功能,然后觉还不错。
一.界面如下:
1.用户名:ComboBox有下拉项目的可编辑文本框是实现后面的记住密码即与账号要对应,具体就是它默认显示一个编辑字段和一个隐藏的下拉列表,先这样简单理解其类中的方法居多,详见:https://msdn.microsoft.com/zh-cn/library/system.windows.forms.combobox(VS.80).aspx
2.密码框:textbox
3.记住与显示密码:checkbox ,可为用户提供一项选择,如真或假是或否,还可以显示一个图像或文本,或两者都显示
详见:https://msdn.microsoft.com/zh-cn/library/system.windows.controls.checkbox.aspx //其他不多说
二.功能的实现:
1.实现按 Enter键 动态将光标定位到下一个TextBox
Form1_Load定义事件name为Key_Down
具体方法:
private void Key_Down(object sender, KeyEventArgs e)
{
if (e.KeyCode == Keys.Enter)
{
//this.SelectNextControl(this.ActiveControl,true, true, true, true);
SendKeys.Send("{Tab}"); //向活动应用程序发送击键 注意格式:Send("{Tab}");中的{}
}
}
窗体中load中:
private void Form1_Load(object sender, EventArgs e)
{
foreach (Control c in this.Controls)
{
if (c.GetType().ToString() == "System.Windows.Forms.TextBox")
{
TextBox tb1 = c as TextBox;
c.KeyDown += new KeyEventHandler(Key_Down);
}
}
}
或者在Combobox中定义事件:
private void Combobox_KeyDown(object sender, KeyEventArgs e)
{
if (e.KeyCode == Keys.Enter)
{
this.SelectNextControl(this.ActiveControl,true, true, true, true);
SendKeys.Send("{Tab}"); //向活动应用程序发送击键 注意格式:Send("{Tab}");中的{}
}
//if (txtContent .SelectStart != 0)
// {
// this.tempStr = this.tempStr.Remove(this.tempStr.Length - 1);
// this.txtMsg.Text = tempStr;
// }
}
2.字符数及字符的规范(即数字)
- 字符数属性里有;
- 字符规范:
调用ComboBox的KeyPress事件
private void QQ_KeyPress(object sender, KeyPressEventArgs e)
{
//如果输入的不是数字键,也不是回车键、Backspace键,则取消该输入
if (!(Char.IsNumber(e.KeyChar)) && e.KeyChar!=(char)13 && e.KeyChar!=(char)8)
{
e.Handled = true;
}
}
3.退格操作(这里可以不用)
首先要using System.Runtime.InteropServices;
接着声明对sendmessage的引用:
        [DllImport("User32.dll", EntryPoint = "SendMessage")]
        private static extern int SendMessage(IntPtr hWnd, uint Msg, IntPtr wParam, IntPtr lParam);
这个写在窗口的成员变量里面。
最后就是在按钮事件里面调用:SendMessage(textBox1.Handle, 258,(IntPtr)8, IntPtr.Zero);
其中textBox1.Handle是文本框的句柄,258是输入时间的消息码,8是退格键的键盘码,8可以换成其它的键盘码就可以输入其它的字符了:)
4.密码隐藏功能
- 将textbox2的属性中passwordchar设置为*或.
- checkbox设置事件CheckedChanged
代码如下:
private void checkBox1_CheckedChanged(object sender, EventArgs e)
{
if (checkBox1.Checked)
//textBox2.PasswordChar = '*';
txtPwd.PasswordChar = new char();
else
//textBox2.PasswordChar = (char)0;
//textBox2.PasswordChar = '\0';
txtPwd.PasswordChar = '*';
}
5.记住密码功能
引用:using System.Runtime.Serialization.Formatters.Binary;
方法实现的思路:
字典类作为数据源与ComboBox绑定
而字典类即作为存取数据如下操作
注:
WinForm控件复杂数据绑定常用数据源(如:Dictionary)(对Combobox,DataGridView等控件DataSource赋值的多种方法)
1) 简单数据绑定
简单的数据绑定是将用户控件的某一个属性绑定至某一个类型实例上的某一属性。采用如下形式进行绑定:引用控件.DataBindings.Add("控件属性", 实例对象, "属性名", true);
2) 复杂数据绑定
复杂的数据绑定是将一个以列表为基础的用户控件(例如:ComboBox、ListBox、ErrorProvider、DataGridView等控件)绑定至一个数据对象的列表。
基本上,Windows Forms的复杂数据绑定允许绑定至支持IList接口的数据列表。此外,如果想通过一个BindingSource组件进行绑定,还可以绑定至一个支持IEnumerable接口的数据列表。
对于复杂数据绑定,常用的数据源类型有(代码以Combobox作为示例控件):
1)IList接口(包括一维数组,ArrayList等)
示例:
private void InitialComboboxByList()
{
ArrayList list = new ArrayList();
for (int i = 0; i < 10;i++ )
{
list.Add(new DictionaryEntry(i.ToString(), i.ToString() + "_value"));
}
this.comboBox1.DisplayMember = "Key";
this.comboBox1.ValueMember = "Value";
this.comboBox1.DataSource = list;
}
2)IListSource接口(DataTable、DataSet等)
private void InitialComboboxByDataTable()
{
DataTable dt=new DataTable();
DataColumn dc1 = new DataColumn("Name");
DataColumn dc2 = new DataColumn("Value");
dt.Columns.Add(dc1);
dt.Columns.Add(dc2);
for (int i = 1; i <=10;i++ )
{
DataRow dr = dt.NewRow();
dr[0] = i;
dr[1] = i + "--" + "hello";
dt.Rows.Add(dr);
}
this.comboBox1.DisplayMember = "Name";
this.comboBox1.ValueMember = "Value";
this.comboBox1.DataSource = dt;
}
3) IBindingList接口(如BindingList类)
4) IBindingListView接口(如BindingSource类)
示例:
private void InitialComboboxByBindingSource ()
{
Dictionary<string, string> dic = new BindingSource <string, string>();
for (int i = 0; i < 10;i++ )
{
dic.Add(i.ToString(),i.ToString()+"_hello");
this.comboBox1.DisplayMember = "Key";
this.comboBox1.ValueMember = "Value";
this.comboBox1.DataSource = new BindingSource(dic, null);
}
}
注意一下上面的程序,BindingSource的DataSource属性值为一个Dictionary类型的实例,如果用dic直接给Combobox赋值的话,程序会报错,因为Dictionary<>并没有实现IList或IListSource接口,但是将Dictionary<>放到BindingSource中便可以实现间接绑定。关于BindingSource更详细的信息请在该网址查看:
http://msdn.microsoft.com/zh-cn/library/system.windows.forms.bindingsource(VS.80).aspx
再看下面一个BindingSource的示例:
private void InitialComboboxByObject()
{
this.comboBox1.DisplayMember = "Name";
this.comboBox1.ValueMember = "Value";
this.comboBox1.DataSource = new BindingSource(new DictionaryEntry("Test","Test_Value"), null);
}
上面代码中BindingSource的Datasource是一个结构类型DictionaryEntry,同样的DictionaryEntry并不能直接赋值给Combobox的DataSource,但通过BindingSource仍然可以间接实现。
这是因为:
BindingSource可以作为一个强类型的数据源。其数据源的类型通过以下机制之一固定:
· 使用 Add 方法可将某项添加到 BindingSource 组件中。
· 将 DataSource 属性设置为一个列表、单个对象或类型。(这三者并不一定要实现IList或IListSource)
这两种机制都创建一个强类型列表。BindingSource 支持由其 DataSource 和 DataMember 属性指示的简单数据绑定和复杂数据绑定。
Dictionary<string, User> users = new Dictionary<string, User>();
User user = new User();
/// <summary>
/// 如果用户选择了记住密码,就将信息写入文件,而在窗体加载的时候,我们读取文件中的内容即可。
/// </summary>
[Serializable]
public class User
{
//public User(string username, string password)
//{
// this.userName = username;
// this.passWord = password;
//}
public string Username
{
get;
set;
}
public string Password
{
get;
set;
}
这些操作可以放到Form1_load类中
- [c#]FileStream用法_使用FileStream读取或写入文件
http://blog.sina.com.cn/s/blog_3f2a8fa90101gbhg.html
{
FileStream fs = new FileStream("data.bin", FileMode.OpenOrCreate);
BinaryFormatter bf = new BinaryFormatter();
// 保存在实体类属性中
user.Username = txtUser.Text.Trim();
//保存密码选中状态
if (checkBox2.Checked)
user.Password = txtPwd.Text.Trim();
else
user.Password = "";
//选在集合中是否存在用户名
if (users.ContainsKey(user.Username))
{
//如果有清掉
users.Remove(user.Username);
}
//添加用户信息到集合
users.Add(user.Username, user);
//写入文件
bf.Serialize(fs, users);
//关闭
fs.Close();
}
///// <summary>
///// //打开用户和密码
///// </summary>
public void OpenPW()
{
FileStream fs = new FileStream("data.bin", FileMode.OpenOrCreate);
//fs.Seek(0, SeekOrigin.Begin);
if (fs.Length > 0)
{
BinaryFormatter bf = new BinaryFormatter();
fs.Position = 0;
//读出存在Data.bin 里的用户信息
users = bf.Deserialize(fs) as Dictionary<string, User>;
//循环添加到Combox1
foreach (User user in users.Values)
{
txtUser.Items.Add(user.Username);
}
//combox1 用户名默认选中第一个
//if (txtUser.Items.Count > 0)
// txtUser.SelectedIndex = txtUser.Items.Count - 1;
}
fs.Close();
}
选择记住密码则选择下拉项对应的密码
这里combobox的name为txtUser,并且设置事件SelectedIndexChanged
private void txtUser_SelectedIndexChanged(object sender, EventArgs e)
{
FileStream fs = new FileStream("data.bin", FileMode.OpenOrCreate);
if (fs.Length > 0)
{
BinaryFormatter bf = new BinaryFormatter();
users = bf.Deserialize(fs) as Dictionary<string, User>;
for (int i = 0; i < users.Count; i++)
{
if (txtUser.Text != "")
{
if (users.ContainsKey(txtUser.Text) && users[txtUser.Text].Password != "")
{
txtPwd.Text = users[txtUser.Text].Password;
checkBox2.Checked = true;
}
else
{
txtPwd.Text = "";
checkBox2.Checked = false;
}
}
}
}
fs.Close();
}
6.注册
这个很low
private void button2_Click(object sender, EventArgs e)
{
System.Diagnostics.Process.Start("https://ssl.zc.qq.com/v3/index-chs.html");
}
前辈的操作
http://www.cnblogs.com/qingci/archive/2012/10/18/2729246.html
7.登录
按前辈操作来说登录应该也可以实现。
具体不详,菜到安详。
