最近在使用声网Agora的RTSA,想着把自己的树莓派使用起来,做个远程图传之类的功能。
RTSA不支持音视频的采集编码,仅提供通道能力,所以树莓派上的音视频采集和编码工作需要自己完成。
调研了市面上的两种摄像头的采集和编码,一种是从csdn上看到有介绍进行调研的,也就是camkit开源工程(由于项目过于久远中间太多坑);另一种是目前树莓派官方推荐的,功能更强大,通过libcamera;两种方式在软件处理上也有一些区别:
第一种:Legacy stack
Legacy stack是raspberry OS Bullseye之前的版本支持的摄像头的方式,网上很多基于python的库都是基于Legacy stack,可以通过raspi-config配置打开
raspi-config
Select [ 3 Interface Options] --> [I1 Legacy Camera] --> [Yes]
Legacy stack支持的三方库,有比较全的camkit。
下载camkit
camkit的功能介绍这里就不做过多介绍了,csdn上有一堆科普的文章,本文尽量干货,介绍整个使用过程。
下载地址:
https://gitee.com/daiyinger/Camkit.git
该项目包含了视频的采集和编码,但是由于项目比较老,依赖的ffmpeg的库≤ffmpeg-4.4.1,ffmpeg-5.x 部分接口找不到。
ffmpeg-4.4.1编译
参考文章FFMPEG编译编译。
wget http://www.ffmpeg.org/releases/ffmpeg-4.4.1.tar.bz2
tar zxvf ffmpeg-4.4.1.tar.bz2
./configure --prefix=/your/install/path \
                  --enable-gpl\
                  --enable-nonfree\
                  --enable-libfdk-aac\
                  --enable-libx264\
                  --enable-libx265\
                  --enable-filter=delogo\
                  --enable-debug\
                  --disable-optimizations\
                  --enable-libspeex\
                  --enable-shared\
                  --enable-pthreads
make -j4
make install
export LD_LIBRARY_PATH=/your/install/path/lib:$LD_LIBRARY_PATH
export PKG_CONFIG_PATH=/your/install/path/lib/pkgconfig:$PKG_CONFIG_PATH
编译camkit
在安装了上述的ffmpeg-4.4.1之后,编译camkit通过
cmake -S . -B build
cmake --build build -j4
编译成功: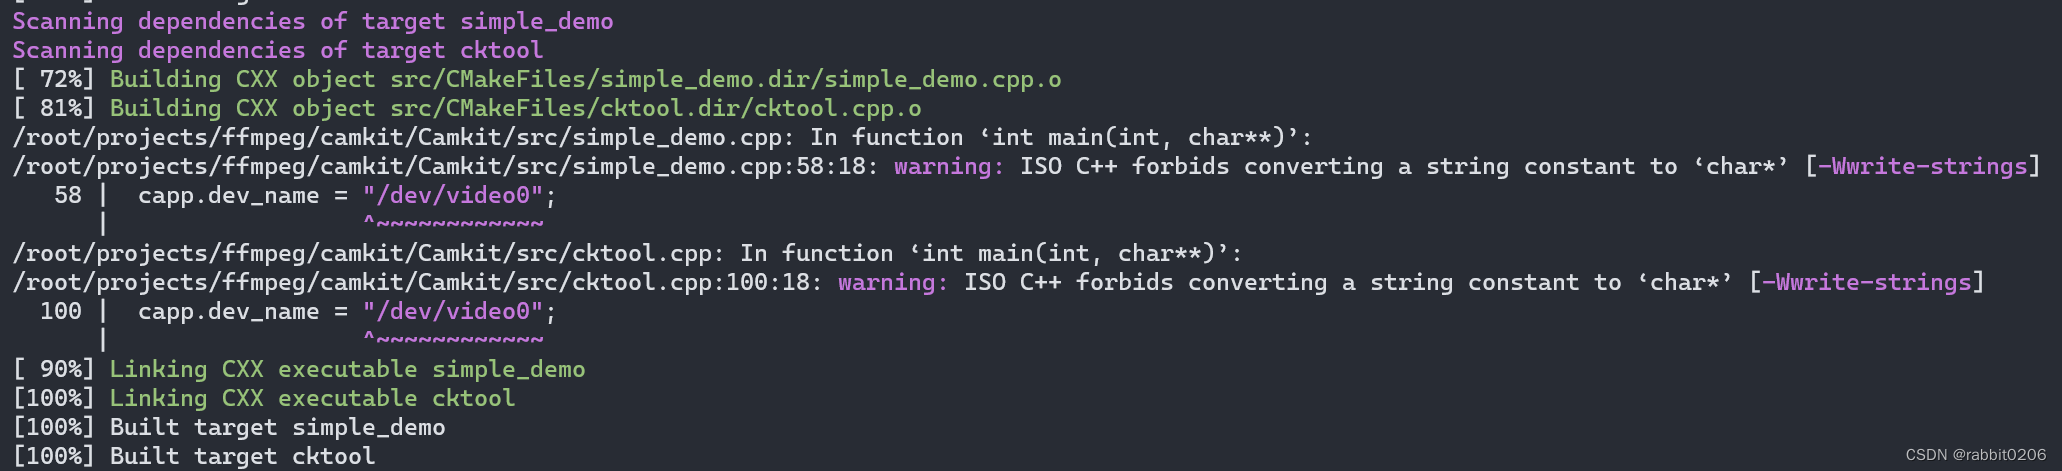
vcpkg
上述ffmpeg-4.4.1编译需要依赖很多第三方库,比如libx264,所以本文顺便介绍下通过vcpkg安装ffmpeg-4.4.1,vcpkg官方默认支持的x86-linux下的最新版本就是ffmpeg-4.4.1,直接安装就行。
vcpkg search ffmpeg
vcpkg install ffmpeg[x264]
vcpkg安装ffmpeg-4.4.1
github:https://github.com/microsoft/vcpkg/blob/master/README_zh_CN.md
官网地址:https://vcpkg.io/en/getting-started.html
在线文档:https://vcpkg.readthedocs.io/en/latest/README/
package搜索:https://vcpkg.io/en/packages.html
git clone https://github.com/microsoft/vcpkg
./bootstrap-vcpkg.sh -disableMetrics
./vcpkg install ffmpeg[x264]
如何通过vcpkg安装老版本ffmpeg-3.3.1
有些场景下需要更好版本的软件,vcpkg支持版本
git log --color=always --pretty='%Cred%h%Creset -%C(auto)%d%Creset %s %Cgreen(%ad)' --date=short | grep --color=never ffmpeg
git checkout 779307a10
vcpkg install ffmpeg

非常不幸,ffmpeg-3.3.3版本vcpkg并不支持
root@locakhost# vcpkg install ffmpeg
Error: invalid triplet: x64-linux
Available architecture triplets
VCPKG built-in triplets:
  x64-windows-static
  x86-windows-static
  x86-uwp
  x64-uwp
  x64-windows
  arm-uwp
  x86-windows

VCPKG community triplets:
看来还得自己编译,留个记录,记录vcpkg的工具的使用。
cmake编译
如果可以的话:
cmake -B [build directory] -S . -DCMAKE_TOOLCHAIN_FILE=[path to vcpkg]/scripts/buildsystems/vcpkg.cmake
将 vcpkg 作为一个子模块
当您希望将 vcpkg 作为一个子模块加入到您的工程中时, 您可以在第一个 project() 调用之前将以下内容添加到 CMakeLists.txt 中, 而无需将 CMAKE_TOOLCHAIN_FILE 传递给 CMake 调用。
set(CMAKE_TOOLCHAIN_FILE "${CMAKE_CURRENT_SOURCE_DIR}/vcpkg/scripts/buildsystems/vcpkg.cmake"
  CACHE STRING "Vcpkg toolchain file")
使用此种方式可无需设置 CMAKE_TOOLCHAIN_FILE 即可使用 vcpkg,且更容易完成配置工作。
camkit学习
学习从cktool.c开始。
capture
camkit通过cmake的PLAT参数设置目标平台,本文使用参数PLAT=PC,同时基于linux进行测试,linux采集使用v4l2框架,v4l2de 初始化流程可以参考:linux调用v4l2获取视频,嵌入式Linux:V4L2视频采集操作流程和接口说明。
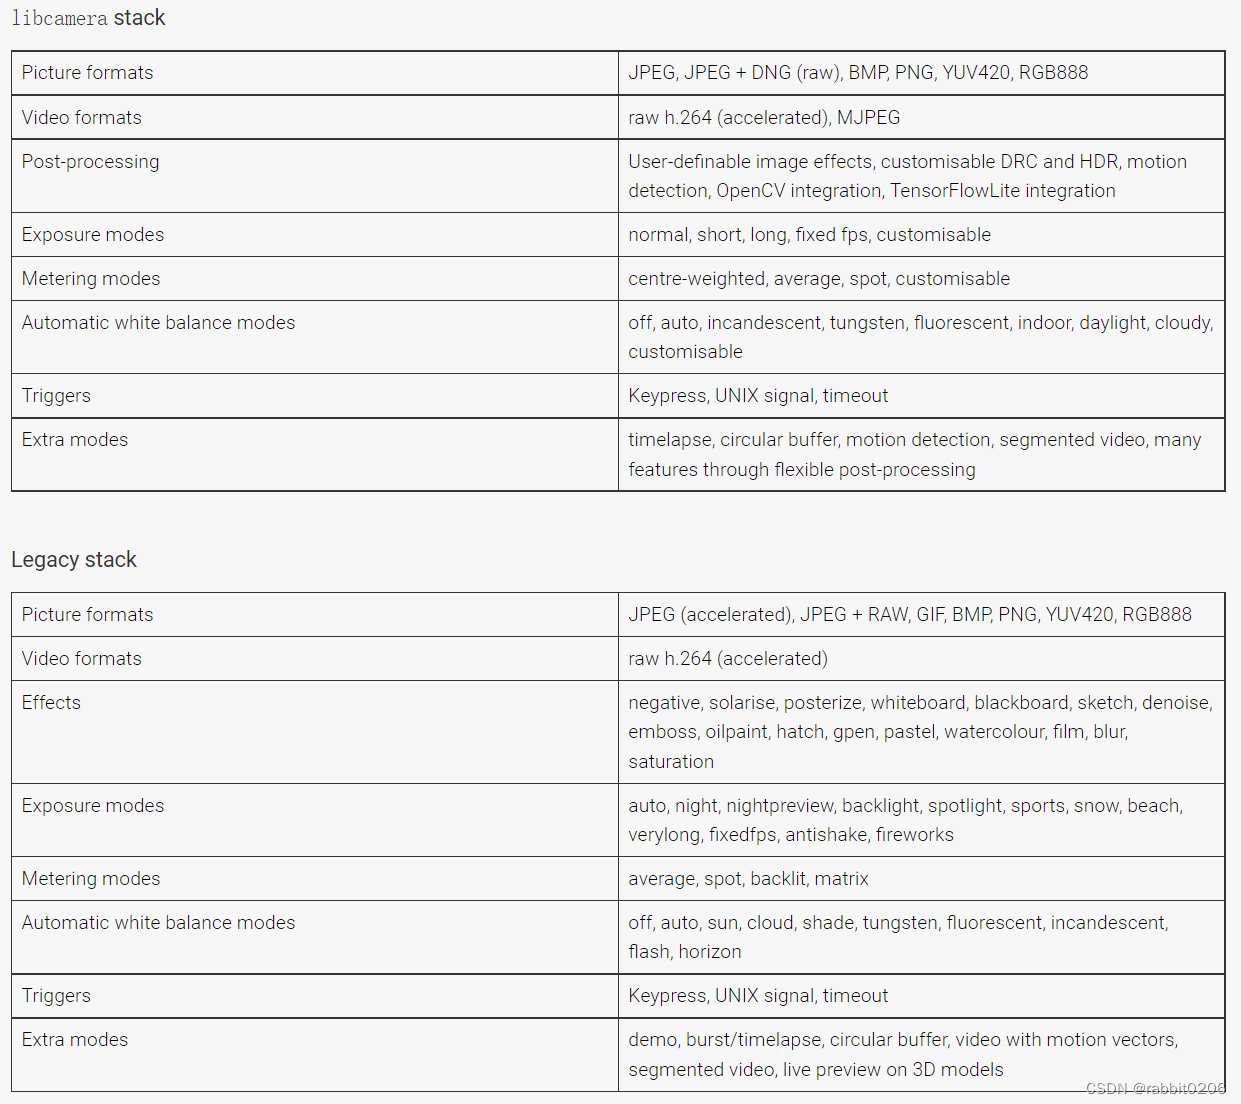
第二种:libcamera
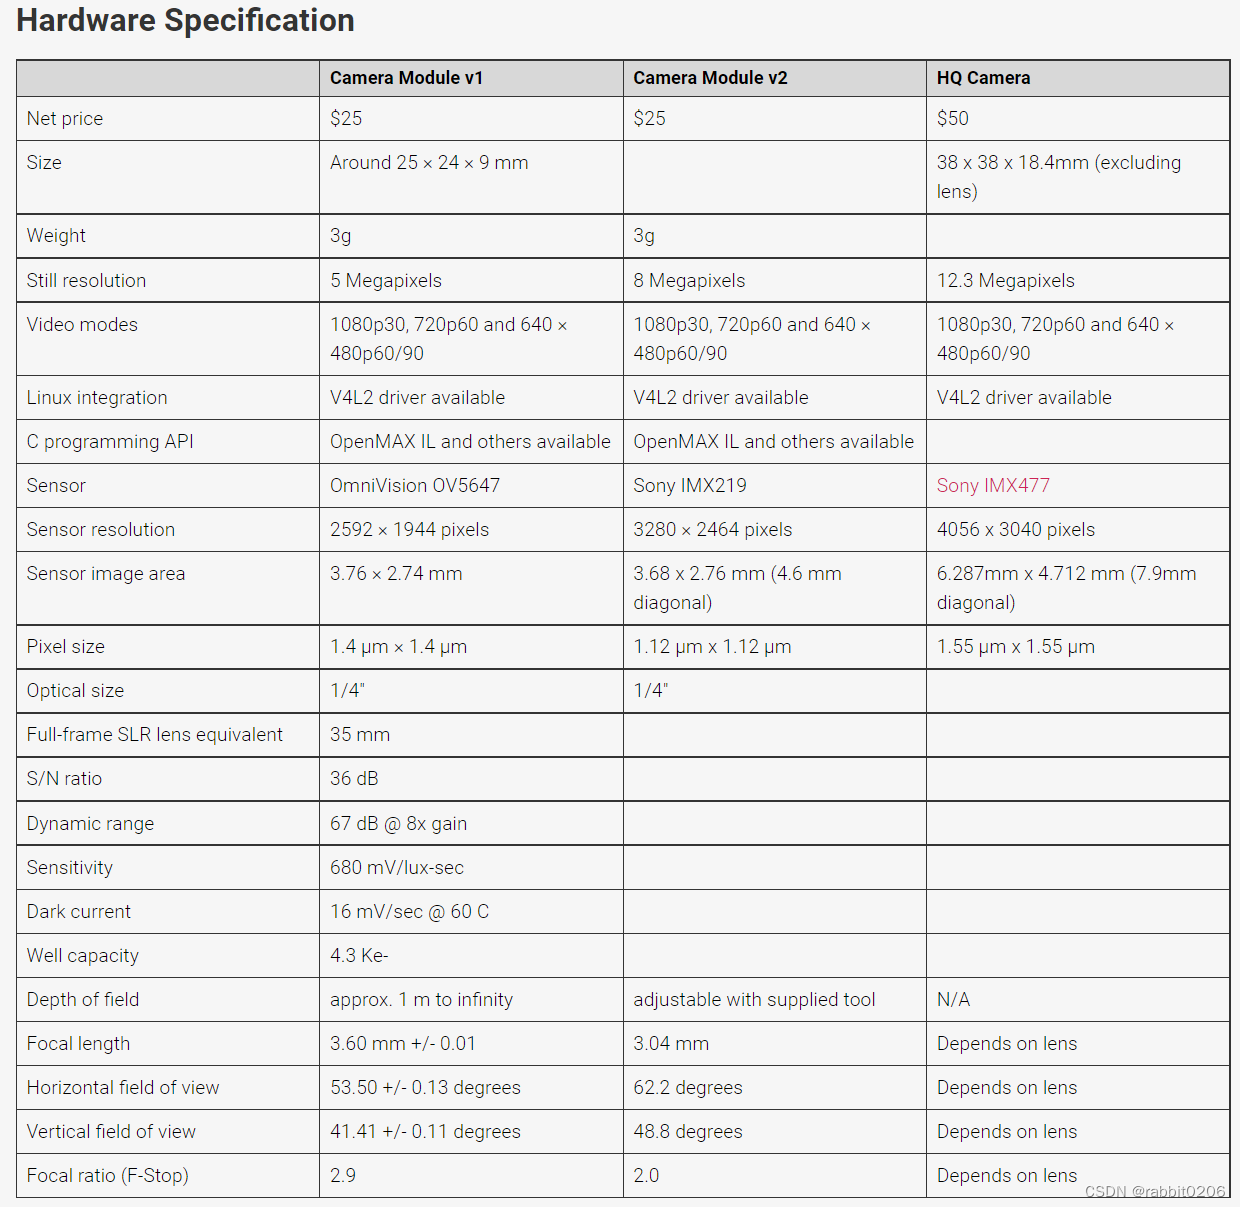
树莓派默认支持3个版本的摄像头,即1)OV5647 or V1 camera;2)IMX219 or V2 camera;3)IMX477 or HQ camera。当然除了这三种sensor,还支持 IMX290, IMX327, OV9281, IMX378。
libcamera 提供了一些列的C++ API用于应用程序可以配置摄像头,以及获取摄像头的帧数据。获取的图像数据可以直接用于图像编码或者视频编码。但是不包括编码和渲染相关的工作。
所有树莓派官方提供了一组基于libcamera的应用层的工具包libcamera-apps,并且模拟了legacy stack的基于Broadcom的GPU的一组接口(raspstill和raspivid):
libcamera-hello: 一个简单的 “hello world” 应用,提供一个camera的流获取以及在屏幕上进行渲染。
libcamera-jpeg:一个小的应用程序用来抓取高清图像。
libcamera-still:一个更加复杂的图像抓取应用,并且拥有和raspistill类似的功能。
libcamera-vid: 视频抓取程序。
libcamera-raw: 用来直接抓取raw 帧(Bayer格式)的应用。
libcamera-detect:该应用默认没有,但是当在树莓派上安装了TensorFlow Lite后就可以用这个库来触发当检测到某个物体时抓取JPEG格式的图像。
libcamera-apps除了具有命令行,用户也可以作为参考示例来创建用户自己的应用程序,可以参考github库,https://github.com/raspberrypi/libcamera-apps。
libcamera
git clone https://git.libcamera.org/libcamera/libcamera.git
cd libcamera
pip3 install --user meson==0.63.3 # libcamera need version>0.56
meson build --prefix /your/path/to/install
ninja -C build install
更详细的编译参考building-libcamera
libcamera-hello
libcamera-hello -qt-preview -t 0 # 正常不需要加入-qt-preview,由于我使用的vnc,加入-qt-preview参数显示摄像头stream窗口
libcamera-jpeg
libcamera-jpeg -o test.jpg
libcamera-still
libcamera-still -o test.jpg
#Encoders
libcamera-still -e png -o test.png
libcamera-still -e bmp -o test.bmp
libcamera-still -e rgb -o test.data
libcamera-still -e yuv420 -o test.data
#Raw Image Capture
libcamera-still -r -o test.jpg
#Very long exposures
libcamera-still -o long_exposure.jpg --shutter 100000000 --gain 1 --awbgains 1,1 --immediate
libcamera-vid
# basic
libcamera-vid -t 10000 -o test.h264
vlc test.h264
# Encoders
libcamera-vid -t 10000 --codec mjpeg -o test.mjpeg
libcamera-vid -t 10000 --codec yuv420 -o test.yuv
# Network Streaming
 # UDP
libcamera-vid -t 0 --inline -o udp://<ip-addr>:<port>
 # paly
vlc udp://@:<port> :demux=h264
ffplay udp://<ip-addr-of-server>:<port> -fflags nobuffer -flags low_delay -framedrop
 # TCP
libcamera-vid -t 0 --inline --listen -o tcp://0.0.0.0:<port>
 # play
vlc tcp/h264://<ip-addr-of-server>:<port>
ffplay tcp://<ip-addr-of-server>:<port> -vf "setpts=N/30" -fflags nobuffer -flags low_delay -framedrop
 # RTSP
libcamera-vid -t 0 --inline -o - | cvlc stream:///dev/stdin --sout
'#rtp{sdp=rtsp://:8554/stream1}' :demux=h264
 # play
vlc rtsp://<ip-addr-of-server>:8554/stream1
ffplay rtsp://<ip-addr-of-server>:8554/stream1 -vf "setpts=N/30" -fflags nobuffer -flags low_delay -framedrop
 # libcamera-vid 可以配合ffmpeg libav,但是测试没有通过
 #  参考 https://www.raspberrypi.com/documentation/accessories/camera.html#libav-integration-with-libcamera-vid
libcamera-raw
用得不多,获取bayer帧。
libcamera-detect
依赖TensorFlowLite,感兴趣可以参考libcamera-detect,本文不做讲解。