路由守卫、路由模式
前置路由守卫 – 设置权限
切换前执行,next()执行切换
import VueRouter from 'vue-router';
const router = new VueRouter({
routes: [
{
path: '/about',
component: MyAbout
},...
]
});
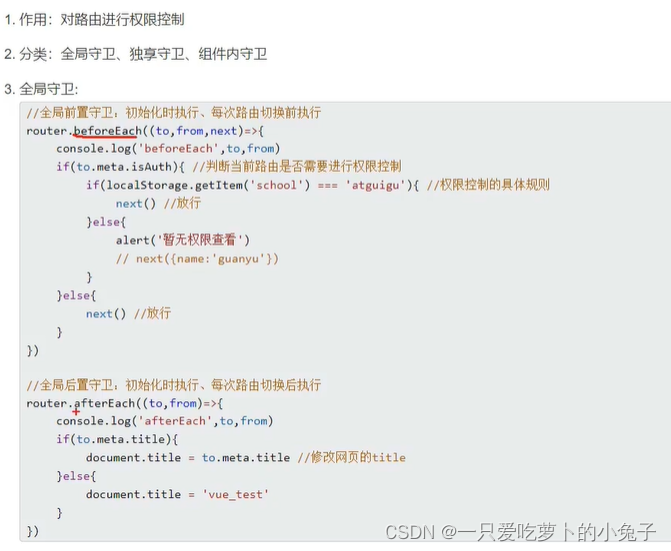
// 全局 前置 路由守卫
// 初始化 和 每次切换路由都会调用 的函数
// 三个参数 (去哪 从那来 放行)
router.beforeEach((to, from, next) => {
// 条件if()
// to.name
if (to.path === "目的路由1" || to.path === "目的路由2") {
// 目的地
if (条件) {
// 满足什么条件
next(); // 放行
} else {
alert(未满足什么条件, 跳转失败)
}
} else {
next(); // 放行
}
})
//暴露
export default router;
meta为路由添加检验权限
meta对象 路由元信息
在每个需要控制权限的路由中meta属性添加
//需要校验的路由
const router = new VueRouter({


  routes: [
	{


	///...
	meta:{

    isAuth:true,title:"网页标题"} //需要校验的路由为true--------------------------------------------------
	},
]
});

router.beforeEach((to, from, next) => {


  if (to.meta.isAuth) {

     // 要判断权限
    document.title = to.meta.title || 'router-learn'
    next();
    alert("网页标题已改")
  } else {


    next();
  }
})
export default  router;
后置路由守卫
eg: 改网页标题
afterEach
页面切换后(包括初始页面)执行, 没有next()
//需要校验的路由
const router = new VueRouter({


  routes: [
	{


	///...
	meta:{

    isAuth:true}//需要校验的路由为true--------------------------------------------------
	},
]
});

// 全局 后置 路由守卫
// 路由切换完成后会调用 的函数
// 三个参数 (去哪 从那来 放行)
router.afterEach((to,from)=>{


	if(to.meta.isAuth)//为true才判断权限
}
)
export default  router;
在后置路由守卫afterEach()内修改网页title
document.title=to.meta.title|| ‘默认名’
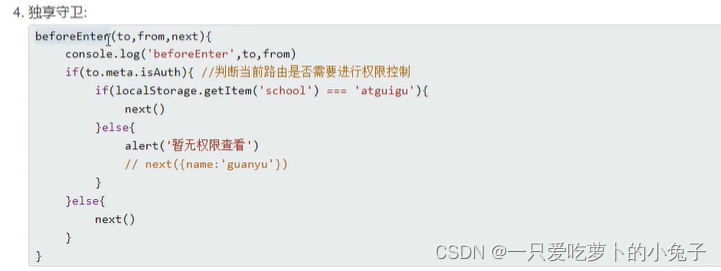
独享路由守卫 – beforeEnter
对某一个路由单独限制
注意
- 只有前置,与全局后置配合
- 写在每个路由内
const router = new VueRouter({


  routes: [
    {


      path: '/about',
      component: MyAbout,
      beforeEnter: (to, from, next) => {


        // 与beforeEach相同用法
      }
    },
  ]
});
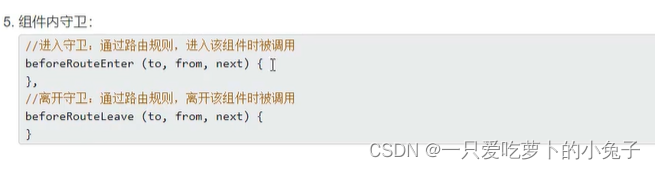
组件内 路由守卫
next()放行(进入/离开)
export default {


  // 路由进入时
  // 通过路由进入本组件后,调用
  beforeRouteEnter(to, from, next) {


    // ...
    next()//放行
  },
  // 路由离开时
  // 通过路由离开本组件前,调用
  beforeRouteLeave(to, from, next) {


    // ...
    next()//放行
  },
};
总结
--------------------------------------------------
路由模式
history与hash模式是路由器的两种工作模式: hash(默认), history(地址美观,但会将地址栏的所有东西发送给后端)
标志是路径中有无#
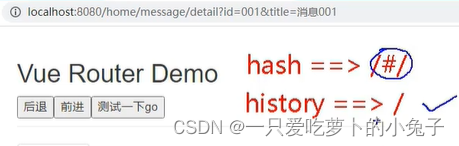
hash模式
vue配置路由后,网页路径中出现的/#是hash
从#开始到结束都是路径里面的hash值, 这个hash值不会随http请求发送给服务器
这是前端人员自己在玩, 不会影响到后端
history模式路由
const router = new VueRouter({


  //
  mode: 'history',
  routes: [
    {

    }
  ]
});
hash兼容性好√√√√√√√√√
但express使用 connect-history-api-fallback插件 可以解决history 404 问题
总结:
