注:
1、真机测试 用appid新建项目 微信扫描查看程序、购买证书 、https
2、配置单页导航栏样式
创建post.json
{
"navigationBarBackgroundColor":
"#0256bd"
}
3、css 图片文字上下居中
<
view
class=
'post-author-date'>
<
image
src=
'/images/headimg.png'></
image
>
<
text
>名字
</
text
>
</
view
>
.post-author-date
image{
width:
60
rpx;
height:
60
rpx;
vertical-align: middle;
}
.post-author-date
text{
font-size:
24
rpx;
}
一、知识点
1、Swiper组件应用
<swiper vertical="{{false}}"></swiper> 等于vertical=false
2、App.json里关于导航栏、标题配置
3、Page页面与应用程序的生命周期
4、数据绑定(核心知识)
5、数据绑定的运算与逻辑
6、AppData区域介绍
7、事件与事件对象
8、缓存(容量限制最大为10M)
9、列表渲染(核心知识 循环)
10、Template模板的使用(核心知识)区别基础程序员与高级程序员
二、
1、新建目录 posts/post.js、post.wxss、post.wxml
2、app.json(新创建的页面都必须在app.json中的page注册)
小程序规定pages数组的第一个元素代表小程序启动的第一个页面
{
"pages": [
"pages/welcom/welcom",
"pages/posts/post"
],
"window": {
"backgroundTextStyle":
"light",
"navigationBarBackgroundColor":
"#aecfda",
"navigationBarTitleText":
"WeChat",
"navigationBarTextStyle":
"black"
}
}
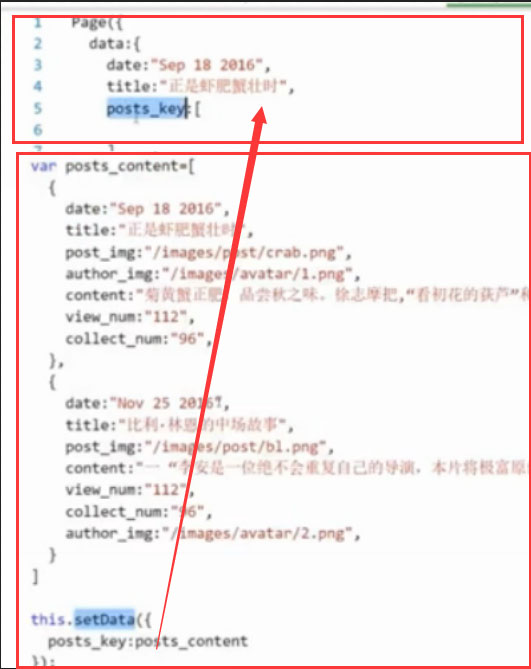
三、脚本文件结构获取后台数据
1、是一个单向的数据绑定(如果数据是从js的page文件向xml{{}}文件传递的)
var foo = "'hello world' from tools.wxs";<view> {{tools.msg}} </view>2、数据绑定
a.post.js
onLoad:
function (options) {
var post_contet1={
date:
"Sep 18 2016",
title:
"模拟数据",
post_img:
"/images/headimg.png",
content:
"加载模拟数据",
view_num:
"96",
author_img:
"/images/headimg.png"
}
this.setData(post_contet1); //赋值data值
},
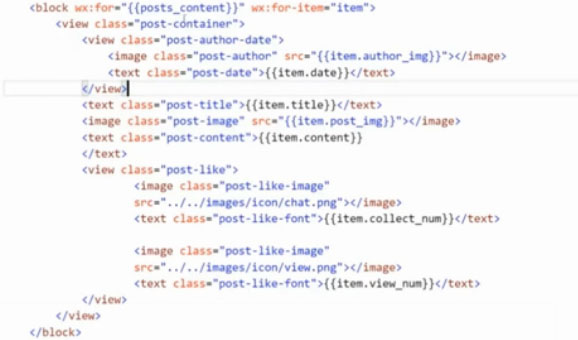
b.post.wxml
<
view
class=
'post-container'>
<
view
class=
'post-author-date'>
<
image
src
=
'{{author_img}}'
></
image
>
<
text
>名字
</
text
>
</
view
>
<
text
class
=
'post-title'>
{{title}}
</
text
>
<
image
class=
'post-image'
src=
'/images/timg2.jpg'></
image
>
<
text
class=
'post-content'>{{content}}
</
text
>
<
view
class=
'post-like'>
<
image
class=
'view'
src=
'/images/view.png'></
image
>
<
text
class
=
'view-txt'>
{{view_num}}
</
text
>
<
image
class=
'collect'
src=
'/images/star.jpg'></
image
>
<
text
class=
'collect-txt'>65
</
text
>
</
view
>
</
view
>
2、post.js: Page回车键自动补全
Page({
/**
* 页面的初始数据
*/
data: {
},
/**
* 生命周期函数--监听页面加载 页面出书话
*/
onLoad:
function (options) {
},
/**
* 生命周期函数--监听页面初次渲染完成
*/
onReady:
function () {
},
/**
* 生命周期函数--监听页面显示
*/
onShow:
function () {
},
/**
* 生命周期函数--监听页面隐藏
*/
onHide:
function () {
},
/**
* 生命周期函数--监听页面卸载
*/
onUnload:
function () {
},
/**
* 页面相关事件处理函数--监听用户下拉动作
*/
onPullDownRefresh:
function () {
},
/**
* 页面上拉触底事件的处理函数
*/
onReachBottom:
function () {
},
/**
* 用户点击右上角分享
*/
onShareAppMessage:
function () {
}
})