前言
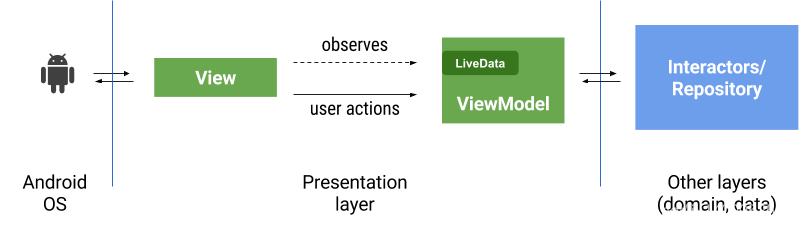
我想做Android开发的大佬都用过MVP,在谷歌没有提出MVVM这种架构模式的时候,大多数开发者都是从传统的MVC过度到MVP的,的确MVP相对MVC来说的确有了很大的改进,具体改进了什么,下面我会一一比对说明,但是随着项目业务逻辑的复杂化,你会发现MVP其实也是非常难以维护,开发成本也是越来越高的,P层庞大的code会随着业务的一点点的增多而变得非常臃肿,庞大。后来,Google 为 Android 又开了一扇窗在Android中引入了MVVM这种设计。MVVM是谷歌提出的一种 Android 架构模式,结合了 Data Binding 和一些生命周期组件 LiveData 和 ViewModel 等。Android 官方把这种设计的架构模式封装成了一系列类的集合,其核心思想为MVVM,基于此扩展成为Android系统量身定做的架构模式,名为: Architecture Components(架构组件),大大的提高了开发的效率,方便了开发者对于代码的维护,同时这种组件化,开发过程中实现了更高级的业务分离方式。详情可以查看谷歌官方样例库。
好了,既然MVVM有这么多的好处,今天我们就来好好了解一下MVVM。
好好聊聊 MVVM
Android MVVM 设计模式的实现主要归功于 Google 带入的 Databinding。
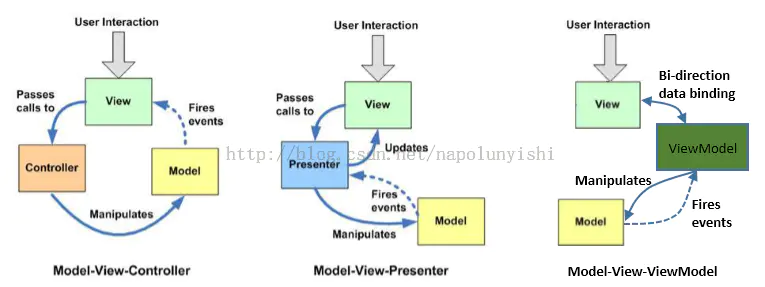
通过上图,你可以发现,MVC -> MVP -> MVVM 这几个软件设计模式是一步步演化发展的,MVVM 是从 MVP 的进一步发展与规范,MVP 隔离了 M 与 V 的直接联系后,靠 Presenter 来中转,所以使用 MVP 时 P 是直接调用 View 的接口来实现对视图的操作的,这个 View 接口使的M 与 V是隔离了,方便测试了,但代码还不够优雅简洁啊,所以 MVVM 就弥补了这些缺陷。在 MVVM 中就出现的 Data Binding 这个概念,意思就是 View 接口的实现方法可以不写了,通过 Binding 来实现。在 Android 中,我个人也是把 Activity、Fragment 当做 View 层的东西的,除了弹 Dialog(而且这也是 View),其它情况基本可以自己重写 Application 来拿 ApplicationContext,那么题主所说的逻辑操作可以不在 Activity、Fragment 出现吧。VM 也是 M 与 V 的桥梁啊,怎么会有很多操作呢~一般场景下一个 View 就会有一个相应的 VM。最后分享一个网站,https://speakerdeck.com (Speakerdeck of GitHub Inc - 在线简报、PDF分享展示平台!)以及下面的两个与题目相关的PPT。Clean Android Architecture(这里有 Coursera App Architecture 的设计分析哦,很赞Demo App 的 Github)。
说了,这么多,也对比了这么多,可能听起来没什么感觉。接下来,我们就一步步深入探究谷歌给我提出的MVVM系列结构,我想最终你会有鸟枪换大炮的感觉。
步步深入
接下来,我将要步步深入讲解MVVM,主要围绕以下五点步步深入。
-
Jetpack
-
Architecture(架构组件)
-
MVVM总结分析与运用
-
扩展组件化
-
封装为通用组件模块
认识jetpack
1. Jetpack简介
2018年谷歌I/O 发布了一系列辅助android开发者的实用工具,合称Jetpack,以帮助开发者构建出色的 Android 应用。
Jetpack 是一套库、工具和指南,可帮助开发者更轻松地编写优质应用。这些组件可帮助您遵循最佳做法、让您摆脱编写样板代码的工作并简化复杂任务,以便您将精力集中放在所需的代码上。
2. Jetpack主要特性
- 加速开发:组件可单独使用,也可以协同工作,当使用kotlin语言特性时,可以提高效率。
- 消除样板代码:Android Jetpack可管理繁琐的Activity(如后台任务、导航和生命周期管理)。
- 构建高质量的强大应用:Android Jetpack组件围绕现代化设计实践构建而成,具有向后兼容性,可以减少崩溃和内存泄漏。
3. Jetpack分类
其实Jetpack中的很多组件并非新开发的,Goole I/O 2017大会时推出了 Android Architecture Component(AAC),它包括了LifeCycle、LiveData、ViewModel、Room。在Goole I/O 2018大会上,用AndroidX替代了Android Support Library,并在Android Architecture Component的基础上发布了Android Jetpack,AndroidX也是属于Android Jetpack。
Android Jetpack分类有4种,分别是Architecture、Foundationy、Behavior、UI,下面分别介绍下:
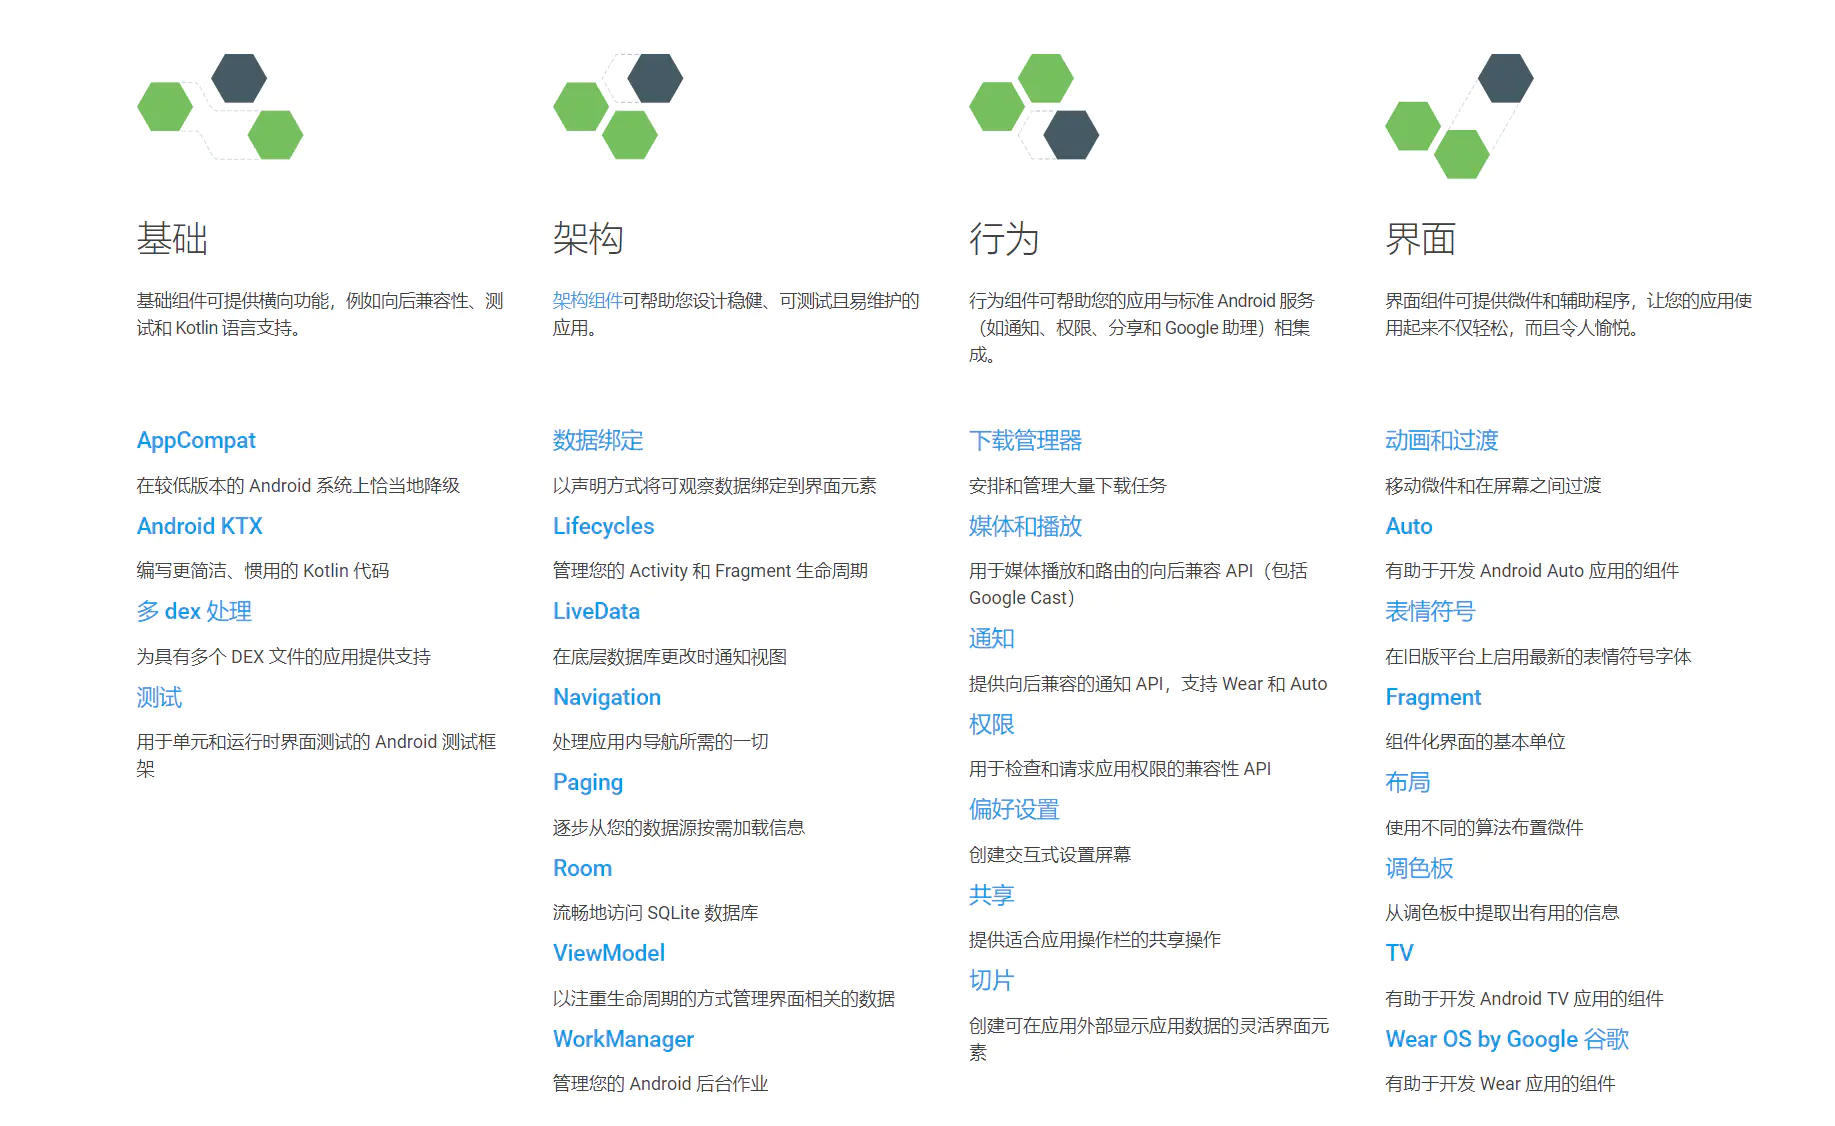
1.Architecture(架构组件)
Architecture指的是架构组件,帮助开发者设计稳健、可测试且易维护的应用。架构组件可以说是对应用开发帮助最大的组件,本系列也是围绕着架构组件进行讲解。
- DataBinding:以声明方式将可观察数据绑定到界面元素,通常和ViewModel配合使用。
- Lifecycle:用于管理Activity和Fragment的生命周期,可帮助开发者生成更易于维护的轻量级代码。
- LiveData: 在底层数据库更改时通知视图。它是一个可观察的数据持有者,与常规observable不同,LiveData是生命周期感知的。
- Navigation:处理应用内导航。
- Paging:可以帮助开发者一次加载和显示小块数据,按需加载部分数据可减少网络带宽和系统资源的使用。
- Room:友好、流畅的访问SQLite数据库。它在SQLite的基础上提供了一个抽象层,允许更强大的数据库访问。
- ViewModel: 以生命周期的方式管理界面相关的数据,通常和DataBinding配合使用,为开发者实现MVVM架构提供了强有力的支持。
- WorkManager: 管理Android的后台的作业,即使应用程序退出或设备重新启动也可以运行可延迟的异步任务。
这些架构组件既可以配合使用,也可以单独使用,这里建议还是尽量按照官方推荐的来。
2.Foundationy(基础组件)
基础组件主要提供了横向功能,例如向后兼容性、测试、安全、Kotlin 语言支持,并包括多个多个平台开发的组件。平台组件如下:
- Android KTX:优化了供Kotlin使用的Jetpack和Android平台API。帮助开发者以更简洁、更愉悦、更惯用的方式使用Kotlin进行Android开发。
- AppCompat:帮助较低版本的Android系统进行兼容。
- Auto: 开发Android Auto应用的组件,提供了适用于所有车辆的标准化界面和用户交互。
- 检测:从AndroidStudio中快速检测基于Kotlin或Java的代码。
- 多Dex处理:为具有多个Dex文件应用提供支持。
- 安全:安全的读写加密文件和共享偏好设置。
- 测试:用于单元和运行时界面测试的Android 测试框架。
- TV: 构建可让用户在大屏幕上体验沉浸式内容的应用。
- Wear OS:开发Wear应用的组件。
3.Behavior(行为组件)
行为组件可帮助开发者的应用与标准Android服务(如通知、权限、分享)相集成。常用行为组件如下:
- CameraX:帮助开发简化相机应用的开发工作。它提供一致且易于使用的界面,适用于大多数Android。设备,并可向后兼容至Android 5.0(API 21)。
- DownloadManager:处理长时间运行的HTTP下载的系统服务。
- 媒体和播放:用于媒体播放和路由(包括Google Cast)的向后兼容API。
- 通知:提供向后兼容的通知API,支持Wear和Auto。
- 权限:用于检查和请求应用权限的兼容性API。
- 设置:创建交互式设置,建议使用AndroidX Preference Library库将用户可配置设置集成到应用中。
- 分享操作:可以更轻松地实现友好的用户分享操作。
- 切片:切片是一种UI模板,创建可在应用外部显示应用数据的灵活界面元素。
4.UI(界面组件)
- Animation and Transition:该框架包含用于常见效果的内置动画,并允许开发者创建自定义动画和生命周期回调。
-
Emoji Compatibility:即便用户没有更新Android系统也可以获取最新的表情符号。
-
Fragment:组件化界面的基本单位。
-
布局:用XML中声明UI元素或者在代码中实例化UI元素。
-
调色板:从调色板中提取出有用的信息。
4.在项目中使用Jetpack
所有 Jetpack 组件都可在 Google Maven 代码库中找到。打开项目的build.gradle 文件并添加 google()代码库,如下所示:
allprojects {
      repositories {
          google()
          jcenter()
     }
}
然后,您可以添加 Jetpack 组件,例如作为 Lifecycles 库的一部分的 LiveData 和 ViewModel 等架构组件,如下所示:
dependencies {
    implementation "androidx.lifecycle:lifecycle-extensions:2.0.0"
    implementation "androidx.lifecycle:lifecycle-viewmodel-ktx:2.0.0"

}至此,Jetpack就简单介绍完毕了,相信,你已经有了深入的理解,更多关于Jetpack的介绍请参考谷歌官方文档jetpack介绍以及Jetpack 组件库都可以在Google Maven 代码库中找到。
认识了Jetpack,接下来,我们进入重要环节,也是MVVM架构的核心精髓,Architecture(架构组件)中的四剑客,DataBinding,Lifecycle,LiveData,ViewModel。
Architecture(架构组件)——DataBinding
在没有出现databinding这个组件之前,我想大家都用过findViewById()方法,这个方法主要是用于快速找到某一个UI组件,或者UI控件,但是,入股一个layout布局中有许多个控件,那我们起步要手写很多个这样的方法,这样看起来,就感觉代码量很多,而起有点高度相似加重复的感觉,可能基于这种原因,后来出现了butterknife这个开源库,它通过注解绑定视图,避免了 findViewById() 的操作,广受好评!但是,由于它是在编译时对注解进行解析完成相关代码的生成,所以在项目编译时会略耗时,但不会影响运行时的性能。同时,它是无法感知activity的生命周期的,所以有一点的局限。
后来,DataBinding出现了。DataBinding 出现的目的旨在取代findViewById()方法,但是它的功能不仅如此。要使用DataBinding前,首先需要如下俩个配置:
DataBinding配置
- 在
build.gradle中开启功能
android {
    ...
    dataBinding {
        enabled = true
    }
}
2. 在gradle.properties中启用新的编译器
android.databinding.enableV2=true
配置好了基本配置,下面正式使用DataBingding,具体使用大概只需要3步即可。
DataBinding简单使用三步曲
1.创建数据源
这一个很简单,就是modle层,简单点就是简单的javabean对象
2.在布局文件xml中定义
Databinding支持的布局文件跟标签是固定<layout>标签,且需要一个<data>标签来声明数据源,因此,只需要把我们mvp,mvc模式下默认的activity/fragemet的布局文件的根节点换成<layout>标签,并申明一个<data>标签,即可,如下下图所示:
<?xml version="1.0" encoding="utf-8"?>
<layout xmlns:android="http://schemas.android.com/apk/res/android"
    xmlns:app="http://schemas.android.com/apk/res-auto"
    xmlns:tools="http://schemas.android.com/tools">

    <data>

        <variable
            name="model"
            type="com.bnd.mvvm.news.NewsData" />

    </data>

    <-- 最外层UI布局文件 !-->
    <LinearLayout
        android:layout_width="match_parent"
        android:layout_height="match_parent"
        android:layout_marginHorizontal="16dp"
        android:layout_marginTop="20dp"
        android:orientation="vertical"
        tools:context=".MainActivity">

           <-- 布局文件 !-->

    </LinearLayout>
</layout>上述xml文件中,<variable>标签就是声明一个在xml中可用的变量,里面的两个属性分别对应的是变量名和变量类型。有了数据源的变量,我们就可以把它绑定给指定的控件入下图所示,用TextView显示新闻的名字:
<?xml version="1.0" encoding="utf-8"?>
<layout xmlns:android="http://schemas.android.com/apk/res/android"
    xmlns:app="http://schemas.android.com/apk/res-auto"
    xmlns:tools="http://schemas.android.com/tools">

    <data>

        <variable
            name="model"
            type="com.bnd.mvvm.news.NewsData" />

    </data>

    <-- 最外层UI布局文件 !-->
    <LinearLayout
        android:layout_width="match_parent"
        android:layout_height="match_parent"
        android:layout_marginHorizontal="16dp"
        android:layout_marginTop="20dp"
        android:orientation="vertical"
        tools:context=".MainActivity">

       <-- 布局文件 !-->
       <TextView
	     android:id="@+id/new_name"
	     android:layout_width="wrap_content"
         android:layout_height="wrap_content"
         android:text="@{model.Name}" />


    </LinearLayout>
</layout>
3.在activity/fragment中使用
当你创建了一个databinding类型的布局文件后,gradle 编译器会自动生成一个与之对应的绑定类。绑定类的命名规则也是标准规范的驼峰式命名,命名标准模板如下:
驼峰化xml文件名 + Binding.java。
在activity/fragment中的获取方式为:
ActivityMainBinding binding = DataBindingUtil.setContentView(this, R.layout.activity_main);
有了binding对象后你就可以直接使用布局文件中的控件了,不用再使用祖传的findviewbyid了:
// 控件的变量名就是布局文件中的id名
binding.new_name.setBackgroundColor(Color.WHITE);
binding.new_name.setTextSize(12);
......
至于赋值,那就更简单了,已经不再需要我们在activity/fragment中为每一个UI组件手动赋值,因为,在布局中我们已经通过如下方式绑定了这个组件,如下所示:
 <-- 布局文件 !-->
       <TextView
	     android:id="@+id/new_name"
	     android:layout_width="wrap_content"
         android:layout_height="wrap_content"
         android:text="@{model.Name}" />
我们只需要按照如下操作即可改变现实的数据:
News new= new News("今日头条最新新闻,xx公司福利飙升啊", "2020-09-02");
binding.setNews(new);
DataBinding事件的传递
在三步曲中,我们知道了如何利用databinding做数据的绑定,接下来,就讲一下如何实现事件的传递。
点击事件的监听有两种方法:
- 直接调用:这种跟之前在activity里设置onclick有些类似,注册的方法必须是
onClick(View view)形式的带着View参数的,使用方法是:
android:onClick="@{objectName::funName}"2.绑定监听器:这种方法对于注册的方法没有任何要求,有参数没有参数的,参数类型是什么样的都没有限制,使用方法是:
android:onClick="@{() -> presenter.onSaveClick(task)}"
这是一个lamda表达式,小括号里的view参数根据自己需求填不填都可以,就相当于在此处注册了一个监听器。
显然第二种方法要更加的灵活,不仅可以根据需要传递任何参数,而且还不会强制要求注册方法必须传递view参数。如下图所示xml代码:
 <Button
            android:layout_width="match_parent"
            android:layout_height="wrap_content"
            android:layout_marginTop="10dp"
            android:onClick="@{model.requestData}"
            android:text="请求网络数据" />
在activity中,只需要声明一个requestData方法即可:
    /**
     * 按钮点击事件
     */
    public void requestData(View view) {
        viewModel.requestData();
    }
实战RecyclerView中使用
1:adapter的item布局xml文件
<?xml version="1.0" encoding="utf-8"?>
<layout xmlns:android="http://schemas.android.com/apk/res/android"
    xmlns:app="http://schemas.android.com/apk/res-auto"
    xmlns:tools="http://schemas.android.com/tools">

    <data>

        <variable
            name="bean"
            type="com.bnd.mvvm.news.NewsBean.StoriesBean" />
    </data>

    <LinearLayout
        android:layout_width="match_parent"
        android:layout_height="wrap_content"
        android:layout_marginBottom="5dp"
        android:background="@drawable/bg_white_radius_5"
        android:orientation="horizontal">

        <ImageView
            android:id="@+id/image"
            android:layout_width="84dp"
            android:layout_height="84dp"
            android:padding="8dp"
            app:imageUrl="@{bean.images.get(0)}"
            tools:src="@mipmap/ic_launcher" />

        <LinearLayout
            android:layout_width="match_parent"
            android:layout_height="match_parent"
            android:orientation="vertical">

            <TextView
                android:id="@+id/text"
                android:layout_width="match_parent"
                android:layout_height="wrap_content"
                android:layout_gravity="center"
                android:layout_marginLeft="10dp"
                android:layout_marginTop="5dp"
                android:layout_marginRight="15dp"
                android:text='@{bean.title,default="热搜的标题就是现眼啊"}' />

            <View
                android:layout_width="wrap_content"
                android:layout_height="0dp"
                android:layout_weight="1" />

            <TextView
                android:id="@+id/text1"
                android:layout_width="match_parent"
                android:layout_height="wrap_content"
                android:layout_gravity="center"
                android:layout_marginLeft="10dp"
                android:layout_marginRight="15dp"
                android:layout_marginBottom="5dp"
                android:gravity="right"
                android:text='@{bean.ga_prefix,default="032822"}'
                android:textSize="12sp" />
        </LinearLayout>
    </LinearLayout>
</layout>
2:adapter的具体实现
自定义baseadapter:
package com.bnd.basic.adapter;

import android.content.Context;
import android.view.LayoutInflater;
import android.view.View;
import android.view.ViewGroup;

import androidx.annotation.LayoutRes;
import androidx.annotation.NonNull;
import androidx.databinding.DataBindingUtil;
import androidx.databinding.ViewDataBinding;
import androidx.recyclerview.widget.RecyclerView;

import java.util.ArrayList;
import java.util.List;

/**
 * 描述:结合dataBinding的RecyclerView Adapter
 */

public abstract class BaseDBRVAdapter<Data, DB extends ViewDataBinding> extends RecyclerView.Adapter<BaseDBRVHolder> {

    private List<Data> data;
    private int itemId;
    protected Context context;
    protected int variableId;
    protected OnItemClickListener<Data> listener;


    public BaseDBRVAdapter(@LayoutRes int itemId, int variableId) {
        this.itemId = itemId;
        this.variableId = variableId;
        data = new ArrayList<>();
    }

    public BaseDBRVAdapter(List<Data> data, @LayoutRes int itemId, int variableId) {
        this.data = data == null ? new ArrayList<Data>() : data;
        this.itemId = itemId;
        this.variableId = variableId;
    }


    @NonNull
    @Override
    public BaseDBRVHolder onCreateViewHolder(@NonNull ViewGroup parent, int position) {
        this.context = parent.getContext();
        LayoutInflater inflater = LayoutInflater.from(context);
        DB binding = DataBindingUtil.inflate(inflater, itemId, parent, false);
        return new BaseDBRVHolder(binding.getRoot());
    }

    @Override
    public void onBindViewHolder(@NonNull BaseDBRVHolder holder, final int position) {
        DB binding = DataBindingUtil.getBinding(holder.itemView);
        final Data itemData = data.get(position);
        binding.setVariable(variableId, itemData);
        onBindViewHolder(itemData, binding, position);
        //迫使数据立即绑定
        binding.executePendingBindings();
        //设置点击事件
        if (listener != null) {
            holder.itemView.setOnClickListener(new View.OnClickListener() {
                @Override
                public void onClick(View v) {
                    listener.onItemClick(itemData, position);
                }
            });
            holder.itemView.setOnLongClickListener(new View.OnLongClickListener() {
                @Override
                public boolean onLongClick(View v) {
                    return listener.onItemLongClick(itemData, position);
                }
            });
        }
    }


    @Override
    public int getItemCount() {
        return data.size();
    }

    /**
     * 绑定数据
     */
    protected void onBindViewHolder(Data data, DB binding, int position) {
    }

    /**
     * 设置新数据
     *
     * @param data
     */
    public void setNewData(List<Data> data) {
        this.data.clear();
        this.data.addAll(data);
        notifyDataSetChanged();
    }

    /**
     * 添加数据
     *
     * @param data
     */
    public void addData(Data data) {
        this.data.add(data);
        notifyDataSetChanged();
    }

    /**
     * 添加数据
     *
     * @param data
     */
    public void addData(List<Data> data) {
        this.data.addAll(data);
        notifyDataSetChanged();
    }

    /**
     * 设置Item 长按、点击事件
     */
    public void setOnItemListener(OnItemClickListener<Data> listener) {
        this.listener = listener;
    }
}
adapter类的具体实现类:
package com.bnd.mvvm.news;

import android.widget.ImageView;

import androidx.databinding.BindingAdapter;

import com.bnd.basic.adapter.BaseDBRVAdapter;
import com.bnd.mvvm.R;
import com.bnd.mvvm.BR;
import com.bnd.mvvm.databinding.ItemNesBinding;
import com.bumptech.glide.Glide;

public class NewsAdapter extends BaseDBRVAdapter<NewsBean.StoriesBean, ItemNesBinding> {

    public NewsAdapter() {
        super(R.layout.item_nes, BR.bean);
    }

    /**
     * 绑定Adapter的ImageView
     * @param imageView
     * @param url       图片地址
     */
    @BindingAdapter({"imageUrl"})
    public static void loadImage(ImageView imageView, String url) {
        //被注释的方法必须是静态的。
        Glide.with(imageView.getContext()).load(url).into(imageView);
    }
}
注意:BR是自动生成的类,包含了所有的layout标签下的variable变量id。
自定义ViewHolder:
package com.bnd.basic.adapter;

import android.view.View;

import androidx.recyclerview.widget.RecyclerView;

/**
 * 描述: 结合dataBinding的RecyclerView Holder
 */

public final class BaseDBRVHolder extends RecyclerView.ViewHolder {

    public BaseDBRVHolder(View itemView) {
        super(itemView);
    }
}
至此,databinding的认识也有了初步理解。你会发现,DataBinding 并是不真的把findViewById()替换掉了,而是相当于对findViewById()的封装,Android插件会自动把根标签<layout>的布局转换为对应的绑定类。
Architecture(架构组件)——Lifecycle
在用MVP模式的时候,我想大家都遇到过这样的问提,就是生命周期同步的问题,比如,我们每次调用p层时,都要isViewAttached做一个判断,常用到以下三个方法:
    /**
     * 绑定view,一般在初始化中调用该方法
     * @param view view
     */
    public void attachView(V view) {
        this.mView = view;
    }

    /**
     * 解除绑定view,一般在onDestroy中调用
     */

    public void detachView() {
        this.mView = null;
    }

    /**
     * View是否绑定
     * @return
     */
    public boolean isViewAttached() {
        return mView != null;
    }
大家都知道,当内存不够时,activity会立即被销毁,但是activity销毁不一定会走ondestory方法。但再次start的时候,我们如果不判断attachView方法,就会再次初始化。另外,当我们更像UI的时候,是无法感知activity/fragment的生命周期的,比如但一个activity在销毁的时候你刚好更新UI,就会报错。对于这些重复判断,或者我们无法感知的生命周期是一件很不友好的事情,但是,为了解决这一类问题,谷歌提出了Lifecycle,它能很好的解决这些问题。
使用 Lifecycle 管理 Activity 和 Fragment 组件的生命周期可以减少重复的样板代码以及减少不必要的麻烦。
下面我们举个例子说明使用Lifecycle的好处。
生命周期的问题
我们都使用过第三方sdk,他们经常要和activity的生命周期挂钩,比如高德地图sdk,百度地图sdk等。假设我们要实现一个定位的功能,我们需要在Activity的生命周期回调方法中添加定位sdk的启动和停止方法:
public class LocationActivity extends AppCompatActivity{

	private LocationListener mListener;

	@Override
	protected void onCreate(Bundle savedInstanceState) {
		// 绑定UI控件
		mListener= new LocationListener(this);
		mListener.onLocationUpdate(new LocationCallback(){
			@Override
			public void onUpdate(Position position){
				// 根据位置数据更新UI
			}
		});
	}

	@Override
	protected void onStart(){
        //在onstart生命周期启用start()方法
		mListener.start();
	}

	@Override
	protected void onStop(){
        //在onStop生命周期启用stop()方法
		mListener.stop();
	}

}
这是我们常用第三方常用的定位组件,他是和Android的activity的生命周期高度绑定的,但是上述这样的处理方式存在一些缺点:
- 每次使用定位sdk都需要在生命周期中写启动和停止的方法,如果有多个activity使用了sdk就存在很多冗余代码。
- 生命周期方法中放置大量代码,这使得它们难以维护。
使用 Lifecycle解决这些问题
使用 Lifecycle 的方法非常简单,我们只需自己定义onStart和onStopf方法,并在自己定义的这俩个方法加入对应注解即可,常用注解如下,这些基本都是绑定activity生命周期,本列只使用前俩种:
@OnLifecycleEvent(Lifecycle.Event.ON_START)

@OnLifecycleEvent(Lifecycle.Event.ON_STOP)

@OnLifecycleEvent(Lifecycle.Event.ON_CREATE)

@OnLifecycleEvent(Lifecycle.Event.ON_RESUME )

@OnLifecycleEvent(Lifecycle.Event.ON_PAUSE)

@OnLifecycleEvent(Lifecycle.Event.ON_DESTROY)

@OnLifecycleEvent(Lifecycle.Event.ON_ANY)
然后在自己的这俩个方法里调用第三方绑定生命周期的方法,如下所示:
public class LocationListener implements LifecycleObserver {

    @OnLifecycleEvent(Lifecycle.Event.ON_START)
    public void start(){
        // 启动定位服务
    }

    @OnLifecycleEvent(Lifecycle.Event.ON_STOP)
    public void stop(){
        // 停止定位服务
    }

}
通过上面的代码可以看到我们只是在原来代码的基础上实现了LifecycleObserver接口,并在start()和stop()方法上加上了代表触发它们的生命周期时机的注解,注解里的参数对应着activity的生命周期。
下面就是超级简单的调用了:
public class LocationActivity extends AppCompatActivity{

	private LocationListener mListener;

	@Override
	protected void onCreate(Bundle savedInstanceState) {
		// 绑定UI控件
		mListener= new LocationListener(this);
		mListener.onLocationUpdate(new LocationCallback(){
			@Override
			public void onUpdate(Position position){
				// 根据位置数据更新UI
			}
		});

		getLifecycle().addObserver(listener);
	}

}
好了,到了这里,我们就实现了简单的定位功能,这个LocationListener 既可以感知生命周期,又可以达到复用的目的。但是,Lifecycle是谷歌在2018年提出的,如果想在低版本和非 activity 、fragment类中也实现生命周期该怎么办呢?还好在支持库 Support Library 26.1.0 中 activity 和 fragment 提供了默认的getLifecycle()方法,因此,我们只要实现LifecycleOwner这个接口即可。
自定义Lifecycle
public class MainActivity extends Activity implements LifecycleOwner {
    private LifecycleRegistry mLifecycleRegistry;

    @Override
    protected void onCreate(Bundle savedInstanceState) {
        super.onCreate(savedInstanceState);

        mLifecycleRegistry = new LifecycleRegistry(this);
        mLifecycleRegistry.markState(Lifecycle.State.CREATED);
    }

    @Override
    public void onStart() {
        super.onStart();
        mLifecycleRegistry.markState(Lifecycle.State.STARTED);
    }

    @NonNull
    @Override
    public Lifecycle getLifecycle() {
        return mLifecycleRegistry;
    }
}
Lifecycle重要常用类

-
Lifecycle抽象类,定义了一些操作LifecycleObserver的抽象方法,以及代表生命周期的State、Event枚举类。 -
LifecycleObserver接口,内部没有定义任何方法,通过Lifecycle.addObserver()可以注册监听生命周期变化,以注释的方法声明监听。 -
LifecycleOwner接口,该接口是由生命周期宿主(activity / fragment)实现的,只有一个Lifecycle getLifecycle()方法。 -
LifecycleRegistry类,它是Lifecycle的子类,其内部定义了具体的实现细节,默认情况下,一个宿主实现了LifecycleOwner接口后就应该在其内部声明一个LifecycleRegistry,并在自己的生命周期回调方法中为其设置各种状态:
this.mLifecycleRegistry.markState(State.CREATED);Architecture(架构组件)——LiveData
Livedata 是一个数据源的包装类,他可以有效的取代请求信息时用到callback接口,还可以配合Lifecycle感知程序组件生命周期。
正常我们请求网络数据时的代码为:
public class MainActivity extends AppCompatActivity {
    private TextView new_title;

    @Override
    protected void onCreate(Bundle savedInstanceState) {
        super.onCreate(savedInstanceState);
        new_title= findViewbyId(R.id.new_title);
        NetModel.getNews().callback(new Callback(){

            @Override
            public void onSuccess(New new){
                new_title.setText(new.getName());
            }

        });
    }
}
使用LiveData可以这样写:
public class MainActivity extends AppCompatActivity {
    private TextView new_title;

    @Override
    protected void onCreate(Bundle savedInstanceState) {
        super.onCreate(savedInstanceState);
        new_title= findViewbyId(R.id.new_title);
        LiveData<New> new_name= NetModel.getNew();
        new_name.observe(this, new Observer<New>() {
            @Override
            public void onChanged(@Nullable New new) {
                new_title.setText(new.getName());
            }
        });
    }
}从代码量上来说,代码并没有简化多少,但是相比之前的代码,其内部给我们做了非常严谨的判断,如果原代码中不对setText()方法添加生命周期的判断,当activity销毁后可能会引发空指针异常。
而在LiveData的observe方法中需要传入一个LifecycleOwner对象,这样LiveData就可以感知宿主的生命周期,从而不用担心此类问题。
深入LiveData
livedata属于包装类,所以如果要使用Livedata就先需要先创建一个Livedata对象,然后在为其填充数据。livedata同时也是一个一个的抽象类,因此不能直接实例化,Android 默认提供了一个它的子类MutableLiveData,我们依次看一下这俩个类的源码:
livedata的源码如下:
/*
* Copyright (C) 2017 The Android Open Source Project
*
* Licensed under the Apache License, Version 2.0 (the "License");
* you may not use this file except in compliance with the License.
* You may obtain a copy of the License at
*
* http://www.apache.org/licenses/LICENSE-2.0
*
* Unless required by applicable law or agreed to in writing, software
* distributed under the License is distributed on an "AS IS" BASIS,
* WITHOUT WARRANTIES OR CONDITIONS OF ANY KIND, either express or implied.
* See the License for the specific language governing permissions and
* limitations under the License.
*/
package androidx.lifecycle;
import static androidx.lifecycle.Lifecycle.State.DESTROYED;
import static androidx.lifecycle.Lifecycle.State.STARTED;
import androidx.annotation.MainThread;
import androidx.annotation.NonNull;
import androidx.annotation.Nullable;
import androidx.arch.core.executor.ArchTaskExecutor;
import androidx.arch.core.internal.SafeIterableMap;
import java.util.Iterator;
import java.util.Map;
/**
* LiveData is a data holder class that can be observed within a given lifecycle.
* This means that an {@link Observer} can be added in a pair with a {@link LifecycleOwner}, and
* this observer will be notified about modifications of the wrapped data only if the paired
* LifecycleOwner is in active state. LifecycleOwner is considered as active, if its state is
* {@link Lifecycle.State#STARTED} or {@link Lifecycle.State#RESUMED}. An observer added via
* {@link #observeForever(Observer)} is considered as always active and thus will be always notified
* about modifications. For those observers, you should manually call
* {@link #removeObserver(Observer)}.
*
* <p> An observer added with a Lifecycle will be automatically removed if the corresponding
* Lifecycle moves to {@link Lifecycle.State#DESTROYED} state. This is especially useful for
* activities and fragments where they can safely observe LiveData and not worry about leaks:
* they will be instantly unsubscribed when they are destroyed.
*
* <p>
* In addition, LiveData has {@link LiveData#onActive()} and {@link LiveData#onInactive()} methods
* to get notified when number of active {@link Observer}s change between 0 and 1.
* This allows LiveData to release any heavy resources when it does not have any Observers that
* are actively observing.
* <p>
* This class is designed to hold individual data fields of {@link ViewModel},
* but can also be used for sharing data between different modules in your application
* in a decoupled fashion.
*
* @param <T> The type of data held by this instance
* @see ViewModel
*/
public abstract class LiveData<T> {
@SuppressWarnings("WeakerAccess") /* synthetic access */
final Object mDataLock = new Object();
static final int START_VERSION = -1;
@SuppressWarnings("WeakerAccess") /* synthetic access */
static final Object NOT_SET = new Object();
private SafeIterableMap<Observer<? super T>, ObserverWrapper> mObservers =
new SafeIterableMap<>();
// how many observers are in active state
@SuppressWarnings("WeakerAccess") /* synthetic access */
int mActiveCount = 0;
private volatile Object mData = NOT_SET;
// when setData is called, we set the pending data and actual data swap happens on the main
// thread
@SuppressWarnings("WeakerAccess") /* synthetic access */
volatile Object mPendingData = NOT_SET;
private int mVersion = START_VERSION;
private boolean mDispatchingValue;
@SuppressWarnings("FieldCanBeLocal")
private boolean mDispatchInvalidated;
private final Runnable mPostValueRunnable = new Runnable() {
@Override
public void run() {
Object newValue;
synchronized (mDataLock) {
newValue = mPendingData;
mPendingData = NOT_SET;
}
//noinspection unchecked
setValue((T) newValue);
}
};
private void considerNotify(ObserverWrapper observer) {
if (!observer.mActive) {
return;
}
// Check latest state b4 dispatch. Maybe it changed state but we didn't get the event yet.
//
// we still first check observer.active to keep it as the entrance for events. So even if
// the observer moved to an active state, if we've not received that event, we better not
// notify for a more predictable notification order.
if (!observer.shouldBeActive()) {
observer.activeStateChanged(false);
return;
}
if (observer.mLastVersion >= mVersion) {
return;
}
observer.mLastVersion = mVersion;
//noinspection unchecked
observer.mObserver.onChanged((T) mData);
}
@SuppressWarnings("WeakerAccess") /* synthetic access */
void dispatchingValue(@Nullable ObserverWrapper initiator) {
if (mDispatchingValue) {
mDispatchInvalidated = true;
return;
}
mDispatchingValue = true;
do {
mDispatchInvalidated = false;
if (initiator != null) {
considerNotify(initiator);
initiator = null;
} else {
for (Iterator<Map.Entry<Observer<? super T>, ObserverWrapper>> iterator =
mObservers.iteratorWithAdditions(); iterator.hasNext(); ) {
considerNotify(iterator.next().getValue());
if (mDispatchInvalidated) {
break;
}
}
}
} while (mDispatchInvalidated);
mDispatchingValue = false;
}
/**
* Adds the given observer to the observers list within the lifespan of the given
* owner. The events are dispatched on the main thread. If LiveData already has data
* set, it will be delivered to the observer.
* <p>
* The observer will only receive events if the owner is in {@link Lifecycle.State#STARTED}
* or {@link Lifecycle.State#RESUMED} state (active).
* <p>
* If the owner moves to the {@link Lifecycle.State#DESTROYED} state, the observer will
* automatically be removed.
* <p>
* When data changes while the {@code owner} is not active, it will not receive any updates.
* If it becomes active again, it will receive the last available data automatically.
* <p>
* LiveData keeps a strong reference to the observer and the owner as long as the
* given LifecycleOwner is not destroyed. When it is destroyed, LiveData removes references to
* the observer & the owner.
* <p>
* If the given owner is already in {@link Lifecycle.State#DESTROYED} state, LiveData
* ignores the call.
* <p>
* If the given owner, observer tuple is already in the list, the call is ignored.
* If the observer is already in the list with another owner, LiveData throws an
* {@link IllegalArgumentException}.
*
* @param owner The LifecycleOwner which controls the observer
* @param observer The observer that will receive the events
*/
@MainThread
public void observe(@NonNull LifecycleOwner owner, @NonNull Observer<? super T> observer) {
assertMainThread("observe");
if (owner.getLifecycle().getCurrentState() == DESTROYED) {
// ignore
return;
}
LifecycleBoundObserver wrapper = new LifecycleBoundObserver(owner, observer);
ObserverWrapper existing = mObservers.putIfAbsent(observer, wrapper);
if (existing != null && !existing.isAttachedTo(owner)) {
throw new IllegalArgumentException("Cannot add the same observer"
+ " with different lifecycles");
}
if (existing != null) {
return;
}
owner.getLifecycle().addObserver(wrapper);
}
/**
* Adds the given observer to the observers list. This call is similar to
* {@link LiveData#observe(LifecycleOwner, Observer)} with a LifecycleOwner, which
* is always active. This means that the given observer will receive all events and will never
* be automatically removed. You should manually call {@link #removeObserver(Observer)} to stop
* observing this LiveData.
* While LiveData has one of such observers, it will be considered
* as active.
* <p>
* If the observer was already added with an owner to this LiveData, LiveData throws an
* {@link IllegalArgumentException}.
*
* @param observer The observer that will receive the events
*/
@MainThread
public void observeForever(@NonNull Observer<? super T> observer) {
assertMainThread("observeForever");
AlwaysActiveObserver wrapper = new AlwaysActiveObserver(observer);
ObserverWrapper existing = mObservers.putIfAbsent(observer, wrapper);
if (existing != null && existing instanceof LiveData.LifecycleBoundObserver) {
throw new IllegalArgumentException("Cannot add the same observer"
+ " with different lifecycles");
}
if (existing != null) {
return;
}
wrapper.activeStateChanged(true);
}
/**
* Removes the given observer from the observers list.
*
* @param observer The Observer to receive events.
*/
@MainThread
public void removeObserver(@NonNull final Observer<? super T> observer) {
assertMainThread("removeObserver");
ObserverWrapper removed = mObservers.remove(observer);
if (removed == null) {
return;
}
removed.detachObserver();
removed.activeStateChanged(false);
}
/**
* Removes all observers that are tied to the given {@link LifecycleOwner}.
*
* @param owner The {@code LifecycleOwner} scope for the observers to be removed.
*/
@SuppressWarnings("WeakerAccess")
@MainThread
public void removeObservers(@NonNull final LifecycleOwner owner) {
assertMainThread("removeObservers");
for (Map.Entry<Observer<? super T>, ObserverWrapper> entry : mObservers) {
if (entry.getValue().isAttachedTo(owner)) {
removeObserver(entry.getKey());
}
}
}
/**
* Posts a task to a main thread to set the given value. So if you have a following code
* executed in the main thread:
* <pre class="prettyprint">
* liveData.postValue("a");
* liveData.setValue("b");
* </pre>
* The value "b" would be set at first and later the main thread would override it with
* the value "a".
* <p>
* If you called this method multiple times before a main thread executed a posted task, only
* the last value would be dispatched.
*
* @param value The new value
*/
protected void postValue(T value) {
boolean postTask;
synchronized (mDataLock) {
postTask = mPendingData == NOT_SET;
mPendingData = value;
}
if (!postTask) {
return;
}
ArchTaskExecutor.getInstance().postToMainThread(mPostValueRunnable);
}
/**
* Sets the value. If there are active observers, the value will be dispatched to them.
* <p>
* This method must be called from the main thread. If you need set a value from a background
* thread, you can use {@link #postValue(Object)}
*
* @param value The new value
*/
@MainThread
protected void setValue(T value) {
assertMainThread("setValue");
mVersion++;
mData = value;
dispatchingValue(null);
}
/**
* Returns the current value.
* Note that calling this method on a background thread does not guarantee that the latest
* value set will be received.
*
* @return the current value
*/
@Nullable
public T getValue() {
Object data = mData;
if (data != NOT_SET) {
//noinspection unchecked
return (T) data;
}
return null;
}
int getVersion() {
return mVersion;
}
/**
* Called when the number of active observers change to 1 from 0.
* <p>
* This callback can be used to know that this LiveData is being used thus should be kept
* up to date.
*/
protected void onActive() {
}
/**
* Called when the number of active observers change from 1 to 0.
* <p>
* This does not mean that there are no observers left, there may still be observers but their
* lifecycle states aren't {@link Lifecycle.State#STARTED} or {@link Lifecycle.State#RESUMED}
* (like an Activity in the back stack).
* <p>
* You can check if there are observers via {@link #hasObservers()}.
*/
protected void onInactive() {
}
/**
* Returns true if this LiveData has observers.
*
* @return true if this LiveData has observers
*/
@SuppressWarnings("WeakerAccess")
public boolean hasObservers() {
return mObservers.size() > 0;
}
/**
* Returns true if this LiveData has active observers.
*
* @return true if this LiveData has active observers
*/
@SuppressWarnings("WeakerAccess")
public boolean hasActiveObservers() {
return mActiveCount > 0;
}
class LifecycleBoundObserver extends ObserverWrapper implements GenericLifecycleObserver {
@NonNull
final LifecycleOwner mOwner;
LifecycleBoundObserver(@NonNull LifecycleOwner owner, Observer<? super T> observer) {
super(observer);
mOwner = owner;
}
@Override
boolean shouldBeActive() {
return mOwner.getLifecycle().getCurrentState().isAtLeast(STARTED);
}
@Override
public void onStateChanged(LifecycleOwner source, Lifecycle.Event event) {
if (mOwner.getLifecycle().getCurrentState() == DESTROYED) {
removeObserver(mObserver);
return;
}
activeStateChanged(shouldBeActive());
}
@Override
boolean isAttachedTo(LifecycleOwner owner) {
return mOwner == owner;
}
@Override
void detachObserver() {
mOwner.getLifecycle().removeObserver(this);
}
}
private abstract class ObserverWrapper {
final Observer<? super T> mObserver;
boolean mActive;
int mLastVersion = START_VERSION;
ObserverWrapper(Observer<? super T> observer) {
mObserver = observer;
}
abstract boolean shouldBeActive();
boolean isAttachedTo(LifecycleOwner owner) {
return false;
}
void detachObserver() {
}
void activeStateChanged(boolean newActive) {
if (newActive == mActive) {
return;
}
// immediately set active state, so we'd never dispatch anything to inactive
// owner
mActive = newActive;
boolean wasInactive = LiveData.this.mActiveCount == 0;
LiveData.this.mActiveCount += mActive ? 1 : -1;
if (wasInactive && mActive) {
onActive();
}
if (LiveData.this.mActiveCount == 0 && !mActive) {
onInactive();
}
if (mActive) {
dispatchingValue(this);
}
}
}
private class AlwaysActiveObserver extends ObserverWrapper {
AlwaysActiveObserver(Observer<? super T> observer) {
super(observer);
}
@Override
boolean shouldBeActive() {
return true;
}
}
private static void assertMainThread(String methodName) {
if (!ArchTaskExecutor.getInstance().isMainThread()) {
throw new IllegalStateException("Cannot invoke " + methodName + " on a background"
+ " thread");
}
}
}
我们简化一下,我们关注一下这两俩个方法:

这是俩个私有的方法,她们的作用就是在做值的更新,只不过一个是在工作线程,一个在子线程。
下面在看一下LiveData的实现类MutableLiveData的源码:
package androidx.lifecycle;

/**
 * {@link LiveData} which publicly exposes {@link #setValue(T)} and {@link #postValue(T)} method.
 *
 * @param <T> The type of data hold by this instance
 */
@SuppressWarnings("WeakerAccess")
public class MutableLiveData<T> extends LiveData<T> {
    @Override
    public void postValue(T value) {
        super.postValue(value);
    }

    @Override
    public void setValue(T value) {
        super.setValue(value);
    }
}MutableLiveData的源码超级简单,他只是实现了livedata的俩个私有方法,postValue和setValue方法。Livedata类添加数据的setValue()和postValue()方法的权限不是公开的,而MutableLiveData只是将这两个方法权限公开而已。
为什么要这样做呢?主要是考虑到架构模型的问题,在数据源请求处使用MutableLiveData对象添加数据,而在UI操作的地方使用LiveData对象就只能使用数据无法改变其数据,这样的话就做到了数据只能在一个地方发生改变提升系统稳定性。当然如果你希望在任何地方都可以改变数据源,直接全部使用MutableLiveData对象即可。
至于如何更新数据,更是简单粗暴,代码如下:
package com.bnd.mvvm.news;
import android.content.Context;

import androidx.lifecycle.MutableLiveData;
import com.bnd.basic.lifecycle.BaseViewModel;
import com.bnd.mvvm.R;
import com.bnd.mvvm.api.Api;
import com.bnd.mvvm.widget.PieData;

import java.util.ArrayList;
import java.util.List;

import io.reactivex.android.schedulers.AndroidSchedulers;
import io.reactivex.disposables.Disposable;
import io.reactivex.functions.Consumer;
import io.reactivex.schedulers.Schedulers;

public class NewsViewModel extends BaseViewModel {
    /**
     * 当数据请求成功回调
     */
    protected MutableLiveData<NewsBean> news = new MutableLiveData<>();
    /**
     * 图标数据
     */
    protected MutableLiveData<List<PieData>> datas = new MutableLiveData<>();


    /**
     * 请求网络数据
     */
    public void requestData() {
        showDialog.setValue(true, "加载中");
        Disposable disposable = Api.getInstance().news()
                .subscribeOn(Schedulers.io())
                .observeOn(AndroidSchedulers.mainThread())
                .subscribe(new Consumer<NewsBean>() {
                    @Override
                    public void accept(NewsBean newsBean) throws Exception {
                        showDialog.setValue(false);
                        //设置数据
                        news.setValue(newsBean);
                    }
                }, new Consumer<Throwable>() {
                    @Override
                    public void accept(Throwable throwable) throws Exception {
                        showDialog.setValue(false);
                        /*
                         * 发生了错误,通知UI层
                         */
                        error.setValue("发生错误了");
                    }
                });
        addDisposable(disposable);
    }


    public void requestPieData(Context context){
        List<PieData> data=new ArrayList<>();
        data.add(new PieData("张三",1000f,
        context.getResources().getColor(R.color.darkorchid),0));
        data.add(new PieData("浩哥",3000f, context.
        getResources().getColor(R.color.dodgerblue),0));
        data.add(new PieData("李四",2000f,
        context.getResources().getColor(R.color.aquamarine),1));
        data.add(new PieData("王五",3000f,
        context.getResources().getColor(R.color.brown),1));
        data.add(new PieData("赵六",2800f,
        context.getResources().getColor(R.color.salmon),0));
        data.add(new PieData("小武",1800f,
        context.getResources().getColor(R.color.chartreuse),1));
        //设置数据
        datas.setValue(data);
    }

    public MutableLiveData<List<PieData>> getPieData() {
        return datas;
    }

    public MutableLiveData<NewsBean> getNews() {
        return news;
    }
}
设置数据的两个方法区别如下,具体如何使用,请根据实际场景选择:
setValue():在UI线程设置数据。postValue():在worker线程设置数据。
看了Livedata的源码和谷歌官网介绍,你会发现,他是可以感知生命周期的,下面更进一步深入剖析Livedata的源码。
感知生命周期
当我们调用LiveData的observe(LifecycleOwner owner,Observer<T> observer)时,LiveData会在LifecycleOwner中添加一个监听生命周期的观察者,
- 当生命周期处于
STARTED或RESUMED这种活动状态时才会通知Observer数据更新 - 当生命周期处于非活动状态时
Observer不会接收到数据更新的通知 - 当生命周期处于
DESTROYED时会将监听生命周期的观察者删除
正式因为有这种感知生命周期的方法,所以避免了开发中遇到的很多种问题和未知异常。
高级扩展
LiveData 除了内部的逻辑操作外,还提供了跟生命周期状态有关的回调方法,对应的源码如下图:

-
onActive(),当生命周期观察者处于活动状态后调用。 -
onInactive(),当生命周期观察者处于非活动状态后调用。
我们知道 LiveData 中的observe()方法需要传入一个LifecycleOwner对象用来感知生命周期,但是它并不是唯一值,也就是说我们能够通过observe()方法同时为一个liveData对象设置两个Activity/Fragment的生命周期宿主,也就是LifecycleOwner,基于这个特性,我们可以将LiveData设置成单例模式从而实现多个组件间共享数据。
同时,谷歌还给我们提供了一个MediatorLiveData,MediatorLiveData是什么了,查看源码如下:
/*
 * Copyright (C) 2017 The Android Open Source Project
 *
 * Licensed under the Apache License, Version 2.0 (the "License");
 * you may not use this file except in compliance with the License.
 * You may obtain a copy of the License at
 *
 *      http://www.apache.org/licenses/LICENSE-2.0
 *
 * Unless required by applicable law or agreed to in writing, software
 * distributed under the License is distributed on an "AS IS" BASIS,
 * WITHOUT WARRANTIES OR CONDITIONS OF ANY KIND, either express or implied.
 * See the License for the specific language governing permissions and
 * limitations under the License.
 */

package androidx.lifecycle;

import androidx.annotation.CallSuper;
import androidx.annotation.MainThread;
import androidx.annotation.NonNull;
import androidx.annotation.Nullable;
import androidx.arch.core.internal.SafeIterableMap;

import java.util.Map;

/**
 * {@link LiveData} subclass which may observe other {@code LiveData} objects and react on
 * {@code OnChanged} events from them.
 * <p>
 * This class correctly propagates its active/inactive states down to source {@code LiveData}
 * objects.
 * <p>
 * Consider the following scenario: we have 2 instances of {@code LiveData}, let's name them
 * {@code liveData1} and {@code liveData2}, and we want to merge their emissions in one object:
 * {@code liveDataMerger}. Then, {@code liveData1} and {@code liveData2} will become sources for
 * the {@code MediatorLiveData liveDataMerger} and every time {@code onChanged} callback
 * is called for either of them, we set a new value in {@code liveDataMerger}.
 *
 * <pre>
 * LiveData<Integer> liveData1 = ...;
 * LiveData<Integer> liveData2 = ...;
 *
 * MediatorLiveData<Integer> liveDataMerger = new MediatorLiveData<>();
 * liveDataMerger.addSource(liveData1, value -> liveDataMerger.setValue(value));
 * liveDataMerger.addSource(liveData2, value -> liveDataMerger.setValue(value));
 * </pre>
 * <p>
 * Let's consider that we only want 10 values emitted by {@code liveData1}, to be
 * merged in the {@code liveDataMerger}. Then, after 10 values, we can stop listening to {@code
 * liveData1} and remove it as a source.
 * <pre>
 * liveDataMerger.addSource(liveData1, new Observer<Integer>() {
 *      private int count = 1;
 *
 *      {@literal @}Override public void onChanged(@Nullable Integer s) {
 *          count++;
 *          liveDataMerger.setValue(s);
 *          if (count > 10) {
 *              liveDataMerger.removeSource(liveData1);
 *          }
 *      }
 * });
 * </pre>
 *
 * @param <T> The type of data hold by this instance
 */
@SuppressWarnings("WeakerAccess")
public class MediatorLiveData<T> extends MutableLiveData<T> {
    private SafeIterableMap<LiveData<?>, Source<?>> mSources = new SafeIterableMap<>();

    /**
     * Starts to listen the given {@code source} LiveData, {@code onChanged} observer will be called
     * when {@code source} value was changed.
     * <p>
     * {@code onChanged} callback will be called only when this {@code MediatorLiveData} is active.
     * <p> If the given LiveData is already added as a source but with a different Observer,
     * {@link IllegalArgumentException} will be thrown.
     *
     * @param source    the {@code LiveData} to listen to
     * @param onChanged The observer that will receive the events
     * @param <S>       The type of data hold by {@code source} LiveData
     */
    @MainThread
    public <S> void addSource(@NonNull LiveData<S> source, @NonNull Observer<? super S> onChanged) {
        Source<S> e = new Source<>(source, onChanged);
        Source<?> existing = mSources.putIfAbsent(source, e);
        if (existing != null && existing.mObserver != onChanged) {
            throw new IllegalArgumentException(
                    "This source was already added with the different observer");
        }
        if (existing != null) {
            return;
        }
        if (hasActiveObservers()) {
            e.plug();
        }
    }

    /**
     * Stops to listen the given {@code LiveData}.
     *
     * @param toRemote {@code LiveData} to stop to listen
     * @param <S>      the type of data hold by {@code source} LiveData
     */
    @MainThread
    public <S> void removeSource(@NonNull LiveData<S> toRemote) {
        Source<?> source = mSources.remove(toRemote);
        if (source != null) {
            source.unplug();
        }
    }

    @CallSuper
    @Override
    protected void onActive() {
        for (Map.Entry<LiveData<?>, Source<?>> source : mSources) {
            source.getValue().plug();
        }
    }

    @CallSuper
    @Override
    protected void onInactive() {
        for (Map.Entry<LiveData<?>, Source<?>> source : mSources) {
            source.getValue().unplug();
        }
    }

    private static class Source<V> implements Observer<V> {
        final LiveData<V> mLiveData;
        final Observer<? super V> mObserver;
        int mVersion = START_VERSION;

        Source(LiveData<V> liveData, final Observer<? super V> observer) {
            mLiveData = liveData;
            mObserver = observer;
        }

        void plug() {
            mLiveData.observeForever(this);
        }

        void unplug() {
            mLiveData.removeObserver(this);
        }

        @Override
        public void onChanged(@Nullable V v) {
            if (mVersion != mLiveData.getVersion()) {
                mVersion = mLiveData.getVersion();
                mObserver.onChanged(v);
            }
        }
    }
}
原来,MediatorLiveData也是LivData的之类,只不过,他的直接父类是MutableLiveData,而MutableLiveData的父类是LivData,他有一个addSource方法,addSource方法可以观察多个Livedata对象的数据变化。所以,但我们有多个MutableLiveData时,并且他们observer中处理的业务逻辑是一样,那么就可以使用addSource(),代码如下:
MediatorLiveData<New> data = new MediatorLiveData();
        data.addSource(LocalModel.getNewInfo(), new Observer<New>() {
            @Override
            public void onChanged(@Nullable New new) {
                data.setValue(user);
            }
        });
        data.addSource(NetModel.getNewInfo(), new Observer<New>() {
            @Override
            public void onChanged(@Nullable New new) {
                data.setValue(new);
            }
        });
        data.observe(this,new Observer<New>() {
            @Override
            public void onChanged(@Nullable New new) {
                // 更新UI
                new_title.setText(new.getName)
            }
        });
好了,到了这里,你就会发现LiveData的核心思想其实就是基于观察者模式的。这些功能非常的符合RxJava的设计理念,实现变换功能的是Transformations类,它提供了两个变化的方法:map() 方法和switchMap() 方法。
Architecture(架构组件)——ViewModel
ViewModel 是Android 架构组件中负责管理UI相关数据与逻辑的,它的功能定义与MVP架构中的Persenter十分相似,配合其他组件使用增加许多方便开发的功能。
开始使用ViewModel
定义一个ViewModel只需要继承ViewModel抽象类即可:
public class MainViewModel extends ViewModel {

}
在activity/fragment中实例化它:
MainViewModel viewModel = ViewModelProviders.of(this).get(MainViewModel.class);
注意:如果想要正常使用ViewModel的全部功能,不能直接new出ViewModel的实例,而是使用ViewModelProvider类创建,上面的ViewModelProviders其实就是对ViewModelProvider的包装类。
正是因为通过ViewModelProvider创建ViewModel的方式,ViewModel才具备了一些比较方便实用的功能。
感知生命周期
因为创建ViewModel时传入了activity/fragment对象实例(ViewModelProviders.of(this)),所以ViewModel可以感知宿主的生命周期。

当宿主onDestroy()时候ViewModel便会自行销毁掉,除此之前,当屏幕旋转的时候,Activity会被recreate,Activity会经过几个生命周期方法,但是这个时候ViewModel还是之前的对象,并没有被重新创建。
数据共享
public class MainViewModel extends ViewModel{

}

public class Fragment1 extends Fragment{
    @Override
    public void onCreate(@Nullable Bundle savedInstanceState) {
        super.onCreate(savedInstanceState);
        MainViewModel ViewModel = ViewModelProviders.of(getActivity()).get(MainViewModel.class);
    }
}

public class Fragment2 extends Fragment{
    @Override
    public void onCreate(@Nullable Bundle savedInstanceState) {
        super.onCreate(savedInstanceState);
        MainViewModel ViewModel = ViewModelProviders.of(getActivity()).get(MainViewModel.class);
    }
}
上面的例子中,如果fragment1和fragment2的宿主activity是同一个的话,那么它们创建的ViewModel是同一个,ViewModel中的数据二者可以共享。
更新UI
ViewModel配合LiveData使用可以做到在不持有activity任何引用的情况下更新UI数据,这是整个组件架构中最有亮点以及最有特色的地方。
public class MainViewModel extends ViewModel{
    MutableLiveData<String> data = new MutableLiveData<>();

    public LiveData<String> getData(){
        return data;
    }

    public void loadData(){
        // 模拟一个数据请求
        data.setValue("test");
    }

}

public class Fragment1 extends Fragment{
    @Override
    public void onCreate(@Nullable Bundle savedInstanceState) {
        super.onCreate(savedInstanceState);
        MainViewModel ViewModel = ViewModelProviders.of(this).get(MainViewModel.class);
        ViewModel.getData().observe(this,new Observer(){
            @Override
            public void onChanged(String s){
                textView.setText(s);
            }
        });
    }
}
在上面的例子中,textView会根据数据源的变化更新自己,而ViewModel中不需要考虑UI更新的问题,只需要关注数据的变化即可。
注意事项
ViewModel看似使用简单,但是在实际使用中会有一些点需要关注的。
1. 数据源的初始化
ViewModel本质上就是管理各种LiveData数据源的,但一定要注意的是在外界getData()前一定要初始化数据源,因为外界获得数据源后一般会直接注册观察者,如果这时候数据源没有初始化就会空指针异常。
2. 数据源的更新
上面的例子中loadData()方法更新数据源是直接用当前data对象更新的,但是在实际使用中每次请求数据后极有可能会发生数据请求模块返回一个新的LiveData实例,这种情况不能直接将当前的data重新赋值:
data = newData;
这样写的话外界设置的观察者就会失效了。
MVVM总结分析与运用
好了,到了这里我们大概认识mvvm的整个架构体系,知道了MVVM模式是Model-View-ViewMode模式的简称。由视图(View)、视图模型(ViewModel)、模型(Model)三部分组成,结构如下图。通过这三部分实现UI逻辑、呈现逻辑和状态控制、数据与业务逻辑的分离。而使用mvvm的好处大致如下:
- 低耦合。View可以独立于Model变化和修改,一个ViewModel可以绑定到不同的View上,当View变化的时候Model可以不变,当Model 变化的时候View也可以不变。
- 可重用性。可以把一些视图的逻辑放在ViewModel里面,让很多View重用这段视图逻辑。
- 独立开发。开发人员可以专注与业务逻辑和数据的开发(ViewModel)。设计人员可以专注于界面(View)的设计。
- 可测试性。可以针对ViewModel来对界面(View)进行测试
当然了,mvvm的应用不仅仅在Android上,现在很多前端框架都是使用了mvvm,比如vue,因此,我们有必要深入了解一下mvvm架构。尤其是做响应式编程,mvvm架构绝是不二之选。
扩展组件化
随着微服务的兴起,组件化的概念也是越来越深入人心,也越来越有必要。你会发现,当你学会了使用组件化将为我们开发带来很多便捷之处。
代码是死的,产品是活的。在日常开发中,各种各样频繁变动的需求,给开发上带来了不小的麻烦。为了尽量把代码写“活”,所以出现了设计模式。但光有设计模式,还是很难满足产品BT的需求。
对于简单的小项目,大多都采用的是单一工程,独立开发。由于项目不大,编译速度及维护成本这些也在接受范围之内。而对于做好一个App产品,这种多人合作、单一工程的App架构势必会影响开发效率,增加项目的维护成本。每个开发者都要熟悉如此之多的代码,将很难进行多人协作开发,而且Android项目在编译代码的时候电脑会非常卡,又因为单一工程下代码耦合严重,每修改一处代码后都要重新编译打包测试,导致非常耗时,最重要的是这样的代码想要做单元测试根本无从下手,所以必须要有更灵活的架构代替过去单一的工程架构。
使用组件化方案架构,高内聚,低耦合,代码边界清晰,每一个组件都可以拆分出来独立运行。所有组件寄托于宿主App,加载分离的各个组件,各自编译自己的模块,有利于多人团队协作开发。
今天就为大家推荐俩个优秀开源的组件化开源库:
- MVVMHabit:基于谷歌最新AAC架构,MVVM设计模式的一套快速开发库,整合Okhttp+RxJava+Retrofit+Glide等主流模块,满足日常开发需求。使用该框架可以快速开发一个高质量、易维护的Android应用。
- ARouter:阿里出的一个用于帮助 Android App 进行组件化改造的框架 —— 支持模块间的路由、通信、解耦。
MVVMHabit + ARouter:MVVM模式 + 组件化方案,前者是设计模式,后者是方案架构,两者并用,相得益彰。有这两个框架作支撑,事半功倍,可快速开发组件化应用。
在后面博客里,我会专门抽出一篇博客来讲解如何利用MVVMHabit + ARouter实现MVVM模式 + 组件化的方案。今天这里就不做过多的叙述,推荐大家学习一下这俩个组件化方案。
主流组件化方案:
1. mvvmhabit:基于谷歌最新AAC架构,MVVM设计模式的一套快速开发库,整合Okhttp+RxJava+Retrofit+Glide等主流模块,满足日常开发需求。使用该框架可以快速开发一个高质量、易维护的Android应用。