参考:腾讯云手动实验https://cloud.tencent.com/developer/labs/lab/10195
ZipKin入门介绍
Zipkin是一款开源的分布式实时数据追踪系统(Distributed Tracking System),基于 Google Dapper的论文设计而来,由 Twitter 公司开发贡献。其主要功能是聚集来自各个异构系统的实时监控数据。分布式跟踪系统还有其他比较成熟的实现,例如:Naver的Pinpoint、Apache的HTrace、阿里的鹰眼Tracing、京东的Hydra、新浪的Watchman,美团点评的CAT,skywalking等。
ZipKin架构
ZipKin可以分为两部分,一部分是zipkin server,用来作为数据的采集存储、数据分析与展示;zipkin client是zipkin基于不同的语言及框架封装的一些列客户端工具,这些工具完成了追踪数据的生成与上报功能,架构如下:
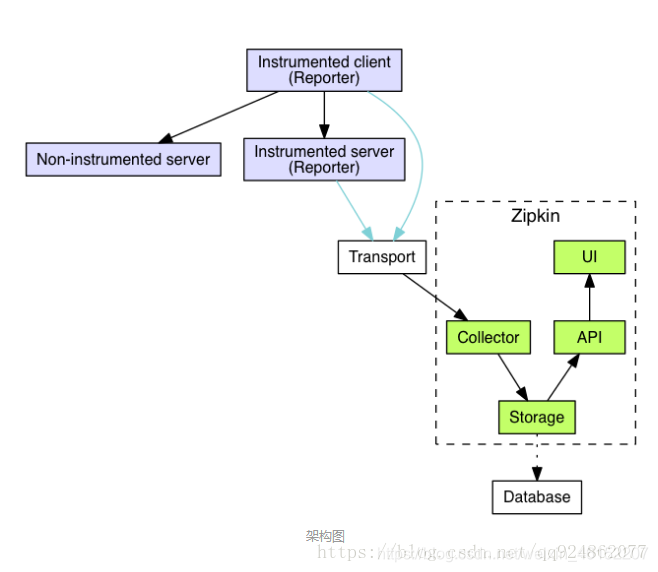
Zipkin Server主要包括四个模块:
(1)Collector 接收或收集各应用传输的数据
(2)Storage 存储接受或收集过来的数据,当前支持Memory,MySQL,Cassandra,ElasticSearch等,默认存储在内存中。
(3)API(Query) 负责查询Storage中存储的数据,提供简单的JSON API获取数据,主要提供给web UI使用
(4)Web 提供简单的web界面
服务追踪流程如下:
┌─────────────┐ ┌───────────────────────┐  ┌─────────────┐  ┌──────────────────┐
│ User Code   │ │ Trace Instrumentation │  │ Http Client │  │ Zipkin Collector │
└─────────────┘ └───────────────────────┘  └─────────────┘  └──────────────────┘
       │                 │                         │                 │
           ┌─────────┐
       │ ──┤GET /foo ├─▶ │ ────┐                   │                 │
           └─────────┘         │ record tags
       │                 │ ◀───┘                   │                 │
                           ────┐
       │                 │     │ add trace headers │                 │
                           ◀───┘
       │                 │ ────┐                   │                 │
                               │ record timestamp
       │                 │ ◀───┘                   │                 │
                             ┌─────────────────┐
       │                 │ ──┤GET /foo         ├─▶ │                 │
                             │X-B3-TraceId: aa │     ────┐
       │                 │   │X-B3-SpanId: 6b  │   │     │           │
                             └─────────────────┘         │ invoke
       │                 │                         │     │ request   │
                                                         │
       │                 │                         │     │           │
                                 ┌────────┐          ◀───┘
       │                 │ ◀─────┤200 OK  ├─────── │                 │
                           ────┐ └────────┘
       │                 │     │ record duration   │                 │
            ┌────────┐     ◀───┘
       │ ◀──┤200 OK  ├── │                         │                 │
            └────────┘       ┌────────────────────────────────┐
       │                 │ ──┤ asynchronously report span     ├────▶ │
                             │                                │
                             │{

                                   │
                             │  "traceId": "aa",              │
                             │  "id": "6b",                   │
                             │  "name": "get",                │
                             │  "timestamp": 1483945573944000,│
                             │  "duration": 386000,           │
                             │  "annotations": [              │
                             │--snip--                        │
                             └────────────────────────────────┘
Instrumented client和server是分别使用了ZipKin Client的服务,Zipkin Client会根据配置将追踪数据发送到Zipkin Server中进行数据存储、分析和展示。
ZipKin几个概念
在追踪日志中,有几个基本概念spanId、traceId、parentId
traceId:用来确定一个追踪链的16字符长度的字符串,在某个追踪链中保持不变。
spanId:区域Id,在一个追踪链中spanId可能存在多个,每个spanId用于表明在某个服务中的身份,也是16字符长度的字符串。
parentId:在跨服务调用者的spanId会传递给被调用者,被调用者会将调用者的spanId作为自己的parentId,然后自己再生成spanId。
如下图:
刚发起调用时traceId和spanId是一致,parentId不存在。

被调用者的traceId和调用者的traceId时一致的,被调用者会产生自己的spanId,并且被调用者的parentId是调用者的spanId

配置Java环境
安装JDK
Zipkin使用Java1.8(拖包)
[root@localhost ~]# tar zxf jdk-8u201-linux-x64.tar.gz
[root@localhost ~]# mv jdk1.8.0_201/ /usr/local/java
[root@localhost ~]# vim /etc/profile
export JAVA_HOME=/usr/local/java
export JRE_HOME=/usr/local/java/jre/
export CLASSPATH=$JAVA_HOME/lib:$JRE_HOME/lib
export PATH=$PATH:$JAVA_HOME/bin:$JRE_HOME/bin
[root@localhost ~]# rm -rf /usr/bin/java
[root@localhost ~]# source /etc/profile
[root@localhost ~]# java -version
java version "1.8.0_201"
Java(TM) SE Runtime Environment (build 1.8.0_201-b09)
Java HotSpot(TM) 64-Bit Server VM (build 25.201-b09, mixed mode)
安装Zipkin
新建目录
[root@localhost ~]# mkdir -p /data/release/zipkin && cd "$_"
下载Zipkin
[root@localhost zipkin]# wget -O zipkin.jar 'https://search.maven.org/remote_content?g=io.zipkin.java&a=zipkin-server&v=LATEST&c=exec'
启动Zipkin,阻塞模式
[root@localhost ~]# java -jar /data/release/zipkin/zipkin.jar
以MySQL为例做数据持久化方案
安装MySQL5.7
将以上阻塞打断
下载MySQL
[root@localhost ~]# wget http://dev.mysql.com/get/mysql57-community-release-el7-9.noarch.rpm
安装rpm包
[root@localhost ~]# rpm -Uvh mysql57-community-release-el7-9.noarch.rpm
安装MySQL
[root@localhost ~]# yum install mysql-community-server -y
启动MySQL服务
[root@localhost ~]# systemctl start mysqld
设置MySQL密码
[root@localhost ~]# grep 'temporary password' /var/log/mysqld.log | awk '{print $NF}'
Tb#phSu!B4hQ
[root@localhost ~]# mysql -uroot -p
# 复制以上的密码即可
修改MySQL的root密码
mysql> ALTER USER 'root'@'localhost' IDENTIFIED BY '123456.CoM';
Query OK, 0 rows affected (0.02 sec)
mysql> exit
Bye
初始化Zipkin数据库
编写初始化脚本
请在 /data/release/zipkin 目录下创建 zipkin_init.sql
示例代码:/data/release/zipkin/zipkin_init.sql
[root@localhost ~]# vim /data/release/zipkin/zipkin_init.sql
CREATE TABLE IF NOT EXISTS zipkin_spans (
  `trace_id_high` BIGINT NOT NULL DEFAULT 0 COMMENT 'If non zero, this means the trace uses 128 bit traceIds instead of 64 bit',
  `trace_id` BIGINT NOT NULL,
  `id` BIGINT NOT NULL,
  `name` VARCHAR(255) NOT NULL,
  `parent_id` BIGINT,
  `debug` BIT(1),
  `start_ts` BIGINT COMMENT 'Span.timestamp(): epoch micros used for endTs query and to implement TTL',
  `duration` BIGINT COMMENT 'Span.duration(): micros used for minDuration and maxDuration query'
) ENGINE=InnoDB ROW_FORMAT=COMPRESSED CHARACTER SET=utf8 COLLATE utf8_general_ci;

ALTER TABLE zipkin_spans ADD UNIQUE KEY(`trace_id_high`, `trace_id`, `id`) COMMENT 'ignore insert on duplicate';
ALTER TABLE zipkin_spans ADD INDEX(`trace_id_high`, `trace_id`, `id`) COMMENT 'for joining with zipkin_annotations';
ALTER TABLE zipkin_spans ADD INDEX(`trace_id_high`, `trace_id`) COMMENT 'for getTracesByIds';
ALTER TABLE zipkin_spans ADD INDEX(`name`) COMMENT 'for getTraces and getSpanNames';
ALTER TABLE zipkin_spans ADD INDEX(`start_ts`) COMMENT 'for getTraces ordering and range';

CREATE TABLE IF NOT EXISTS zipkin_annotations (
  `trace_id_high` BIGINT NOT NULL DEFAULT 0 COMMENT 'If non zero, this means the trace uses 128 bit traceIds instead of 64 bit',
  `trace_id` BIGINT NOT NULL COMMENT 'coincides with zipkin_spans.trace_id',
  `span_id` BIGINT NOT NULL COMMENT 'coincides with zipkin_spans.id',
  `a_key` VARCHAR(255) NOT NULL COMMENT 'BinaryAnnotation.key or Annotation.value if type == -1',
  `a_value` BLOB COMMENT 'BinaryAnnotation.value(), which must be smaller than 64KB',
  `a_type` INT NOT NULL COMMENT 'BinaryAnnotation.type() or -1 if Annotation',
  `a_timestamp` BIGINT COMMENT 'Used to implement TTL; Annotation.timestamp or zipkin_spans.timestamp',
  `endpoint_ipv4` INT COMMENT 'Null when Binary/Annotation.endpoint is null',
  `endpoint_ipv6` BINARY(16) COMMENT 'Null when Binary/Annotation.endpoint is null, or no IPv6 address',
  `endpoint_port` SMALLINT COMMENT 'Null when Binary/Annotation.endpoint is null',
  `endpoint_service_name` VARCHAR(255) COMMENT 'Null when Binary/Annotation.endpoint is null'
) ENGINE=InnoDB ROW_FORMAT=COMPRESSED CHARACTER SET=utf8 COLLATE utf8_general_ci;

ALTER TABLE zipkin_annotations ADD UNIQUE KEY(`trace_id_high`, `trace_id`, `span_id`, `a_key`, `a_timestamp`) COMMENT 'Ignore insert on duplicate';
ALTER TABLE zipkin_annotations ADD INDEX(`trace_id_high`, `trace_id`, `span_id`) COMMENT 'for joining with zipkin_spans';
ALTER TABLE zipkin_annotations ADD INDEX(`trace_id_high`, `trace_id`) COMMENT 'for getTraces/ByIds';
ALTER TABLE zipkin_annotations ADD INDEX(`endpoint_service_name`) COMMENT 'for getTraces and getServiceNames';
ALTER TABLE zipkin_annotations ADD INDEX(`a_type`) COMMENT 'for getTraces';
ALTER TABLE zipkin_annotations ADD INDEX(`a_key`) COMMENT 'for getTraces';
ALTER TABLE zipkin_annotations ADD INDEX(`trace_id`, `span_id`, `a_key`) COMMENT 'for dependencies job';

CREATE TABLE IF NOT EXISTS zipkin_dependencies (
  `day` DATE NOT NULL,
  `parent` VARCHAR(255) NOT NULL,
  `child` VARCHAR(255) NOT NULL,
  `call_count` BIGINT
) ENGINE=InnoDB ROW_FORMAT=COMPRESSED CHARACTER SET=utf8 COLLATE utf8_general_ci;

ALTER TABLE zipkin_dependencies ADD UNIQUE KEY(`day`, `parent`, `child`);
登录MySQL
[root@localhost ~]# mysql -uroot -p123456.CoM
创建zipkin数据库,并将刚才的实例sql文件导入
mysql> CREATE DATABASE zipkin;
Query OK, 1 row affected (0.01 sec)
mysql> use zipkin;
Database changed
mysql> source /data/release/zipkin/zipkin_init.sql
mysql> show tables;
+---------------------+
| Tables_in_zipkin    |
+---------------------+
| zipkin_annotations  |
| zipkin_dependencies |
| zipkin_spans        |
+---------------------+
3 rows in set (0.00 sec)
mysql> exit
Bye
启动Zipkin
[root@localhost ~]# cd /data/release/zipkin/
[root@localhost zipkin]# STORAGE_TYPE=mysql MYSQL_HOST=localhost MYSQL_TCP_PORT=3306 MYSQL_DB=zipkin \
MYSQL_USER=root MYSQL_PASS='123456.CoM' \
nohup java -jar zipkin.jar > /dev/null 2>&1 &
创建具有数据上报能力的Demo
安装Node.js
下载Node.js的源码安装包
[root@localhost ~]# wget https://npm.taobao.org/mirrors/node/v14.0.0/node-v14.0.0-linux-x64.tar.xz
解压Node.js源码包
[root@localhost ~]# tar xf node-v14.0.0-linux-x64.tar.xz
添加Node.js的命令到系统环境变量中
[root@localhost ~]# mv node-v14.0.0-linux-x64 /usr/local/nodejs
[root@localhost ~]# vim /etc/profile
# 末尾添加
export PATH=$PATH:/usr/local/nodejs/bin
[root@localhost ~]# source /etc/profile
[root@localhost ~]# node -v
v14.0.0
创建Demo目录
[root@localhost zipkin]# mkdir /data/release/service_a
请在 /data/release/service_a 目录下创建并编辑 package.json,
示例代码:/data/release/service_a/package.json
[root@localhost zipkin]# cd ../service_a/
[root@localhost service_a]# vim ../service_a/package.json
{


  "name": "service_a",
  "version": "1.0.0",
  "description": "",
  "main": "index.js",
  "scripts": {

    },
  "author": "",
  "license": "ISC",
  "dependencies": {


    "express": "^4.15.3",
    "zipkin": "^0.7.2",
    "zipkin-instrumentation-express": "^0.7.2",
    "zipkin-transport-http": "^0.7.2"
  }
}
安装相关依赖
[root@localhost service_a]# npm install
创建并编辑 app.js
请在 /data/release/service_a 目录下创建 app.js
[root@localhost service_a]# vim app.js
const express = require('express');
const {

    Tracer, ExplicitContext, BatchRecorder} = require('zipkin');
const {

    HttpLogger} = require('zipkin-transport-http');
const zipkinMiddleware = require('zipkin-instrumentation-express').expressMiddleware;

const ctxImpl = new ExplicitContext();
const recorder = new BatchRecorder({


    logger: new HttpLogger( {


        endpoint: 'http://127.0.0.1:9411/api/v1/spans'
    })
});

const tracer = new Tracer({

    ctxImpl, recorder});

const app = express();

app.use(zipkinMiddleware({


  tracer,
  serviceName: 'service-a'
}));

app.use('/', (req, res, next) => {


    res.send('hello world\n');
});

app.listen(3001, () => {


  console.log('service-a listening on port 3001!')
});
启动服务(阻塞模式)
[root@localhost service_a]# node app.js
service-a listening on port 3001!
访问127.0.0.1:3001
[root@localhost ~]# curl 127.0.0.1:3001
hello world