翻译 | 《JavaScript Everywhere》第16章 创建,读取,更新和删除操作
写在最前面
大家好呀,我是毛小悠,是一位前端开发工程师。正在翻译一本英文技术书籍。
为了提高大家的阅读体验,对语句的结构和内容略有调整。如果发现本文中有存在瑕疵的地方,或者你有任何意见或者建议,可以在评论区留言,或者加我的微信:code_maomao,欢迎相互沟通交流学习。
(σ゚∀゚)σ…:*☆哎哟不错哦
第16章 创建,读取,更新和删除操作
我喜欢纸质笔记本,几乎一直都随身携带着。通常,它们相对便宜,我很快就写满了临时的想法。不久前,我购买了价格更高的精装本笔记本,上面有精美的封面和精美的纸本。购买时,我对笔记本中将要出现的草图和计划抱有很大的野心,但是它在我的办公桌上呆了几个月。最终,我将其放在架子上,回到了我的标准笔记本电脑品牌。
就像我的笔记本一样,我们的应用仅在用户能够使用时才有用。你可能会从我们的API开发中回想起Notedly应用程序是一个“ CRUD”(创建,读取,更新和删除)应用程序。经过身份验证的用户可以创建新笔记、阅读笔记、更新笔记的内容或笔记作为收藏夹的状态以及删除笔记。在本章中,我们将在Web用户界面中实现所有这些功能。为了完成这些任务,我们将编写GraphQL请求和查询。
创建新笔记
当前,我们可以查看笔记,但无法创建笔记。这类似于没有笔的笔记本。让我们为用户添加创建新笔记的功能。我们将通过创建一个用户可以在其中写笔记的textarea形式。
当用户提交表单时,我们将执行GraphQL更改以在数据库中创建笔记。
首先,让我们在src/pages/new.js中创建NewNote组件:
import React, {

     useEffect } from 'react';
import {

     useMutation, gql } from '@apollo/client';

const NewNote = props => {


  useEffect(() => {


   // update the document title
   document.title = 'New Note — Notedly';
  });

  return <div>New note</div>;
};

export default NewNote;
接下来,让我们在src/pages/index.js文件中设置新路由:
// import the NewNote route component
import NewNote from './new';

// add a private route to our list of routes, within the
<PrivateRoute path="/new" component={

    NewNote} />
我们知道,我们将创建新笔记并更新现有笔记。为了适应这种行为,让我们创建一个名为NoteForm的新组件,该组件将用作笔记表单编辑的标记和React状态。
我们将在src/components/NoteForm.js中创建一个新文件。该组件将由一个包含文本区域以及一些最小样式的表单元素组成。该功能将非常类似于我们的UserForm组件:
import React, {

     useState } from 'react';
import styled from 'styled-components';

import Button from './Button';

const Wrapper = styled.div`
  height: 100%;
`;

const Form = styled.form`
  height: 100%;
`;

const TextArea = styled.textarea`
  width: 100%;
  height: 90%;
`;

const NoteForm = props => {


  // set the default state of the form
  const [value, setValue] = useState({

     content: props.content || '' });

  // update the state when a user types in the form
  const onChange = event => {


   setValue({


    ...value,
    [event.target.name]: event.target.value
   });
  };

  return (
   <Wrapper> <Form onSubmit={

    e => {


      e.preventDefault();
      props.action({


       variables: {


        ...values
       }
      });
     }}
    > <TextArea required type="text" name="content" placeholder="Note content" value={

    value.content} onChange={

    onChange} /> <Button type="submit">Save</Button> </Form> </Wrapper> );
};

export default NoteForm;
下一步,我们将需要参考在NewNote页面组件的NoteForm成分。在src/pages/new.js中:
 import React, {

     useEffect } from 'react';
import {

     useMutation, gql } from '@apollo/client';
// import the NoteForm component
import NoteForm from '../components/NoteForm';

const NewNote = props => {


  useEffect(() => {


   // update the document title
   document.title = 'New Note — Notedly';
  });

  return <NoteForm />;
};
export default NewNote;
有了这些更新,切换至http://localhost:1234/new将显示我们的效果(图16-1)。
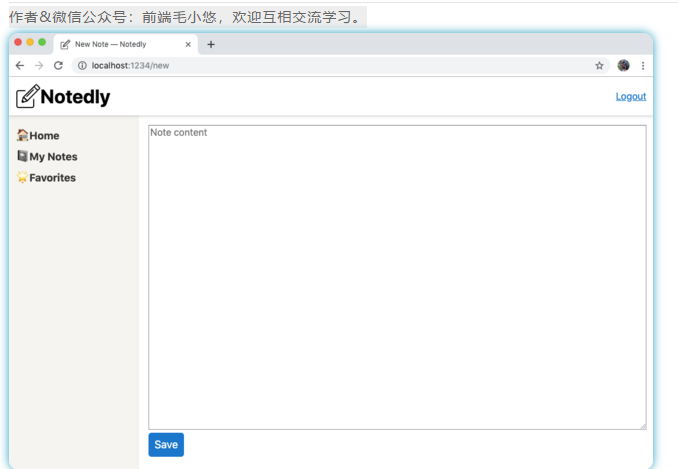
图16-1我们的NewNote组件为用户提供了一个较大的文本区域和保存按钮
完成表格后,我们可以开始编写我们的修改以创建新笔记。
在src/pages/new.js中:
 import React, {

     useEffect } from 'react';
import {

     useMutation, gql } from '@apollo/client';

import NoteForm from '../components/NoteForm';

// our new note query
const NEW_NOTE = gql`
  mutation newNote($content: String!) {
   newNote(content: $content) {
    id
    content
    createdAt
    favoriteCount
    favoritedBy {
     id
     username
    }
    author {
     username
     id
    }
   }
  }
`;

const NewNote = props => {


  useEffect(() => {


   // update the document title
   document.title = 'New Note — Notedly';
  });

  const [data, {

     loading, error }] = useMutation(NEW_NOTE, {


   onCompleted: data => {


    // when complete, redirect the user to the note page
    props.history.push(`note/${

      data.newNote.id}`);
   }
  });

  return (
   <React.Fragment>
    {

    /* as the mutation is loading, display a loading message*/}
    {

    loading && <p>Loading...</p>}
    {

    /* if there is an error, display a error message*/}
    {

    error && <p>Error saving the note</p>}
    {

    /* the form component, passing the mutation data as a prop */}
    <NoteForm action={

    data} />
   </React.Fragment>
  );
};

export default NewNote;
在前面的代码中,提交表单时,我们执行newNote修改。如果修改成功,则将用户重定向到单个笔记页面。你可能会注意到newNote修改请求了很多数据。这与笔记修改所请求的数据匹配,理想地更新了Apollo的缓存以快速切换到各个笔记组件。
如前所述,Apollo积极地缓存我们的查询,这有助于加快应用程序的切换。不幸的是,这也意味着用户可以访问页面,而看不到他们刚刚进行的更新。我们可以手动更新Apollo的缓存,但是更简单的方法是使用Apollo的refetchQueries功能可在执行修改时有意地更新缓存。
为此,我们需要访问预先编写的查询。到目前为止,我们一直将它们包含在组件文件的顶部,但让我们将其移动到自己的query.js文件中。在/src/gql/query.js中创建一个新文件,并添加我们的每个笔记查询以及IS\_LOGGED\_IN查询:
import {

     gql } from '@apollo/client';

const GET_NOTES = gql`
  query noteFeed($cursor: String) {
   noteFeed(cursor: $cursor) {
    cursor
    hasNextPage
    notes {
     id
     createdAt
     content
     favoriteCount
     author {
      username
      id
      avatar
     }
    }
   }
  }
`;

const GET_NOTE = gql`
  query note($id: ID!) {
   note(id: $id) {
    id
    createdAt
    content
    favoriteCount
    author {
     username
     id
     avatar
    }
   }
  }
`;

const IS_LOGGED_IN = gql`
  {
   isLoggedIn @client
  }
`;

export {

     GET_NOTES, GET_NOTE, IS_LOGGED_IN };
可重用的查询和修改
展望未来,我们将所有查询和修改都与组件分开,这将使我们能够轻松地在应用程序中重用它们,并且对于在测试期间mocking。
现在在src/pages/new.js中,我们可以通过导入查询并添加refetchQueries选项来请求我们的修改重新获取GET\_NOTES查询:
// import the query
import {

     GET_NOTES } from '../gql/query';

// within the NewNote component update the mutation
//everything else stays the same

const NewNote = props => {


  useEffect(() => {


   // update the document title
   document.title = 'New Note — Notedly';
  });

  const [data, {

     loading, error }] = useMutation(NEW_NOTE, {


   // refetch the GET_NOTES query to update the cache
   refetchQueries: [{

     query: GET_NOTES }],
   onCompleted: data => {


    // when complete, redirect the user to the note page
    props.history.push(`note/${

    data.newNote.id}`);
   }
  });

  return (
   <React.Fragment>
    {

    /* as the mutation is loading, display a loading message*/}
    {

    loading && <p>Loading...</p>}
    {

    /* if there is an error, display a error message*/}
    {

    error && <p>Error saving the note</p>}
    {

    /* the form component, passing the mutation data as a prop */}
    <NoteForm action={

    data} />
   </React.Fragment>
  );
};
我们的最后一步是将链接添加到我们的/new页面,以便用户可以轻松切换到该页面。在src/components/Navigation.js文件中,添加一个新的链接项,如下所示:
<li>
  <Link to="/new">New</Link>
</li>
这样,我们的用户就可以切换到新的笔记页面,输入笔记,然后将笔记保存到数据库中。
阅读用户说明
我们的应用程序当前能够读取我们的笔记摘要以及单个笔记,但是我们还没有查询经过身份验证的用户的笔记。让我们编写两个GraphQL查询来创建用户及其收藏夹的提要。
在src/gql/query.js中,添加GET\_MY\_NOTES查询并更新导出,如下所示:
// add the GET_MY_NOTES query
const GET_MY_NOTES = gql`
  query me {


    me {


      id
      username
      notes {


        id
        createdAt
        content
        favoriteCount
        author {


          username
          id
          avatar
        }
      }
    }
  }
`;

// update to include GET_MY_NOTES
export {

     GET_NOTES, GET_NOTE, IS_LOGGED_IN, GET_MY_NOTES };
现在在src/pages/mynotes.js中,导入查询并使用NoteFeed组件显示笔记:
import React, {

     useEffect } from 'react';
import {

     useQuery, gql } from '@apollo/client';

import NoteFeed from '../components/NoteFeed';
import {

     GET_MY_NOTES } from '../gql/query';

const MyNotes = () => {


  useEffect(() => {


    // update the document title
    document.title = 'My Notes — Notedly';
  });

  const {

     loading, error, data } = useQuery(GET_MY_NOTES);

  // if the data is loading, our app will display a loading message
  if (loading) return 'Loading...';
  // if there is an error fetching the data, display an error message
  if (error) return `Error! ${

      error.message}`;
  // if the query is successful and there are notes, return the feed of notes
  // else if the query is successful and there aren't notes, display a message
  if (data.me.notes.length !== 0) {


    return <NoteFeed notes={

    data.me.notes} />;
  } else {


    return <p>No notes yet</p>;
  }
};

export default MyNotes;
我们可以重复此过程以创建“收藏夹”页面。首先,在src/gql/query.js中:
 // add the GET_MY_FAVORITES query
const GET_MY_FAVORITES = gql`
  query me {


    me {


      id
      username
      favorites {


        id
        createdAt
        content
        favoriteCount
        author {


          username
          id
          avatar
        }
      }
    }
  }
`;

// update to include GET_MY_FAVORITES
export {

     GET_NOTES, GET_NOTE, IS_LOGGED_IN, GET_MY_NOTES, GET_MY_FAVORITES };
现在,在src/pages/favorites.js中:
import React, {

     useEffect } from 'react';
import {

     useQuery, gql } from '@apollo/client';

import NoteFeed from '../components/NoteFeed';
// import the query
import {

     GET_MY_FAVORITES } from '../gql/query';

const Favorites = () => {


  useEffect(() => {


    // update the document title
    document.title = 'Favorites — Notedly';
  });

  const {

     loading, error, data } = useQuery(GET_MY_FAVORITES);

  // if the data is loading, our app will display a loading message
  if (loading) return 'Loading...';
  // if there is an error fetching the data, display an error message
  if (error) return `Error! ${

      error.message}`;
  // if the query is successful and there are notes, return the feed of notes
  // else if the query is successful and there aren't notes, display a message
  if (data.me.favorites.length !== 0) {


    return <NoteFeed notes={

    data.me.favorites} />;
  } else {


    return <p>No favorites yet</p>;
  }
};

export default Favorites;
最后,让我们更新src/pages/new.js文件以重新获取GET\_MY\_NOTES查询,以确保在创建笔记时更新了用户笔记的缓存列表。在src/pages/new.js中,首先更新GraphQL查询import语句:
import {

     GET_MY_NOTES, GET_NOTES } from '../gql/query';
然后更新修改:
const [data, {

     loading, error }] = useMutation(NEW_NOTE, {


  // refetch the GET_NOTES and GET_MY_NOTES queries to update the cache
  refetchQueries: [{

     query: GET_MY_NOTES }, {

     query: GET_NOTES }],
  onCompleted: data => {


    // when complete, redirect the user to the note page
    props.history.push(`note/${

      data.newNote.id}`);
  }
});
通过这些更改,我们现在可以在我们的应用程序中执行所有读取操作。
更新说明
当前,用户一旦写了笔记,便无法对其进行更新。为了解决这个问题,我们希望在应用程序中启用笔记编辑。我们的GraphQL API具有updateNote修改,它接受笔记ID和内容作为参数。如果笔记存在于数据库中,则修改将使用修改中发送的内容更新存储的内容。
在我们的应用程序中,我们可以在/ edit/NOTE\_ID处创建一条路由,将现有笔记内容放置在textarea表单中。当用户单击“保存”时,我们将提交表单并执行updateNote更改。
让我们创建一条新路由,在该路由中将编辑我们的笔记。首先,我们可以使我们的一个重复的src/pages/ note.js页并将其命名为edit.js。目前,该页面仅显示笔记。
在src/pages/edit.js中:
import React from 'react';
import {

     useQuery, useMutation, gql } from '@apollo/client';

// import the Note component
import Note from '../components/Note';
// import the GET_NOTE query
import {

     GET_NOTE } from '../gql/query';

const EditNote = props => {


  // store the id found in the url as a variable
  const id = props.match.params.id;
  // define our note query
  const {

     loading, error, data } = useQuery(GET_NOTE, {

     variables: {

     id } });

  // if the data is loading, display a loading message
  if (loading) return 'Loading...';
  // if there is an error fetching the data, display an error message
  if (error) return <p>Error! Note not found</p>;
  // if successful, pass the data to the note component
  return <Note note={

    data.note} />;
};

export default EditNote;
现在,我们可以通过将页面添加到src/pages/index.js中的路由来使页面可切换:
// import the edit page component
import EditNote from './edit';

// add a new private route that accepts an :id parameter
<PrivateRoute path="/edit/:id" component={

    EditNote} />
这样,如果你切换到/note/ID处的笔记页面并将其交换为/edit/ID,你将看到笔记的改变。让我们对其进行更改,以使其显示在表单的textarea中显示的笔记内容。
在src/pages/edit.js中,删除Note组件的import语句,并将其替换为NoteForm组件:
// import the NoteForm component
import NoteForm from '../components/NoteForm';
现在,我们可以更新EditNote组件来使用我们的编辑表单。我们可以使用content属性将笔记的内容传递给表单组件。虽然我们的GraphQL修改仅接受原作者的更新,但我们也可以只将表单显示的范围限制为笔记的作者,以避免混淆其他用户。
首先,将新查询添加到src/gql/query.js文件中,以获取当前用户,其用户ID以及收藏的笔记ID的列表:
// add GET_ME to our queries
const GET_ME = gql`
  query me {
    me {
      id
      favorites {
        id
      }
    }
  }
`;

// update to include GET_ME
export {


  GET_NOTES,
  GET_NOTE,
  GET_MY_NOTES,
  GET_MY_FAVORITES,
  GET_ME,
  IS_LOGGED_IN
};
在src/pages/edit.js中,导入GET\_ME查询并包括用户检查:
import React from 'react';
import {

     useMutation, useQuery } from '@apollo/client';

// import the NoteForm component
import NoteForm from '../components/NoteForm';
import {

     GET_NOTE, GET_ME } from '../gql/query';
import {

     EDIT_NOTE } from '../gql/mutation';

const EditNote = props => {


  // store the id found in the url as a variable
  const id = props.match.params.id;
  // define our note query
  const {

     loading, error, data } = useQuery(GET_NOTE, {

     variables: {

     id } });
  // fetch the current user's data
  const {

     data: userdata } = useQuery(GET_ME);
  // if the data is loading, display a loading message
  if (loading) return 'Loading...';
  // if there is an error fetching the data, display an error message
  if (error) return <p>Error! Note not found</p>;
  // if the current user and the author of the note do not match
  if (userdata.me.id !== data.note.author.id) {


    return <p>You do not have access to edit this note</p>;
  }
  // pass the data to the form component
  return <NoteForm content={

    data.note.content} />;
};
现在,我们可以编辑表单中的笔记,但是单击按钮尚不能保存我们的更改。让我们写我们的GraphQLupdateNote修改。与查询文件类似,让我们创建一个文件来保存我们的修改。在src/gql/mutation中,添加以下内容:
import {

     gql } from '@apollo/client';

const EDIT_NOTE = gql`
  mutation updateNote($id: ID!, $content: String!) {
    updateNote(id: $id, content: $content) {
      id
      content
      createdAt
      favoriteCount
      favoritedBy {
        id
        username
      }
      author {
        username
        id
      }
    }
  }
`;

export {

     EDIT_NOTE };
编写好修改后,我们可以导入它并更新我们的组件代码,以在单击按钮时调用该修改。为此,我们将添加一个useMutation挂钩。修改完成后,我们会将用户重定向到笔记页面。
// import the mutation
import {

     EDIT_NOTE } from '../gql/mutation';

const EditNote = props => {


  // store the id found in the url as a variable
  const id = props.match.params.id;
  // define our note query
  const {

     loading, error, data } = useQuery(GET_NOTE, {

     variables: {

     id } });
  // fetch the current user's data
  const {

     data: userdata } = useQuery(GET_ME);
  // define our mutation
  const [editNote] = useMutation(EDIT_NOTE, {


    variables: {


      id
    },
    onCompleted: () => {


      props.history.push(`/note/${

      id}`);
    }
  });

  // if the data is loading, display a loading message
  if (loading) return 'Loading...';
  // if there is an error fetching the data, display an error message
  if (error) return <p>Error!</p>;
  // if the current user and the author of the note do not match
  if (userdata.me.id !== data.note.author.id) {


    return <p>You do not have access to edit this note</p>;
  }

  // pass the data and mutation to the form component
  return <NoteForm content={

    data.note.content} action={

    editNote} />;
};

export default EditNote;
最后,我们只想向用户显示“编辑”链接,但前提是用户是笔记的作者。在我们的应用程序中,我们将需要检查以确保当前用户的ID与笔记作者的ID相匹配。为了实现此行为,我们将涉及几个组件。
现在,我们可以直接在Note组件中实现我们的功能,让我们在src/components/NoteUser.js上创建一个专门用于登录用户交互的组件。在这个React组件中,我们将对当前用户ID执行GraphQL查询,并提供一个指向编辑页面的可路由链接。有了这些信息,我们就可以开始导入所需的库并设置一个新的React组件。在React组件内,我们将包含一个编辑链接,该链接会将用户引导至笔记的编辑页面。现在,无论笔记的所有者是谁,用户都将看到此链接。
如下更新src/components/NoteUser.js:
import React from 'react';
import {

     useQuery, gql } from '@apollo/client';
import {

     Link } from 'react-router-dom';

const NoteUser = props => {


  return <Link to={

    `/edit/${

      props.note.id}`}>Edit</Link>;
};

export default NoteUser;
接下来,我们将更新Note组件以执行本地isLoggedIn状态查询。
然后,我们可以根据用户的登录状态有条件地呈现NoteUser组件。
首先,我们导入GraphQL库与NoteUser组件一起执行查询。在src/components/Note.js中,在文件顶部添加以下内容:
import {

     useQuery } from '@apollo/client';

// import logged in user UI components
import NoteUser from './NoteUser';
// import the IS_LOGGED_IN local query
import {

     IS_LOGGED_IN } from '../gql/query';
现在,我们可以更新我们的JSX组件以检查登录状态。如果用户已登录,我们将显示NoteUser组件;否则,我们将显示收藏夹计数。
const Note = ({

     note }) => {


  const {

     loading, error, data } = useQuery(IS_LOGGED_IN);
  // if the data is loading, display a loading message
  if (loading) return <p>Loading...</p>;
  // if there is an error fetching the data, display an error message
  if (error) return <p>Error!</p>;

  return (
    <StyledNote>
      <MetaData>
        <MetaInfo>
          <img src={

    note.author.avatar} alt={

    `${

      note.author.username} avatar`} height="50px" />
        </MetaInfo>
        <MetaInfo>
          <em>by</em> {

    note.author.username} <br />
          {

    format(note.createdAt, 'MMM Do YYYY')}
        </MetaInfo>
        {

    data.isLoggedIn ? (
          <UserActions>
            <NoteUser note={

    note} />
          </UserActions>
        ) : (
          <UserActions>
            <em>Favorites:</em> {

    note.favoriteCount}
          </UserActions>
        )}
      </MetaData>
      <ReactMarkdown source={

    note.content} />
    </StyledNote>
  );
};
未经身份验证的编辑
尽管我们将在UI中隐藏编辑链接,但用户仍然可以切换到笔记的编辑屏幕,而无需成为笔记所有者。值得庆幸的是,我们的GraphQL API旨在防止笔记所有者以外的任何人编辑笔记的内容。我们不会在本书中进行介绍,但是一个不错的附加步骤是更新src/pages/edit.js组件以重定向用户(如果他们不是笔记所有者)。
进行此更改后,登录用户可以在每个笔记的顶部看到一个编辑链接。单击该链接将切换到一个编辑表单,而不管笔记的所有者是谁。让我们通过更新NoteUser组件来查询当前用户的ID并仅在其与笔记作者的ID匹配时显示编辑链接来解决此问题。
首先在src/components/NoteUser.js中,添加以下内容:
import React from 'react'; import {

     useQuery } from '@apollo/client'; import {

     Link } from 'react-router-dom'; // import our GET_ME query
import {

     GET_ME } from '../gql/query'; const NoteUser = props => {

     const {

     loading, error, data } = useQuery(GET_ME); // if the data is loading, display a loading message
  if (loading) return <p>Loading...</p>; // if there is an error fetching the data, display an error message
  if (error) return <p>Error!</p>; return (
    <React.Fragment>
      Favorites: {

    props.note.favoriteCount}
      <br />
      {

    data.me.id === props.note.author.id && (
        <React.Fragment>
          <Link to={

    `/edit/${

      props.note.id}`}>Edit</Link>
        </React.Fragment>
      )}
    </React.Fragment>
  );
};

export default NoteUser;
进行此更改后,只有笔记的原始作者才能在UI中看到编辑链接(图16-2)。
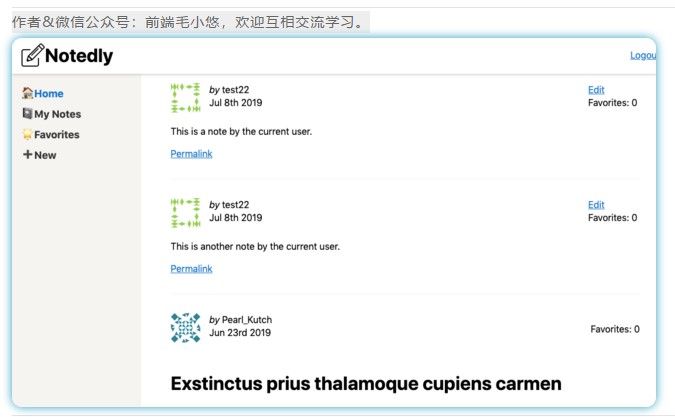
图16-2。只有笔记的作者才能看到编辑链接
删除笔记
我们的CRUD应用程序仍然缺少删除笔记的功能。我们可以编写一个UI按钮组件,单击该组件将执行GraphQL修改,从而删除笔记。让我们从src/components/DeleteNote.js创建一个新组件开始。由于我们将在不可路由的组件内执行重定向,因此我们将使用React Router的withRouter高阶组件:
import React from 'react';
import {

     useMutation } from '@apollo/client';
import {

     withRouter } from 'react-router-dom';

import ButtonAsLink from './ButtonAsLink';

const DeleteNote = props => {


  return <ButtonAsLink>Delete Note</ButtonAsLink>;
};

export default withRouter(DeleteNote);
现在,我们可以编写我们的修改了。我们的GraphQL API具有deleteNote修改,如果删除了笔记,则返回布尔值true。修改完成后,我们会将用户重定向到应用程序的/ mynotes页面。
首先,在src/gql/mutation.js中,按如下所示编写修改:
const DELETE_NOTE = gql`
  mutation deleteNote($id: ID!) {
    deleteNote(id: $id)
  }
`;

// update to include DELETE_NOTE
export {

     EDIT_NOTE, DELETE_NOTE };
现在在src/components/DeleteNote中,添加以下内容:
import React from 'react';
import {

     useMutation } from '@apollo/client';
import {

     withRouter } from 'react-router-dom';

import ButtonAsLink from './ButtonAsLink';
// import the DELETE_NOTE mutation
import {

     DELETE_NOTE } from '../gql/mutation';
// import queries to refetch after note deletion
import {

     GET_MY_NOTES, GET_NOTES } from '../gql/query';

const DeleteNote = props => {


  const [deleteNote] = useMutation(DELETE_NOTE, {


    variables: {


      id: props.noteId
    },
    // refetch the note list queries to update the cache
    refetchQueries: [{

     query: GET_MY_NOTES, GET_NOTES }],
    onCompleted: data => {


      // redirect the user to the "my notes" page
      props.history.push('/mynotes');
    }
  });

  return <ButtonAsLink onClick={

    deleteNote}>Delete Note</ButtonAsLink>;
};

export default withRouter(DeleteNote);
现在,我们可以在src/components/NoteUser.js文件中导入新的DeleteNote组件,仅将其显示给笔记的作者:
import React from 'react';
import {

     useQuery } from '@apollo/client';
import {

     Link } from 'react-router-dom';

import {

     GET_ME } from '../gql/query';
// import the DeleteNote component
import DeleteNote from './DeleteNote';

const NoteUser = props => {


  const {

     loading, error, data } = useQuery(GET_ME);
  // if the data is loading, display a loading message
  if (loading) return <p>Loading...</p>;
  // if there is an error fetching the data, display an error message
  if (error) return <p>Error!</p>;

  return (
    <React.Fragment>
      Favorites: {

    props.note.favoriteCount} <br />
      {

    data.me.id === props.note.author.id && (
        <React.Fragment>
          <Link to={

    `/edit/${

      props.note.id}`}>Edit</Link> <br />
          <DeleteNote noteId={

    props.note.id} />
        </React.Fragment>
      )}
    </React.Fragment>
  );
};

export default NoteUser;
写入此修改后,登录用户现在可以通过单击按钮删除笔记。
切换收藏夹
我们的应用程序缺少的最后一个用户功能是能够添加和删除“收藏夹”笔记。让我们遵循为该功能创建组件并将其集成到我们的应用程序中的模式。首先,在src/components/FavoriteNote.js中创建一个新组件:
import React, {

     useState } from 'react';
import {

     useMutation } from '@apollo/client';

import ButtonAsLink from './ButtonAsLink';

const FavoriteNote = props => {


  return <ButtonAsLink>Add to favorites</ButtonAsLink>;
};

export default FavoriteNote;
在添加任何功能之前,让我们继续将该组件合并到我们的src/components/NoteUser.js组件中。首先,导入组件:
import FavoriteNote from './FavoriteNote';
现在,在我们的JSX中,包括了对该组件的引用。你可能还记得,当我们编写GET\_ME查询时,我们包括了一个喜爱的笔记ID列表,我们将在这里使用它:
 return (
  <React.Fragment>
    <FavoriteNote me={

    data.me} noteId={

    props.note.id} favoriteCount={

    props.note.favoriteCount} />
    <br />
    {

    data.me.id === props.note.author.id && (
      <React.Fragment>
        <Link to={

    `/edit/${

      props.note.id}`}>Edit</Link> <br />
        <DeleteNote noteId={

    props.note.id} />
      </React.Fragment>
    )}
  </React.Fragment>
);
你会注意到,我们正在将三个属性传递给FavoriteNote组件。首先是我们的我的数据,其中包括当前用户的ID,以及由用户收藏笔记的列表。第二,当前笔记的noteID。最后是favoriteCount,它是当前用户收藏夹的总数。
现在,我们可以返回src/components/FavoriteNote.js文件。在此文件中,我们将存储当前收藏夹数作为状态,并检查当前笔记ID是否在用户收藏夹的现有列表中。我们将根据用户收藏夹的状态更改用户看到的文本。当用户单击按钮时,它将调用我们的toggleFavorite修改,该修改将在用户列表中添加或删除收藏夹。让我们首先更新组件以使用状态来控制点击功能。
const FavoriteNote = props => {


  // store the note's favorite count as state
  const [count, setCount] = useState(props.favoriteCount);

  // store if the user has favorited the note as state
  const [favorited, setFavorited] = useState(
    // check if the note exists in the user favorites list
    props.me.favorites.filter(note => note.id === props.noteId).length > 0
  );

  return (
    <React.Fragment> {

    favorited ? ( <ButtonAsLink onClick={

    () => {


            setFavorited(false);
            setCount(count - 1);
          }}
        >
          Remove Favorite </ButtonAsLink> ) : ( <ButtonAsLink onClick={

    () => {


            setFavorited(true);
            setCount(count + 1);
          }}
        >
          Add Favorite </ButtonAsLink> )}
      : {

    count} </React.Fragment> );
};
通过前面的更改,我们将在用户单击时更新状态,但尚未调用GraphQL修改。让我们通过编写修改并将其添加到组件中来完成此组件。结果显示为图16-3。
在src/gql/mutation.js中:
// add the TOGGLE_FAVORITE mutation
const TOGGLE_FAVORITE = gql`
  mutation toggleFavorite($id: ID!) {
    toggleFavorite(id: $id) {
      id
      favoriteCount
    }
  }
`;

// update to include TOGGLE_FAVORITE
export {

     EDIT_NOTE, DELETE_NOTE, TOGGLE_FAVORITE };
在src/components/FavoriteNote.js中:
import React, {

     useState } from 'react';
import {

     useMutation } from '@apollo/client';

import ButtonAsLink from './ButtonAsLink';
// the TOGGLE_FAVORITE mutation
import {

     TOGGLE_FAVORITE } from '../gql/mutation';
// add the GET_MY_FAVORITES query to refetch
import {

     GET_MY_FAVORITES } from '../gql/query';

const FavoriteNote = props => {


  // store the note's favorite count as state
  const [count, setCount] = useState(props.favoriteCount);

  // store if the user has favorited the note as state
  const [favorited, setFavorited] = useState(
    // check if the note exists in the user favorites list
    props.me.favorites.filter(note => note.id === props.noteId).length > 0
  );

  // toggleFavorite mutation hook
  const [toggleFavorite] = useMutation(TOGGLE_FAVORITE, {


    variables: {


      id: props.noteId
    },
    // refetch the GET_MY_FAVORITES query to update the cache
    refetchQueries: [{

     query: GET_MY_FAVORITES }]
  });

  // if the user has favorited the note, display the option to remove the favorite
  // else, display the option to add as a favorite
  return (
    <React.Fragment> {

    favorited ? ( <ButtonAsLink onClick={

    () => {


            toggleFavorite();
            setFavorited(false);
            setCount(count - 1);
          }}
        >
          Remove Favorite </ButtonAsLink> ) : ( <ButtonAsLink onClick={

    () => {


            toggleFavorite();
            setFavorited(true);
            setCount(count + 1);
          }}
        >
          Add Favorite </ButtonAsLink> )}
      : {

    count} </React.Fragment> );
};

export default FavoriteNote;

图16-3。登录的用户将能够创建,阅读,更新和删除笔记
结论
在本章中,我们已将站点变成功能齐全的CRUD(创建,读取,更新,删除)应用程序。现在,我们可以根据已登录用户的状态来实现GraphQL查询和修改。构建集成CRUD用户交互的用户界面的能力将为构建各种Web应用程序奠定坚实的基础。借助此功能,我们已经完成了应用的MVP(最低可行产品)。在下一章中,我们将应用程序部署到Web服务器上。
如果有理解不到位的地方,欢迎大家纠错。如果觉得还可以,麻烦你点赞收藏或者分享一下,希望可以帮到更多人。