deeplabv3+模型训练好后,可以用来预测自己的图片。训练模型过程可以看我前面的文章。
1.预测单张图片
预测本地图片
首先将图片保存好,然后可以参照deeplabv3+官方的demo:deeplab_demo.ipynp编写自己的程序。这里就不放代码了,直接看预测多张图片的。
预测在线图片
需要给定图片的url,也直接看下面的吧。
2.预测多张图片
import os
from io import BytesIO
from six.moves import urllib
from matplotlib import gridspec
from matplotlib import pyplot as plt
import numpy as np
from PIL import Image
import tensorflow as tf
import datetime
class DeeplabModel(object):
"""class to load deeplab model and run inference."""
INPUT_TENSOR_NAME = 'ImageTensor:0'
OUTPUT_TENSOR_NAME = 'SemanticPredictions:0'
INPUT_SIZE = 513
FROZEN_GRAPH_NAME = 'frozen_inference_graph'
def __init__(self, model_path):
"""creates and loads pretrained deeplab model."""
self.graph = tf.Graph()
# Extract frozen graph
with open(model_path + "frozen_inference_graph.pb", "rb") as f:
graph_def = tf.GraphDef.FromString(f.read())
if graph_def is None:
raise RuntimeError('cannot find inference graph')
with self.graph.as_default():
tf.import_graph_def(graph_def, name='')
self.sess = tf.Session(graph=self.graph)
def run(self, image):
"""runs inference on a single image.
Args:
image:A PIL.Image object,raw input image.
Returns:
resized_image:RGB image resized from original input image.
seg_map:Segmentation map
"""
width, height = image.size
resize_ratio = 1.0 * self.INPUT_SIZE / max(width, height)
target_size = (int(resize_ratio * width), int(resize_ratio * height))
resized_image = image.convert('RGB').resize(target_size, Image.ANTIALIAS)
batch_seg_map = self.sess.run(self.OUTPUT_TENSOR_NAME,
feed_dict={
self.INPUT_TENSOR_NAME: [np.asarray(resized_image)]})
seg_map = batch_seg_map[0]
# print('deeplab model finished')
return resized_image, seg_map
def create_pascal_label_colormap():
"""creates a label colormap used in PASCAL VOC Segmentation benchmark.
Returns:
A colormap for visualizing segmentation results"""
colormap = np.zeros((256, 3), dtype=int)
ind = np.arange(256, dtype=int)
for shift in reversed(range(8)):
for channel in range(3):
colormap[:, channel] |= ((ind >> channel) & 1) << shift
ind >>= 3
return colormap
def label_to_color_image(label):
"""Adds color defined by dataset colormap to label"""
if label.ndim != 2:
raise ValueError('Expect 2-D input label')
colormap = create_pascal_label_colormap()
if np.max(label) >= len(colormap):
raise ValueError('label value too large.')
return colormap[label]
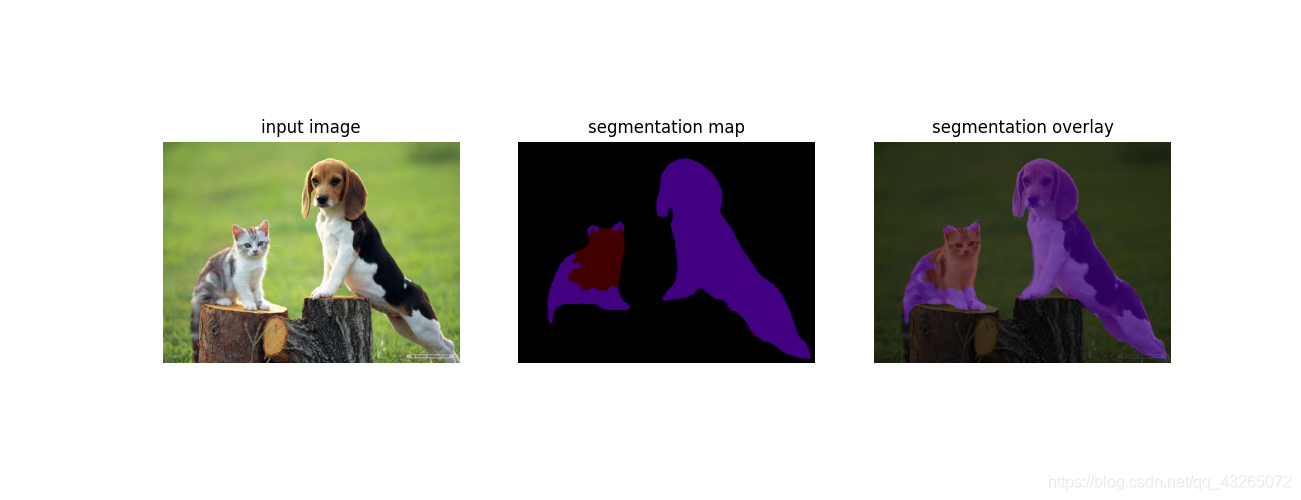
def vis_segmentation(image, seg_map):
"""可视化分割图像
Para:
image:原图
seg_map:分割好的图像
"""
plt.figure(figsize=(15, 5))
grid_spec = gridspec.GridSpec(1, 3, width_ratios=[10, 10, 10])
plt.subplot(grid_spec[0])
plt.imshow(image)
plt.axis('off')
plt.title('input image')
plt.subplot(grid_spec[1])
seg_image = label_to_color_image(seg_map).astype(np.uint8)
plt.imshow(seg_image)
plt.axis('off')
plt.title('segmentation map')
plt.subplot(grid_spec[2])
plt.imshow(image)
plt.imshow(seg_image, alpha=0.7)
plt.axis('off')
plt.title('segmentation overlay')
plt.show()
LABEL_NAMES = np.asarray([
'background', 'aeroplane', 'bicycle', 'bird', 'boat', 'bottle', 'bus',
'car', 'cat', 'chair', 'cow', 'diningtable', 'dog', 'horse', 'motorbike',
'person', 'pottedplant', 'sheep', 'sofa', 'train', 'tv'
])
def load_image(image_path):
"""从本地文件夹中加载图像"""
img = Image.open(image_path)
return img
def save_seg_image(seg_map, save_logdir):
"""save segmentation image"""
colored_image = label_to_color_image(seg_map).astype(np.uint8)
colored_image = Image.fromarray(colored_image)
colored_image.save(save_logdir)
export_model_path = '/home/hy/software/models/research/deeplab/datasets/pascal_voc_seg/exp/train_on_train_set/export/'
MODEL = DeeplabModel(export_model_path)
def run_visualization(image_path, saved_path, mode=False):
"""inferences deeplab model and visualizes results
Args:
image_path:path where image stores or url where can load image
saved_path:path where segmentation images store
mode:chose load image from local path or online, default False refers local path """
start = datetime.datetime.now()
if mode:
try:
f = urllib.request.urlopen(image_path)
jpeg_str = f.read()
original_im = Image.open(BytesIO(jpeg_str))
except IOError:
print('Cannot retrieve image.Please check url:' + image_path)
return
resized_im, seg_map = MODEL.run(original_im)
else:
if not os.path.exists(image_path) or not os.path.exists(saved_path):
print('Error:cannot find image path!')
return
image_lists = os.listdir(image_path)
length = len(image_lists)
for i in range(0, length):
print('predict the %dth image' % i)
original_im = load_image(os.path.join(image_path, image_lists[i]))
# print('running deeplab on image %s...' % image_path)
resized_im, seg_map = MODEL.run(original_im)
save_seg_image(seg_map, os.path.join(saved_path, image_lists[i]))
end = datetime.datetime.now()
print(end - start)
vis_segmentation(resized_im, seg_map)
# IMAGE_URL = 'https://ss3.bdstatic.com/70cFv8Sh_Q1YnxGkpoWK1HF6hhy/it/u=3731733193,393708434&fm=26&gp=0.jpg'
img_path = '/home/hy/template/pictures'
save_path = '/home/hy/template/seg_map'
run_visualization(img_path, save_path)
不过上面代码只是循环读取图片进行处理,如果有更高效的办法请给我留言呀!
3.效果图