Editor Scripting
前言
欢迎来到英雄 (Unity)联盟,今年冠状病毒肆虐正好有理由宅在家学习学习~今天我们来学习自定义编辑器界面。
1.参考的官网教程
2.其它参考
创建一个自定义Inspector
1.创建自己的脚本
using System.Collections.Generic;
using UnityEngine;
/// <summary>
/// 自己创建的脚本
/// </summary>
public class YourScript : MonoBehaviour
{
    [Header("得分")]
    public int score;
    /// <summary>
    /// 等级
    /// </summary>
    public int Level
    {
        get
        {
            return score / 100;
        }
    }
}
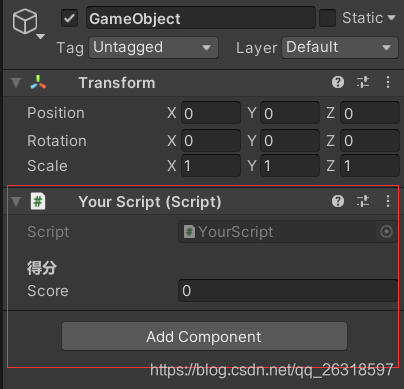
创建好后挂到一个空物体上有个默认的Inspector界面,只能看到score字段看不到Level属性
2.为了能直观的看到对应得分的Level需要在Editor文件夹下新建一个脚本告诉Unity显示出Level信息。这个脚本只在编辑器环境下有效,在Build的时候是会被自动忽略的!!脚本需要引用UnityEditor命名空间并且继承Editor这个类;我们主要工作就是覆写OnInspectorGUI()这个父类方法。
using UnityEngine;
using UnityEditor;

[CustomEditor(typeof(YourScript))]
public class YourScriptEditor : Editor
{
    public override void OnInspectorGUI()
    {
        //保留已有的样式
        DrawDefaultInspector();

        //脚本实例获取
        YourScript ys = (YourScript)target;

        //添加Level 显示
        EditorGUILayout.LabelField("Level",ys.Level.ToString());
    }
}
这时就可以看到Inpector上的Level信息了,是不是很好玩啊,哈哈哈

添加按钮
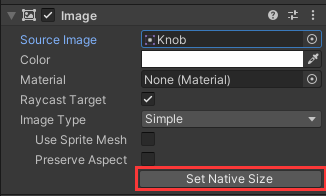
接下来添加像Image控件上的Set Native Size 按钮,可以在编辑器未运行时执行方法。
方法如下在Editor脚本中添加GUILayout.Button即可:
using UnityEngine;
using UnityEditor;

[CustomEditor(typeof(YourScript))]
public class YourScriptEditor : Editor
{
    public override void OnInspectorGUI()
    {
        //保留已有的样式
        DrawDefaultInspector();

        //脚本实例获取
        YourScript ys = (YourScript)target;

        //添加Level 显示
        EditorGUILayout.LabelField("Level",ys.Level.ToString());

        //按钮示例
        if (GUILayout.Button("实例化一个cube"))
        {
            ys.SpawnCube();
        }
    }
}
编辑器菜单栏扩展
添加到顶部菜单栏

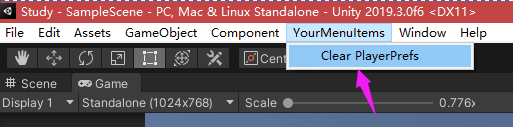
1.新建一个脚本YourMenuItems(必须放在Editor文件夹下),使用MenuItem特性标记你所写的静态方法,它就会自动在顶部菜单栏添加对应的菜单,点击后会执行对应的方法。
using System.Collections;
using System.Collections.Generic;
using UnityEditor;
using UnityEngine;

public class YourMenuItems
{
    [MenuItem("YourMenuItems/Clear PlayerPrefs")]
    public static void ClearPlayerPrefs() {
        PlayerPrefs.DeleteAll();
        Debug.Log("Clear PlayerPrefs");
    }
}
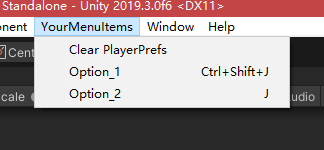
2.给菜单添加快捷键直接在路径后面空一格,然后写上快捷键组合符号
快捷键对照表
% 代表 Windows中的 CTRL,OSX中的 CMD按键
# 代表 Shift
& 代表 Alt
LEFT/RIGHT/UP/DOWN 代表方向键
F1…F2 代表 顶部的F键
HOME, END, PGUP, PGDN
如果是当个字母的快捷键需要在前面加下划线: _g
示例如下:
/// <summary>
    /// 快捷键 CTRL + Shift + j
    /// </summary>
    [MenuItem(path+"/Option_1 %#j") ]
    public static void MenuItem_A() {
        Debug.Log("快捷键 CTRL + Shift + j");
    }

    /// <summary>
    /// 单字母快捷键 j
    /// </summary>
    [MenuItem(path+"/Option_2 _j") ]
    public static void MenuItem_B() {
        Debug.Log("单字母快捷键 j");
    }

添加到其他菜单栏
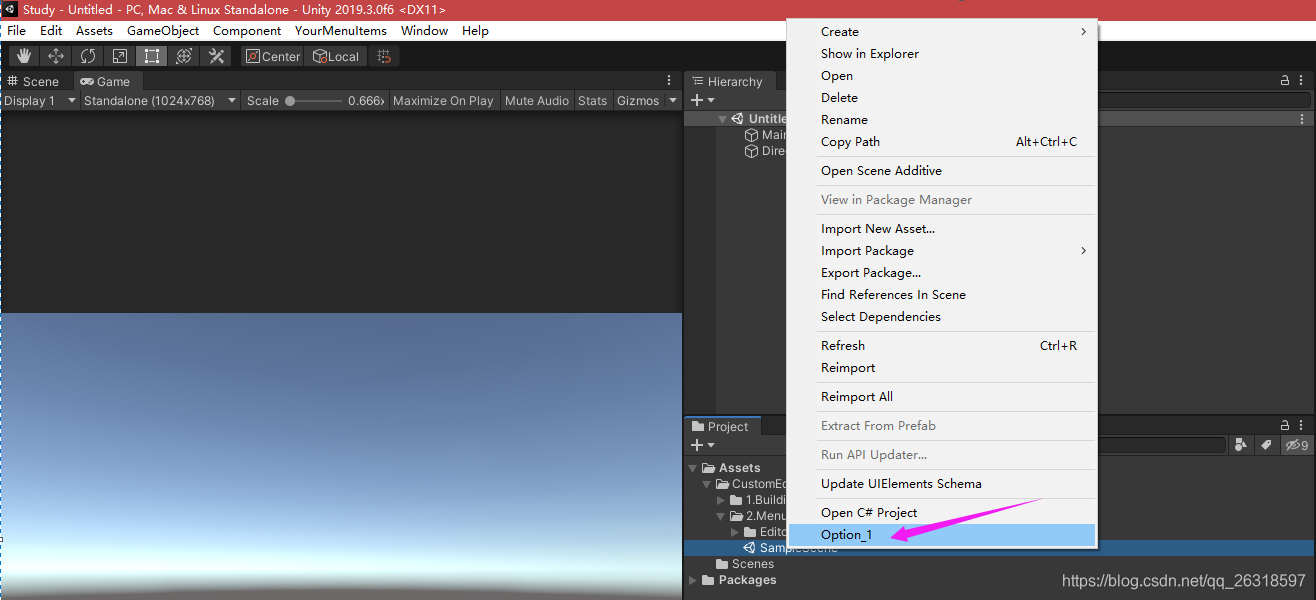
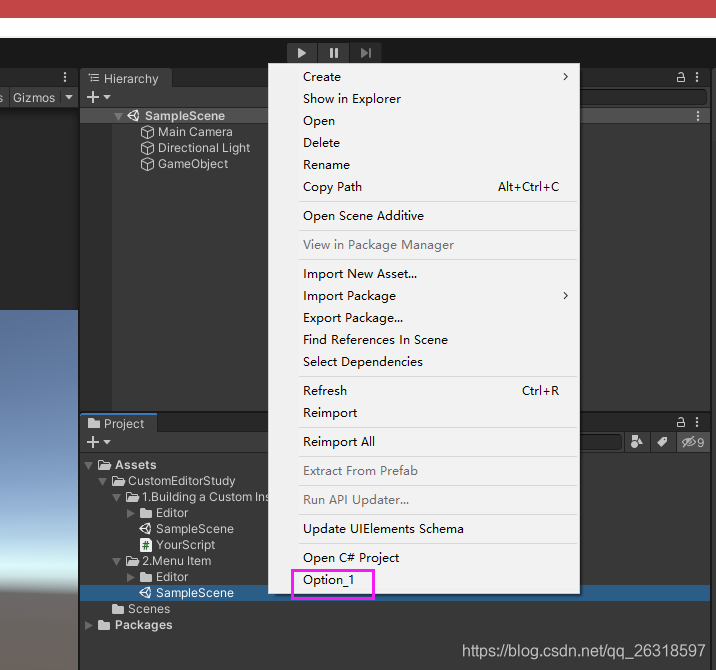
我们可以在写路径时添加特殊的根路径(Assets/ 或者 Assets/Create/)实现把菜单放到Project/Assets 的右键菜单栏上:

也可以用根路径(CONTEXT/ComponentName)把菜单放到名字为“ComponentName”的组件右键菜单栏上:
 	/// <summary>
    /// Project/Assets 右键菜单
    /// </summary>
    [MenuItem("Assets/Option_1")]
    public static void MenuItem_C()
    {
        Debug.Log("Project/Assets 右键菜单 点击");
    }

    /// <summary>
    /// 组件YourScript,Inspector上的 右键菜单
    /// </summary>
    [MenuItem("CONTEXT/YourScript/Option_2")]
    public static void MenuItem_D()
    {
        Debug.Log("组件YourScript,Inspector上的 右键菜单 点击");
    }

添加菜单激活验证
有的菜单需要在一定的条件下才允许使用,这时可以添加验证参数和方法自动验证并控制菜单的激活状态。
1.给MenuItem_C菜单新增一个验证方法MenuItem_C_Validation,设置它的validate=true,返回一个布尔值告之当前是否可以激活菜单。路径参数(菜单名itemName)必须一致。
    /// <summary>
    /// Project/Assets 右键菜单
    /// </summary>
    [MenuItem(itemName:"Assets/Option_1")]
    public static void MenuItem_C()
    {
        Debug.Log("Project/Assets 右键菜单 点击");
    }
    /// <summary>
    /// Project/Assets 右键菜单 验证方法
    /// </summary>
    [MenuItem(itemName:"Assets/Option_1",validate =true)]
    public static bool MenuItem_C_Validation()
    {
    	//判断当前选中的是否是场景资源
        return Selection.activeObject.GetType() == typeof(SceneAsset);
    }
下面所示如果当前不是场景文件就把菜单变为不可点状态:

选中场景文件菜单就可点了:
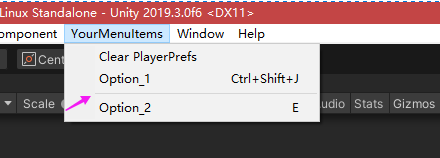
菜单排序
菜单排序直接在特性中添加参数priority,每五十个为一组。
priority 都在[0,49]之间时为一组,它们没有分隔线
    const string path = "YourMenuItems";
    [MenuItem(path+"/Clear PlayerPrefs",priority = 0)]
    public static void ClearPlayerPrefs() {
        PlayerPrefs.DeleteAll();
        Debug.Log("Clear PlayerPrefs");
    }

    /// <summary>
    /// 快捷键 CTRL + Shift + j
    /// </summary>
    [MenuItem(path+"/Option_1 %#j",priority =1) ]
    public static void MenuItem_A() {
        Debug.Log("快捷键 CTRL + Shift + j");
    }

    /// <summary>
    /// 单字母快捷键 j
    /// </summary>
    [MenuItem(path+"/Option_2 _j",priority =2) ]
    public static void MenuItem_B() {
        Debug.Log("单字母快捷键 j");
    }
priority =51时会添加分隔线划到新的一组
    /// <summary>
    /// 单字母快捷键 e
    /// </summary>
    [MenuItem(path + "/Option_2 _e", priority = 51)]
    public static void MenuItem_E()
    {
        Debug.Log("单字母快捷键 e");
    }
获取选中组件引用
直接在菜单对应的方法内添加MenuCommand 参数,系统会自动传入。
/// <summary>
/// 组件YourScript,Inspector上的 右键菜单
/// </summary>
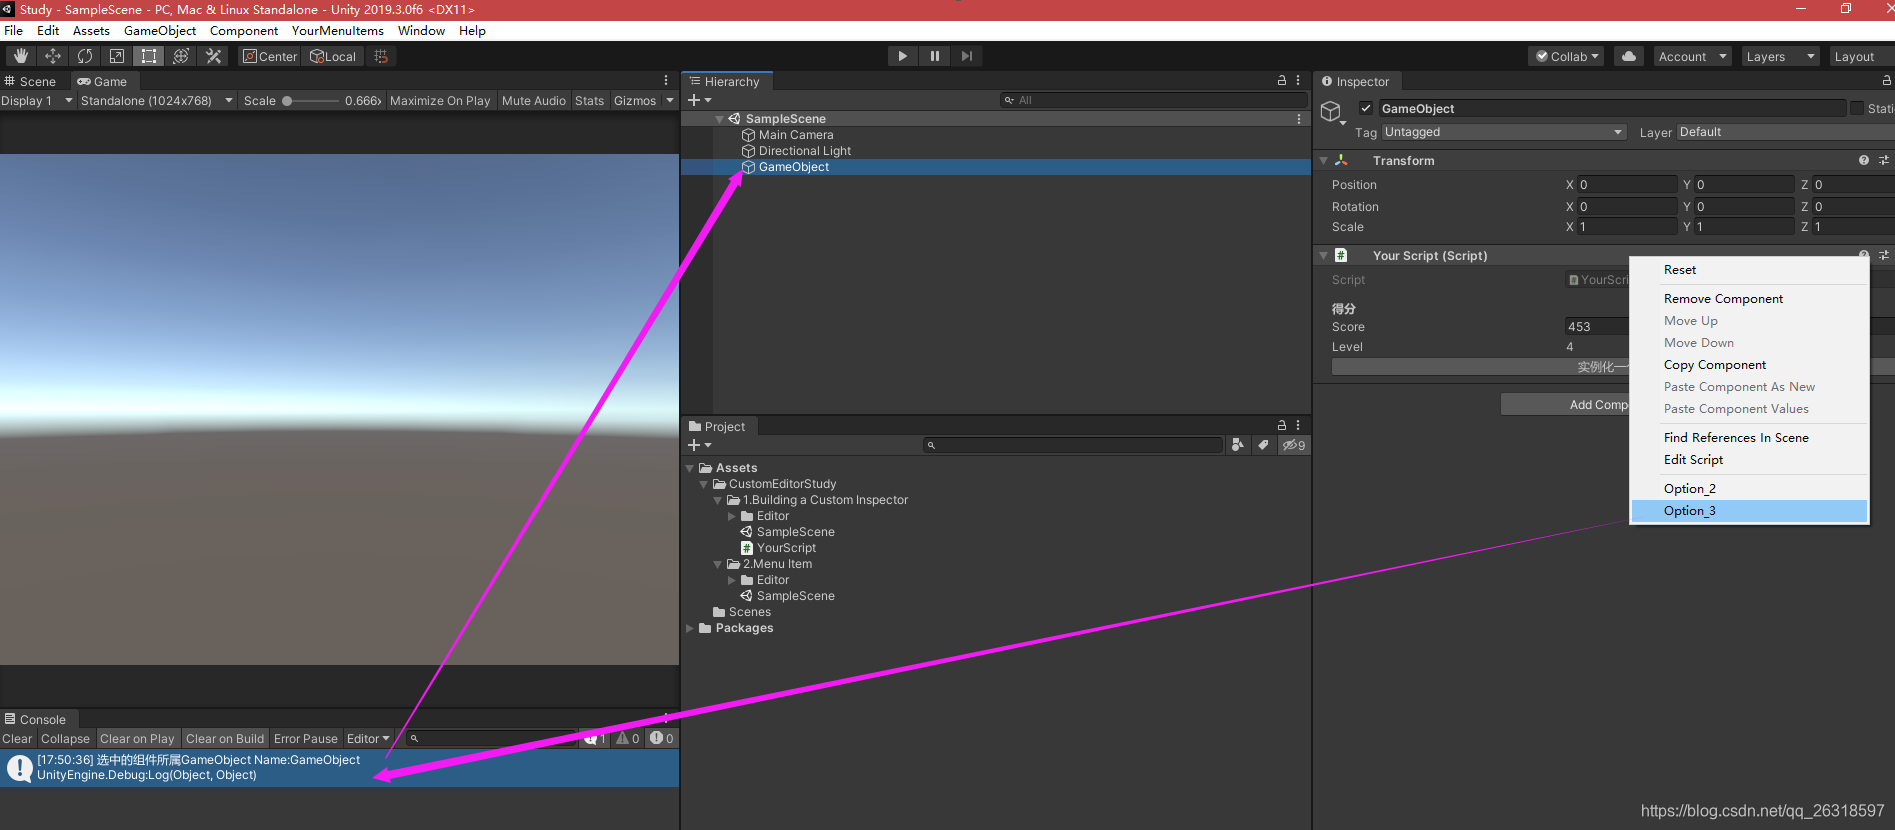
[MenuItem("CONTEXT/YourScript/Option_3")]
public static void MenuItem_F(MenuCommand menucommand)
{
YourScript ys = menucommand.context as YourScript;
Debug.Log($"选中的组件所属GameObject Name:{ys.gameObject.name}",ys.gameObject);
}
为组件添加默认的Inpector 右键菜单
在组件脚本里添加方法并用特性ContextMenu标记,它是组件默认的菜单。而[MenuItem("CONTEXT/YourScript/MenuName")]是对组件菜单的扩展,不需要写在组件脚本里,这样可以对系统自带的组件进行扩展。
using System.Collections;
using System.Collections.Generic;
using UnityEngine;
/// <summary>
/// 自己创建的脚本
/// </summary>
public class YourScript : MonoBehaviour
{
[Header("得分")]
public int score;
/// <summary>
/// 等级
/// </summary>
public int Level
{
get
{
return score / 100;
}
}
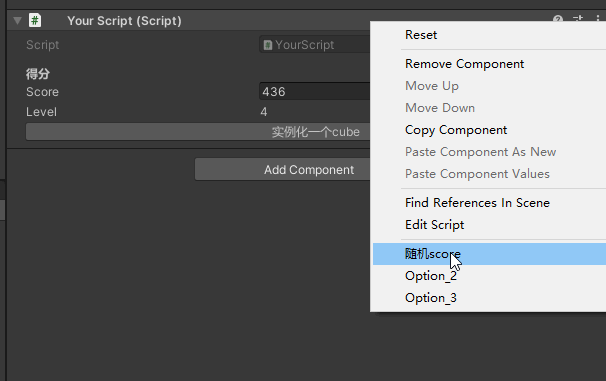
[ContextMenu("随机score")]
public void YourScriptDefaultMenu() {
score = Random.Range(0,1000);
}
}
为组件上的字段添加菜单
在字段上添加特性ContextMenuItem,并设置对应的执行参数即可。
using System.Collections;
using System.Collections.Generic;
using UnityEngine;
/// <summary>
/// 自己创建的脚本
/// </summary>
public class YourScript : MonoBehaviour
{
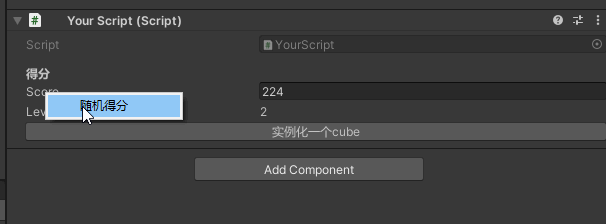
[Header("得分"),ContextMenuItem(name:"随机得分",function:"YourScriptDefaultMenu")]
public int score;
/// <summary>
/// 等级
/// </summary>
public int Level
{
get
{
return score / 100;
}
}
/// <summary>
/// 生成一个cube
/// </summary>
public void SpawnCube()
{
var cube = GameObject.CreatePrimitive(PrimitiveType.Cube);
}
[ContextMenu("随机score")]
public void YourScriptDefaultMenu() {
score = Random.Range(0,1000);
}
}
脚本使用技巧
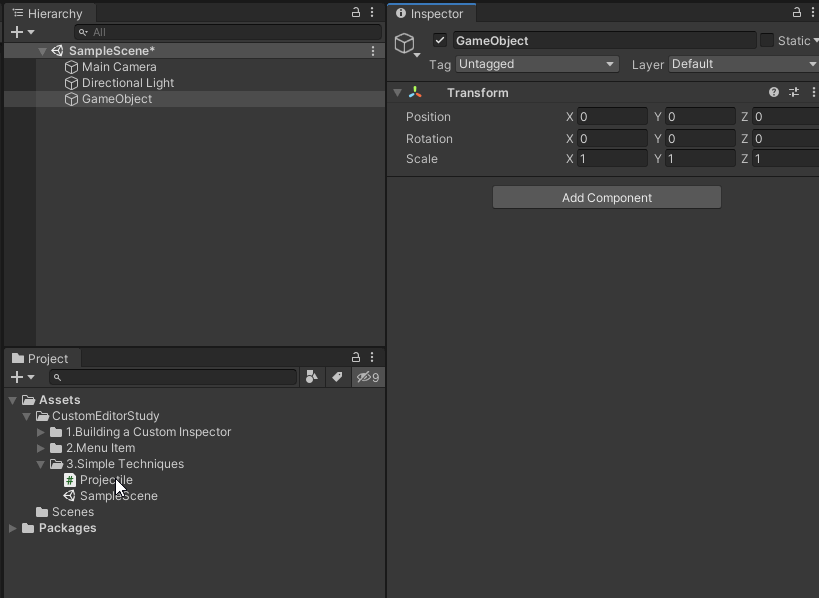
自动添加相关依赖组件
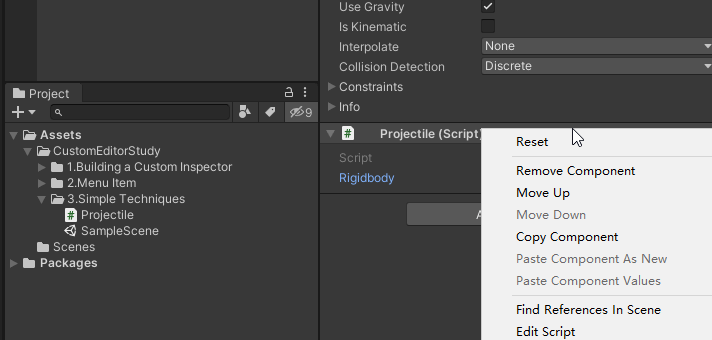
有时候一个脚本挂到一个GameObject上时需要依赖其他的组件,为了让不需要关系这些依赖的人使用这个脚本可以给脚本添加依赖信息(RequireComponent(typeof(xxx1),typeof(xxx2),...)),这样脚本首次挂到GameObject时就会把需要的依赖组件自动加上。
using UnityEngine;

[RequireComponent(typeof(Rigidbody),typeof(Transform))]
public class Projectile : MonoBehaviour
{

}
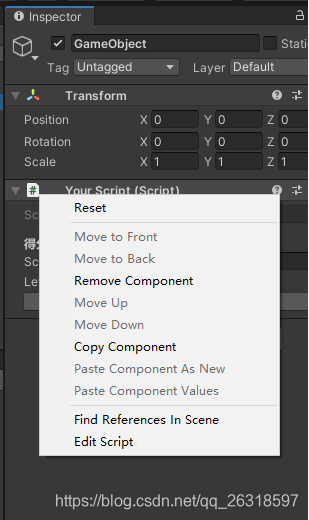
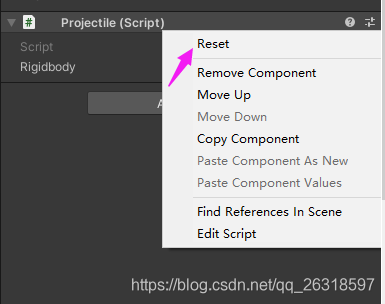
Inspector 菜单上的Reset功能
在所有Monobehaviour上都有一个Reset菜单,只要在脚本中覆写Reset()方法就可以响应该菜单的点击。
using System.Collections;
using System.Collections.Generic;
using UnityEngine;

[RequireComponent(typeof(Rigidbody))]
public class Projectile : MonoBehaviour
{
    public new Rigidbody rigidbody;

    private void Reset()
    {
        rigidbody =transform.GetComponent<Rigidbody>();
    }
}
暴露方法,快速测试
有时候需要验证某个方法,这时可以在方法上添加[ContextMenu]属性暴露该方法。这样就不用另外添加ui按钮,简化测试步骤。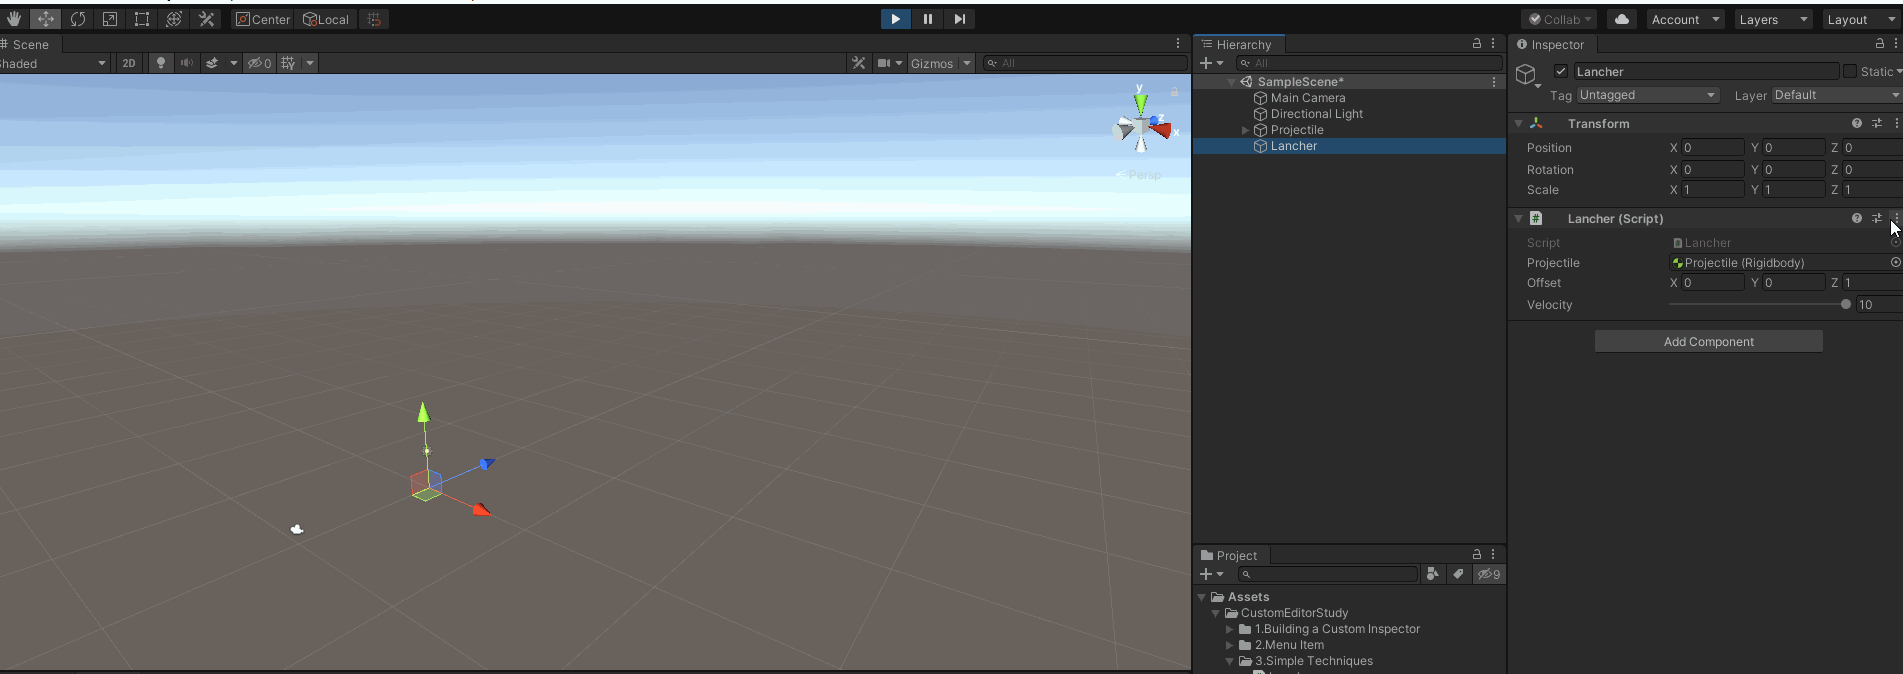
using UnityEngine;

public class Lancher : MonoBehaviour
{
    public Rigidbody projectile;
    public Vector3 offset = Vector3.forward;

    [Range(0,10)]
    public float velocity = 10;

    [ContextMenu("发射")]
    public void Fire() {
        var body = Instantiate(projectile,transform.TransformPoint(offset),transform.rotation);
        body.velocity = Vector3.forward * velocity;
    }
}
在SceneView中添加Widget
Handles.PositionHandle
接下来学习给SceneView 中添加辅助Widget,比如用一个坐标轴标记一个Vector3的位置。一般情况下只有当你选中场景中的GameObject并且点中了工具栏上的坐标轴选项才有坐标轴。学习之后我们也可以在Editor的OnSceneGUI()中添加自定义的坐标轴:Handles.PositionHandle。
1.新建一个LancherEditor脚本并放到Editor文件夹下。
using UnityEditor;
using UnityEngine;

[CustomEditor(typeof(Lancher))]
public class LancherEditor : Editor
{
    private void OnSceneGUI()
    {
        var lancher = target as Lancher;
        var transform = lancher.transform;

        //转到世界坐标
        var wOffset = transform.TransformPoint(lancher.offset);
        //设置坐标轴
        wOffset = Handles.PositionHandle(position:wOffset,rotation:transform.rotation);

        //更新拖拽坐标轴后的位置
        lancher.offset = transform.InverseTransformPoint(position: wOffset);
    }
}
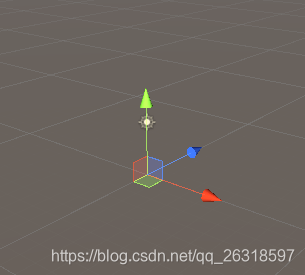
2.添加完上面编辑器代码后就会在SceneView中发现选中Lancher物体就有两个坐标轴。 其中一个就是lancher.offset对应的坐标轴标记

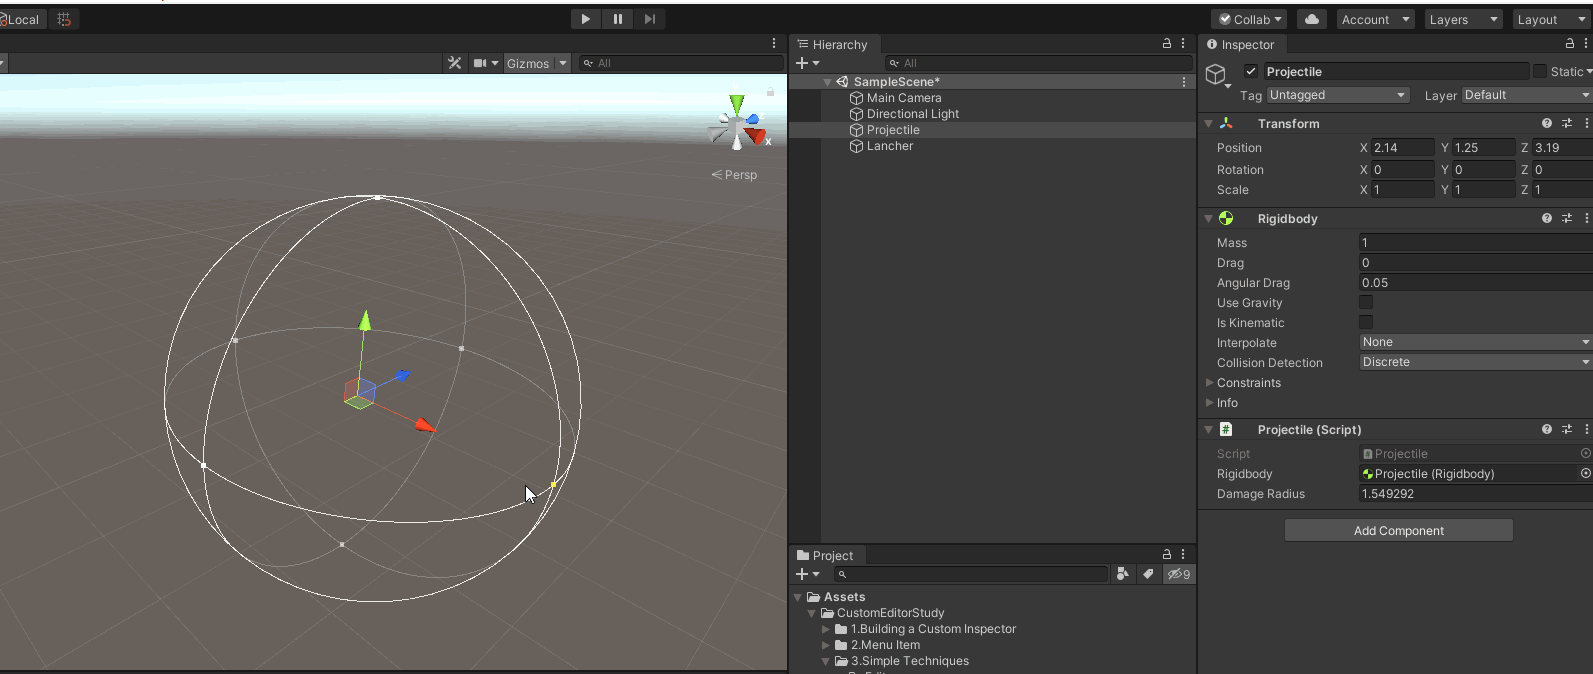
Handles.RadiusHandle
Handles.RadiusHanle可以标记一个可编辑的球体,让Radiu更加直观。其中Undo.RecordObject可以记录对Projectile的修改操作,这样可以用Ctrl+Z进行撤销操作。
using UnityEditor;
using UnityEngine;

[CustomEditor(typeof(Projectile))]
public class ProjectileEditor : Editor
{
    private void OnSceneGUI()
    {
        var projectile = target as Projectile;

        //开始修改检测
        EditorGUI.BeginChangeCheck();

        var transform = projectile.transform;
        //获取最新值
        var newDamageRadius = Handles.RadiusHandle(rotation: transform.rotation, position: transform.position, radius: projectile.damageRadius);

        //结束修改检测,更新值
        if (EditorGUI.EndChangeCheck())
        {
            //记录操作,后面可以撤销当前操作
            Undo.RecordObject(projectile,"改变damageRadius的操作");
            projectile.damageRadius = newDamageRadius;
        }
    }
}
DrawGizmo
使用[DrawGizmo]能让一个没有Renderer组件的物体在Scene View 中渲染出来方便观察测试,它必须是一个静态方法参数包含两个:一个是要渲染的目标组件,一个是GizmoType,这个方法可以放在任何类中但需要该类文件在Editor文件夹下。
    /// <summary>
    /// 给没有Render组件的物体绘制Gizmos
    /// </summary>
    /// <param name="projectile">目标组件</param>
    /// <param name="gizmoType"></param>
    [DrawGizmo( GizmoType.Selected | GizmoType.NonSelected)]
    static void DrawGizmos(Projectile projectile,GizmoType gizmoType) {
        Gizmos.DrawSphere(projectile.transform.position,0.125f);
    }

在Scene View 中绘制2D按钮
在Scene View中绘制按钮并绑定功能可以方便开发的时候测试功能。
1.在OnSceneGUI()中如果要绘制2D的GUI需要用Handles.BeginGUI()切到2D,后面再用Handles.EndGUI()切回去;
2.在GUILayout.BeginArea和GUILayout.EndArea()语句块内绘制按钮等…
3.new EditorGUI.DisabledGroupScope(!Application.isPlaying)表示只在运行时才激活UI。
4.需要注意的是 坐标的转换,屏幕坐标应用到GUILayout.Button需要做y轴方向的翻转!!!即(rectMin.y = SceneView.currentDrawingSceneView.position.height - rectMin.y;)

using UnityEditor;
using UnityEngine;

[CustomEditor(typeof(Lancher))]
public class LancherEditor : Editor
{
    private void OnSceneGUI()
    {
        var lancher = target as Lancher;
        var transform = lancher.transform;

        //转到世界坐标
        var wOffset = transform.TransformPoint(lancher.offset);
        //设置坐标轴
        wOffset = Handles.PositionHandle(position: wOffset, rotation: transform.rotation);

        //更新拖拽坐标轴后的位置
        lancher.offset = transform.InverseTransformPoint(position: wOffset);

        //绘制2D UI
        {
            Handles.BeginGUI();
            Vector2 rectMin = Camera.current.WorldToScreenPoint(wOffset);
            //y轴坐标需要翻转
            rectMin.y = SceneView.currentDrawingSceneView.position.height - rectMin.y;

            var rect = new Rect(position: rectMin, size: new Vector2(64, 18));

            {
                GUILayout.BeginArea(rect);
                //激活判断:只在运行模式激活
                using (new EditorGUI.DisabledGroupScope(!Application.isPlaying))
                {
                    //绑定事件
                    if (GUILayout.Button("发射"))
                    {
                        lancher.Fire();
                    }
                }
                GUILayout.EndArea();
            }
            Handles.EndGUI();
        }
    }
}
