这是介绍tkinter库实现桌面应用程序开发的第三篇博文,坚持不易,且行且珍惜。希望我的分享,能帮助大家少走弯路,提高学习效率。
这篇博文,我打算和大家分享一下当前比较火的额词云效果以及实现top10的统计功能,通过良好的、友善的可视化界面能提高感知和实用度,因此我这里继续使用tkinter库作为前端的展示开发库,在这里,我将使用ttk的Progressbar实现在统计过程中的等待交互窗口、使用notebook进行分TAB页显示,使用treeview实现词频统计的列表展现,然后使用LABEL加载词云图,也使用toplevel实现子窗口展现。因此,这篇博文还是非常值得大家花点时间参观一下的。
整体内容大致包括:
1、使用jieba库进行中文分词和词频统计
2、使用wordcloud库生成词云
3、使用tkinter库进行可视化展现
4、使用多线程技术进行异步监听加载
一、jieba库介绍
Jieba是python比较好用的分词模块,可用于中文句子/词性分割、词性标注、未登录词识别,支持用户词典等功能。能较好实现中文分词,同时支持繁体分词。
jieba.cut()提供了三种分词模式,具体包括如下:
精确模式:试图将句子最精确地切开,适合文本分析;
全模式:把句子中所有的可以成词的词语都扫描出来, 速度非常快,但是不能解决歧义,存在过度切分的问题;
搜索引擎模式:在精确模式的基础上,对长词再次切分,提高召回率,适合用于搜索引擎分词。
举例如下:
import jieba
import re # 正则表达式库
text = "Jieba是python比较好用的分词模块,可用于中文句子/词性分割、词性标注、未登录词识别,支持用户词典等功能。能较好实现中文分词,同时支持繁体分词。"
# 文本预处理
# 定义正则表达式匹配模式,将符合模式的字符去除
pattern = re.compile(u'\t|\n|\.|-|:|;|\)|\(|\?|"|、|,|。|/')
text = re.sub(pattern, '', text)
#全模式
seg_list = jieba.cut(text, cut_all = True)
print( "全模式:\n" + '/' .join(seg_list))
# 精确模式
seg_list = jieba.cut(text, cut_all = False)
print('精确模式:\n' + '/' .join(seg_list))
# 搜索引擎模式
seg_list = jieba.cut_for_search(text)
print('搜索引擎模式:\n' + '/'.join(seg_list))
运行结果如下:
全模式:
Jieba/是/python/比较/好/用/的/分词/模块/可用/用于/中文/文句/句子/词性/分割/词性/标注/未/登录/词/识别/别支/支持/用户/词典/等/功能/能/较/好/实现/中文/分词/同时/支持/繁体/分词
精确模式:
Jieba/是/python/比较/好用/的/分词/模块/可/用于/中文/句子/词性/分割/词性/标注/未/登录/词/识别/支持/用户/词典/等/功能/能/较/好/实现/中文/分词/同时/支持/繁体/分词
搜索引擎模式:
Jieba/是/python/比较/好用/的/分词/模块/可/用于/中文/句子/词性/分割/词性/标注/未/登录/词/识别/支持/用户/词典/等/功能/能/较/好/实现/中文/分词/同时/支持/繁体/分词
大家可以根据具体实际的需要进行自行选择使用哪种模式。
实现词频统计的具体脚本如下:
import jieba
import collections
import re # 正则表达式库
fn = open('zyds.txt', encoding="utf-8") # 打开文件
text = fn.read() # 读出整个文件
print(text)
fn.close() # 关闭文件
# 文本预处理
# 定义正则表达式匹配模式,将符合模式的字符去除
pattern = re.compile(u'\t|\n|\.|-|:|;|\)|\(|\?|"|、|,|。| |”|“|;')
text = re.sub(pattern, '', text)
#进行词频统计
text_list = jieba.cut(text, cut_all=False)
# 词频TOP10高频统计
word_counts = collections.Counter(text_list) # 对分词做词频统计
word_counts_top10 = word_counts.most_common(10) # 获取前10最高频的词
print (word_counts_top10) # 输出检查
备注:其中文件名可以根据自己实际文件路径和名称进行修改。
在上述脚本的输出结果中,也许大家会发现有很多语气词、或者非关键词被提取出来,因此在这个环节我们可以通过设置stop_words进行关键词过滤和优化。实现逻辑为:新定义一个列表,然后进行过滤,过滤完毕之后的词append到新的列表中去。相关脚本如下:
定义去除词典
stop_words = [u'的', u',',u'和', u'是', u'随着', u'对于',u'对',u'等',u'能',u'都',u'。',
u' ',u'、',u'中',u'在',u'了',u'通常',u'如果',u'我们',u'需要'] # 自定义去除词库

new_text_list=[]
for word in text_list: # 循环读出每个分词
    if word not in stop_words: # 如果不在去除词库中
        new_text_list.append(word) # 分词追加到列表
二、使用wordcloud库生成词云图
wordcloud库通常和jieba结合使用,将分好的单词以图片的方式展示出来,根据单词出现的次数使单词突出。
wordcloud库是python非常优秀的词云展示第三方库。词云以词语为基本单位更加直观和艺术的展示文本, wordcloud把词云当作一个对象,它可以将文本中词语出现的频率作为一个参数绘制词云,而词云的大小、颜色、形状等都是可以设定的。
from wordcloud import WordCloud
from PIL import Image # 图像处理库
import numpy as np # numpy数据处理库
mask = np.array(Image.open('timg1.jpg')) # 定义词频背景
# mask = ImageColorGenerator(back_img)
w_cloud = WordCloud(
    font_path="c:\windows\Fonts\simhei.ttf",
    background_color='white',
    width=1000,
    height=600,
    mask=mask).generate_from_frequencies(text_list)
# 输出成图片:
w_cloud.to_file('wordcloud.jpg')
图片输出结果如下:

这里简要讲下几个会影响图像清晰问题的WordCloud的参数:
mask:遮罩图,字的大小布局和颜色都会依据遮罩图生成。
background_color:背景色,默认黑。根据说明文档,如果想设置透明底色的云词图,那么可以设置background_color=None, mode="RGBA" 生成云词图。
max_font_size:最大字号。
min_font_size:最小字号。不设置的情况下,默认是4。
scale:根据说明文档,当云词图很大的,加大该值会比使用更大的图更快,但值越高也会越慢(计算更复杂)。默认值是1。
random_state:不同的值会让字图的分布不一样。
三、使用tkinter库进行可视化展现
先看看效果图:
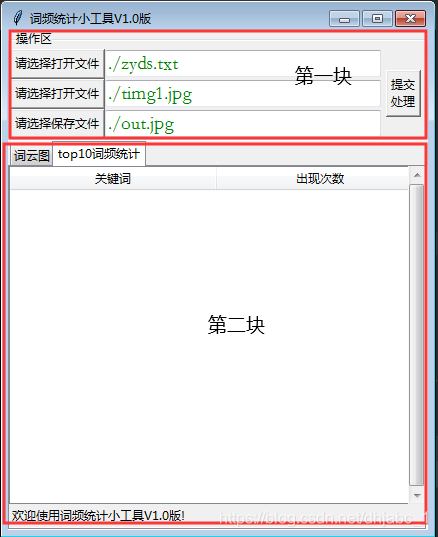
有两块内容分别进行处理:
先说第一块:需要实现选择文件功能,其中选择文件分别包括:词频统计的文本文件、背景图文件和需要保存的词云图。
1、实现打开文件对话框,并针对异常报错。
from tkinter import messagebox as msgbox

def load_src_file(*args):
    localfile = filedialog.askopenfile(title='打开单个文件',
                filetypes=[("文本文件","*.txt")],# 只处理的文件类型
                initialdir='D:/')
    if(localfile):
        openfile.delete(0,END)
        openfile.insert(END,localfile.name)
    else:
        msgbox.showinfo(message=('读取文件异常'))

def load_src_file1(*args):
    localfile = filedialog.askopenfile(title='打开单个文件',
                filetypes=[("图片文件", "*.jpg"), ('图片文件', '*.png')],# 只处理的文件类型
                initialdir='D:/')
    if(localfile):
        openfile2.delete(0,END)
        openfile2.insert(END,localfile.name)
    else:
        msgbox.showinfo(message=('读取文件异常'))

def save_out_file(*args):
    localfile = filedialog.asksaveasfile(title='保存文件',
                             filetypes=[("图片文件", "*.jpg"), ('图片文件', '*.png')],  # 只处理的文件类型
                             initialdir='D:/')
    if(localfile):
        savefile.delete(0,END)
        savefile.insert(END,localfile.name)
    else:
        msgbox.showinfo(message=('读取文件异常'))
2、使用treeview控件显示词云图:
(1)设置表格:
col = [1, 2]
tree = ttk.Treeview(tab2, columns=col, height=10, show="headings")
tree.column('0', width=150, anchor='center')  # 指定第一列的宽度和名称, 如果show = "headings", 这一列就被隐藏。
tree.column('1', width=100, anchor='center')
tree.column('2', width=100, anchor='w')
tree.heading('0', text='column0')
tree.heading('1', text='关键词')
tree.heading('2', text='出现次数')
(2)清空表格
def add_tree(self,list, tree):
    #新增数据到表格
    i = 0
    for subList in list:
        tree.insert('', 'end', values=subList)
        i = i + 1
(3)添加表格数据
def add_tree(self,list, tree):
#新增数据到表格
i = 0
for subList in list:
tree.insert('', 'end', values=subList)
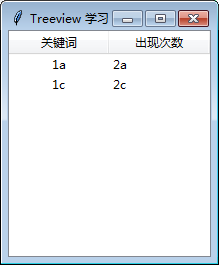
i = i + 1举例如下:
from tkinter import *
import tkinter.ttk as ttk

win = Tk()
win.title("Treeview")

col = [1, 2]
data = {"item0": ["1a", "2a"],"item2": ["1c", "2c"]}
tree = ttk.Treeview(win, columns=col, height=10, show="headings")
tree.column('0', width=150, anchor='center')  # 指定第一列的宽度和名称, 如果show = "headings", 这一列就被隐藏。
tree.column('1', width=100, anchor='center')
tree.column('2', width=100, anchor='w')
tree.heading('0', text='column0')
tree.heading('1', text='关键词')
tree.heading('2', text='出现次数')
tree.insert('', 'end', values=data["item0"])
tree.insert('', 'end', values=data["item2"])
tree.pack(expand=Y,fill=BOTH)
win.mainloop()
运行效果如下:
3、Progressbar的实现
from tkinter import *
from tkinter import filedialog, ttk
root = Tk()  # 创建一个Tkinter.Tk()实例
root.title('消息')
root.geometry('600x300+450+200')
def up(i):
        mpb["value"] = i%20
        i+=1
        root.after(100, up,i)  # 每隔1s调用函数up更新控件信息
Label(root, text='正在处理中,请稍候...', fg='red').pack()
mpb = ttk.Progressbar(root, orient="horizontal", length=200, mode="indeterminate")
mpb.pack()
mpb["maximum"] = 20
mpb["value"] = 0
up(0)
root.mainloop()
输出效果如下:

四、使用多线程技术进行异步监听加载
这个部分将会在多线程的文章中进行讲解,敬请期待。
相关代码如下:(暂不包含多线程的相关代码)
from tkinter import *
from tkinter import filedialog
from tkinter import ttk
from PIL import Image,ImageTk
import cv2
import base_final
import time
from tkinter import messagebox as msgbox

def center_window( root, w, h):
    # 获取屏幕 宽、高
    ws = root.winfo_screenwidth()
    hs = root.winfo_screenheight()
    # 计算 x, y 位置
    x = (ws / 2) - (w / 2)
    y = (hs / 2) - (h / 2)
    root.geometry('%dx%d+%d+%d' % (w, h, x, y))

def load_src_file(*args):
    localfile = filedialog.askopenfile(title='打开单个文件',
                filetypes=[("文本文件","*.txt")],# 只处理的文件类型
                initialdir='D:/')
    if(localfile):
        openfile.delete(0,END)
        openfile.insert(END,localfile.name)
    else:
        msgbox.showinfo(message=('读取文件异常'))

def load_src_file1(*args):
    localfile = filedialog.askopenfile(title='打开单个文件',
                filetypes=[("图片文件", "*.jpg"), ('图片文件', '*.png')],# 只处理的文件类型
                initialdir='D:/')
    if(localfile):
        openfile2.delete(0,END)
        openfile2.insert(END,localfile.name)
    else:
        msgbox.showinfo(message=('读取文件异常'))

def save_out_file(*args):
    localfile = filedialog.asksaveasfile(title='保存文件',
                             filetypes=[("图片文件", "*.jpg"), ('图片文件', '*.png')],  # 只处理的文件类型
                             initialdir='D:/')
    if(localfile):
        savefile.delete(0,END)
        savefile.insert(END,localfile.name)
    else:
        msgbox.showinfo(message=('读取文件异常'))

def onclick(*args):
    global data
    source_file = openfile.get()
    result_file = savefile.get()
    source_image = openfile2.get()

    top_level = Toplevel(root)
    top_level.geometry('200x50')
    top_level.title('Sign up window')
    Label(top_level, text='正在处理中,请稍候...', fg='blue',font=("微软雅黑",15)).pack()
    mpb = ttk.Progressbar(top_level, orient="horizontal",length=200, mode="indeterminate")
    mpb.pack()
    mpb["maximum"] = 20
    mpb["value"] = 0
    top_level.overrideredirect(1)  # 去除窗口边框
    top_level.wm_attributes("-alpha", 0.9)  # 透明度(0.0~1.0)
    top_level.wm_attributes("-toolwindow", True)  # 置为工具窗口(没有最大最小按钮)
    top_level.wm_attributes("-topmost", True)  # 永远处于顶层
    center_window(top_level, 200, 150)
    top_level.update()

    def up(i):
        flag = base_1.get_flag()
        while flag:
            mpb["value"] = (i + 1) % 20
            i += 1
            flag = base_1.get_flag()
            top_level.update()
            time.sleep(0.1)
        data = base_1.get_result()
        top_level.destroy()
        return data

    base_1 = base_final.base_run(source_file, source_image,result_file)
    base_1.setDaemon(True)  # 设置守护进程,主线程结束时,不管子线程有没有结束都会退出进程
    base_1.start()
    data = up(0)


    img = cv2.imread(result_file)
    cv2image = cv2.cvtColor(img, cv2.COLOR_BGR2RGB)
    current_image = Image.fromarray(cv2image)  # 将图像转换成Image对象
    pil_image_resized = resize(430, 500, current_image)  # 等比例缩放本地图片
    # imgtk = ImageTk.PhotoImage(word_cloud)
    imgtk = ImageTk.PhotoImage(pil_image_resized)
    label1.imgtk = imgtk
    label1.config(image=imgtk)

    for i in data:
        tree.insert('', 'end', values=[i[0],i[1]])

def resize(w_box, h_box, pil_image):
    f1 = 1.0 * w_box / pil_image.size[0]  # 1.0 forces float division in Python2
    f2 = 1.0 * h_box / pil_image.size[1]
    factor = min([f1, f2])
    width = int(pil_image.size[0] * factor)
    height = int(pil_image.size[1] * factor)
    return pil_image.resize((width, height), Image.ANTIALIAS)

root=Tk()
root.title('词频统计小工具V1.0版')
center_window(root,420,500)
#初始化操作区控件
top_frame = ttk.LabelFrame(root,text='操作区')
open_button = Button(top_frame, text='请选择打开文件',command=load_src_file)
open_button.grid(row=0, sticky="w")
openfile = ttk.Entry(top_frame,
            width=30,
            font=('StSong',14),
            foreground='green')
openfile.insert(END,'./zyds.txt')
openfile.grid(row=0, column=1)

open_button2 = Button(top_frame, text='请选择打开文件', command=load_src_file1)
open_button2.grid(row=1, sticky="w")
openfile2 = ttk.Entry(top_frame,
                     width=30,
                     font=('StSong', 14),
                     foreground='green')
openfile2.insert(END, './timg1.jpg')
openfile2.grid(row=1, column=1)

save_button = Button(top_frame, text='请选择保存文件',command=save_out_file)
save_button.grid(row=2, sticky="w")
savefile = ttk.Entry(top_frame,
            width=30,
            font=('StSong',14),
            foreground='green')
savefile.insert(END,'./out.jpg')
savefile.grid(row=2, column=1)

login = Button(top_frame,text='提交\n处理',command=onclick)
login.grid(row=0, column=2, rowspan=3, padx=5, pady=5)
top_frame.pack(side='top')

#初始化图像显示控件
tabControl = ttk.Notebook(root)  # Create Tab Control
tab1 = ttk.Frame(tabControl)  # Create a tab
label1=Label(tab1,text='欢迎使用词频统计小工具V1.0版!')
label1.pack()
tabControl.add(tab1, text='词云图')  # Add the tab
tab2 = ttk.Frame(tabControl)  # Add a second tab
tabControl.add(tab2, text='top10词频统计')  # Make second tab visible

col = [1, 2]
tree = ttk.Treeview(tab2, columns=col, height=10, show="headings")
tree.column('0', width=150, anchor='center')  # 指定第一列的宽度和名称, 如果show = "headings", 这一列就被隐藏。
tree.column('1', width=100, anchor='center')
tree.column('2', width=100, anchor='w')
tree.heading('0', text='column0')
tree.heading('1', text='关键词')
tree.heading('2', text='出现次数')

vbar = ttk.Scrollbar(tree, command=tree.yview)
tree.configure(yscrollcommand=vbar.set)
vbar.pack(side=RIGHT, fill=Y)

tree.pack(expand=Y,fill=BOTH)
ll = Label(tab2,text='欢迎使用词频统计小工具V1.0版!')
ll.pack(side='left')
tabControl.pack(expand=Y,fill=BOTH)
root.mainloop()
最后出来的效果如下: