在 Netty序列化(一) —— ProtoBuf 中我们介绍了Netty内置的Protocol Buffers的用法,在Netty中除了使用其内置的,我们还可以集成第三方序列化框架,如 MessagePack
在使用MessagePack前,我们首先需要引入其依赖,如下:
<dependency>
    <groupId>org.msgpack</groupId>
    <artifactId>msgpack</artifactId>
    <version>0.6.12</version>
</dependency>
然后我们还需要在实体类上加上相关的注解 —— @Message,如下:
@Message
public class User{
    private String name;
    private int age;
    private String sex;

	//省略Getter、Setter方法
	...
}
在其服务端和客户端的代码,除了我们添加的ChannelHandler不同,其余基本一致,首先查看一下客户端代码,如下:
public class NettyClient {

    public static void main(String[] args) throws Exception {
        NettyClient client = new NettyClient();
        client.connect("127.0.0.1", 8888);
    }

    private void connect(String host, int port) throws Exception{
        EventLoopGroup group = new NioEventLoopGroup();
        Bootstrap bootstrap = new Bootstrap();
        try {
            bootstrap.group(group)
                    .channel(NioSocketChannel.class)
                    .option(ChannelOption.TCP_NODELAY, true)
                    .handler(new ChannelInitializer<SocketChannel>() {
                        @Override
                        protected void initChannel(SocketChannel ch) throws Exception {
                            ch.pipeline().addLast("lengthFieldPrepender", new LengthFieldPrepender(2));
                            ch.pipeline().addLast(new MsgPackEncoder());
                            ch.pipeline().addLast(new MsgPackClientHandler());
                        }
                    });

            ChannelFuture channelFuture = bootstrap.connect(host, port).sync();
            channelFuture.channel().closeFuture().sync();
        } finally {
            group.shutdownGracefully();
        }
    }
}

上图中的第一个就是为解决粘包半包问题,用来添加报文的长度字段,这里我们设置添加的长度字段大小为两个字节,这里我们就需要自己设置了,到时服务端也是需要设置进行分离的。
第二个就是我们自己实现的编码器了,用于进行序列化,将实体类编码为字节进行传输。
public class MsgPackEncoder extends MessageToByteEncoder<Object> {
    @Override
    protected void encode(ChannelHandlerContext ctx, Object msg, ByteBuf out) throws Exception {
        MessagePack messagePack = new MessagePack();
        byte[] bytes = messagePack.write(msg);
        out.writeBytes(bytes);
    }
}
最后就是我们的业务代码了,我们想服务端发送100个实体类
public class MsgPackClientHandler extends ChannelInboundHandlerAdapter {

    @Override
    public void channelActive(ChannelHandlerContext ctx) throws Exception {
        for (int i = 0; i < 100; i++) {
            User user = new User();
            user.setName("Kimi_" + i);
            user.setAge(18);
            user.setSex("男");
            ctx.write(user);
        }
        ctx.flush();
    }
}
客户端完成后,我们继续查看其服务端的代码,如下:
public class NettyServer {

    public static void main(String[] args) throws Exception {
        NettyServer server = new NettyServer();
        server.bind(8888);
    }

    private void bind(int port) throws Exception {
        EventLoopGroup bossGroup = new NioEventLoopGroup();
        EventLoopGroup workerGroup = new NioEventLoopGroup();
        ServerBootstrap serverBootstrap = new ServerBootstrap();
        try {
            serverBootstrap.group(bossGroup, workerGroup)
                    .channel(NioServerSocketChannel.class)
                    .option(ChannelOption.SO_BACKLOG, 512)
                    .childHandler(new ChannelInitializer<SocketChannel>() {
                        @Override
                        protected void initChannel(SocketChannel ch) throws Exception {
                            ch.pipeline().addLast("lengthFieldBasedFrameDecoder",
                                    new LengthFieldBasedFrameDecoder(65535, 0, 2, 0, 2));
                            ch.pipeline().addLast(new MsgPackDecoder());
                            ch.pipeline().addLast(new MsgPackServerHandler());
                        }
                    });

            ChannelFuture channelFuture = serverBootstrap.bind(port).sync();
            channelFuture.channel().closeFuture().sync();
        } finally {
            bossGroup.shutdownGracefully();
            workerGroup.shutdownGracefully();
        }
    }
}

第一个用于分离数据包中的长度字段,得到其实际数据,其中的参数含义如下:
-
maxFrameLength:表示的是包的最大长度
我们在客户端设置的存储报文长度为2个字节,所以其最大为65535(一个字节的最大长度为255) -
lengthFieldOffset:指的是长度域的偏移量,表示跳过指定个数字节之后的才是长度域
这个参数表示数据包前面还有没有其他的数据,我们在读取报文长度时需不需要跳过数据读取,这里数据包前面没有任何的其他数据,最前面就是其报文长度,无需跳过,所以为0 -
lengthFieldLength:记录该帧数据长度的字段本身的长度
该参数就是设置的报文长度字节,客户端设置的为2,所以这里值就是2 -
lengthAdjustment:长度的一个修正值,可正可负
该参数可由公式:实际数据包长度 = 长度域中记录的数据长度 + lengthFieldOffset + lengthFieldLength + lengthAdjustment计算得出 -
initialBytesToStrip:从数据帧中跳过的字节数,表示得到一个完整的数据包之后,忽略多少字节,开始读取实际我要的数据
这里表示我们在一个数据包中,想要获取的实际的数据,需要从跳过多少字节来读取,我们设置了报文长度为2个字节,所以我们需要跳过2个字节才能读取到想要的数据
第二个Handler就是用于反序列化,将字节解码为实体类。代码如下:
public class MsgPackDecoder extends MessageToMessageDecoder<ByteBuf> {
    @Override
    protected void decode(ChannelHandlerContext ctx, ByteBuf msg, List<Object> out) throws Exception {
        int len = msg.readableBytes();
        byte[] bytes = new byte[len];
        msg.getBytes(msg.readerIndex(), bytes, 0, len);
        MessagePack messagePack = new MessagePack();
        out.add(messagePack.read(bytes, User.class));
    }
}
这里需要注意的是我们继承的是MessageToMessageDecoder,而不是ByteToMessageDecoder,这是为什么呢?我们在客户端序列化是继承的用MessageToByteDecoder,这里为什么不用ByteToMessageDecoder呢?这是因为我们在进行序列化时,其前一步进行分离报文的长度及实际数据包时,已经将其转化为了消息了,这里我们只是基于实际的数据包进行反序列化。
最后一个就是用于服务端的业务处理了,如下:
public class MsgPackServerHandler extends ChannelInboundHandlerAdapter {

    @Override
    public void channelRead(ChannelHandlerContext ctx, Object msg) throws Exception {
        User user = (User) msg;
        System.out.println("姓名:" + user.getName() + ",年龄:" + user.getAge() + ",性别:" + user.getSex());
    }
}
这样我们就完成了第三方序列化框架MessagePack的集成了,测试结果如下:

这里有关数据包在分离报文长度字段和实际数据的 lengthAdjustment 参数再详细介绍一下,有关其公式:实际数据包长度 = 长度域中记录的数据长度 + lengthFieldOffset + lengthFieldLength + lengthAdjustment ,我们举几个例子进行说明,如下:
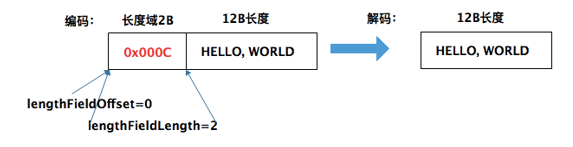
实际数据包长度 = 长度域 + 长度域中记录的数据长度 = 2 + 12 = 14
所以其公式即:14 = 12 + 0 + 2 + lengthAdjustment ,所以 lengthAdjustment = 0 ,initialBytesToStrip = 2
要是我们希望解码后保留其长度字段,如下图:
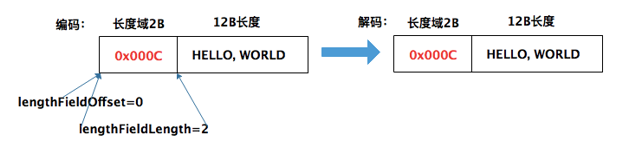
实际数据包长度 = 长度域 + 长度域中记录的数据长度 = 2 + 12 = 14
所以其公式即:14 = 12 + 0 + 2 + lengthAdjustment ,所以 lengthAdjustment = 0 ,initialBytesToStrip = 2
所以上述几个参数都是一致的,就是 initialBytesToStrip 的值为0,而不是2。
这里还有其他的情况,如我们的长度域中不仅仅记录了实际数据的大小,它还包括了本身的长度大小,如下:
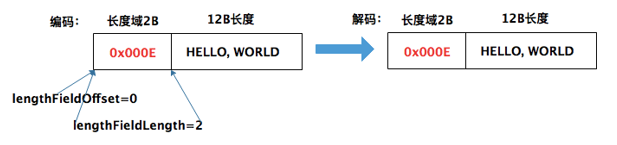
实际数据包长度 = 长度域中记录的数据长度 = 14 (无需加上长度域大小,记录的数据长度已包括)
所以其公式即:14 = 14 + 0 + 2 + lengthAdjustment ,所以 lengthAdjustment = -2
还有的情况就是在长度域前面还有其他的数据,如下图
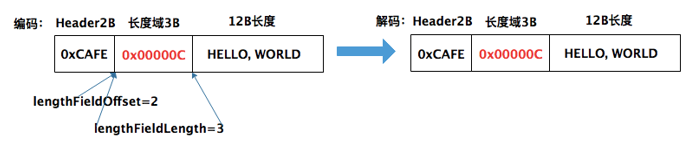
实际数据包长度 = Header + 长度域 + 长度域中记录的数据长度 = 2 + 3 + 12 = 17
所以其公式即:17 = 12 + 2 + 3 + lengthAdjustment ,所以 lengthAdjustment = 0
还有比如长度域后面有其他的数据,然后才是其实际数据

实际数据包长度 = 长度域 + Header + 长度域中记录的数据长度 = 3 + 2 + 12 = 17
所以其公式即:17 = 12 + 0 + 3 + lengthAdjustment ,所以 lengthAdjustment = 2
