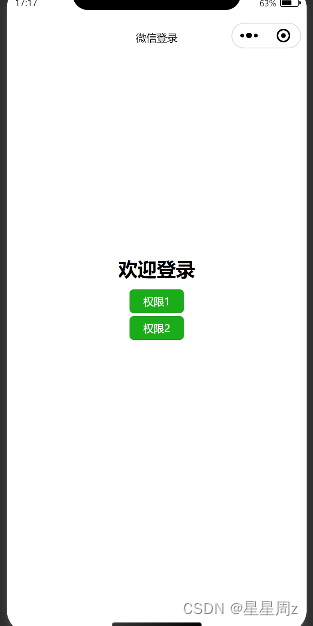
1. Permissão 1: barra inferior de propriedade conforme mostrado na figura

1.2 Permissão 2: Barra inferior de propriedade conforme mostrado na figura

1.3 Defina um atributo global para armazenar a renderização da barra de abas inferior

Um: Primeiro configure a tabbar no arquivo global App.json (mínimo 2 e máximo 5), e configure a página
{
    "pages": [
        "pages/login/index",

        "pages/zy/index",
        "pages/myInfo/index",
        "pages/onlyOne/index",
        "pages/friend/index",
        "pages/setting/index"
    ],
    "window": {
        "backgroundTextStyle": "light",
        "navigationBarBackgroundColor": "#fff",
        "navigationBarTitleText": "微信登录",
        "navigationBarTextStyle": "black"
    },
    "tabBar": {
      "custom": true,
      "color": "#666666",
      "selectedColor": "#FF5F15",
      "backgroundColor": "#ffffff",
      "borderStyle": "black",
      "list": [
        {
          "pagePath": "pages/zy/index",
          "text": "主页"
        },
        {
          "pagePath": "pages/myInfo/index",
          "text": "我的信息"
        },
        {
          "pagePath": "pages/onlyOne/index",
          "text": "个人中心"
        },
        {
          "pagePath": "pages/friend/index",
          "text": "朋友信息"
        },
        {
          "pagePath": "pages/setting/index",
          "text": "手机设置"
        }
      ]
    },
    "sitemapLocation": "sitemap.json"
}
Dois: página de login
 1.wxml:

<view class="title">
      欢迎登录
    </view>
    <!-- <button open-type="chooseAvatar" bind:chooseavatar="onChooseAvatar" type="primary" size="mini">微信授权登录</button> -->


    <view>
      <button bindtap="login" data-type="1" type="primary" size="mini">权限1</button>
    </view>
    <view>
      <button bindtap="login" data-type="2" type="primary" size="mini">权限2</button>
    </view>

2. js

// pages/login/index.js
const app = getApp().globalData        //获取并设置tabbar
Page({


  /**
   * 页面的初始数据
   */
  data: {
  },
  login(e){
    const type = e.target.dataset.type
    if(type == 1){    //用户权限
      app.routerList = [
        {
          name:"主页",
          icon:"home-o",
          url:"/pages/zy/index",
        },
        {
          name:"我的信息",
          icon:"chat-o",
          url:"/pages/myInfo/index",
        },
        {
          name:"个人中心",
          icon:"https://b.yzcdn.cn/vant/icon-demo-1126.png",
          url:"/pages/onlyOne/index",
        }
      ]
      wx.reLaunch({
        url: '/pages/zy/index',
      })
    }else{
      app.routerList = [
        {
          name:"朋友信息",
          icon:"friends-o",
          url:"/pages/friend/index",
        },
        {
          name:"手机设置",
          icon:"setting-o",
          url:"/pages/setting/index",
        },
        {
          name:"个人中心",
          icon:"https://b.yzcdn.cn/vant/icon-demo-1126.png",
          url:"/pages/onlyOne/index",
        }
      ]
      wx.reLaunch({
        url: '/pages/friend/index',
      })
    }

  },
})
Desta forma, haverá informações de roteamento após o login
Imediatamente após a segunda etapa: Crie uma pasta de barra de guias personalizada no mesmo nível das páginas (conforme mostrado na figura :)

terceiro passo:
Escreva o código na barra de guias personalizada
1.在index.wxml  中编写:

<van-tabbar active="{

   { active }}" bind:change="onChange">
  <van-tabbar-item bindtap="loadPage" data-url="{

   {item.url}}" wx:for="{

   {routerList}}" wx:key="index" icon="{

   {item.icon}}">
      {

   {item.name}}
  </van-tabbar-item>
</van-tabbar>

2.在index.json 中编写:注意此处用的vant ui 库 如没下载清先npm下载后使用
https://vant-contrib.gitee.io/vant-weapp/#/tabbar#api

{
  "component": true,
  "usingComponents": {
    "van-tabbar": "@vant/weapp/tabbar/index",
    "van-tabbar-item": "@vant/weapp/tabbar-item/index",
    "van-icon": "@vant/weapp/icon/index"
  }
}

3.在index.js中:
Component({
  /**
   * 组件的属性列表
   */
  properties: {
    active:{      //对外提供当前选中的项 可以直接在每个页面中引入  以避免 tabbar显示与点击不同步的现象
      type:Number,
      value:0
    }
  },
  /**
   * 组件的初始数据
   */
  data: {
    routerList:[]
  },
  lifetimes:{
    attached(){
      this.setData({ routerList: getApp().globalData.routerList});  //获取路由
      console.log(this.data.routerList)
    }
  },
  /**
   * 组件的方法列表
   */
  methods: {
    onChange(event) {
      // event.detail 的值为当前选中项的索引
      this.setData({ active: event.detail });
    },
    loadPage(event){
      wx.switchTab({
        url: event.target.dataset.url,
      })
    },
  }
})
o quarto passo:
1.1 Adicione este código à função de ciclo de vida onShow de cada página:
Se não for adicionado, fará com que a exibição da barra de guias fique fora de sincronia com o clique
  onShow() {
    if (typeof this.getTabBar === 'function' &&
      this.getTabBar()) {
      console.log(this.getTabBar())
      this.getTabBar().setData({
        active: 1        //这里的active的值根据你的routerList 顺序一致
      })
    }
  },
1.2 Caso não queira adicionar, você também pode configurar o json na página onde não deseja adicionar o código acima
Como mostrado na imagem 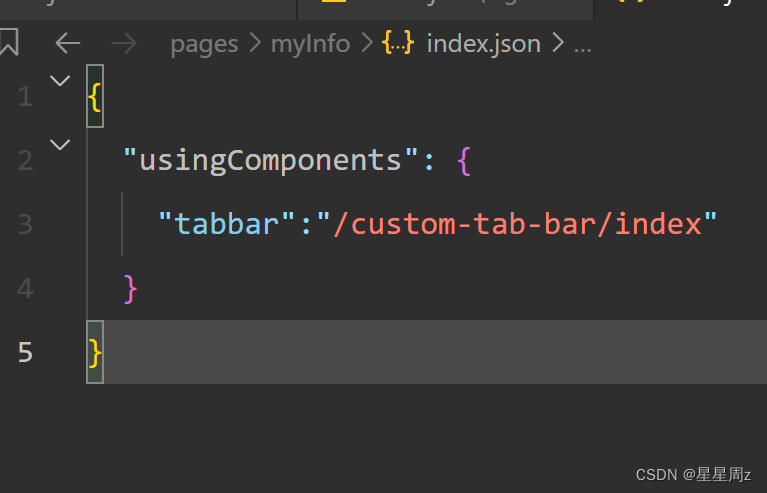 :
:
wxml: active pode ser definido diretamente como 0