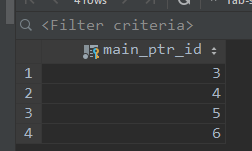
1、データテーブルaxf_navを設定します
アプリ/ models.py
from django.db import models


class Main(models.Model):
    img = models.CharField(max_length=255)
    name = models.CharField(max_length=64)
    trackid = models.IntegerField(default=1)

    class meta:
        abstract = True


class MainWheel(Main):
    class Meta:
        db_table = 'axf_wheel'


class MainNav(Main):
    class Meta:
        db_table = 'axf_nav'
移行:
#生成迁移文件:
python manage.py makemigrations
#执行迁移文件:
python manage.py migrate
挿入データ:


ディスプレイ:

CSS
/*底部图标和文字样式*/
footer .home span {
    background: url(/static/img/home_selected.png) no-repeat;
    background-size: 0.513889rem;
}

footer .home dd {
    color: orange;
}

/*顶部轮播*/
#home {
    padding: 1.5rem 0;
    overflow: auto;
    height: 100%;
    width: 100%;
    padding-bottom: 3rem;
    position: fixed;
}

#topSwiper {
    height: 3.95rem;
    width: 10rem;
    overflow: hidden;
}

#topSwiper div a {
    display: inline-block;
    height: 3.95rem;
    width: 10rem;
}

#topSwiper img {
    height: 100%;
    width: 100%;
}

/*顶部导航*/
.topMenu {
    padding-bottom: 0.26rem;

}

.topMenu nav {
    margin: 0.35rem 0 0.26rem;
    background: white;
}

.topMenu nav ul {
    display: flex;
}

.topMenu nav li {
    width: 2.5rem;
    text-align: center;
    font-size: 0.35rem;

}

.topMenu nav li img {
    width: 2.5rem;
}

#swiperMenu {
    width: 100%;
}
表示:

アクセス:

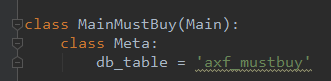
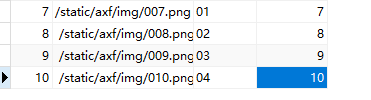
図2は、データテーブルaxf_mustbuyを設定します
テンプレート:
移行:
#生成迁移文件:
python manage.py makemigrations
#执行迁移文件:
python manage.py migrate
データの挿入:
ビュー:

:フロントエンドディスプレイ、home.html

この期間を追加home.css
/*首页必购*/
#swiperMenu {
    width: 100%;
}

#swiperMenu li img {
    width: 100%;
}
home.js(追加、変更を持って、次のように完全なコードです):
$(function () {
    ISpr();
ISprMenu();
})

function ISpr() {
    var swiper = new Swiper("#topSwiper", {
            loop: true,
            autoplay: 3000,
            pagination: '.swiper-pagination'
        }
    );
}
function ISprMenu() {
    var swiper = new Swiper("#swiperMenu", {
           slidesPerView: 3,
        }
    );
}
アクセス:

3、プログラムのデバッグ手法

ジャンゴデバッグツールをインストールします。
pip install django-debug-toolbar
インストールが完了したら
設定中に登録


'debug_toolbar',

'debug_toolbar.middleware.DebugToolbarMiddleware'

INTERNAL_IPS = ('127.0.0.1','localhost')
urls.py
from AXF01 import settings
if settings.DEBUG:
    import debug_toolbar

    urlpatterns = [
                      path('__debug__/', include(debug_toolbar.urls)),
                  ] + urlpatterns
アクセス:

楽しいプラグインでのpython:thefuck
参考视频:https://www.bilibili.com/video/av69060979?p=271
23分20秒开始
