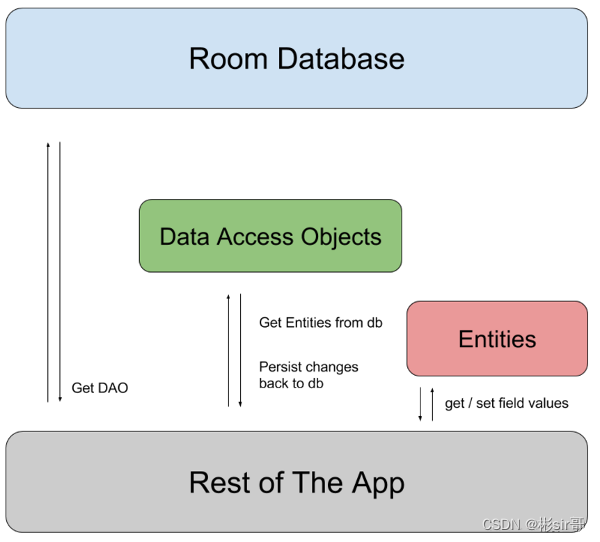
1. 部屋の紹介
Room は、Google によって起動されたデータベース フレームワークで、ORM (Object Relational Mapping) オブジェクト リレーショナル マッピング データベースです。その基礎となる層はSQLiteのカプセル化です。
Room次の 3 つの主要コンポーネントが含まれています。
- データベース クラス (
DataBase)。データベースを保持し、アプリケーションの永続データへの基礎となる接続のメイン アクセス ポイントとして機能します。 - データ エンティティ (
Entity)。アプリケーションのデータベース内のテーブルを表すために使用されます。 - データ アクセス オブジェクト (
DAO) は、アプリケーションがデータベース内のデータのクエリ、更新、挿入、削除に使用できるメソッドを提供します。
@Entityテーブル構造エンティティ@PrimaryKey主キー@ColumnInfo列/フィールド情報
2. Room+ViewModel+LiveDataを使用してデータを追加、削除、変更、確認します
Entity、Dao、Database を使用して、それぞれのデータベースを操作します
。テーブルは 1 つの Entity と 1 つの Dao に対応します (Dao は追加、削除、変更、クエリ操作を担当します)
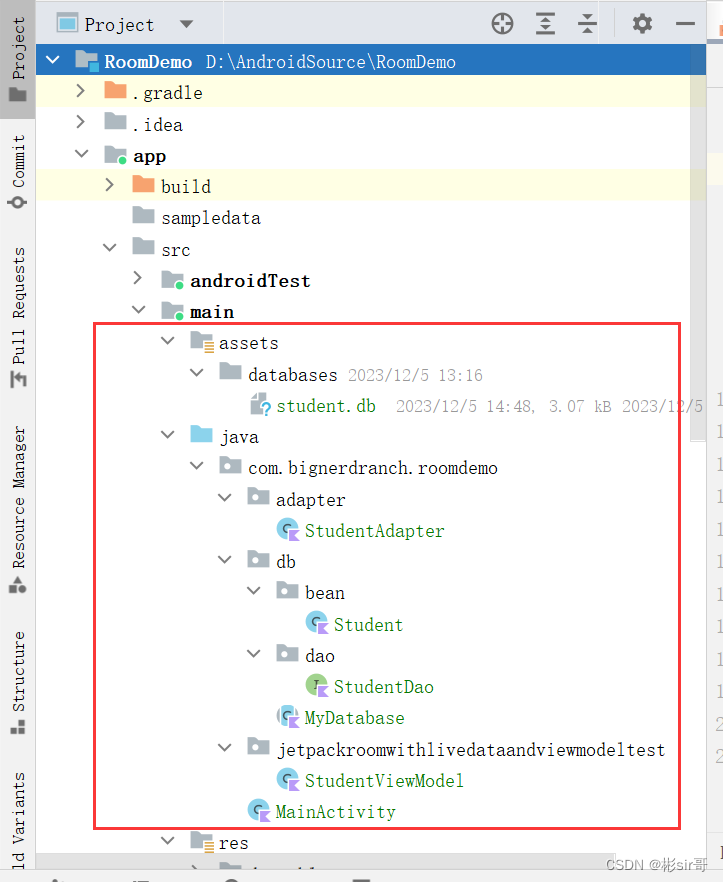
项目RoomDemo,如下图:
次の依存関係をbuild.gradleに追加します。
plugins {


    id 'com.android.application'
    id 'kotlin-android'
    id 'kotlin-android-extensions'
    id 'kotlin-kapt'
}

dependencies {


    def room_version = "2.3.0"
    implementation "androidx.room:room-runtime:$room_version"
    annotationProcessor "androidx.room:room-compiler:$room_version"
    kapt "androidx.room:room-compiler:$room_version"
}
まず、データ テーブルを作成しますStudent。まずパッケージ名を作成し、 com.bignerdranch.roomdemo の下に db パッケージを作成し、 パッケージを作成します。 4> 、 パッケージの下に クラスを作成します。 dbbeanbeanStudent
package com.bignerdranch.roomdemo.db.bean

import androidx.room.ColumnInfo
import androidx.room.Entity
import androidx.room.Ignore
import androidx.room.PrimaryKey
import org.jetbrains.annotations.NotNull

@Entity(tableName = "student")
class Student {


    @NotNull
    @PrimaryKey(autoGenerate = true)
    @ColumnInfo(name = "id", typeAffinity = ColumnInfo.INTEGER)
    var id = 0

    @NotNull
    @ColumnInfo(name = "name", typeAffinity = ColumnInfo.TEXT)
    var name: String

    @NotNull
    @ColumnInfo(name = "age", typeAffinity = ColumnInfo.TEXT)
    var age: String

    /**
     * Room会使用这个构造器来存储数据,也就是当你从表中得到Student对象时候,Room会使用这个构造器
     */
    constructor(id: Int, name: String, age: String) {


        this.id = id
        this.name = name
        this.age = age
    }

    /**
     * 由于Room只能识别和使用一个构造器,如果希望定义多个构造器,你可以使用Ignore标签,让Room忽略这个构造器
     * 同样,@Ignore标签还可用于字段,使用@Ignore标签标记过的字段,Room不会持久化该字段的数据
     */
    @Ignore
    constructor(name: String, age: String) {


        this.name = name
        this.age = age
    }
}
This@Entity はデータベース内のテーブルを表し、Student クラスは Student テーブルに対応します。 a>< a i=4> は主キーを表します。ここでは 、 は自動インクリメント、 は を表します。空ではない。 はテーブル内の列名を表し、 は列名の値を表します。 @PrimaryKeyidautoGenerate = true@NonNull@ColumnInfoname = "name"
次に、 db パッケージの下に新しい dao パッケージを作成し、 StudentDao を作成します。内部のコードは次のとおりです。 :
package com.bignerdranch.roomdemo.db.dao

import androidx.lifecycle.LiveData
import androidx.room.*
import com.bignerdranch.roomdemo.db.bean.Student

@Dao
interface StudentDao {


    @Insert
    fun insertStudent(student: Student?)

    @Delete
    fun deleteStudent(student: Student?)

    @Update
    fun updateStudent(student: Student?)

    @Query("SELECT * FROM student")
    fun getStudentList(): LiveData<List<Student?>?>? //希望监听学生表的变化,为其加上LiveData

    @Query("SELECT * FROM student WHERE id = :id")
    fun getStudentById(id: Int): Student?
}
StudentDao は主にいくつかのメソッドを定義するインターフェースであり、コンパイル時にアノテーションを介して実装クラスが生成されます。
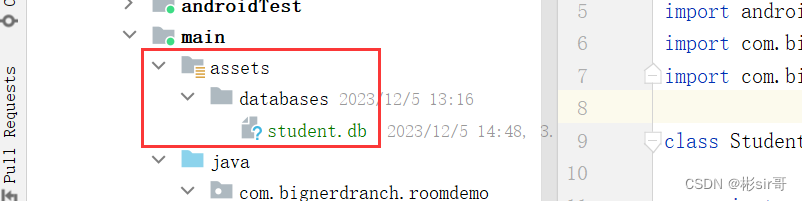
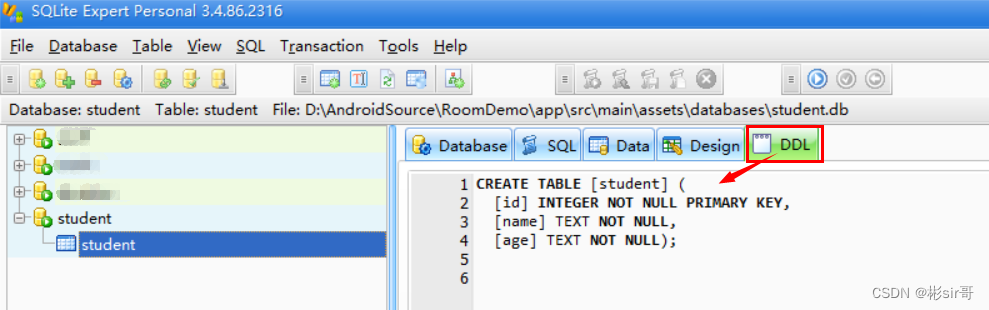
次に、新しい main/assets/databases を作成し、 student.db ファイルを次の場所に配置します。
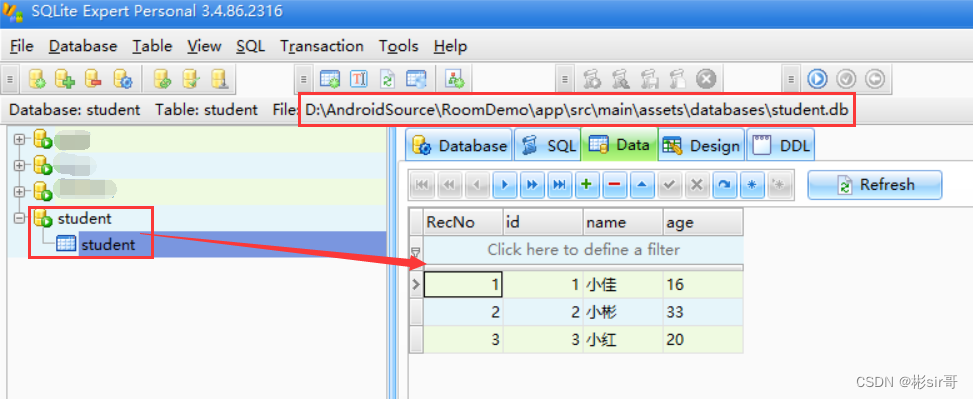
用SQLite软件导入students.db文件,如下图:
次に、MyDatabase.kt で、createFromAsset() メソッドを使用して を作成します。 > データベース。以下はデータベースの作成です。 パッケージの下に新しい クラスを作成し、 を継承します。コードは次のとおりです: assets/database/students.dbRoomdbMyDatabaseRoomDatabase
package com.bignerdranch.roomdemo.db

import android.content.Context
import android.util.Log
import androidx.room.Database
import androidx.room.Room
import androidx.room.RoomDatabase
import androidx.room.migration.Migration
import androidx.sqlite.db.SupportSQLiteDatabase
import com.bignerdranch.roomdemo.db.bean.Student
import com.bignerdranch.roomdemo.db.dao.StudentDao

@Database(entities = [Student::class], exportSchema = false, version = 1)
abstract class MyDatabase() : RoomDatabase() {


    abstract fun studentDao(): StudentDao?

    companion object {


        private val DATABASE_NAME = "my_db"
        private var databaseInstance: MyDatabase? = null

        @Synchronized //已同步
        fun getInstance(context: Context): MyDatabase? {


            if (databaseInstance == null) {


                databaseInstance = Room
                    .databaseBuilder(
                        context.applicationContext,
                        MyDatabase::class.java,
                        DATABASE_NAME
                    )
                    .createFromAsset("databases/student.db")
                    .fallbackToDestructiveMigration()
//                    .addMigrations(MIGRATION_1_2, MIGRATION_2_3, MIGRATION_1_3, MIGRATION_3_4)
                    .build()
            }
            return databaseInstance
        }

        val MIGRATION_1_2: Migration = object : Migration(1, 2) {


            override fun migrate(database: SupportSQLiteDatabase) {


                //do something
                Log.d("MyDatabase", "MIGRATION_1_2")
            }
        }
        private val MIGRATION_2_3: Migration = object : Migration(2, 3) {


            override fun migrate(database: SupportSQLiteDatabase) {


                //do something
                Log.d("MyDatabase", "MIGRATION_2_3")
            }
        }
        private val MIGRATION_1_3: Migration = object : Migration(1, 3) {


            override fun migrate(database: SupportSQLiteDatabase) {


                //do something
                Log.d("MyDatabase", "MIGRATION_1_3")
            }
        }
        val MIGRATION_3_4: Migration = object : Migration(3, 4) {


            override fun migrate(database: SupportSQLiteDatabase) {


                Log.d("MyDatabase", "MIGRATION_3_4")
                database.execSQL(
                    "CREATE TABLE temp_Student (" +
                            "id INTEGER PRIMARY KEY NOT NULL," +
                            "name TEXT," +
                            "age TEXT)"
                )
                database.execSQL(
                    "INSERT INTO temp_Student (id, name, age) " +
                            "SELECT id, name, age FROM Student"
                )
                database.execSQL("DROP TABLE Student")
                database.execSQL("ALTER TABLE temp_Student RENAME TO Student")
            }
        }
    }
}
ここの注釈@Databaseは、このクラスがデータベースの操作に使用されることを示します。entities = [Student::class] は、現在のデータベース内のテーブルを示します。テーブルは 1 つだけです< /span>< a i=3> テーブル。複数のテーブルはカンマで区切る必要があります。 はデータベースのバージョンを示し、データベースのアップグレードに使用できます。 はルームライブラリで提供されます。 Studentversion = 1createFromAsset()
これは抽象クラスであり、コンパイル時に実装クラスを構築するのに役立ちますRoom。
次に、携帯電話またはエミュレータで実行します。それでは何もすることがありません。
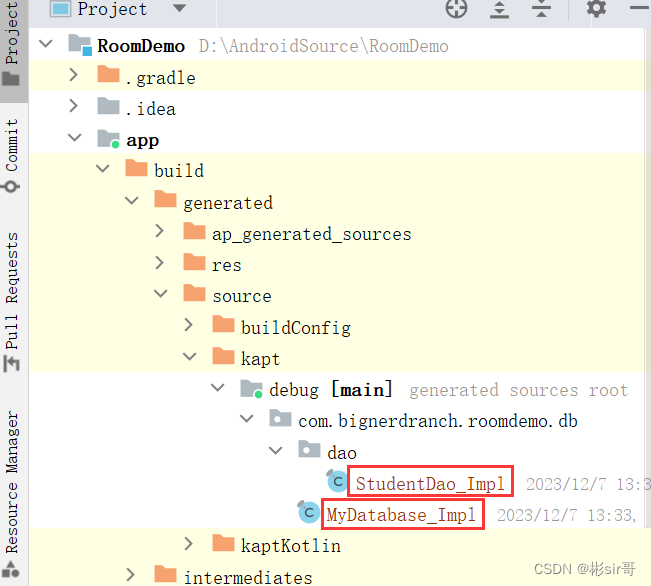
MyDatabase と StudentDao の実装クラスが自動生成されていることがわかります。
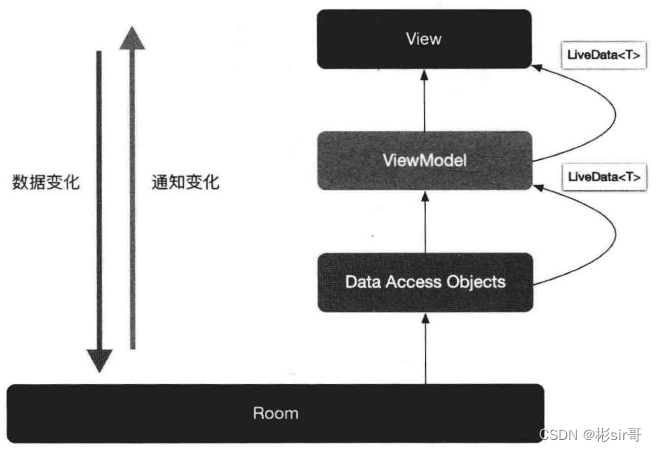
ViewModel 内:Room.Database を通じてLiveDataデータを確認し、 のときに外部でLiveData
監視します。変更があった場合、 の を通じてページ データの変更が通知されます。構造は次のとおりです。RoomViewModelLiveData
と から継承する StudentViewModel クラスを作成します。 4> の場合、コードは次のとおりです。新しいAndroidViewModelDatabaseLiveData
package com.bignerdranch.roomdemo.jetpackroomwithlivedataandviewmodeltest

import android.app.Application
import androidx.lifecycle.AndroidViewModel
import androidx.lifecycle.LiveData
import com.bignerdranch.roomdemo.db.MyDatabase
import com.bignerdranch.roomdemo.db.bean.Student

class StudentViewModel(application: Application) : AndroidViewModel(application) {


    private val myDatabase: MyDatabase?
    val liveDataStudent: LiveData<List<Student?>?>?

    init {


        myDatabase = MyDatabase.getInstance(application)
        liveDataStudent = myDatabase!!.studentDao()!!.getStudentList()
    }

}
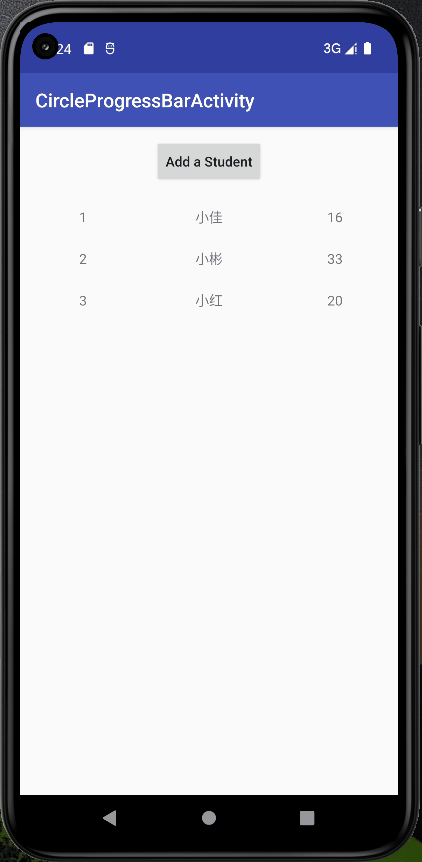
テーブルの操作は追加、削除、変更、確認などわずかですが、結果をより直感的に表示するために、UIにいくつかの変更を加える必要があります。
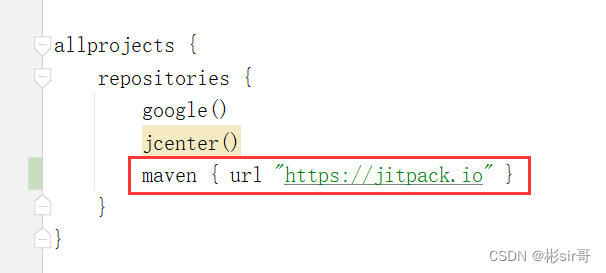
プロジェクトを追加し、クロージャライブラリを追加します。 build.gradlerepositoriesjitpack
その後、app の build.gradle の dependencies{} が増加します
implementation 'com.github.CymChad:BaseRecyclerViewAdapterHelper:3.0.6'
1. レイアウトを変更する
Sync 次に、ページのレイアウト ファイルを変更しましょうactivity_main.xml
<?xml version="1.0" encoding="utf-8"?>
<LinearLayout xmlns:android="http://schemas.android.com/apk/res/android"
    android:layout_width="match_parent"
    android:layout_height="match_parent"
    android:orientation="vertical">

    <Button
        android:id="@+id/btnInsertStudent"
        android:layout_width="wrap_content"
        android:layout_height="wrap_content"
        android:layout_gravity="center_horizontal"
        android:layout_margin="12dp"
        android:text="Add a Student"
        android:textAllCaps="false" />

    <androidx.recyclerview.widget.RecyclerView
        android:id="@+id/recyclerView"
        android:layout_width="match_parent"
        android:layout_height="wrap_content" />
</LinearLayout>
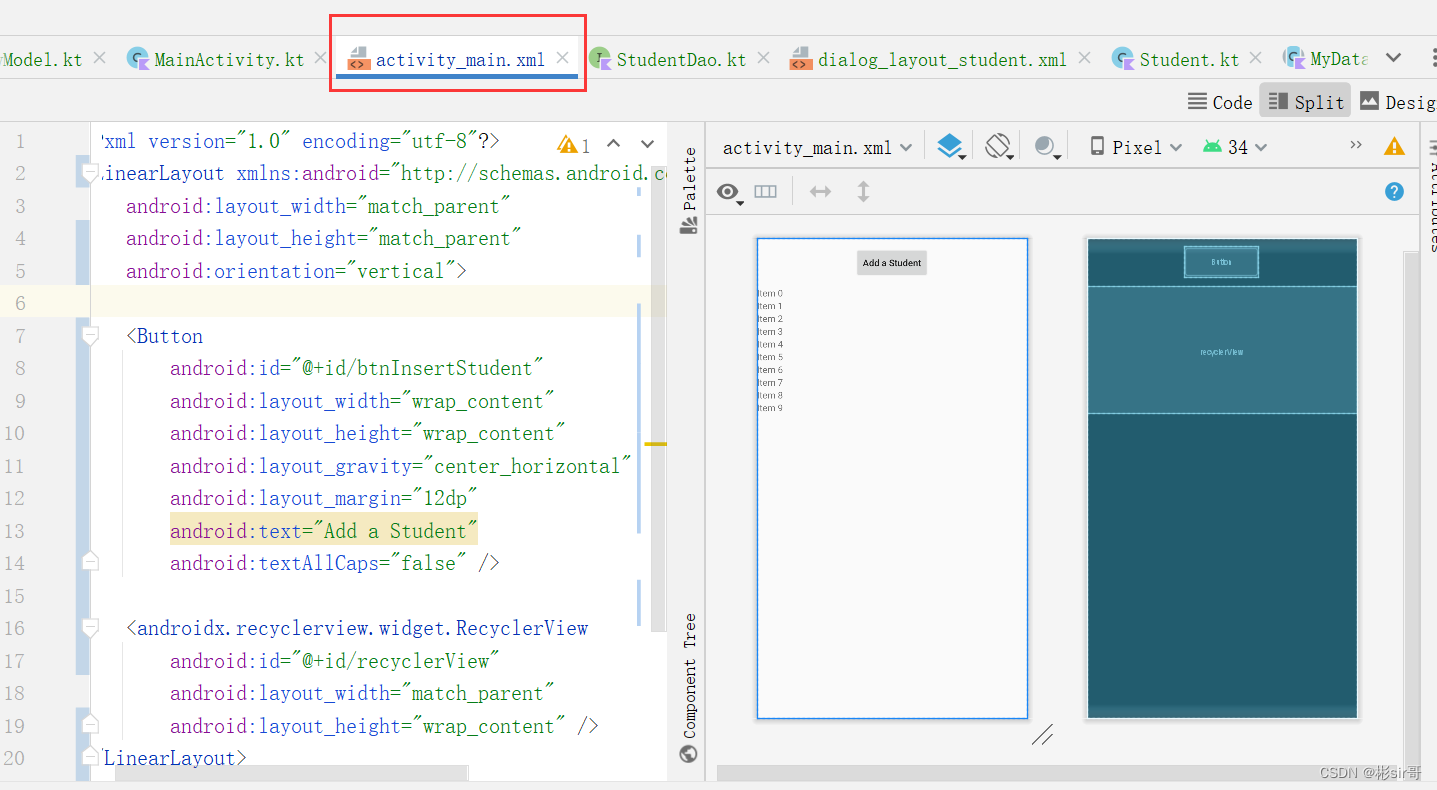
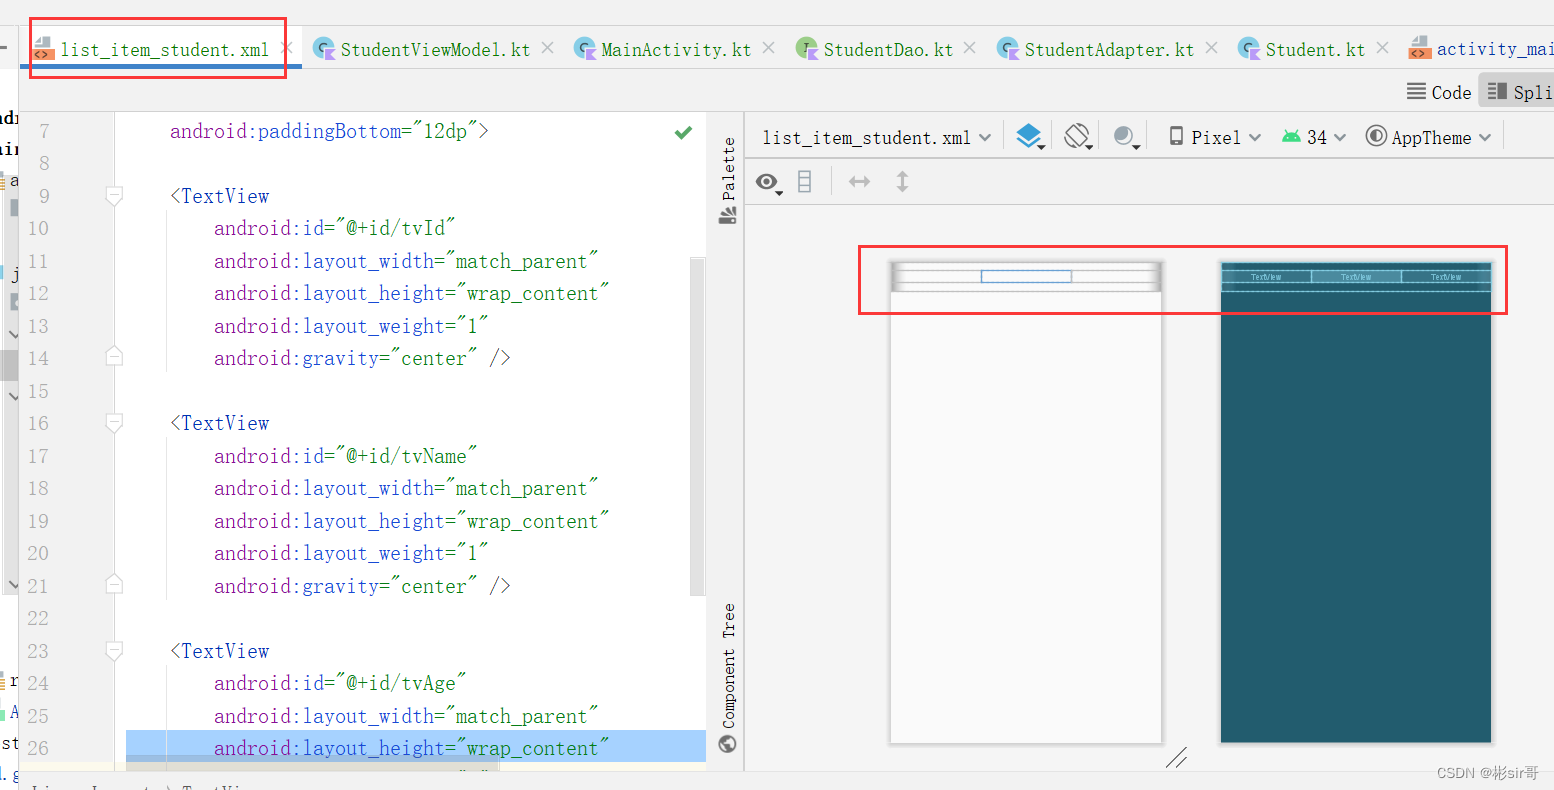
ここにボタンとリストがあります。item リストの
レイアウトを作成し、 レイアウトの場合、コードは次のとおりです。layoutlist_item_student.xml
<?xml version="1.0" encoding="utf-8"?>
<LinearLayout xmlns:android="http://schemas.android.com/apk/res/android"
    android:layout_width="match_parent"
    android:layout_height="wrap_content"
    android:orientation="horizontal"
    android:paddingTop="12dp"
    android:paddingBottom="12dp">

    <TextView
        android:id="@+id/tvId"
        android:layout_width="match_parent"
        android:layout_height="wrap_content"
        android:layout_weight="1"
        android:gravity="center" />

    <TextView
        android:id="@+id/tvName"
        android:layout_width="match_parent"
        android:layout_height="wrap_content"
        android:layout_weight="1"
        android:gravity="center" />

    <TextView
        android:id="@+id/tvAge"
        android:layout_width="match_parent"
        android:layout_height="wrap_content"
        android:layout_weight="1"
        android:gravity="center" />

</LinearLayout>
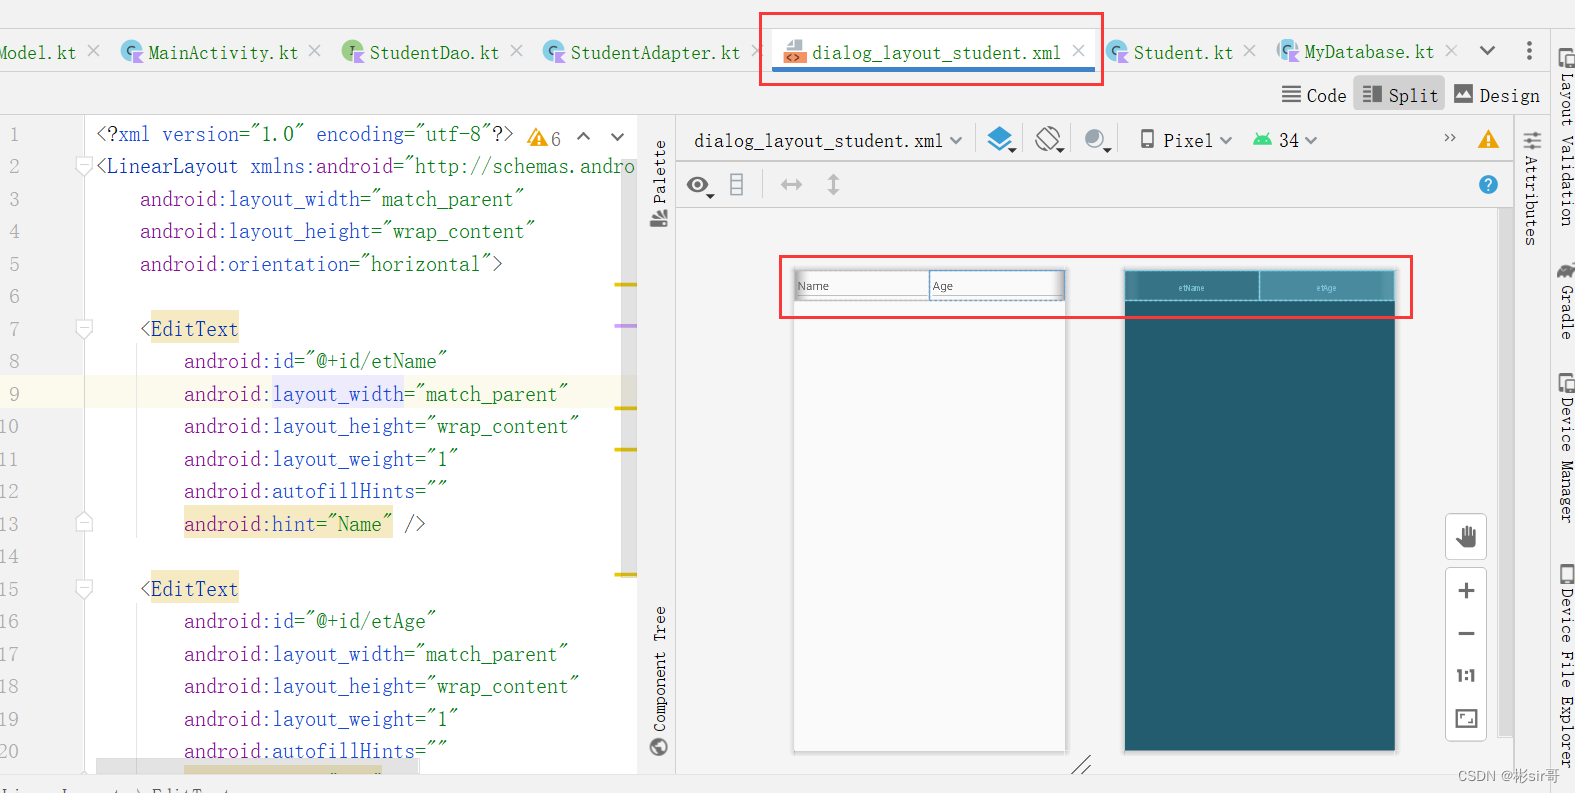
新建dialog_layout_student.xml,布局如下:
<?xml version="1.0" encoding="utf-8"?>
<LinearLayout xmlns:android="http://schemas.android.com/apk/res/android"
    android:layout_width="match_parent"
    android:layout_height="wrap_content"
    android:orientation="horizontal">

    <EditText
        android:id="@+id/etName"
        android:layout_width="match_parent"
        android:layout_height="wrap_content"
        android:layout_weight="1"
        android:autofillHints=""
        android:hint="Name" />

    <EditText
        android:id="@+id/etAge"
        android:layout_width="match_parent"
        android:layout_height="wrap_content"
        android:layout_weight="1"
        android:autofillHints=""
        android:hint="Age" />

</LinearLayout>
com.bignerdranch.roomdemo の下に新しい adapter パッケージを作成し、そのパッケージの下にアダプタとして新しい StudentAdapter クラスを作成します。リストデータ。コードは次のとおりです:
2. リスト アダプター
package com.bignerdranch.roomdemo.adapter

import com.bignerdranch.roomdemo.R
import com.bignerdranch.roomdemo.db.bean.Student
import com.chad.library.adapter.base.BaseQuickAdapter
import com.chad.library.adapter.base.viewholder.BaseViewHolder
import kotlinx.android.synthetic.main.list_item_student.view.*

class StudentAdapter(layoutResId: Int = R.layout.list_item_student) :
    BaseQuickAdapter<Student, BaseViewHolder>(layoutResId) {


    override fun convert(holder: BaseViewHolder, item: Student) {


        holder.itemView.run {


            tvId.text = item.id.toString()
            tvName.text = item.name
            tvAge.text = item.age
        }

    }
}
次に、MainActivity でList を初期化し、StudentViewModel をインスタンス化してリッスンしますLiveData 変更すると、コードは次のようになります。
package com.bignerdranch.roomdemo

import android.content.DialogInterface
import android.os.AsyncTask
import android.os.Bundle
import android.text.TextUtils
import android.view.View
import android.widget.EditText
import android.widget.Toast
import androidx.appcompat.app.AlertDialog
import androidx.appcompat.app.AppCompatActivity
import androidx.lifecycle.ViewModelProvider
import androidx.recyclerview.widget.LinearLayoutManager
import com.bignerdranch.roomdemo.adapter.StudentAdapter
import com.bignerdranch.roomdemo.db.MyDatabase
import com.bignerdranch.roomdemo.db.bean.Student
import com.bignerdranch.roomdemo.jetpackroomwithlivedataandviewmodeltest.StudentViewModel
import com.chad.library.adapter.base.BaseQuickAdapter
import com.chad.library.adapter.base.listener.OnItemLongClickListener
import kotlinx.android.synthetic.main.activity_main.recyclerView

/**
 *
 * @date
 */
class MainActivity : AppCompatActivity(), OnItemLongClickListener {


    private val mStudentAdapter by lazy {


        StudentAdapter().apply {


            setOnItemLongClickListener(this@MainActivity)
        }
    }

    private var myDatabase: MyDatabase? = null
    private var studentList: MutableList<Student>? = null

    override fun onCreate(savedInstanceState: Bundle?) {


        super.onCreate(savedInstanceState)
        setContentView(R.layout.activity_main)
        findViewById<View>(R.id.btnInsertStudent).setOnClickListener {


            openAddStudentDialog()
        }
        studentList = ArrayList()

        val layoutManager = LinearLayoutManager(this@MainActivity)
        layoutManager.orientation = LinearLayoutManager.VERTICAL
        recyclerView.layoutManager = layoutManager
        recyclerView.adapter = mStudentAdapter
//        mStudentAdapter.setList(studentList)

        myDatabase = MyDatabase.getInstance(this)
        val studentViewModel: StudentViewModel =
            ViewModelProvider(this)[StudentViewModel::class.java]
        studentViewModel.liveDataStudent!!.observe(this) {

     students ->
            (studentList as ArrayList<Student?>).clear()
            (studentList as ArrayList<Student?>).addAll(students!!)
//            studentAdapter2!!.notifyDataSetChanged()
            mStudentAdapter.setList(studentList)
            mStudentAdapter.notifyDataSetChanged()
        }
    }

    private fun updateOrDeleteDialog(student: Student?) {


        val options = arrayOf("更新", "删除")
        AlertDialog.Builder(this@MainActivity)
            .setTitle("")
            .setItems(options) {

     _, which ->
                if (which == 0) {


                    openUpdateStudentDialog(student)
                } else if (which == 1) {


                    if (student != null) {


                        DeleteStudentTask(student).execute()
                    }
                }
            }.show()
    }

    private fun openAddStudentDialog() {


        val customView: View = this.layoutInflater.inflate(R.layout.dialog_layout_student, null)
        val etName = customView.findViewById<EditText>(R.id.etName)
        val etAge = customView.findViewById<EditText>(R.id.etAge)
        val builder = AlertDialog.Builder(this@MainActivity)
        val dialog = builder.create()
        dialog.setTitle("Add Student")
        dialog.setButton(DialogInterface.BUTTON_POSITIVE, "OK") {

     dialog, which ->
            if (TextUtils.isEmpty(etName.text.toString()) || TextUtils.isEmpty(etAge.text.toString())) {


                Toast.makeText(this@MainActivity, "输入不能为空", Toast.LENGTH_SHORT).show()
            } else {


                InsertStudentTask(etName.text.toString(), etAge.text.toString()).execute()
            }
        }
        dialog.setButton(
            DialogInterface.BUTTON_NEGATIVE,
            "CANCEL"
        ) {

     dialog, which -> dialog.dismiss() }
        dialog.setView(customView)
        dialog.show()
    }

    private fun openUpdateStudentDialog(student: Student?) {


        if (student == null) {


            return
        }
        val customView: View = this.layoutInflater.inflate(R.layout.dialog_layout_student, null)
        val etName = customView.findViewById<EditText>(R.id.etName)
        val etAge = customView.findViewById<EditText>(R.id.etAge)
        etName.setText(student.name)
        etAge.setText(student.age)
        val builder = AlertDialog.Builder(this@MainActivity)
        val dialog = builder.create()
        dialog.setTitle("Update Student")
        dialog.setButton(DialogInterface.BUTTON_POSITIVE, "OK") {

     dialog, which ->
            if (TextUtils.isEmpty(etName.text.toString()) || TextUtils.isEmpty(etAge.text.toString())) {


                Toast.makeText(this@MainActivity, "输入不能为空", Toast.LENGTH_SHORT).show()
            } else {


                UpdateStudentTask(
                    student.id,
                    etName.text.toString(),
                    etAge.text.toString()
                ).execute()
            }
        }
        dialog.setButton(
            DialogInterface.BUTTON_NEGATIVE,
            "CANCEL"
        ) {

     dialog, which -> dialog.dismiss() }
        dialog.setView(customView)
        dialog.show()
    }

    private inner class InsertStudentTask(var name: String, var age: String) :
        AsyncTask<Void?, Void?, Void?>() {


        override fun doInBackground(vararg params: Void?): Void? {


            myDatabase!!.studentDao()!!.insertStudent(Student(name, age))
            return null
        }
    }

    private inner class UpdateStudentTask(var id: Int, var name: String, var age: String) :
        AsyncTask<Void?, Void?, Void?>() {


        override fun doInBackground(vararg params: Void?): Void? {


            myDatabase!!.studentDao()!!.updateStudent(Student(id, name, age))
            return null
        }
    }

    private inner class DeleteStudentTask(var student: Student) : AsyncTask<Void?, Void?, Void?>() {


        override fun doInBackground(vararg params: Void?): Void? {


            myDatabase!!.studentDao()!!.deleteStudent(student)
            return null
        }
    }

    override fun onItemLongClick(
        adapter: BaseQuickAdapter<*, *>,
        view: View,
        position: Int
    ): Boolean {


        updateOrDeleteDialog((studentList as ArrayList<Student?>)[position])
        return true
    }
}
の実行後、LiveData データが変更された場合、追加、削除、変更のたびにデータを使用するのではなく、 更新するだけUI > QueryStudentTask() システムを簡素化して手動でデータベースに 1 回クエリを実行すると、次のような効果が得られます。
3. ソースコードをダウンロードする
ソース コードのダウンロード github アドレス:https://github.com/caobin10/RoomDemo