このブログには複数の非常に詳細な概要もあり、興味のある友人は次のリンクに移動できます。
畳み込みニューラル ネットワーク:畳み込みニューラル ネットワークの超詳細な紹介
ターゲット検出:ターゲット検出の超詳細な紹介
セマンティック セグメンテーション:セマンティック セグメンテーションの超詳細な紹介
NMS: NMS 全体とそのバリエーションを理解して確認できるようにします。
データ拡張:コンピューター ビジョンにおけるデータ拡張を理解するための記事
損失関数:分類検出セグメンテーションにおける損失関数と評価指標
トランスフォーマー:ビジュアルトランスフォーマーに関する調査
機械学習実践シリーズ:デシジョンツリー
YOLO シリーズ:v1、v2、v3、v4、scaled-v4、v5、v6、v7、yolof、yolox、yolos、yolop
記事ディレクトリ
1. mmセグメンテーションの概要
github リンク: https://github.com/open-mmlab/mmsegmentation
2. 都市景観データセットの概要
2.1 データ構造
1. データセットの構造:
- 画像ベース: leftImg8bit (5030 アイテム、合計 11.6GB、実際には 5000 アイテム)
- Annotations_base: gtFine (30030 アイテム、合計 1.1GB)
2. 写真の枚数
-
5,000 の優れた注釈
- 2975 トレーニング画像、500 トレーニング画像、1525 テスト画像
-
20,000 個のラフな注釈 (個々のオブジェクトをカバーするためにポリゴンを使用)
3.画像サイズ:
- 1024x2048
4. データシナリオ:
- 50 の異なる都市のストリート シーン
- train/val/testの街は全部違う
5. カテゴリの定義:

- *: 単一インスタンスとしてマークされています。同じカテゴリの複数のオブジェクトが相互に分散している場合、つまりインスタンスの境界が明確でない場合、これらのオブジェクトは車/自転車グループなどの単一のインスタンス グループを形成します。
- +: 表現されているラベルは現在どの評価項目にも含まれておらず、無効として扱われるため、これらのラベルは削除されます 一般に、CityScapes には 19 のカテゴリが含まれていると言われます。
6. 表示方法
Cityscape には独自の注釈メソッドがあります: cityscapescripts
https://github.com/mcordts/cityscapesScripts/tree/master/cityscapesscripts
注: トレーニングする前に、trainlabelid.png に 19 カテゴリがあるかどうかを必ず確認してください。安全のため、cityscapesscripts/helpers/labels.py を使用して再生成することをお勧めします。

cityscapesScripts/helpers/labels.py ファイルは、以下に示すように、さまざまなカテゴリと ID 値に対応するメソッド、色などを定義します。
- 合計カテゴリ: 34 カテゴリ
- 現在利用可能なカテゴリ: 19 カテゴリ
- ラベル ファイル タイプ: CityScapes ラベルは 1 つの json に集中していませんが、各画像は 4 つのラベル ファイルに対応しています。
-
color.png: 各色はカテゴリに対応します

-
instanceIds.png: インスタンスの分割に使用されます

-
labelIds.png: ラベル、合計 34 カテゴリ (0 ~ 33)、背景は 0

-
TrainLabelId.png: トレーニング用ラベル、(19 トレーニング カテゴリ + 1 無視)、トレーニングに参加しないピクセル値を 255 に設定、トレーニングに参加する残りのカテゴリのピクセル値は 0 ~ 18

-
ポリゴン.json
-
- _gtFine_polygons.json には、各クラスと対応する領域が格納されます (ポリゴンの頂点の位置は領域の境界を表します)。
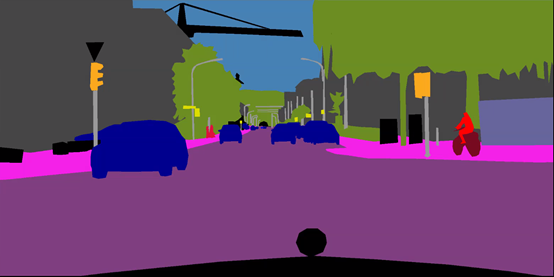
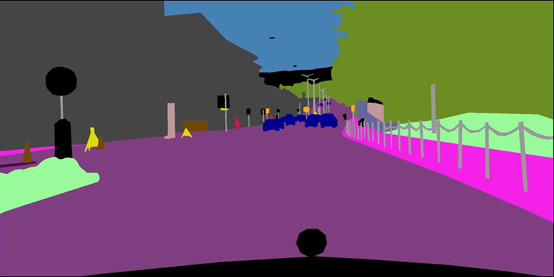
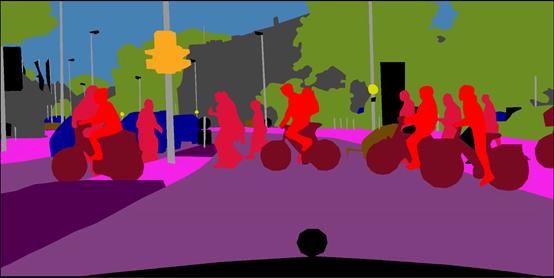
2.2 アノテーションの例


3. データセットを Cityscape 形式に変換します
3.1 labelme でマークされたデータを学習に使用できるデータに変換する
from pathlib import Path
import os
import glob
import cv2
import png
import numpy as np
import shutil
from PIL import Image


# set add_4 and add_15 folder
seg_folder = Path('./20210311_ground_mask_part1/')

seg_folder_TrainID = Path(os.path.join(seg_folder,"TrainID"))
seg_folder_img = Path(os.path.join(seg_folder,"img"))
seg_folder_LabelID = Path(os.path.join(seg_folder,"LabelID"))
seg_folder_color = Path(os.path.join(seg_folder,"color"))

if not seg_folder_img.exists():
    os.mkdir(seg_folder_img)
if not seg_folder_LabelID.exists():
    os.mkdir(seg_folder_LabelID)
if not seg_folder_TrainID.exists():
    os.mkdir(seg_folder_TrainID)
if not seg_folder_color.exists():
    os.mkdir(seg_folder_color)

LabelID_glob = glob.glob('./20210311_ground_mask_part1/20210222_TJP_freespace_ss/20210222_TJP_freespace_ss_label/*.png')
TrainID_glob = glob.glob('./20210311_ground_mask_part1/20210222_TJP_freespace_ss/20210222_TJP_freespace_ss_label/*.png')
Img_glob = glob.glob('./20210311_ground_mask_part1/20210222_TJP_freespace_ss/20210222_TJP_freespace_ss_extract/*.jpg')
Color_glob = glob.glob('./20210311_ground_mask_part1/20210222_TJP_freespace_ss/20210222_TJP_freespace_ss_label/*.png')
# assert(len(LabelID_glob)==len(Img_glob))

print("len for lable glob",len(LabelID_glob))

# ******************* TrainID process ****************************
print("begin to process TrainID")
for k in range(len(LabelID_glob)):
    transfer_ori = Image.open(TrainID_glob[k])
    transfer_ground = np.array(transfer_ori)
    transfer_ground[transfer_ground == 0] = 255  # ignore
    transfer_ground[transfer_ground == 1] = 0   # freespace
    transfer_ground[transfer_ground == 2] = 1  # white solid lane line
    transfer_ground[transfer_ground == 3] = 2  # white dotted lane line
    # transfer_ground[transfer_ground == 4] = 3  # yellow solid lane line
    # transfer_ground[transfer_ground == 5] = 4  # yellow dotted lane line
    transfer_ground[transfer_ground == 6] = 3  # arrow
    transfer_ground[transfer_ground == 7] = 4  # diamond_sign
    transfer_ground[transfer_ground == 8] = 5  # zebra crossing
    transfer_ground[transfer_ground == 9] = 6  # stop line
    transfer_ground_img = Image.fromarray(transfer_ground)
    transfer_ground_img = transfer_ground_img.resize((2048, 1024))
    transfer_ori_path = os.path.join(seg_folder_TrainID,TrainID_glob[k].split('/')[-1].split('\\')[1])
    transfer_ground_img.save(transfer_ori_path)
    print("the {0} th TrainID img has been processed and save in folder".format(k))
#
# # ******************* LableID process ****************************
print("begin to process LableID")
for k in range(len(LabelID_glob)):
    transfer_ori = Image.open(TrainID_glob[k])
    transfer_ground = np.array(transfer_ori)
    transfer_ground[transfer_ground == 0] = 0  # ignore
    transfer_ground[transfer_ground == 1] = 1  # freespace
    transfer_ground[transfer_ground == 2] = 2  # white solid lane line
    transfer_ground[transfer_ground == 3] = 3  # white dotted lane line
    # transfer_ground[transfer_ground == 4] = 4  # yellow solid lane line
    # transfer_ground[transfer_ground == 5] = 5  # yellow dotted lane line
    transfer_ground[transfer_ground == 6] = 4  # arrow
    transfer_ground[transfer_ground == 7] = 5  # diamond_sign
    transfer_ground[transfer_ground == 8] = 6  # zebra crossing
    transfer_ground[transfer_ground == 9] = 7  # stop line

    transfer_ground_img = Image.fromarray(transfer_ground)
    transfer_ground_img = transfer_ground_img.resize((2048, 1024))
    transfer_ori_path = os.path.join(seg_folder_TrainID, TrainID_glob[k].split('/')[-1].split('\\')[1])
    transfer_ground_img.save(transfer_ori_path)
    print("the {0} th LabelID img has been processed and save in folder".format(k))


# # ******************** resize img ***********************************
for k in range(len(Img_glob)):
    print("copy the {0}th img to add img folder".format(k))
    src_img = Image.open(Img_glob[k])
    src_img = src_img.resize((2048, 1024))
    src_img_save_path = os.path.join(seg_folder_img,Img_glob[k].split('/')[-1].split('\\')[1].split('.')[0])
    src_img.save(src_img_save_path+'.png')
#
# ## ********************* resize color png *****************************
for k in range(len(Color_glob)):
    print("copy the {0}th img to color folder".format(k))
    src_img = Image.open(Color_glob[k])
    src_img = src_img.resize((2048,1024))
    color_img_save_path = os.path.join(seg_folder_color,Color_glob[k].split('/')[-1].split('\\')[1].split('.')[0])
    src_img.save(color_img_save_path+'.png')
3.2 重命名
import os
import glob
import shutil
from pathlib import Path


img_path = './img/'
TrainID_path = './TrainID/'
LabelID_path = './LabelID/'
color_path = './color/'
gtFine_path = './gtFine/'
leftImg8bit_path = './leftImg8bit/'

if not Path(gtFine_path).exists():
    os.mkdir(gtFine_path)
if not Path(leftImg8bit_path).exists():
    os.mkdir(leftImg8bit_path)

img_files = os.listdir(img_path)
TrainID_files = os.listdir(TrainID_path)
LabelID_files = os.listdir(LabelID_path)
color_files = os.listdir(color_path)

m = 0
for file in color_files:
    #import pdb;pdb.set_trace()

    old = color_path + os.sep + color_files[m]
    filename = os.path.splitext(file)[0]

    new = gtFine_path + 'part1_' + filename + '_gtFine_color.png'
    shutil.move(old, new)
    print('rename {}th color files'.format(m))
    m+=1

i = 0
for file in img_files:
    #import pdb;pdb.set_trace()

    old = img_path + os.sep + img_files[i]
    filename = os.path.splitext(file)[0]

    new = leftImg8bit_path+ 'part1_' + filename + '_leftImg8bit.png'
    shutil.move(old, new)
    print('rename {}th img files'.format(i))
    i+=1
j = 0
for file in TrainID_files:
    # import pdb;pdb.set_trace()

    old = TrainID_path + os.sep + TrainID_files[j]
    filename = os.path.splitext(file)[0]

    new = gtFine_path + 'part1_' + filename + '_gtFine_labelTrainIds.png'
    shutil.move(old, new)
    print('rename {}th trainid files'.format(j))
    j += 1
k = 0
for file in LabelID_files:
    # import pdb;pdb.set_trace()

    old = LabelID_path + os.sep + LabelID_files[k]
    filename = os.path.splitext(file)[0]

    new = gtFine_path + 'part1_' + filename + '_gtFine_labelIds.png'
    shutil.move(old, new)
    print('rename {}th labelid files'.format(k))
    k += 1
-
色

-
ラベルトレインID

-
ラベルID

3.3 XML から JSON へ
import json
import xmltodict
import glob
import os

xml_list = glob.glob('./20210222_TJP_freespace_ss_xml/*.xml') #xml文件的路径


'''json to xml'''
def json_to_xml(json_str):
    # xmltodict库的unparse()json转xml
    # 参数pretty 是格式化xml
    xml_str = xmltodict.unparse(json_str, pretty=1, root='shapes')
    return xml_str

'''xml to json'''
def xml_to_json(xml_str):
    # parse是的xml解析器
    xml_parse = xmltodict.parse(xml_str)
    # json库dumps()是将dict转化成json格式,loads()是将json转化成dict格式。
    # dumps()方法的ident=1,格式化json
    json_str = json.dumps(xml_parse, indent=1)
    return json_str


for xml_path in xml_list:

    if os.path.exists(xml_path):
        with open(xml_path, 'r') as f1:
            xmlfile = f1.read()
            print('---------xml文件-----------')
            print(xmlfile)
            print('---------json文件----------')
            print(xml_to_json(xmlfile))
        with open(xml_path[:-3]+'json','w') as newfile:
            newfile.write(xml_to_json(xmlfile))
            print('--------写入json文件--------')
            print('写入xml.json文件成功')
4. トレーニングとテスト
4.1 データセットのパス名などを変更する
注: 最初にパスをコンパイルしてください python setup.py develop
1. データセットのパスを変更する
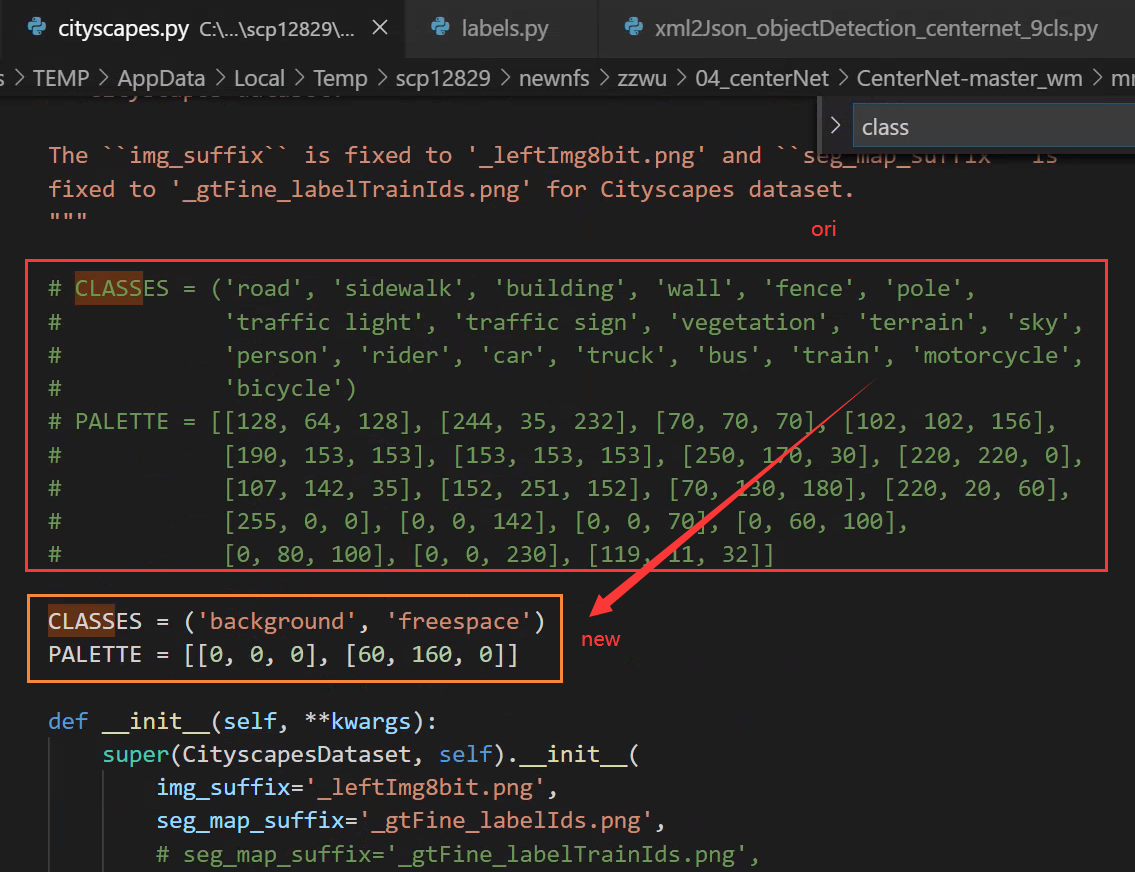
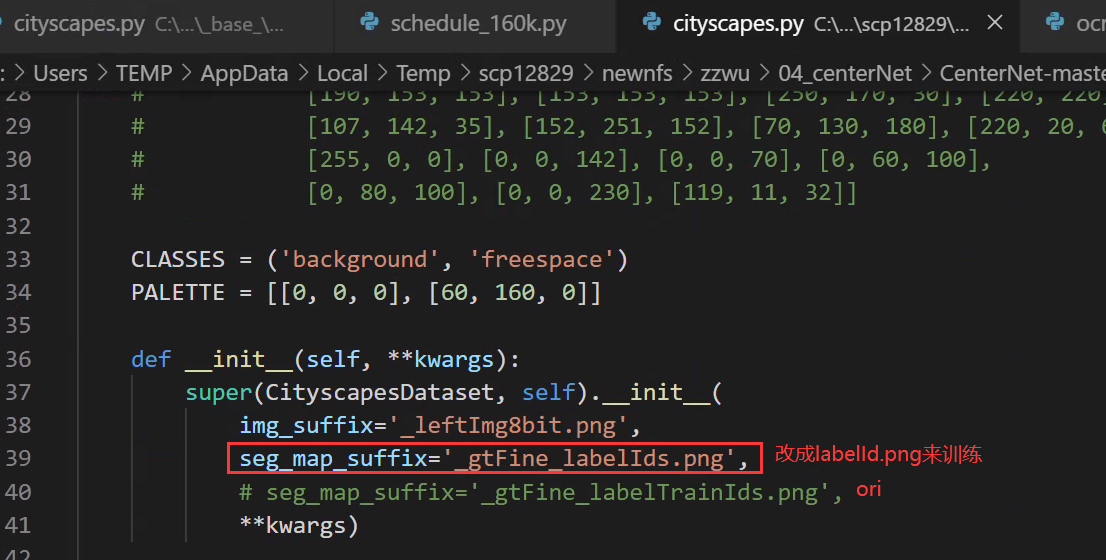
mmseg/datasets/cityscapes.py

2. カテゴリの数を変更する
config/_base_/ocrnet_hr18.py
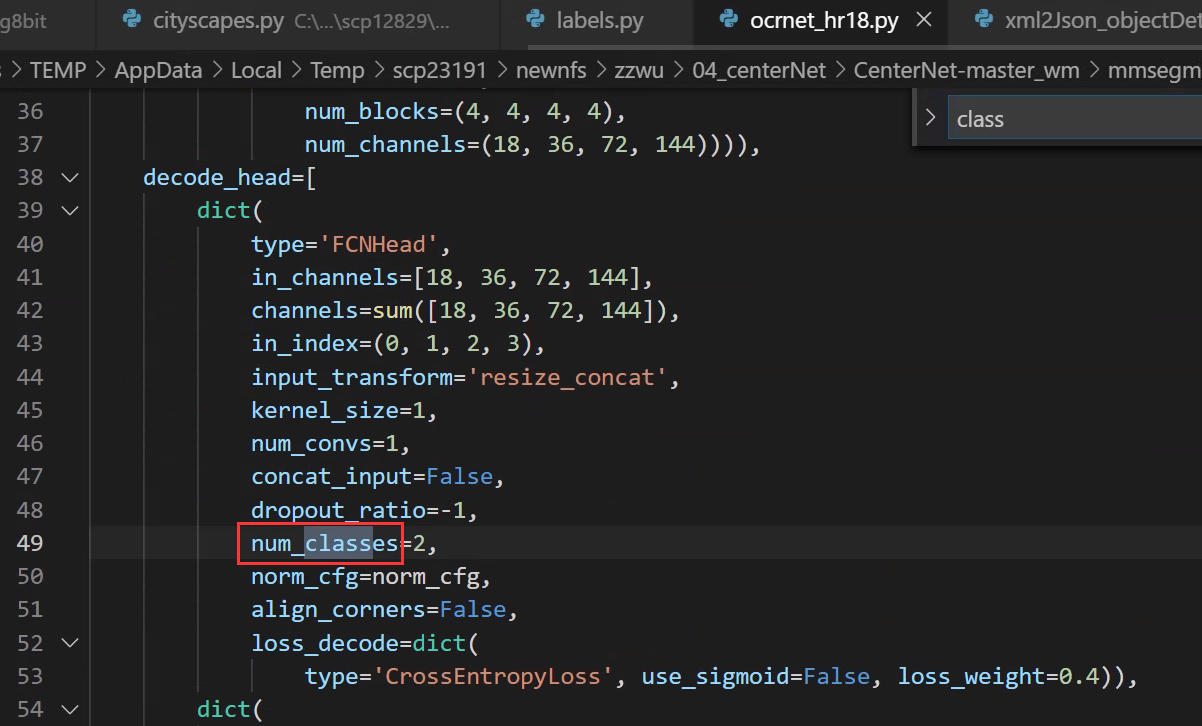
mmseg/datasets/cityscapes.py
mmseg/core/class_names.py

3. labelid.png をトレーニング ラベルとして使用します。つまり、フリースペースとバックグラウンドの 2 つのカテゴリをトレーニングします。
フリースペース カテゴリのみをトレーニングし、背景を無視してトレーニングに参加しない通常の方法を使用すると、セグメンテーションで無視されたピクセルが存在するため、視覚化中に背景がすべてフリースペース カテゴリとして学習されたことがわかります。は、実際には注目されていないピクセルです。つまり、それらがどのカテゴリであると予測されるかは誰も気にしませんが、画像内に無視される領域が大きい場合、つまり、無視される領域が大きい場合は、カテゴリが間違っていると、そのようなモデルは使用できないため、ここでは labelid.png をトレーニングとして使用します。ラベル、つまり、フリースペースとバックグラウンドの 2 つのカテゴリをトレーニングするため、トレーニング効果は非常に優れています。
mmseg/datasets/cityscapes.py
4. トレーニング、テスト、検証データを変更する
mmseg/datasets/cityscapes.py
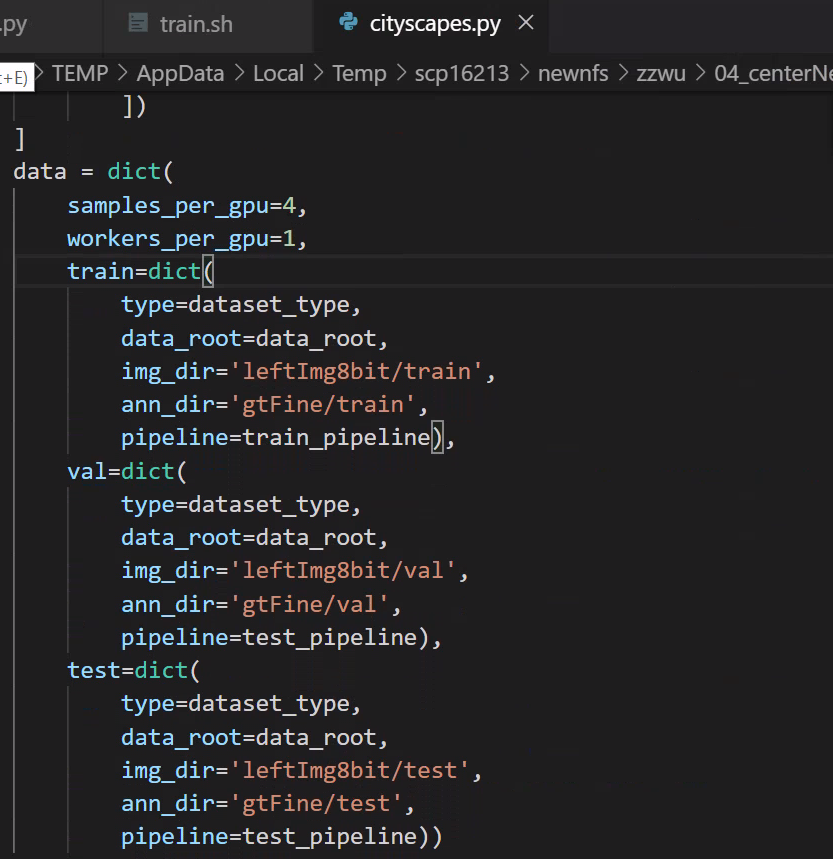
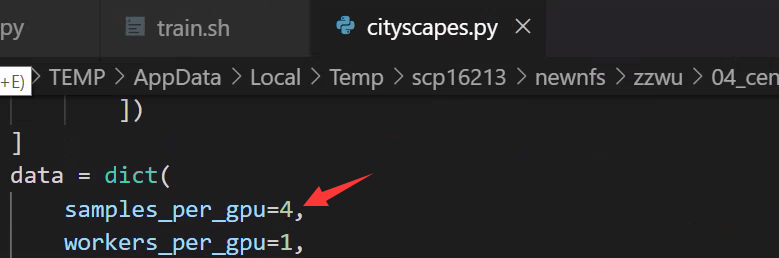
5.各GPUのサンプル数(バッチ)を変更する
configs/_base_/datasets/cityscapes.py
6. 分散トレーニング/非分散トレーニングの BN 修正
config/_base_/models/ocrnet_hr18.py

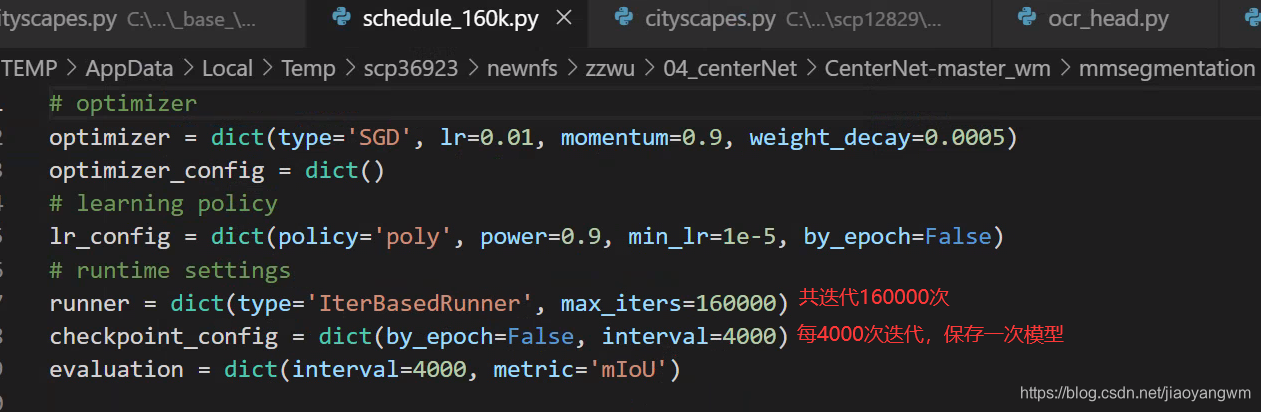
7. 反復回数とモデルを保存する間隔を変更します。
config/_base_/schedules/schedule_160k.py
8. 各トレーニングのデータを確認できる場所:
mmseg/datasets/builder.py
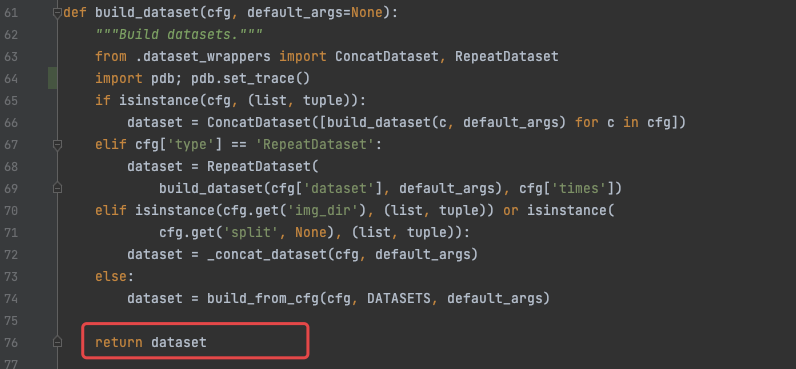

datasets[0].keys()
>>>
dict_keys(['img_metas', 'img', 'gt_semantic_seg'])
4.2 トレーニング
1.シングルカードトレーニング
python tools/train.py ${

    CONFIG_FILE} [optional arguments]
2. マルチカードトレーニング
./tools/dist_train.sh ${

    CONFIG_FILE} ${

    GPU_NUM} [optional arguments]
python -m torch.distributed.launch --nproc_per_node=2 --master_port=29003 tools/train.py --config configs/ocrnet/ocrnet_hr18s_512x1024_40k_cityscapes.py --launcher pytorch --work_dir work_dir
エラーが次の場合、解決策:master_port の値を変更します。
subprocess.CalledProcessError: Command '[xxx]' returned non-zero exit status 1.
Optional arguments are:
--no-validate (not suggested): By default, the codebase will perform evaluation at every k iterations during the training. To disable this behavior, use --no-validate.
--work-dir ${

    WORK_DIR}: Override the working directory specified in the config file.
--resume-from ${

    CHECKPOINT_FILE}: Resume from a previous checkpoint file (to continue the training process).
--load-from ${

    CHECKPOINT_FILE}: Load weights from a checkpoint file (to start finetuning for another task).
Difference between resume-from and load-from:
resume-from loads both the model weights and optimizer state including the iteration number.
load-from loads only the model weights, starts the training from iteration 0.
4.3 テスト
# single-gpu testing
python tools/test.py ${

    CONFIG_FILE} ${

    CHECKPOINT_FILE} [--out ${

    RESULT_FILE}] [--eval ${

    EVAL_METRICS}] [--show]

# save test result at dir
python tools/test.py ${

    CONFIG_FILE} ${

    CHECKPOINT_FILE} [--out ${

    RESULT_FILE}] [--show-dir result]

# multi-gpu testing
./tools/dist_test.sh ${

    CONFIG_FILE} ${

    CHECKPOINT_FILE} ${

    GPU_NUM} [--out ${

    RESULT_FILE}] [--eval ${

    EVAL_METRICS}]
Optional arguments:

RESULT_FILE: Filename of the output results in pickle format. If not specified, the results will not be saved to a file.
EVAL_METRICS: Items to be evaluated on the results. Allowed values depend on the dataset, e.g., mIoU is available for all dataset. Cityscapes could be evaluated by cityscapes as well as standard mIoU metrics.
--show: If specified, segmentation results will be plotted on the images and shown in a new window. It is only applicable to single GPU testing and used for debugging and visualization. Please make sure that GUI is available in your environment, otherwise you may encounter the error like cannot connect to X server.
--show-dir: If specified, segmentation results will be plotted on the images and saved to the specified directory. It is only applicable to single GPU testing and used for debugging and visualization. You do NOT need a GUI available in your environment for using this option.
例:
すでにチェックポイントをディレクトリ Checkpoints/ にダウンロードしていると仮定します。
- PSPNet をテストし、結果を視覚化します。任意のキーを押すと次の画像が表示されます。
python tools/test.py configs/pspnet/pspnet_r50-d8_512x1024_40k_cityscapes.py \
    checkpoints/pspnet_r50-d8_512x1024_40k_cityscapes_20200605_003338-2966598c.pth \
    --show
- PSPNet をテストし、後の視覚化のためにペイントされたイメージを保存します。
python tools/test.py configs/pspnet/pspnet_r50-d8_512x1024_40k_cityscapes.py \
    checkpoints/pspnet_r50-d8_512x1024_40k_cityscapes_20200605_003338-2966598c.pth \
    --show-dir psp_r50_512x1024_40ki_cityscapes_results
- PASCAL VOC で PSPNet をテストし (テスト結果を保存せずに)、mIoU を評価します。
python tools/test.py configs/pspnet/pspnet_r50-d8_512x1024_20k_voc12aug.py \
    checkpoints/pspnet_r50-d8_512x1024_20k_voc12aug_20200605_003338-c57ef100.pth \
    --eval mAP
- 4 つの GPU で PSPNet をテストし、標準の mIoU と都市景観メトリックを評価します。
./tools/dist_test.sh configs/pspnet/pspnet_r50-d8_512x1024_40k_cityscapes.py \
    checkpoints/pspnet_r50-d8_512x1024_40k_cityscapes_20200605_003338-2966598c.pth \
    4 --out results.pkl --eval mIoU cityscapes
注: 都市景観の mIoU と当社の mIoU の間には、ある程度のギャップ (~0.1%) があります。その理由は、デフォルトでは都市の景観がクラスのサイズで各クラスを平均化しているためです。すべてのデータセットに対して平均のない単純なバージョンを使用します。
- 4 つの GPU を使用した都市景観テスト分割で PSPNet をテストし、公式評価サーバーに送信する PNG ファイルを生成します。
まず、設定ファイル configs/pspnet/pspnet_r50-d8_512x1024_40k_cityscapes.py に以下を追加します。
data = dict(
    test=dict(
        img_dir='leftImg8bit/test',
        ann_dir='gtFine/test'))
次に、テストを実行します。
./tools/dist_test.sh configs/pspnet/pspnet_r50-d8_512x1024_40k_cityscapes.py \
    checkpoints/pspnet_r50-d8_512x1024_40k_cityscapes_20200605_003338-2966598c.pth \
    4 --format-only --eval-options "imgfile_prefix=./pspnet_test_results"
./pspnet_test_results ディレクトリに png ファイルが保存されます。zip -r results.zip pspnet_test_results/ を実行し、zip ファイルを評価サーバーに送信できます。
4.4 デモ
python demo/image_demo.py ${

    IMAGE_FILE} ${

    CONFIG_FILE} ${

    CHECKPOINT_FILE} [--device ${

    DEVICE_NAME}] [--palette-thr ${

    PALETTE}]
# example
python demo/image_demo.py demo/demo.jpg configs/pspnet/pspnet_r50-d8_512x1024_40k_cityscapes.py \
    checkpoints/pspnet_r50-d8_512x1024_40k_cityscapes_20200605_003338-2966598c.pth --device cuda:0 --palette cityscapes
注: 同じ構成を使用して複数回トレーニングする場合は、config/hr.py の名前を変更することで、結果を異なる作業ディレクトリに置くことができます。
5. トレーニングスキル
5.1 さまざまなカテゴリーの減量設定
/configs/_base_/models/ocrnet_hr18.py