Table des matières
0. Contexte
Entièrement localisé, utilisant la carte de développement Rockchip rk3588 pour remplacer la carte de développement jetson nano.
1. Transformation du modèle
L'étape de conversion du modèle doit être effectuée dans la machine virtuelle de la version de bureau Ubuntu20.04 sur l'ordinateur portable, comprenant deux étapes principales : la conversion de yolov5s.pt en yolov5s.onnx et la conversion de yolov5s.onnx en yolov5s.rknn.
Reportez-vous principalement au blog " Article yolov5 - yolov5 entraîne le modèle pt et le convertit en modèle rknn, le déploie sur la carte de développement RK3588 - l'ensemble du processus, de la formation au déploiement "
1.1 Environnement de base
Environnement de base : machine virtuelle Ubuntu 20.04 sur la plateforme x86 (notez qu'un ordinateur sur la plateforme x86 est requis ici, un ordinateur portable ordinaire suffira ; la version du système dans la machine virtuelle est la version de bureau Ubuntu 20.04)
1.2 Créer un environnement python
- Installez miniconda dans la machine virtuelle, puis activez l'environnement de base
- Créez un environnement conda pour python 3.8 (notez que la version de python ici doit être 3.8), reportez-vous à la commande suivante
conda create -n rk3588 python=3.8
conda activate rk3588
pip install numpy -i https://mirror.baidu.com/pypi/simple
cd ~/Desktop
git clone https://gitcode.net/mirrors/rockchip-linux/rknn-toolkit2.git
pip install -r rknn-toolkit2/doc/requirements_cp38-1.4.0.txt -i https://mirror.baidu.com/pypi/simple
pip install pandas==1.4.* pyyaml matplotlib==3.3.* seaborn -i https://mirror.baidu.com/pypi/simple
1.3 Convertir yolov5s.pt en yolov5s.onnx
Tout d'abord, téléchargez le code du projet yolov5 sur le bureau (notez que le projet yolov5 ici est en fait la version v5.0), comme suit
cd ~/Desktop
git clone https://gitcode.net/mirrors/ultralytics/yolov5.git
cd yolov5
git reset --hard c5360f6e7009eb4d05f14d1cc9dae0963e949213
Deuxièmement, recherchez l'adresse de téléchargement de yolov5s.pt à partir de l'adresse du projet yolov5 , téléchargez-la avec Thunder et téléchargez yolov5s.pt dans le répertoire de la machine virtuelle ~/Desktop/yolov5/weights ;
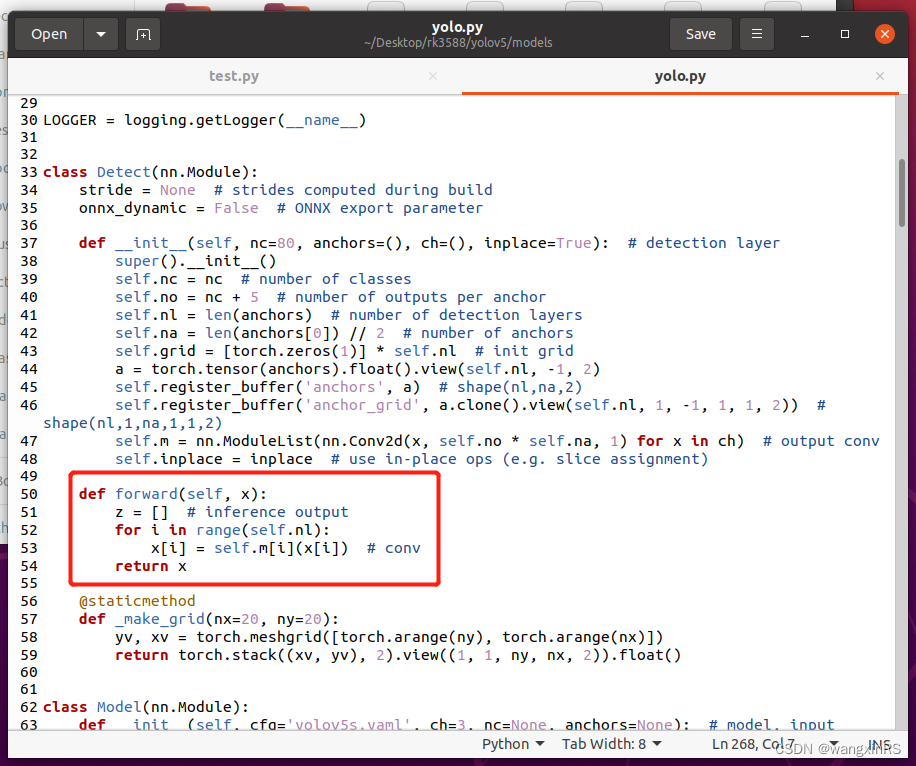
Encore une fois, modifiez la fonction Detect dans ~/Desktop/yolov5/models/yolo.py, comme indiqué dans la figure ci-dessous (notez que cette partie n'est utilisée que lors de la conversion et ne peut pas être modifiée pendant la formation)
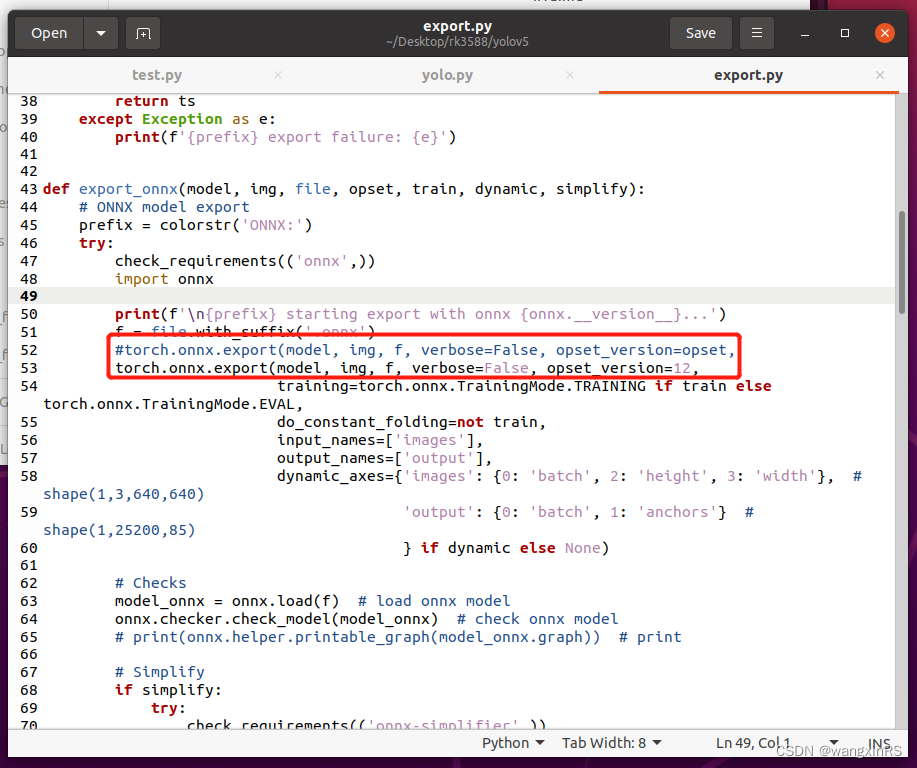
Encore une fois, modifiez la fonction export_onnx() dans ~/Desktop/yolov5/export.py, comme indiqué ci-dessous
Enfin, appelez la commande suivante sur la ligne de commande. Dans le répertoire des poids, le fichier yolov5s.onnx existe :
python export.py --weights weights/yolov5s.pt --img 640 --batch 1 --include onnx
1.4 Convertir yolov5s.onnx en yolov5s.rknn
Tout d’abord, téléchargez le projet rknn-toolkit2. Cette étape a effectivement été réalisée lors de la préparation de l'environnement.
cd ~/Desktop
git clone https://gitcode.net/mirrors/rockchip-linux/rknn-toolkit2.git
Deuxièmement, installez l'environnement de rknn-toolkit2. Cette étape a effectivement été réalisée lors de la préparation de l'environnement.
cd ~/Desktop/rknn-toolkit2
cd doc && pip install -r requirements_cp38-1.4.0.txt -i https://mirror.baidu.com/pypi/simple
Encore une fois, installez la boîte à outils rknn-toolkit2.
cd ~/Desktop/rknn-toolkit2
cd packages && pip install rknn_toolkit2-1.4.0_22dcfef4-cp38-cp38-linux_x86_64.whl -i https://mirror.baidu.com/pypi/simple
Testez si l'installation a réussi. Exécutez l'environnement python dans le terminal, puis entrez
from rknn.api import RKNN
Encore une fois, copiez yolov5s.onnx dans le répertoire ~/Desktop/rknn-toolkit2/examples/onnx/yolov5 et apportez quelques modifications à test.py dans ce répertoire, comme indiqué ci-dessous.
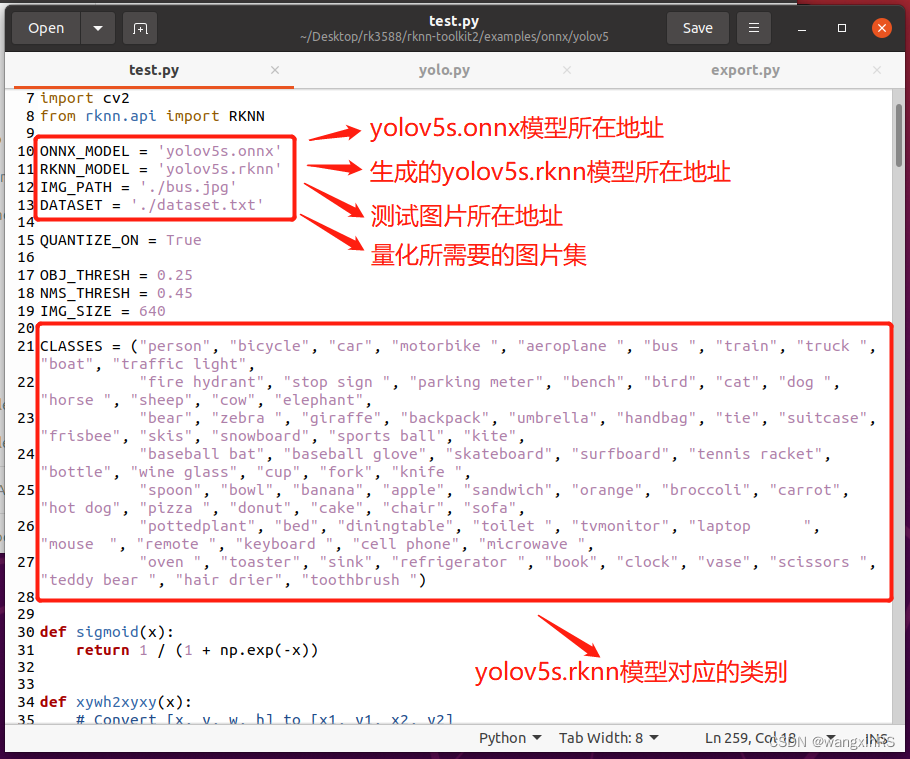

Enfin, exécutez python test.py-le pour obtenir yolov5s.rknn dans le même répertoire.
2. Déploiement de la carte de développement
En utilisant yolov5s.onnx, nous exécutons le code yolov5. Ici, il est divisé en version c et version python. Les opérations suivantes sont effectuées sur la carte de développement.
Version 2.1.c
- Téléchargez la démo officielle sur la carte de développement rk3588
cd ~/Desktop
git clone https://gitcode.net/mirrors/rockchip-linux/rknpu2.git
- Modifiez le fichier. Entrez d'abord dans le répertoire rknpu2/examples/rknn_yolov5_demo, puis modifiez le fichier d'en-tête postprocess.h dans le fichier d'inclusion, comme indiqué ci-dessous

Deuxièmement, modifiez le fichier coco_80_labels_list.txt dans le répertoire model, remplacez-le par votre propre classe et enregistrez-le, comme indiqué ci-dessous.
Enfin, placez le fichier rknn converti dans le répertoire model/RK3588, compilez et exécutez le shell. Une fois la commande exécutée avec succès, le répertoire d'installation sera généré.
bash ./build-linux_RK3588.sh
(3) Exécutez la démo. Téléchargez yolov5s.rknn dans le répertoire model/RK3588, placez les images qui doivent être déduites dans le répertoire model et exécutez
cd install/rknn_yolov5_demo_linux
./rknn_yolov5_demo ./model/RK3588/yolov5s.rknn ./model/bus.jpg
2.1. version python (doit être python 3.9)
Cette version de l'API fait principalement référence au "RKNN Toolkit Lite2 User Guide" .
- source de mise à jour
# 默认注释了源码镜像以提高 apt update 速度,如有需要可自行取消注释
deb http://mirrors.tuna.tsinghua.edu.cn/ubuntu-ports/ focal main restricted universe multiverse
# deb-src https://mirrors.tuna.tsinghua.edu.cn/ubuntu-ports/ jammy main restricted universe multiverse
deb http://mirrors.tuna.tsinghua.edu.cn/ubuntu-ports/ focal-updates main restricted universe multiverse
# deb-src https://mirrors.tuna.tsinghua.edu.cn/ubuntu-ports/ jammy-updates main restricted universe multiverse
deb http://mirrors.tuna.tsinghua.edu.cn/ubuntu-ports/ focal-backports main restricted universe multiverse
# deb-src https://mirrors.tuna.tsinghua.edu.cn/ubuntu-ports/ jammy-backports main restricted universe multiverse
deb http://mirrors.tuna.tsinghua.edu.cn/ubuntu-ports/ focal-security main restricted universe multiverse
# deb-src https://mirrors.tuna.tsinghua.edu.cn/ubuntu-ports/ jammy-security main restricted universe multiverse
Source de mise à jour :
sudo apt-get update
- installation d'une miniconde
wget https://repo.anaconda.com/miniconda/Miniconda3-latest-Linux-aarch64.sh (installation en ligne)
Il est recommandé d'installer hors ligne. Accédez au site officiel de miniconda , sélectionnez la version py3.8 et téléchargez-la avec Thunder, comme suit
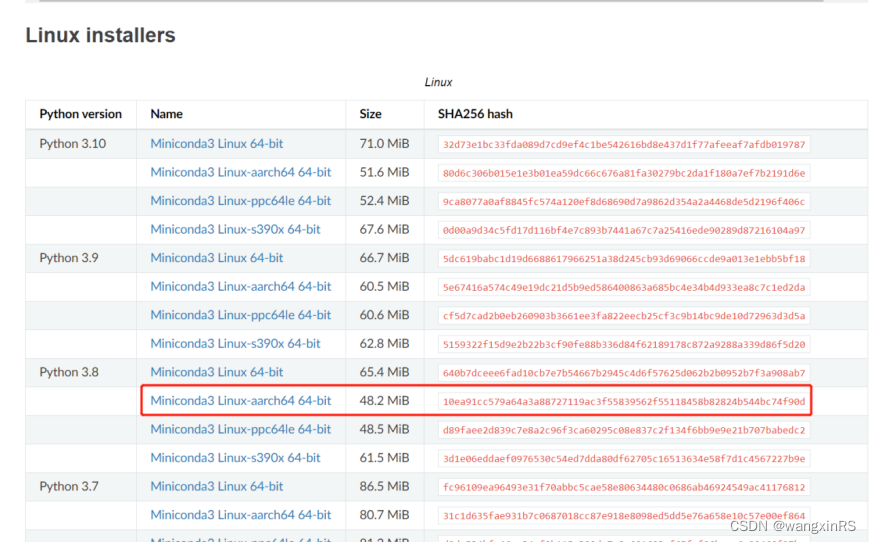
Téléchargez ensuite Miniconda3-py38_23.1.0-1-Linux-aarch64.sh dans le répertoire ~/Downloads de la carte rk3588 et effectuez l'opération d'installation.
bash ./Miniconda3-py38_23.1.0-1-Linux-aarch64.sh
- Créez un environnement python, comprenant principalement numpy, opencv, psutils, etc.
conda create -n rk3588 python=3.9
conda activate rk3588
pip install numpy opencv-python -i https://mirror.baidu.com/pypi/simple
- Téléchargez le projet RKNN Toolkit2 sur le bureau
cd ~/Desktop && git clone https://gitcode.net/mirrors/rockchip-linux/rknn-toolkit2.git
- Installer l'environnement RKNN Toolkit Lite2
cd rknn-toolkit2/rknn_toolkit_lite2/packages
pip install rknn_toolkit_lite2-1.4.0-cp39-cp39-linux_aarch64.whl -i https://mirror.baidu.com/pypi/simple
- Ajoutez le fichier .so. L'objectif principal ici est de garantir que le script python peut appeler normalement le script C du npu.
cd ~/Downloads && git clone https://gitcode.net/mirrors/rockchip-linux/rknpu2.git
sudo cp rknpu2/runtime/RK3588/Linux/librknn_api/aarch64/librknn* /usr/lib
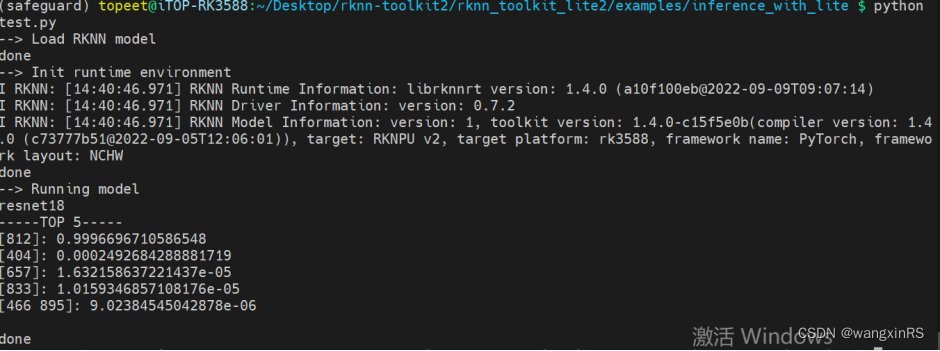
- environnement de test. Les cas de tests se trouvent dans le répertoire examples/inference_with_lite.
cd rknn-toolkit2/rknn_toolkit_lite2/examples/inference_with_lite
python test.py
Les résultats en cours d'exécution sont les suivants
- script python pour tester yolov5. Créez des données dans le répertoire inference_with_lite et placez l'image de test dans le répertoire ; téléchargez yolov5s.rknn dans le répertoire inference_with_lite ; créez yolov5.py, effectuez une inférence sur l'image de test et enregistrez le résultat dans res.jpg dans le même répertoire. ( Lien de référence https://github.com/ChuanSe/yolov5-PT-to-RKNN/blob/main/detect.py) Le code est le suivant
import os
import urllib
import traceback
import time
import sys
import numpy as np
import cv2
#from rknn.api import RKNN
import platform
from rknnlite.api import RKNNLite
import multiprocessing

ONNX_MODEL = 'yolov5s.onnx'
RKNN_MODEL = 'yolov5s.rknn'
IMG_PATH = './data/car.png'
DATASET = './dataset.txt'

QUANTIZE_ON = True

OBJ_THRESH = 0.25
NMS_THRESH = 0.45
IMG_SIZE = 640

CLASSES = ("person", "bicycle", "car", "motorbike ", "aeroplane ", "bus ", "train", "truck ", "boat", "traffic light",
           "fire hydrant", "stop sign ", "parking meter", "bench", "bird", "cat", "dog ", "horse ", "sheep", "cow", "elephant",
           "bear", "zebra ", "giraffe", "backpack", "umbrella", "handbag", "tie", "suitcase", "frisbee", "skis", "snowboard", "sports ball", "kite",
           "baseball bat", "baseball glove", "skateboard", "surfboard", "tennis racket", "bottle", "wine glass", "cup", "fork", "knife ",
           "spoon", "bowl", "banana", "apple", "sandwich", "orange", "broccoli", "carrot", "hot dog", "pizza ", "donut", "cake", "chair", "sofa",
           "pottedplant", "bed", "diningtable", "toilet ", "tvmonitor", "laptop    ", "mouse  ", "remote ", "keyboard ", "cell phone", "microwave ",
           "oven ", "toaster", "sink", "refrigerator ", "book", "clock", "vase", "scissors ", "teddy bear ", "hair drier", "toothbrush ")


# decice tree for rk356x/rk3588
DEVICE_COMPATIBLE_NODE = '/proc/device-tree/compatible'

def get_host():
    # get platform and device type
    system = platform.system()
    machine = platform.machine()
    os_machine = system + '-' + machine
    if os_machine == 'Linux-aarch64':
        try:
            with open(DEVICE_COMPATIBLE_NODE) as f:
                device_compatible_str = f.read()
                if 'rk3588' in device_compatible_str:
                    host = 'RK3588'
                else:
                    host = 'RK356x'
        except IOError:
            print('Read device node {} failed.'.format(DEVICE_COMPATIBLE_NODE))
            exit(-1)
    else:
        host = os_machine
    return host

INPUT_SIZE = 224
RK3588_RKNN_MODEL = 'resnet18_for_rk3588.rknn'


def sigmoid(x):
    return 1 / (1 + np.exp(-x))


def xywh2xyxy(x):
    # Convert [x, y, w, h] to [x1, y1, x2, y2]
    y = np.copy(x)
    y[:, 0] = x[:, 0] - x[:, 2] / 2  # top left x
    y[:, 1] = x[:, 1] - x[:, 3] / 2  # top left y
    y[:, 2] = x[:, 0] + x[:, 2] / 2  # bottom right x
    y[:, 3] = x[:, 1] + x[:, 3] / 2  # bottom right y
    return y


def process(input, mask, anchors):

    anchors = [anchors[i] for i in mask]
    grid_h, grid_w = map(int, input.shape[0:2])

    box_confidence = sigmoid(input[..., 4])
    box_confidence = np.expand_dims(box_confidence, axis=-1)

    box_class_probs = sigmoid(input[..., 5:])

    box_xy = sigmoid(input[..., :2])*2 - 0.5

    col = np.tile(np.arange(0, grid_w), grid_w).reshape(-1, grid_w)
    row = np.tile(np.arange(0, grid_h).reshape(-1, 1), grid_h)
    col = col.reshape(grid_h, grid_w, 1, 1).repeat(3, axis=-2)
    row = row.reshape(grid_h, grid_w, 1, 1).repeat(3, axis=-2)
    grid = np.concatenate((col, row), axis=-1)
    box_xy += grid
    box_xy *= int(IMG_SIZE/grid_h)

    box_wh = pow(sigmoid(input[..., 2:4])*2, 2)
    box_wh = box_wh * anchors

    box = np.concatenate((box_xy, box_wh), axis=-1)

    return box, box_confidence, box_class_probs


def filter_boxes(boxes, box_confidences, box_class_probs):
    """Filter boxes with box threshold. It's a bit different with origin yolov5 post process!

    # Arguments
        boxes: ndarray, boxes of objects.
        box_confidences: ndarray, confidences of objects.
        box_class_probs: ndarray, class_probs of objects.

    # Returns
        boxes: ndarray, filtered boxes.
        classes: ndarray, classes for boxes.
        scores: ndarray, scores for boxes.
    """
    boxes = boxes.reshape(-1, 4)
    box_confidences = box_confidences.reshape(-1)
    box_class_probs = box_class_probs.reshape(-1, box_class_probs.shape[-1])

    _box_pos = np.where(box_confidences >= OBJ_THRESH)
    boxes = boxes[_box_pos]
    box_confidences = box_confidences[_box_pos]
    box_class_probs = box_class_probs[_box_pos]

    class_max_score = np.max(box_class_probs, axis=-1)
    classes = np.argmax(box_class_probs, axis=-1)
    _class_pos = np.where(class_max_score >= OBJ_THRESH)

    boxes = boxes[_class_pos]
    classes = classes[_class_pos]
    scores = (class_max_score* box_confidences)[_class_pos]

    return boxes, classes, scores


def nms_boxes(boxes, scores):
    """Suppress non-maximal boxes.

    # Arguments
        boxes: ndarray, boxes of objects.
        scores: ndarray, scores of objects.

    # Returns
        keep: ndarray, index of effective boxes.
    """
    x = boxes[:, 0]
    y = boxes[:, 1]
    w = boxes[:, 2] - boxes[:, 0]
    h = boxes[:, 3] - boxes[:, 1]

    areas = w * h
    order = scores.argsort()[::-1]

    keep = []
    while order.size > 0:
        i = order[0]
        keep.append(i)

        xx1 = np.maximum(x[i], x[order[1:]])
        yy1 = np.maximum(y[i], y[order[1:]])
        xx2 = np.minimum(x[i] + w[i], x[order[1:]] + w[order[1:]])
        yy2 = np.minimum(y[i] + h[i], y[order[1:]] + h[order[1:]])

        w1 = np.maximum(0.0, xx2 - xx1 + 0.00001)
        h1 = np.maximum(0.0, yy2 - yy1 + 0.00001)
        inter = w1 * h1

        ovr = inter / (areas[i] + areas[order[1:]] - inter)
        inds = np.where(ovr <= NMS_THRESH)[0]
        order = order[inds + 1]
    keep = np.array(keep)
    return keep


def yolov5_post_process(input_data):
    masks = [[0, 1, 2], [3, 4, 5], [6, 7, 8]]
    anchors = [[10, 13], [16, 30], [33, 23], [30, 61], [62, 45],
               [59, 119], [116, 90], [156, 198], [373, 326]]

    boxes, classes, scores = [], [], []
    for input, mask in zip(input_data, masks):
        b, c, s = process(input, mask, anchors)
        b, c, s = filter_boxes(b, c, s)
        boxes.append(b)
        classes.append(c)
        scores.append(s)

    boxes = np.concatenate(boxes)
    boxes = xywh2xyxy(boxes)
    classes = np.concatenate(classes)
    scores = np.concatenate(scores)

    nboxes, nclasses, nscores = [], [], []
    for c in set(classes):
        inds = np.where(classes == c)
        b = boxes[inds]
        c = classes[inds]
        s = scores[inds]

        keep = nms_boxes(b, s)

        nboxes.append(b[keep])
        nclasses.append(c[keep])
        nscores.append(s[keep])

    if not nclasses and not nscores:
        return None, None, None

    boxes = np.concatenate(nboxes)
    classes = np.concatenate(nclasses)
    scores = np.concatenate(nscores)

    return boxes, classes, scores


def draw(image, boxes, scores, classes):
    """Draw the boxes on the image.

    # Argument:
        image: original image.
        boxes: ndarray, boxes of objects.
        classes: ndarray, classes of objects.
        scores: ndarray, scores of objects.
        all_classes: all classes name.
    """
    for box, score, cl in zip(boxes, scores, classes):
        top, left, right, bottom = box
        print('class: {}, score: {}'.format(CLASSES[cl], score))
        print('box coordinate left,top,right,down: [{}, {}, {}, {}]'.format(top, left, right, bottom))
        top = int(top)
        left = int(left)
        right = int(right)
        bottom = int(bottom)

        cv2.rectangle(image, (top, left), (right, bottom), (255, 0, 0), 2)
        cv2.putText(image, '{0} {1:.2f}'.format(CLASSES[cl], score),
                    (top, left - 6),
                    cv2.FONT_HERSHEY_SIMPLEX,
                    0.6, (0, 0, 255), 2)


def letterbox(im, new_shape=(640, 640), color=(0, 0, 0)):
    # Resize and pad image while meeting stride-multiple constraints
    shape = im.shape[:2]  # current shape [height, width]
    if isinstance(new_shape, int):
        new_shape = (new_shape, new_shape)

    # Scale ratio (new / old)
    r = min(new_shape[0] / shape[0], new_shape[1] / shape[1])

    # Compute padding
    ratio = r, r  # width, height ratios
    new_unpad = int(round(shape[1] * r)), int(round(shape[0] * r))
    dw, dh = new_shape[1] - new_unpad[0], new_shape[0] - new_unpad[1]  # wh padding

    dw /= 2  # divide padding into 2 sides
    dh /= 2

    if shape[::-1] != new_unpad:  # resize
        im = cv2.resize(im, new_unpad, interpolation=cv2.INTER_LINEAR)
    top, bottom = int(round(dh - 0.1)), int(round(dh + 0.1))
    left, right = int(round(dw - 0.1)), int(round(dw + 0.1))
    im = cv2.copyMakeBorder(im, top, bottom, left, right, cv2.BORDER_CONSTANT, value=color)  # add border
    return im, ratio, (dw, dh)

def scale_coords(img1_shape, coords, img0_shape, ratio_pad=None):
    # 将预测的坐标信息coords(相对img1_shape)转换回相对原图尺度(img0_shape)
    #:param img1_shape: 缩放后的图像大小  [H, W]=[384, 512]
    #:param coords: 预测的box信息 [7,4]  [anchor_nums, x1y1x2y2] 这个预测信息是相对缩放后的图像尺寸(img1_shape)的
    #:param img0_shape: 原图的大小  [H, W, C]=[375, 500, 3]
    #:param ratio_pad: 缩放过程中的缩放比例以及pad  一般不传入
    #:return: coords: 相对原图尺寸(img0_shape)的预测信息

    # Rescale coords (xyxy) from img1_shape to img0_shape
    if ratio_pad is None:  # calculate from img0_shape
        # gain = old/new = 1.024  max(img1_shape): 求img1的较长边  这一步对应的是之前的letterbox步骤
        gain = max(img1_shape) / max(img0_shape)
        # wh padding 这一步起不起作用,完全取决于letterbox的方式
        # 当letterbox为letter_pad_img时,pad=(0.0, 64.0); 当letterbox为leeter_img时,pad=(0.0, 0.0)
        pad = (img1_shape[1] - img0_shape[1] * gain) / 2, (img1_shape[0] - img0_shape[0] * gain) / 2
    else:
        gain = ratio_pad[0][0]
        pad = ratio_pad[1]

    # 将相对img1的预测信息缩放得到相对原图img0的预测信息
    coords[:, [0, 2]] -= pad[0]  # x padding
    coords[:, [1, 3]] -= pad[1]  # y padding
    coords[:, :4] /= gain  # 缩放
    # 缩放到原图的预测结果,并对预测值进行了一定的约束,防止预测结果超出图像的尺寸
    clip_coords(coords, img0_shape)
    return coords

def clip_coords(boxes, img_shape):
    # Clip bounding xyxy bounding boxes to image shape (height, width)
    # np.clip(c, a, b): 将矩阵c中所有的元素约束在[a, b]中间
    # 如果某个元素小于a,就将这个元素变为a;如果元素大于b,就将这个元素变为b
    # 这里将预测得到的xyxy做个约束,是因为当物体处于图片边缘的时候,预测值是有可能超过图片大小的
    #:param boxes: 函数开始=>缩放到原图的预测结果[7, 4]
    # 函数结束=>缩放到原图的预测结果,并对预测值进行了一定的约束,防止预测结果超出图像的尺寸
    #:param img_shape: 原图的shape [H, W, C]=[375, 500, 3]

    boxes[:, 0] = np.clip(boxes[:, 0], 0, img_shape[1])  # x1
    boxes[:, 1] = np.clip(boxes[:, 1], 0, img_shape[0])  # y1
    boxes[:, 2] = np.clip(boxes[:, 2], 0, img_shape[1])  # x2
    boxes[:, 3] = np.clip(boxes[:, 3], 0, img_shape[0])  # y2

def yolov5Detection(roundNum):
    print('当前进程ID:{}'.format(os.getpid()))
    #host_name = get_host()
    rknn_model = 'yolov5s.rknn'

    # Create RKNN object
    #rknn = RKNN(verbose=True)
    #rknn_lite = RKNNLite(verbose=True) # 详细日志显示在终端上
    rknn_lite = RKNNLite()

    # load RKNN model
    print('--> Load RKNN model')
    ret = rknn_lite.load_rknn(rknn_model)
    if ret != 0:
        print('Load RKNN model failed')
        exit(ret)
    print('done')

    # Init runtime environment
    print('--> Init runtime environment')
    #ret = rknn.init_runtime()
    ret = rknn_lite.init_runtime(core_mask=RKNNLite.NPU_CORE_AUTO)
    # ret = rknn.init_runtime('rk3566')
    if ret != 0:
        print('Init runtime environment failed!')
        exit(ret)
    print('done')


    starttime = time.time()
    for ii in range(roundNum):
        print("进程{},执行第{}轮推理".format(os.getpid(), ii+1))
        # Set inputs
        img0 = cv2.imread(IMG_PATH)
        img = img0.copy()
        img, ratio, (dw, dh) = letterbox(img, new_shape=(IMG_SIZE, IMG_SIZE))
        img = cv2.cvtColor(img, cv2.COLOR_BGR2RGB)
        img = cv2.resize(img, (IMG_SIZE, IMG_SIZE))

        # Inference
        print('--> Running model')
        outputs = rknn_lite.inference(inputs=[img])
        #np.save('./onnx_yolov5_0.npy', outputs[0])
        #np.save('./onnx_yolov5_1.npy', outputs[1])
        #np.save('./onnx_yolov5_2.npy', outputs[2])
        print('done')


        # post process
        input0_data = outputs[0]
        input1_data = outputs[1]
        input2_data = outputs[2]

        input0_data = input0_data.reshape([3, -1]+list(input0_data.shape[-2:]))
        input1_data = input1_data.reshape([3, -1]+list(input1_data.shape[-2:]))
        input2_data = input2_data.reshape([3, -1]+list(input2_data.shape[-2:]))

        input_data = list()
        input_data.append(np.transpose(input0_data, (2, 3, 0, 1)))
        input_data.append(np.transpose(input1_data, (2, 3, 0, 1)))
        input_data.append(np.transpose(input2_data, (2, 3, 0, 1)))

        boxes, classes, scores = yolov5_post_process(input_data) # 此时检测框为缩放后的尺寸
        img1_shape = img.shape  # letterbox缩放后的图片尺寸
        img0_shape = img0.shape  # 原始图片尺寸
        boxes = self.scale_coords(img1_shape, boxes, img0_shape)  # 将缩放后图片上的预测结果,调整到原图片尺寸上


        #img_1 = cv2.cvtColor(img, cv2.COLOR_RGB2BGR)
        img_1 = img0.copy()
        if boxes is not None:
            draw(img_1, boxes, scores, classes) # 在原图上做检测框
            #cv2.imwrite('res.jpg', img_1)
        # show output
        # cv2.imshow("post process result", img_1)
        # cv2.waitKey(0)
        # cv2.destroyAllWindows()
        #time.sleep(0.001)

    endtime = time.time()
    print("进程Pid:{}, 总耗时{}秒,单轮平均耗时{}秒".format(os.getpid(), endtime-starttime, (endtime-starttime) / float(roundNum)))

    rknn_lite.release()


if __name__ == '__main__':
    roundNum = 1000
    total = 9
    processes = []
    for i in range(total):
        myprocess = multiprocessing.Process(target=yolov5Detection,args=(roundNum,))
        processes.append(myprocess)
    for i in range(total):
        processes[i].daemon = True
        processes[i].start()

    for _ in range(roundNum):
        print('主进程pid:{},当前共有{}个子进程'.format(os.getpid(), total))
        time.sleep(1)
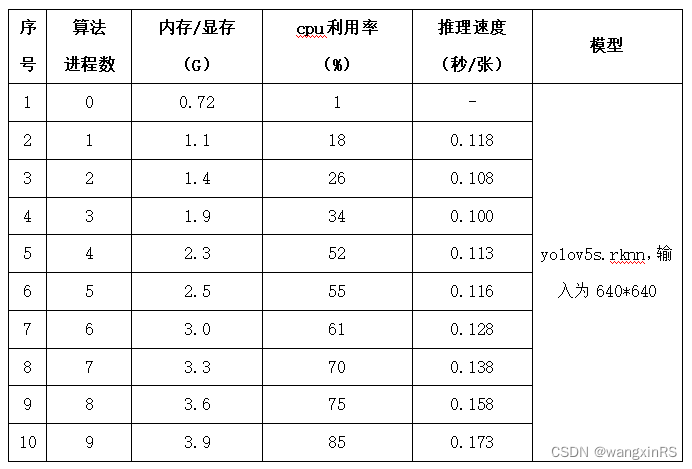
3. Tests de performances
Le test suivant est une lecture d'image yolov5 de 1 000 cycles, une inférence, un post-traitement et d'autres étapes. La vitesse d'inférence ci-dessous est la durée totale du processus complet de lecture unique, d'inférence et de post-traitement.