Serie de artículos:
Práctica del proyecto de separación de front-end y back-end de SpringBoot + Vue || Uno: diseño de front-end de Vue
Práctica del proyecto de separación de front-end de SpringBoot + Vue || Dos: backend de Spring Boot y conexión de base de datos
SpringBoot + Vue front-end práctica del proyecto de separación final || Tres: conexión Spring Boot back-end y Vue front-end
Práctica del proyecto de separación SpringBoot + Vue front-end y back-end || Cuatro: implementación de la función de gestión de usuarios Práctica del proyecto de separación SpringBoot + Vue front-end || Tres: implementación de la función de gestión de usuarios
SpringBoot + Vue práctica del proyecto de separación front-end || Tres: conexión de back-end de Spring Boot y Vue front-end | | Cinco: Seguimiento de la función de gestión de usuarios
Directorio de artículos
Explicación en video de Bilibili: el proyecto de separación de front-end y back-end de SpringBoot + Vue más simple pero práctico en 2023.
Si no desea ver el video, puede consultar las notas de este artículo para obtener más detalles.
Crear un nuevo proyecto backend de Spring
IDEAfile->new->project

elegirSpring Initializr
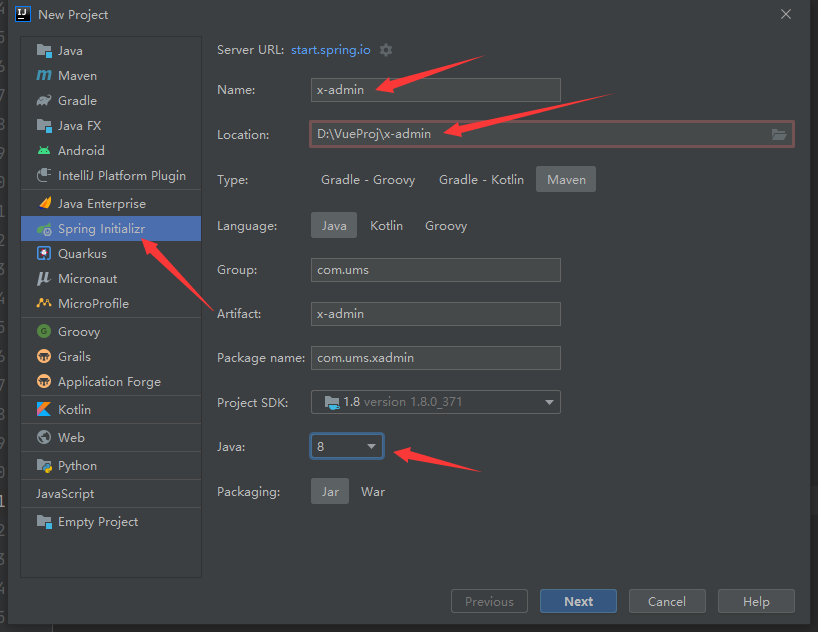
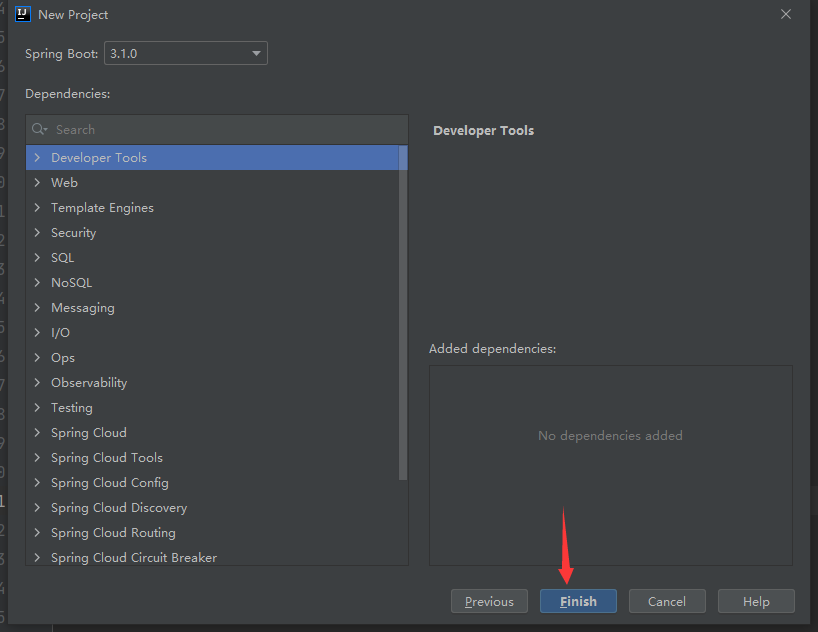
No hay dependencia aquí, directamente.FINISH
Agregar dependencias
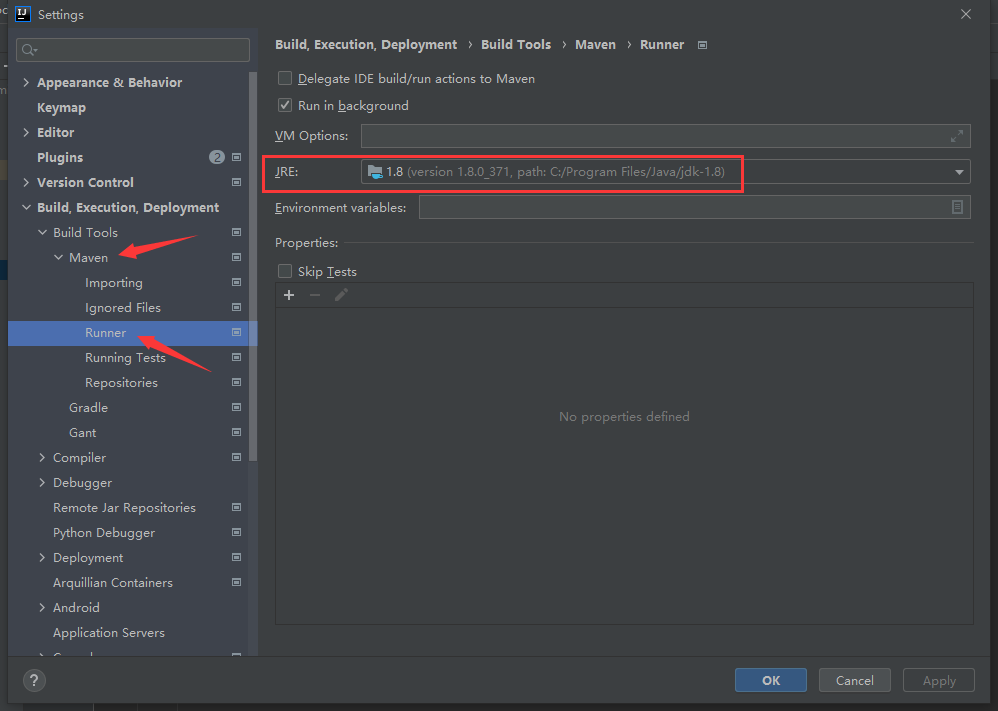
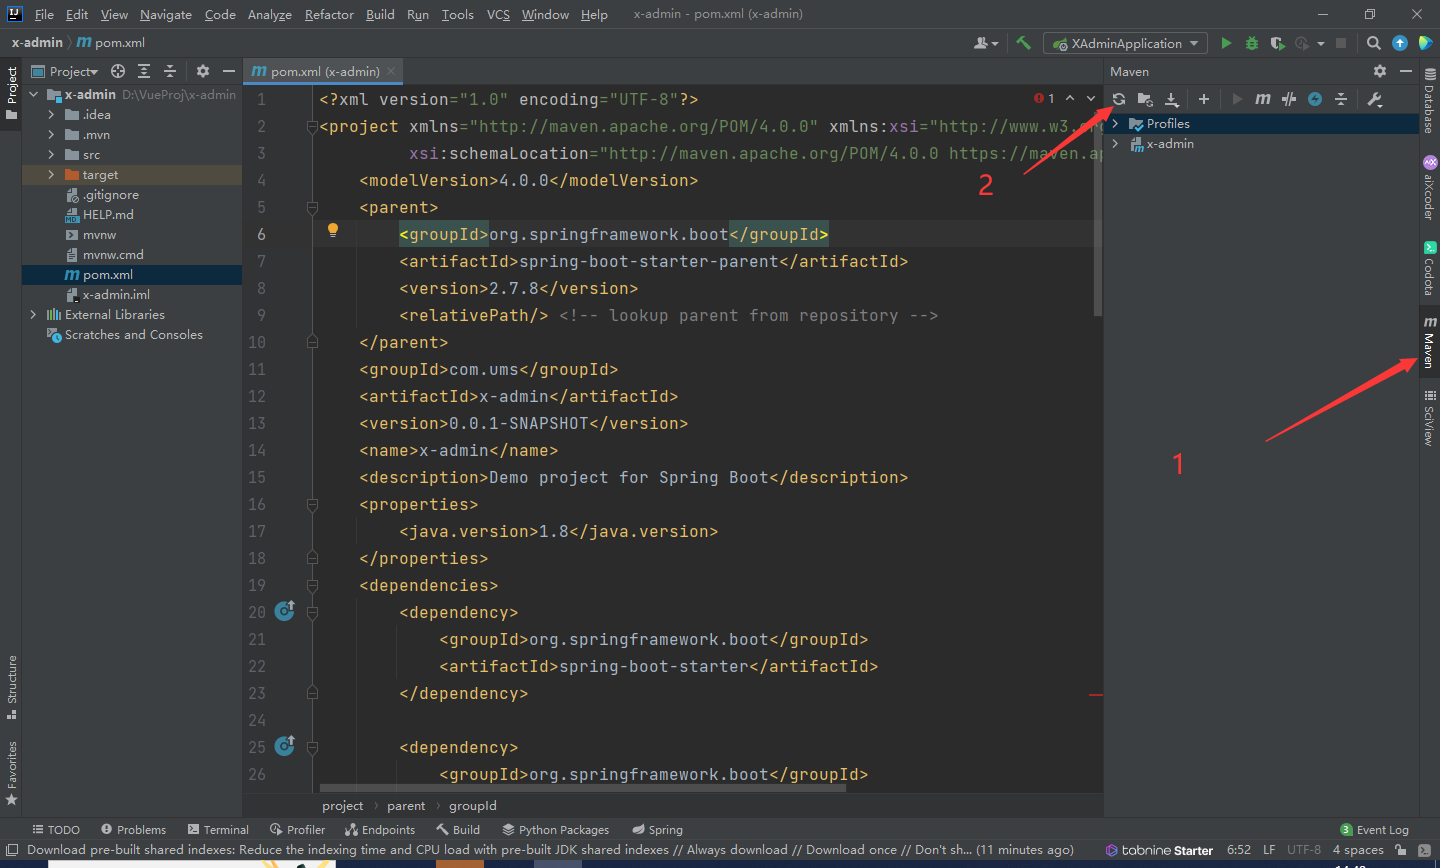
mavenPrimero confirme que se haya configurado la configuración local , haga clic en File -> SettingsVer Maven

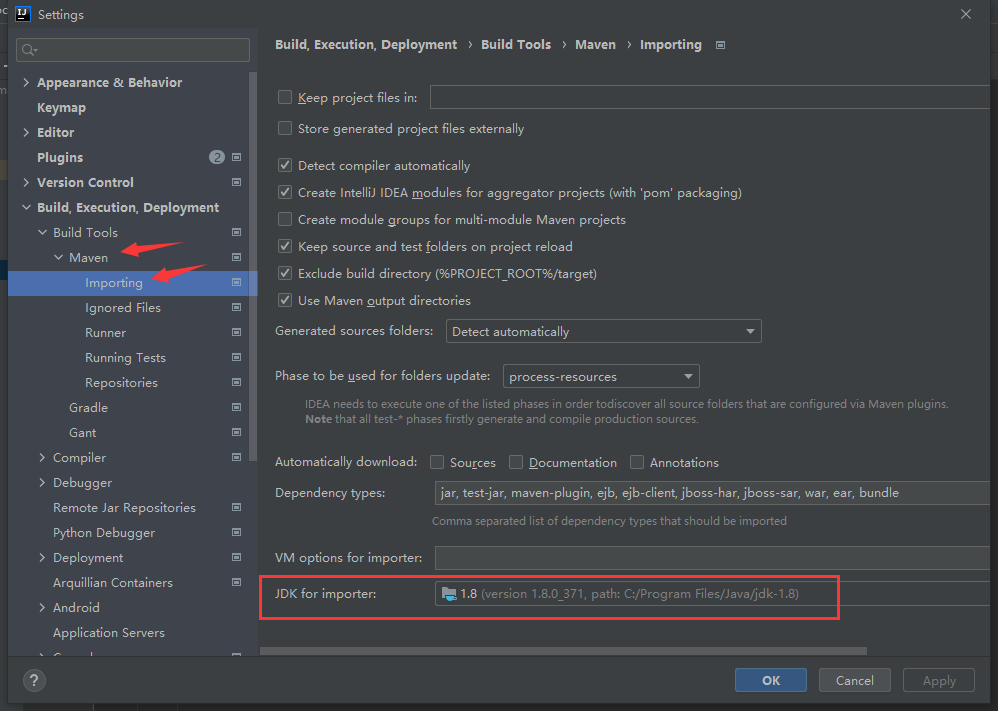
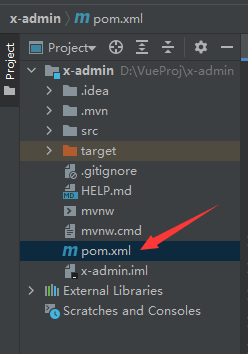
encontrar pom.xmlarchivo
Copie directamente las dependencias necesarias aquí
<?xml version="1.0" encoding="UTF-8"?>
<project xmlns="http://maven.apache.org/POM/4.0.0" xmlns:xsi="http://www.w3.org/2001/XMLSchema-instance"
         xsi:schemaLocation="http://maven.apache.org/POM/4.0.0 https://maven.apache.org/xsd/maven-4.0.0.xsd">
    <modelVersion>4.0.0</modelVersion>
    <parent>
        <groupId>org.springframework.boot</groupId>
        <artifactId>spring-boot-starter-parent</artifactId>
        <version>2.7.8</version>
        <relativePath/> <!-- lookup parent from repository -->
    </parent>
    <groupId>com.ums</groupId>
    <artifactId>x-admin</artifactId>
    <version>0.0.1-SNAPSHOT</version>
    <name>x-admin</name>
    <description>Demo project for Spring Boot</description>
    <properties>
        <java.version>1.8</java.version>
    </properties>
    <dependencies>
        <dependency>
            <groupId>org.springframework.boot</groupId>
            <artifactId>spring-boot-starter</artifactId>
        </dependency>

        <dependency>
            <groupId>org.springframework.boot</groupId>
            <artifactId>spring-boot-starter-test</artifactId>
            <scope>test</scope>
        </dependency>

        <!-- web -->
        <dependency>
            <groupId>org.springframework.boot</groupId>
            <artifactId>spring-boot-starter-web</artifactId>
        </dependency>
        <!-- mysql -->
        <dependency>
            <groupId>com.mysql</groupId>
            <artifactId>mysql-connector-j</artifactId>
        </dependency>
        <!-- mybatis-plus -->
        <dependency>
            <groupId>com.baomidou</groupId>
            <artifactId>mybatis-plus-boot-starter</artifactId>
            <version>3.5.2</version>
        </dependency>
        <dependency>
            <groupId>com.baomidou</groupId>
            <artifactId>mybatis-plus-generator</artifactId>
            <version>3.5.2</version>
        </dependency>
        <!-- freemarker -->
        <dependency>
            <groupId>org.freemarker</groupId>
            <artifactId>freemarker</artifactId>
        </dependency>
        <!-- lombok -->
        <dependency>
            <groupId>org.projectlombok</groupId>
            <artifactId>lombok</artifactId>
        </dependency>

        <dependency>
            <groupId>org.springframework.boot</groupId>
            <artifactId>spring-boot-starter-data-redis</artifactId>
            <version>2.2.5.RELEASE</version>
        </dependency>

        <!-- fastjson -->
        <dependency>
            <groupId>com.alibaba.fastjson2</groupId>
            <artifactId>fastjson2</artifactId>
            <version>2.0.7</version>
        </dependency>

    </dependencies>

    <build>
        <plugins>
            <plugin>
                <groupId>org.springframework.boot</groupId>
                <artifactId>spring-boot-maven-plugin</artifactId>
            </plugin>
        </plugins>
    </build>

</project>
Cuando encuentre un resultado, haga clic en el botón Mavencentral 刷新a la derecha y espere a que IDEA descargue las dependencias. Actualice unas cuantas veces más y espere.
Crear una nueva base de datos
Cree una nueva base de datos vinculándola navicata una base de datos localxdb

Cree un nuevo 123.txtdocumento, copie el siguiente comando SQL en él y cámbiele el nombre123.sql
CREATE TABLE `x_user` (
  `id` int(11) NOT NULL AUTO_INCREMENT,
  `username` varchar(50) NOT NULL,
  `password` varchar(100) DEFAULT NULL,
  `email` varchar(50) DEFAULT NULL,
  `phone` varchar(20) DEFAULT NULL,
  `status` int(1) DEFAULT NULL,
  `avatar` varchar(200) DEFAULT NULL,
   `deleted` INT(1) DEFAULT 0,
  PRIMARY KEY (`id`)
) ENGINE=InnoDB AUTO_INCREMENT=3 DEFAULT CHARSET=utf8;

insert into `x_user` (`id`, `username`, `password`, `email`, `phone`, `status`, `avatar`, `deleted`) values('1','admin','123456','[email protected]','18677778888','1','https://wpimg.wallstcn.com/f778738c-e4f8-4870-b634-56703b4acafe.gif','0');
insert into `x_user` (`id`, `username`, `password`, `email`, `phone`, `status`, `avatar`, `deleted`) values('2','zhangsan','123456','[email protected]','13966667777','1','https://wpimg.wallstcn.com/f778738c-e4f8-4870-b634-56703b4acafe.gif','0');
insert into `x_user` (`id`, `username`, `password`, `email`, `phone`, `status`, `avatar`, `deleted`) values('3','lisi','123456','[email protected]','13966667778','1','https://wpimg.wallstcn.com/f778738c-e4f8-4870-b634-56703b4acafe.gif','0');
insert into `x_user` (`id`, `username`, `password`, `email`, `phone`, `status`, `avatar`, `deleted`) values('4','wangwu','123456','[email protected]','13966667772','1','https://wpimg.wallstcn.com/f778738c-e4f8-4870-b634-56703b4acafe.gif','0');
insert into `x_user` (`id`, `username`, `password`, `email`, `phone`, `status`, `avatar`, `deleted`) values('5','zhaoer','123456','[email protected]','13966667776','1','https://wpimg.wallstcn.com/f778738c-e4f8-4870-b634-56703b4acafe.gif','0');
insert into `x_user` (`id`, `username`, `password`, `email`, `phone`, `status`, `avatar`, `deleted`) values('6','songliu','123456','[email protected]','13966667771','1','https://wpimg.wallstcn.com/f778738c-e4f8-4870-b634-56703b4acafe.gif','0');

CREATE TABLE `x_role` (
  `role_id` int(11) NOT NULL AUTO_INCREMENT,
  `role_name` varchar(50) DEFAULT NULL,
  `role_desc` varchar(100) DEFAULT NULL,
  PRIMARY KEY (`role_id`)
) ENGINE=InnoDB AUTO_INCREMENT=4 DEFAULT CHARSET=utf8mb4;

insert into `x_role` (`role_id`, `role_name`, `role_desc`) values('1','admin','超级管理员');
insert into `x_role` (`role_id`, `role_name`, `role_desc`) values('2','hr','人事专员');
insert into `x_role` (`role_id`, `role_name`, `role_desc`) values('3','normal','普通员工');

CREATE TABLE `x_menu` (
  `menu_id` int(11) NOT NULL AUTO_INCREMENT,
  `component` varchar(100) DEFAULT NULL,
  `path` varchar(100) DEFAULT NULL,
  `redirect` varchar(100) DEFAULT NULL,
  `name` varchar(100) DEFAULT NULL,
  `title` varchar(100) DEFAULT NULL,
  `icon` varchar(100) DEFAULT NULL,
  `parent_id` int(11) DEFAULT NULL,
  `is_leaf` varchar(1) DEFAULT NULL,
  `hidden` tinyint(1) DEFAULT NULL,
  PRIMARY KEY (`menu_id`)
) ENGINE=InnoDB AUTO_INCREMENT=12 DEFAULT CHARSET=utf8mb4;

insert  into `x_menu`(`menu_id`,`component`,`path`,`redirect`,`name`,`title`,`icon`,`parent_id`,`is_leaf`,`hidden`) values (1,'Layout','/user','/user/list','userManage','用户管理','userManage',0,'N',0),(2,'user/user','list',NULL,'userList','用户列表','userList',1,'Y',0),(3,'user/role','role',NULL,'roleList','角色列表','role',1,'Y',0),(4,'user/permission','permission',NULL,'permissionList','权限列表','permission',1,'Y',0);

CREATE TABLE `x_user_role` (
  `id` int(11) NOT NULL AUTO_INCREMENT,
  `user_id` int(11) DEFAULT NULL,
  `role_id` int(11) DEFAULT NULL,
  PRIMARY KEY (`id`)
) ENGINE=InnoDB AUTO_INCREMENT=5 DEFAULT CHARSET=utf8mb4;

insert into `x_user_role` (`id`, `user_id`, `role_id`) values('1','1','1');

CREATE TABLE `x_role_menu` (
  `id` int(11) NOT NULL AUTO_INCREMENT,
  `role_id` int(11) DEFAULT NULL,
  `menu_id` int(11) DEFAULT NULL,
  PRIMARY KEY (`id`)
) ENGINE=InnoDB AUTO_INCREMENT=5 DEFAULT CHARSET=utf8mb4;
Haga clic derecho xdby seleccione运行SQL文件

123.sqlEjecutar después de encontrar el archivo.
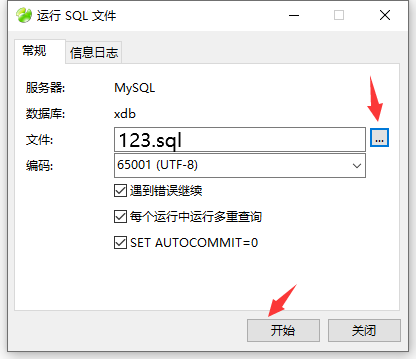
Ejecutar exitosamente
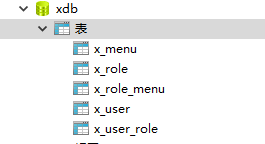
IDEA se conecta a la base de datos
Abrir src\main\resources\application.yml, si no existe tal archivo y solo application.propertyel archivo, cambie directamente su sufijo a.yml
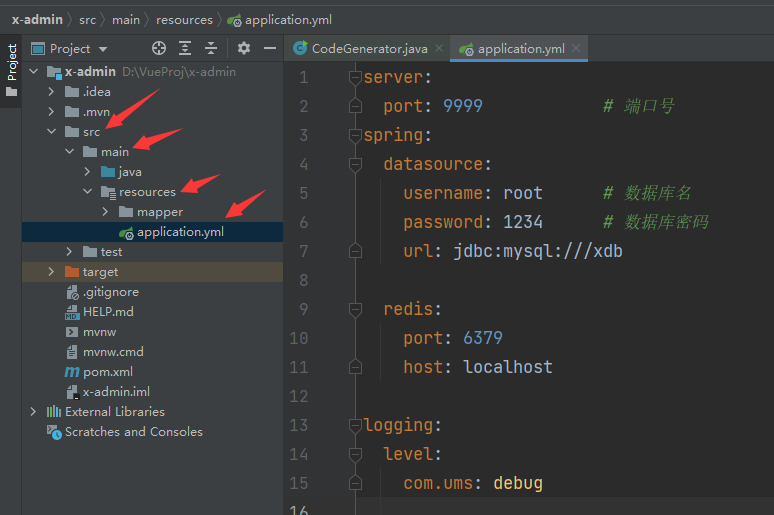
escribir codigo
server:
  port: 9999            # 端口号
spring:
  datasource:
    username: root      # 数据库名
    password: 1234      # 数据库密码
    url: jdbc:mysql:///xdb

  redis:
    port: 6379
    host: localhost

logging:
  level:
    com.ums: debug
IDEA crea automáticamente entidades de clase
Primero cree un package:syspaquete nuevo y vacío y el código generado se colocará aquí

Mybatis-plusCódigo Java utilizado para Cree uno nuevo
a continuación.src\testjava类:CodeGenerator
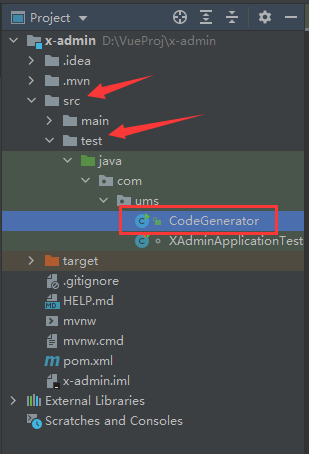
Luego escriba el siguiente código, hay explicaciones en el código.
package com.ums;
import com.baomidou.mybatisplus.generator.FastAutoGenerator;
import com.baomidou.mybatisplus.generator.config.OutputFile;
import com.baomidou.mybatisplus.generator.engine.FreemarkerTemplateEngine;
import java.util.Collections;
public class CodeGenerator {
public static void main(String[] args) {
String url = "jdbc:mysql:///xdb"; // 与配置文件 一致
String username = "root";
String password = "1234";
String author = "anthony";
String moduleName = "sys"; // 系统管理的代码包
String mapperLocation = "D:\\VueProj\\x-admin\\src\\main\\resources\\mapper\\" + moduleName ;
String tables = "x_menu,x_role,x_role_menu,x_user,x_user_role"; // 与数据库中的表名一致,逗号隔开
FastAutoGenerator.create(url, username, password)
.globalConfig(builder -> {
builder.author(author) // 设置作者
// .enableSwagger() // 开启 swagger 模式
// .fileOverride() // 覆盖已生成文件
.outputDir("D:\\VueProj\\x-admin\\src\\main\\java"); // 指定输出目录
})
.packageConfig(builder -> {
builder.parent("com.ums") // 设置父包名
.moduleName(moduleName) // 设置父包模块名
.pathInfo(Collections.singletonMap(OutputFile.xml, mapperLocation)); // 设置mapperXml生成路径
})
.strategyConfig(builder -> {
builder.addInclude(tables) // 设置需要生成的表名
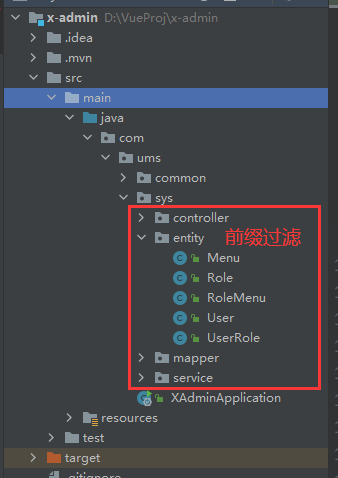
.addTablePrefix("x_"); // 设置过滤表前缀, x_menu 生成的类实体无 x_ 前缀
})
.templateEngine(new FreemarkerTemplateEngine()) // 使用Freemarker引擎模板,默认的是Velocity引擎模板
.execute();
}
}
Hacer clicrun
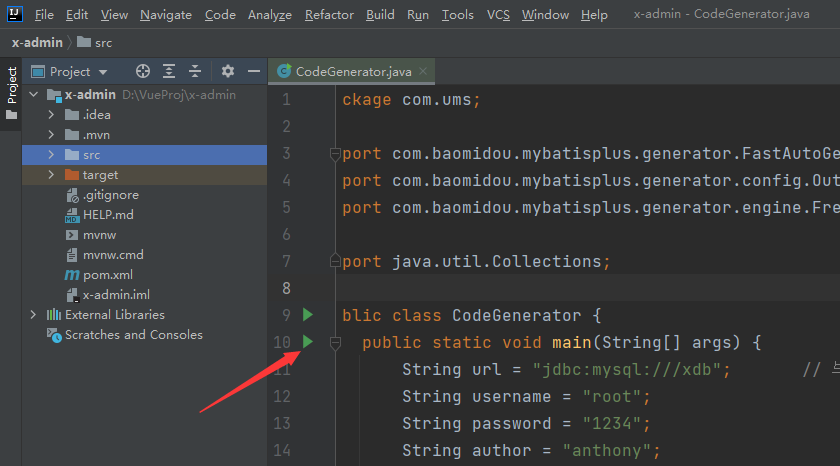
Generar codigo
Definir el formato de los datos pasados al front-end.
Como se mencionó en la sección anterior, es necesario registrar el formato de los datos de respuesta del inicio de sesión del front-end.
Ahora, el back-end construye este formato.
{

    "code":20000,"data":{

    "token":"admin-token"}}
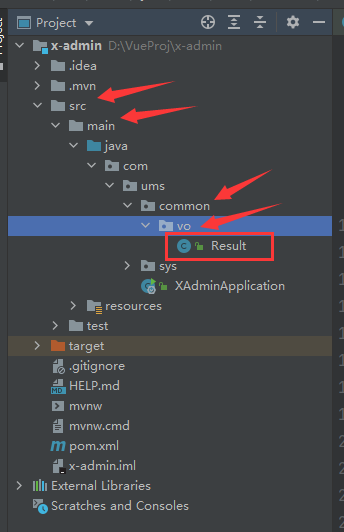
src\mainCree un nuevo paquete a continuación commonLuego cree un nuevo paquete: voLuego cree una nueva clase JavaResult
Escribir código con comentarios y explicaciones.
package com.ums.common.vo;


import lombok.AllArgsConstructor;
import lombok.Data;
import lombok.NoArgsConstructor;

@Data
@NoArgsConstructor
@AllArgsConstructor
public class Result<T> {


    private Integer code;       // 成功失败的代码,此处定义2000为成功,2001为失败
    private String message;     // 消息,里面包含数据data
    private T data;             // 未定义的数据形式

    // 此处重载了四个 success 方法,有些能够返回数据,有的只返回代码或信息
    public static <T> Result<T> success() {


        return new Result<>(20000,"success",null);
    }

    public static <T> Result<T> success(T data) {


        return new Result<>(20000,"success",data);
    }

    public static <T> Result<T> success(T data, String message) {


        return new Result<>(20000,message,data);
    }

    public static <T> Result<T> success(String message) {


        return new Result<>(20000,message,null);
    }

    public static<T>  Result<T> fail(){


        return new Result<>(20001,"fail",null);
    }

    public static<T>  Result<T> fail(Integer code){


        return new Result<>(code,"fail",null);
    }

    public static<T>  Result<T> fail(Integer code, String message){


        return new Result<>(code,message,null);
    }

    public static<T>  Result<T> fail( String message){


        return new Result<>(20001,message,null);
    }
}
prueba
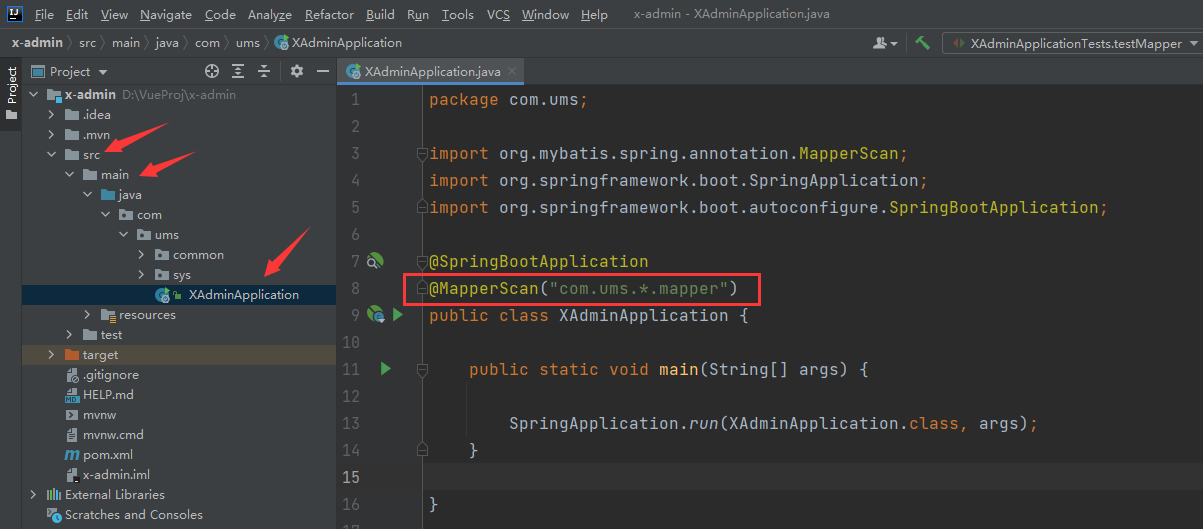
- Primero agregue comentarios en
src\main\javael programa principal.XAdminApplication@MapperScan("com.ums.*.mapper")
- Ingrese para
UserControllerescribir el código de prueba

package com.ums.sys.controller; import com.ums.common.vo.Result; import com.ums.sys.entity.User; import com.ums.sys.service.IUserService; import org.springframework.beans.factory.annotation.Autowired; import org.springframework.web.bind.annotation.GetMapping; import org.springframework.web.bind.annotation.RequestMapping; import org.springframework.stereotype.Controller; import org.springframework.web.bind.annotation.RestController; import java.util.List; /** * <p> * 前端控制器 * </p> * * @author anthony * @since 2023-06-16 */ @RestController @RequestMapping("/user") public class UserController { @Autowired private IUserService userService; @GetMapping("/all") public Result<List<User>> getAllUser() { List<User> list = userService.list(); return Result.success(list,"查询成功"); } } - Ejecute el programa principal,
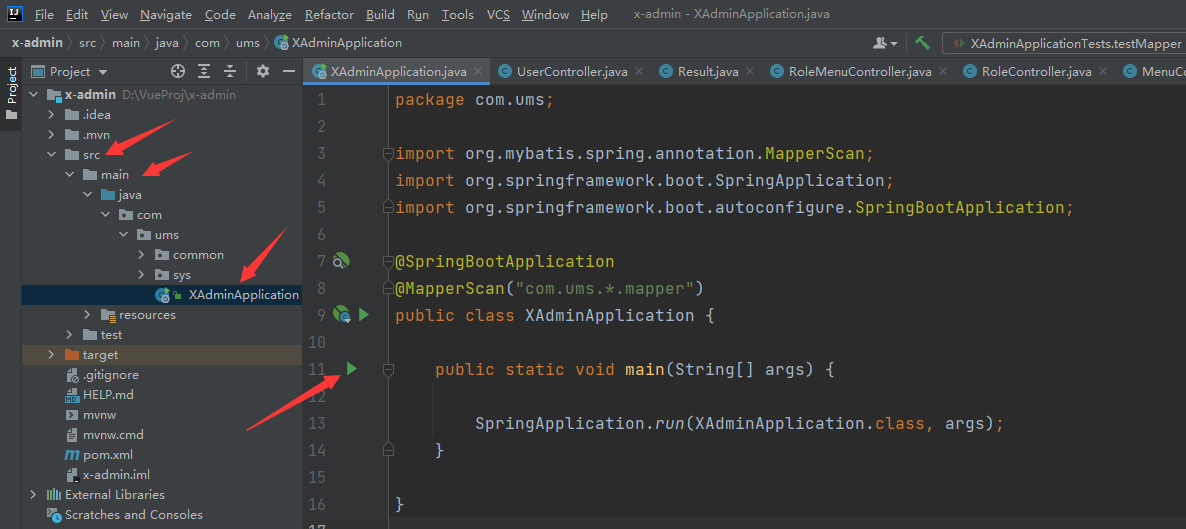
ingrese al navegador, ingresehttp://localhost:9999/user/ally muestre los datos con éxito.

El formato de datos aquí también se puede conectar al front-end.