1. Tipo de codificación
1. código ASCII
ASCII (Código estándar americano para el intercambio de información) es un estándar de codificación para representar caracteres de texto que se desarrolló originalmente a principios de la década de 1960 con el fin de intercambiar información entre computadoras y dispositivos de comunicación. La codificación ASCII utiliza números binarios de 7 bits (128 valores diferentes) ( 1 byte ) para representar caracteres, incluidos caracteres de control (como avance de línea y retorno de carro) y letras, números, signos de puntuación y algunos símbolos especiales en inglés común.
| ASCII | personaje | ASCII | personaje | ASCII | personaje | ASCII | personaje |
|---|---|---|---|---|---|---|---|
| 0 | NUL | 32 | ESPACIO | 64 | @ | 96 | ` |
| 1 | SOL | 33 | ! | sesenta y cinco | A | 97 | a |
| 2 | STX | 34 | " | 66 | B | 98 | b |
| 3 | ETC | 35 | # | 67 | C | 99 | C |
| 4 | EOT | 36 | ps | 68 | D | 100 | d |
| 5 | ENQ | 37 | % | 69 | mi | 101 | mi |
| 6 | ACK | 38 | & | 70 | F | 102 | F |
| 7 | BEL | 39 | ' | 71 | GRAMO | 103 | gramo |
| 8 | Licenciatura | 40 | ( | 72 | h | 104 | h |
| 9 | PESTAÑA | 41 | ) | 73 | I | 105 | i |
| 10 | LF | 42 | * | 74 | j | 106 | j |
| 11 | Vermont | 43 | + | 75 | k | 107 | k |
| 12 | FF | 44 | , | 76 | l | 108 | yo |
| 13 | CR | 45 | - | 77 | METRO | 109 | metro |
| 14 | ENTONCES | 46 | . | 78 | norte | 110 | norte |
| 15 | Y | 47 | / | 79 | oh | 111 | oh |
| dieciséis | DLE | 48 | 0 | 80 | PAG | 112 | pag |
| 17 | DC1 | 49 | 1 | 81 | q | 113 | q |
| 18 | DC2 | 50 | 2 | 82 | R | 114 | r |
| 19 | DC3 | 51 | 3 | 83 | S | 115 | s |
| 20 | DC4 | 52 | 4 | 84 | t | 116 | t |
| 21 | DESEAR | 53 | 5 | 85 | Ud. | 117 | tu |
| 22 | SINC | 54 | 6 | 86 | V | 118 | v |
| 23 | ETB | 55 | 7 | 87 | W. | 119 | w |
| 24 | PODER | 56 | 8 | 88 | X | 120 | X |
| 25 | EM | 57 | 9 | 89 | Y | 121 | y |
| 26 | SUB | 58 | : | 90 | z | 122 | z |
| 27 | ESC | 59 | ; | 91 | [ | 123 | { |
| 28 | FS | 60 | < | 92 | \ | 124 | | |
| 29 | GS | 61 | = | 93 | ] | 125 | } |
| 30 | RS | 62 | > | 94 | ^ | 126 | ~ |
| 31 | A NOSOTROS | 63 | ? | 95 | _ | 127 | DEL |
2. Codificación Unicode
Unicode(统一码)是一种字符编码标准,旨在为世界上所有的文字符号提供唯一的数字编码,以便在计算机系统中进行统一的字符表示和处理。Unicode编码的目标是覆盖全球范围内的所有字符,包括各种语言的字母、符号、标点符号、特殊字符、表情符号等。这使得Unicode成为一种非常强大和全面的字符编码方案。
Unicode使用十六进制表示字符,通常用前缀 "U+" 加上一个四位或更多位的十六进制数。例如,拉丁字母大写的"A"的Unicode编码是U+0041。Unicode的优势在于它提供了一个大的字符集,可以涵盖世界上几乎所有的文字。最早的Unicode版本采用了16位编码(称为UCS-2),这使得Unicode可以表示最多65,536个字符。然而,随着需求的增加,Unicode逐渐扩展到32位编码(4个字节)(称为UCS-4或UTF-32),使得Unicode的字符范围扩展到了约4294967296个字符。
3、utf8编码
UTF-8(Unicode Transformation Format - 8-bit)是一种变长字符编码,它是Unicode的一种实现方式,用于在计算机系统中表示和存储Unicode字符。UTF-8编码的特点是使用1至4个字节来表示不同范围内的字符,从而实现对全球范围内所有字符的支持。
UTF-8编码的规则如下:
-
对于ASCII字符(码点范围:0x00 - 0x7F),UTF-8使用单个字节表示,与ASCII编码完全兼容。例如,英文字母、数字和常见的符号在UTF-8中都使用一个字节表示,与ASCII编码的相应字符相同。
-
对于Unicode字符的其他范围,UTF-8使用多个字节表示。其规则如下:
- 0x0080 - 0x07FF(128~2047) 范围的字符使用两个字节表示。
- 0x0800 - 0xFFFF(2048~65535) 范围的字符使用三个字节表示。
- 0x10000 - 0x10FFFF(65536~1114111) 范围的字符使用四个字节表示。
UTF-8的变长编码机制使得它在存储和传输文本数据时可以节省空间。由于大部分文本内容都是由ASCII字符组成的,所以对于纯英文文本,UTF-8编码的效率与ASCII编码相同,不会增加额外的开销。只有当包含其他Unicode字符时,UTF-8才使用额外的字节来表示这些字符。
4、URL编码
URL编码(URL Encoding),也称为百分号编码(Percent Encoding),是一种在互联网传输中用于将特殊字符和非ASCII字符转换成特定格式的编码方式。URL编码保证了URL中不会出现不合法的字符或导致歧义的字符,确保URL在网络中正确传输和解析。
URL编码的规则是将每个字符转换成 % 加上两位十六进制数的形式。转换规则如下:
- 对于ASCII字符:除了字母、数字和一些特殊字符外,其余字符都需要进行编码。
- 对于非ASCII字符:使用UTF-8编码将字符转换成多个字节,然后将每个字节转换成
%加上两位十六进制数的形式。
以下是一些常见字符的URL编码示例:
- 空格(空格在URL中通常编码为加号 "+" 或 "%20"): 空格在URL编码中可以被编码为 "+" 或 "%20"。例如,"Hello World" 可以被编码为 "Hello+World" 或 "Hello%20World"。
- 斜杠 "/":"/" 在URL中被编码为 "%2F"。
- 问号 "?":"?" 在URL中被编码为 "%3F"。
- 等号 "=":"=" 在URL中被编码为 "%3D"。
5、HTML实体编码
HTML实体编码是一种用于在HTML文档中表示特殊字符和保留字符的编码方式。在HTML中,某些字符具有特殊含义,比如用于标记标签的尖括号 "<" 和 ">",用于表示空格的连续空格字符,以及用于表示版权符号、商标符号等特殊符号。如果直接在HTML文档中使用这些字符,会导致解析错误或显示不正确的结果。
HTML实体编码使用特殊的实体名称(以"&"开头,以";"结尾)或实体编号(以"&#"开头,以";"结尾)来替代特殊字符。这样可以确保特殊字符被正确解析和显示。
以下是一些常见的HTML实体编码示例:
- 小于号 "<":
<或< - 大于号 ">":
>或> - 和号 "&":
&或& - 空格字符(连续空格):
或 
二、使用php、python、nodejs、java实现后台数据处理
1、PHP
前端form表单
<!DOCTYPE html>
<html lang="en">
<head>
    <meta charset="UTF-8">
    <meta name="viewport" content="width=device-width, initial-scale=1.0">
    <title>Document</title>
</head>
<body>
    <form action="./web.php" method="post">
        <input type="text" name="username" id="">
        <input type="password" name="password" id="">
        <input type="submit" value="submit">
    </form>
</body>
</html>
后端PHP
<?php
$user=$_POST['username'];
$passwd=$_POST['password'];
echo $user . "<br/>" . $passwd;
?>
2、python
这里我们使用Flask框架,打开cmd命令行,输入pip install flask命令下载flask框架
前端form表单
<!DOCTYPE html>
<html lang="en">
<head>
    <meta charset="UTF-8">
    <meta name="viewport" content="width=device-width, initial-scale=1.0">
    <title>Document</title>
</head>
<body>
    <form action="http://localhost:5000/login" method="post">
        <input type="text" name="username" id="">
        <input type="password" name="password" id="">
        <input type="submit" value="submit">
    </form>
</body>
</html>
后端python
from flask import Flask, request

app=Flask(__name__)
#通过装饰器定义路由
@app.route('/login',methods=['GET','POST'])
def login():
    username=request.form.get('username')        #接收数据
    password=request.form.get('password')
    print('username:',username)
    return 'login successfully'

if __name__=='__main__':
    app.run(debug=True)
登录成功


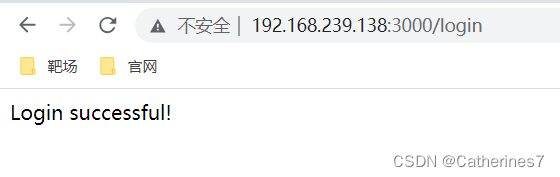
3、nodejs
这里我们在ubuntu上部署了nodejs环境,并且使用express框架,body-parser中间件来接收数据
apt-get install nodejs
apt-get install npm
下载成功后创建目录,cd进入目录,下载express以及body-parser
npm install express
npm install body-parser
前端form表单
<!DOCTYPE html>
<html lang="en">
<head>
    <meta charset="UTF-8">
    <meta name="viewport" content="width=device-width, initial-scale=1.0">
    <title>Document</title>
</head>
<body>
    <form action="http://192.168.239.138:3000/login" method="post">
        <input type="text" name="username" id="">
        <input type="password" name="password" id="">
        <input type="submit" value="submit">
    </form>
</body>
</html>
后端nodejs
const express = require('express');
const bodyParser = require('body-parser');
const app = express();
const port = 3000;
// 使用 body-parser 中间件来解析 POST 请求的数据
app.use(bodyParser.urlencoded({ extended: true }));
// 处理 POST 请求的路由
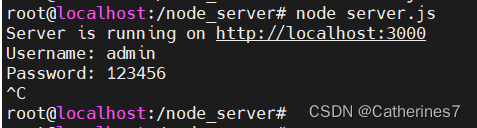
app.post('/login', (req, res) => {
const { username, password } = req.body;
console.log('Username:', username);
console.log('Password:', password);
// 可以在这里做更多的操作,比如验证用户名和密码等
res.send('Login successful!'); // 返回响应给客户端
});
// 启动服务器
app.listen(port, () => {
console.log(`Server is running on http://localhost:${port}`);
});
最后使用node server.js命令运行服务
成功登录
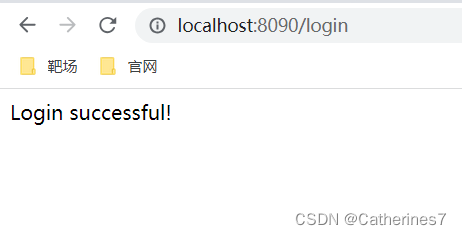
4、java
这里我们使用tomcat中间件以及servlet,首先去tomcat官网下载安装包,然后进入cmd,cd到安装路径下的bin目录,比如D:\apache-tomcat-10.1.11\bin,然后运行startup.bat,然后不要关闭对话框,在浏览器里输入localhost:8080(默认端口8080,可以在conf下的server.xml配置文件里更改端口号),如果出现tomcat的默认页面,就说明成功运行了
https://tomcat.apache.org/download-10.cgi#10.1.11
我下的是10.1.11版本,选择64位windows安装包,然后打开idea创建maven项目,我的jdk版本是20的,这里注意在java compiler里选择与jdk版本相同的版本
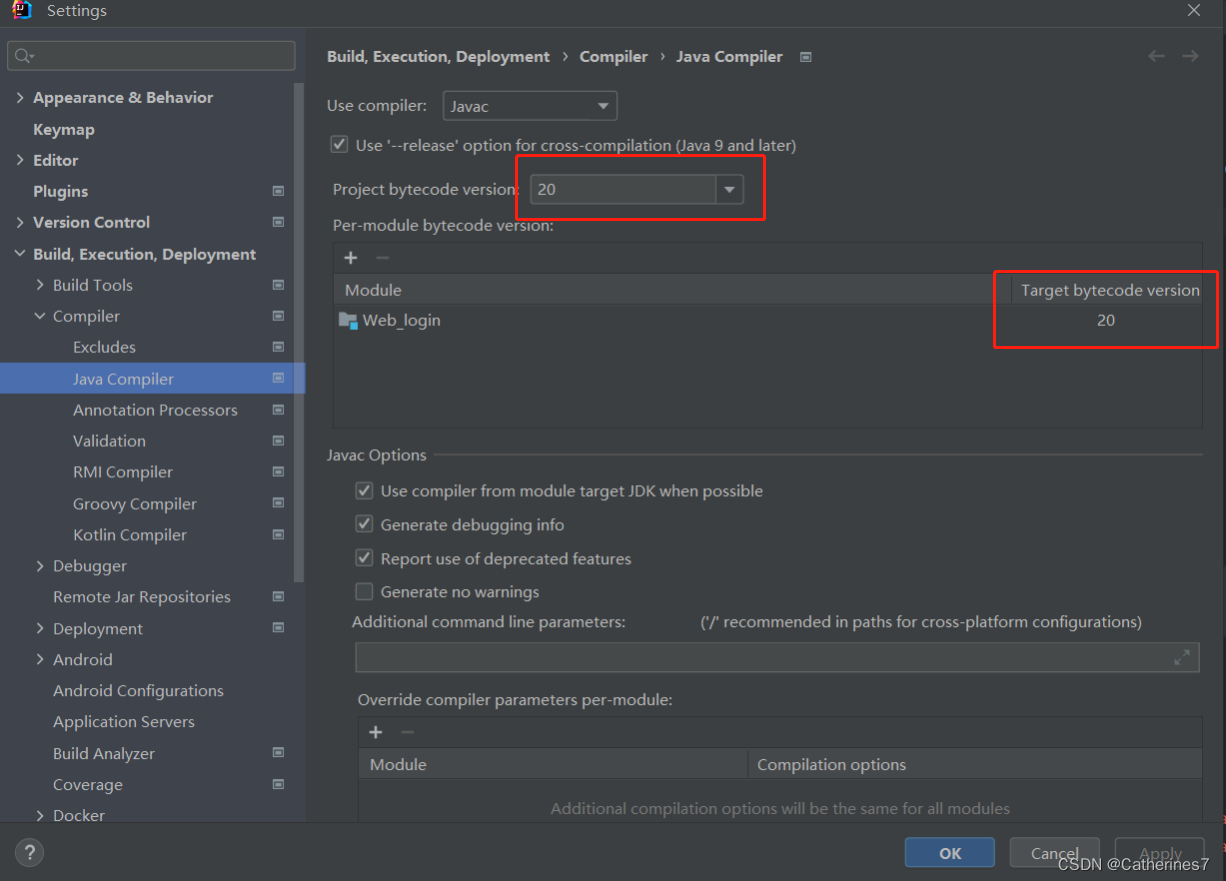
这里的deployment选择Artifact
完成后运行,出现这个页面说明idea与tomcat整合完毕,下面就是写代码了
前端form表单(也可以使用jsp文件)
<!DOCTYPE html>
<html lang="en">
<head>
    <meta charset="UTF-8">
    <title>Title</title>
</head>
<body>
<form action="/login" method="post">
    <input type="text" name="username" id="user">
    <input type="password" name="password" id="pwd">
    <input type="submit" value="submit">
</form>
</body>
</html>
后端java
package com.web;

import jakarta.servlet.ServletException;
import jakarta.servlet.annotation.WebServlet;
import jakarta.servlet.http.HttpServlet;
import jakarta.servlet.http.HttpServletRequest;
import jakarta.servlet.http.HttpServletResponse;

import java.io.IOException;

@WebServlet("/login")
public class LoginServlet extends HttpServlet {
    public void doPost (HttpServletRequest req, HttpServletResponse rep) throws ServletException, IOException{
        // 获取表单数据
        String username = req.getParameter("username");
        String password = req.getParameter("password");

        System.out.println("Username: " + username);
        System.out.println("Password: " + password);

        // 可以在这里做更多的操作,比如验证用户名和密码等

        // 返回响应给客户端
        rep.setContentType("text/html;charset=UTF-8");
        rep.getWriter().println("Login successful!");
    }
}
pom.xml
<project xmlns="http://maven.apache.org/POM/4.0.0" xmlns:xsi="http://www.w3.org/2001/XMLSchema-instance"
  xsi:schemaLocation="http://maven.apache.org/POM/4.0.0 http://maven.apache.org/maven-v4_0_0.xsd">
  <modelVersion>4.0.0</modelVersion>
  <groupId>org.example</groupId>
  <artifactId>Web_login</artifactId>
  <packaging>war</packaging>
  <version>1.0-SNAPSHOT</version>
  <name>Web_login Maven Webapp</name>
  <url>http://maven.apache.org</url>
  <properties>
    <project.build.sourceEncoding>UTF-8</project.build.sourceEncoding>
    <project.reporting.outputEncoding>UTF-8</project.reporting.outputEncoding>
    <maven.compiler.source>20</maven.compiler.source>
    <maven.compiler.target>20</maven.compiler.target> #这里都要选择与自己jdk版本相同的版本
    <java.version>20</java.version>
  </properties>
  <dependencies>
    <dependency>
      <groupId>jakarta.servlet</groupId>
      <artifactId>jakarta.servlet-api</artifactId>
      <version>5.0.0</version>
      <scope>provided</scope>
    </dependency>
    <dependency>
      <groupId>junit</groupId>
      <artifactId>junit</artifactId>
      <version>3.8.1</version>
      <scope>test</scope>
    </dependency>
  </dependencies>
  <build>
    <finalName>Web_login</finalName>
  </build>
</project>
运行,成功登录