Hola a todos, soy un panda rojo ❤
Con el rápido desarrollo de la tecnología moderna de procesamiento de imágenes e inteligencia artificial,
Muchos académicos han tratado de aplicar CV al campo de la enseñanza, que puede reemplazar a los maestros para calificar trabajos .
Libera al profesor del tedioso y agotador marcaje,
Con el fin de promover aún más la calidad de la enseñanza a un nivel superior.
El marcaje manual tradicional es engorroso e ineficiente.
El progreso es difícil de controlar y es propenso a omisiones y exámenes sin corregir, errores en la puntuación, etc.

Moderna "puntuación de máquina",Trabajo conveniente, alta eficiencia, fácil de operar,
Todo lo que necesitas es una cámara (teléfono móvil), tomar fotografías para obtener los resultados,
Las hojas de cálculo de Excel se pueden importar para facilitar la gestión de archivos.
Expliquemos el principio de funcionamiento de nuestro sencillo sistema de reconocimiento de tarjetas de respuesta desde la perspectiva de la implementación del código.
El primer paso es importar el kit de herramientas y una serie de preprocesamiento
import numpy as np
import argparse
import imutils
import cv2
# 设置参数
ap = argparse.ArgumentParser()
ap.add_argument("-i", "--image", default="test_01.png")
args = vars(ap.parse_args())
# 正确答案
ANSWER_KEY = {
0: 1, 1: 4, 2: 0, 3: 3, 4: 1} #
def order_points(pts):
# 一共4个坐标点
rect = np.zeros((4, 2), dtype = "float32")
# 按顺序找到对应坐标0,1,2,3分别是 左上,右上,右下,左下
# 计算左上,右下
s = pts.sum(axis = 1)
rect[0] = pts[np.argmin(s)]
rect[2] = pts[np.argmax(s)]
# 计算右上和左下
diff = np.diff(pts, axis = 1)
rect[1] = pts[np.argmin(diff)]
rect[3] = pts[np.argmax(diff)]
return rect
def four_point_transform(image, pts):
# 获取输入坐标点
rect = order_points(pts)
(tl, tr, br, bl) = rect
# 计算输入的w和h值
widthA = np.sqrt(((br[0]-bl[0])** 2) + ((br[1]-bl[1])**2))
widthB = np.sqrt(((tr[0] -tl[0]) ** 2) + ((tr[1] - tl[1]) ** 2))
maxWidth = max(int(widthA), int(widthB))
heightA = np.sqrt(((tr[0]-br[0])**2)+((tr[1]-br[1])**2))
heightB = np.sqrt(((tl[0]-bl[0])**2)+((tl[1]-bl[1])**2))
maxHeight = max(int(heightA), int(heightB))
# 变换后对应坐标位置
dst = np.array([
[0, 0],
[maxWidth - 1, 0],
[maxWidth - 1, maxHeight - 1],
[0, maxHeight - 1]], dtype = "float32")
# 计算变换矩阵
M = cv2.getPerspectiveTransform(rect, dst)
warped = cv2.warpPerspective(image, M, (maxWidth, maxHeight))
return warped # 返回变换后结果
def sort_contours(cnts, method="left-to-right"):
reverse = False
i = 0
if method == "right-to-left" or method == "bottom-to-top":
reverse = True
if method == "top-to-bottom" or method == "bottom-to-top":
i = 1
boundingBoxes = [cv2.boundingRect(c) for c in cnts]
(cnts, boundingBoxes) = zip(*sorted(zip(cnts, boundingBoxes),
key=lambda b: b[1][i], reverse=reverse))
return cnts, boundingBoxes
def cv_show(name,img):
cv2.imshow(name, img)
cv2.waitKey(0)
cv2.destroyAllWindows()
image = cv2.imread(args["image"])
contours_img = image.copy()
gray = cv2.cvtColor(image, cv2.COLOR_BGR2GRAY)
blurred = cv2.GaussianBlur(gray, (5, 5), 0)
edged = cv2.Canny(blurred, 75, 200)
# 轮廓检测
cnts = cv2.findContours(edged.copy(), cv2.RETR_EXTERNAL,
cv2.CHAIN_APPROX_SIMPLE)[1]
cv2.drawContours(contours_img,cnts,-1,(0,0,255),3)
docCnt = None
# 确保检测到了
if len(cnts) > 0:
# 根据轮廓大小进行排序
cnts = sorted(cnts, key=cv2.contourArea, reverse=True)
for c in cnts: # 遍历每一个轮廓
# 近似
peri = cv2.arcLength(c, True)
approx = cv2.approxPolyDP(c, 0.02 * peri, True)
# 准备做透视变换
if len(approx) == 4:
docCnt = approx
break
# 执行透视变换
warped = four_point_transform(gray, docCnt.reshape(4, 2))
thresh = cv2.threshold(warped, 0, 255,
cv2.THRESH_BINARY_INV | cv2.THRESH_OTSU)[1]
thresh_Contours = thresh.copy()
# 找到每一个圆圈轮廓
cnts = cv2.findContours(thresh.copy(), cv2.RETR_EXTERNAL,
cv2.CHAIN_APPROX_SIMPLE)[1]
cv2.drawContours(thresh_Contours,cnts,-1,(0,0,255),3)
questionCnts = []
for c in cnts:# 遍历
# 计算比例和大小
(x, y, w, h) = cv2.boundingRect(c)
ar = w / float(h)
# 根据实际情况指定标准
if w >= 20 and h >= 20 and ar >= 0.9 and ar <= 1.1:
questionCnts.append(c)
# 按照从上到下进行排序
questionCnts = sort_contours(questionCnts,
method="top-to-bottom")[0]
correct = 0
# 每排有5个选项
for (q, i) in enumerate(np.arange(0, len(questionCnts), 5)):
cnts = sort_contours(questionCnts[i:i + 5])[0]
bubbled = None
for (j, c) in enumerate(cnts): # 遍历每一个结果
# 使用mask来判断结果
mask = np.zeros(thresh.shape, dtype="uint8")
cv2.drawContours(mask, [c], -1, 255, -1) #-1表示填充
# 通过计算非零点数量来算是否选择这个答案
mask = cv2.bitwise_and(thresh, thresh, mask=mask)
total = cv2.countNonZero(mask)
# 通过阈值判断
if bubbled is None or total > bubbled[0]:
bubbled = (total, j)
# 第二步,与正确答案进行对比
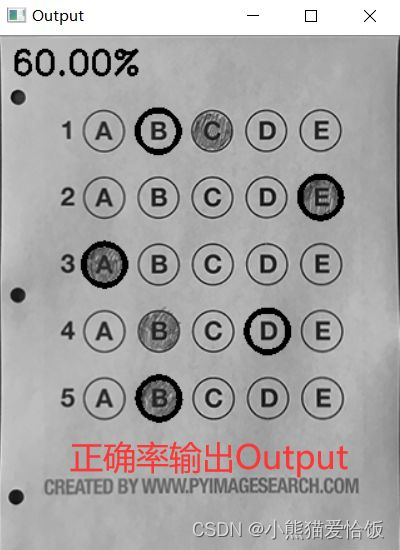
color = (0, 0, 255)
k = ANSWER_KEY[q]
# 判断正确
if k == bubbled[1]:
color = (0, 255, 0)
correct += 1
cv2.drawContours(warped, [cnts[k]], -1, color, 3) #绘图
#正确率的文本显示
score = (correct / 5.0) * 100
print("[INFO] score: {:.2f}%".format(score))
cv2.putText(warped, "{:.2f}%".format(score), (10, 30),
cv2.FONT_HERSHEY_SIMPLEX, 0.9, (0, 0, 255), 2)
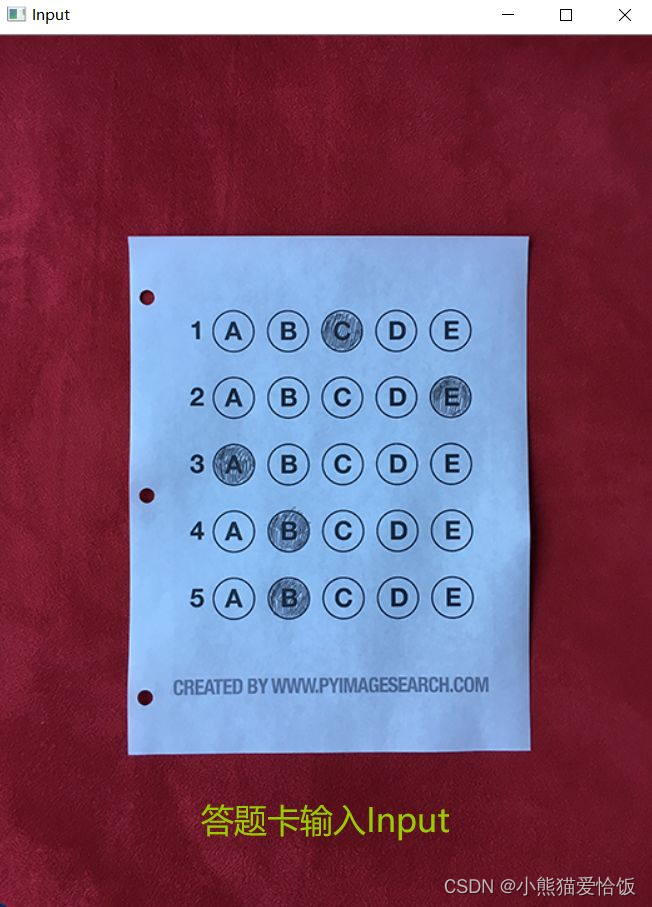
cv2.imshow("Input", image)
cv2.imshow("Output", warped)
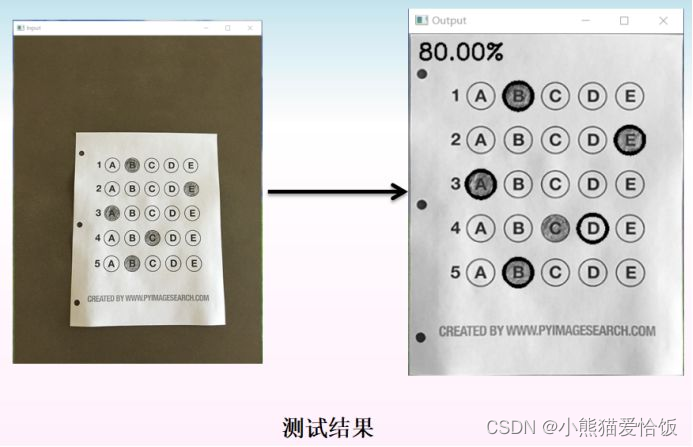
El efecto final es el siguiente:
== Así es, estoy en el artículo del agua~ ~ ~ ==
No sé qué mirar para mis amigos ~
no se pescar
Eso es todo por el artículo de hoy.
Soy Red Panda, nos vemos en el próximo artículo (✿◡‿◡)