Al hacer la gran tarea del aprendizaje automático, es necesario expandir y mejorar los datos de algunos conjuntos de datos.
Directorio de artículos
Mejora de la función de procesamiento de imágenes
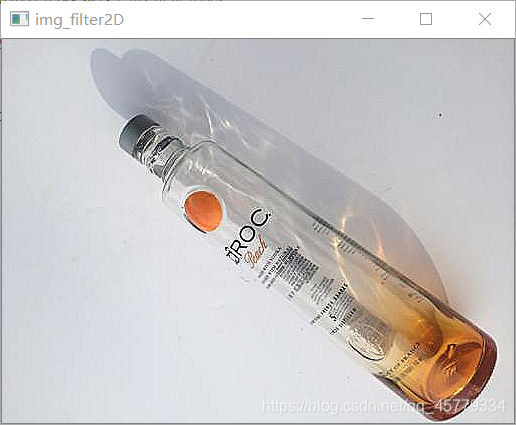
Originalmente quería hacer un cambio de brillo, pero el efecto no fue bueno, por lo que solo se usó la función de núcleo para enfocar el borde del objeto de imagen, logrando así la mejora de la información de borde y color del objeto de destino.
def img_process(img, img_class, img_num, class_dir_path):
#1.图像锐化
kernel = np.array([[0, -1, 0], [-1, 5, -1], [0, -1, 0]], np.float32) #定义一个核
#采用核边缘锐化,增强目标物体的边缘及色彩特征信息
dst = cv2.filter2D(img, -1, kernel=kernel)
# cv2.imshow("img_filter2D", dst)
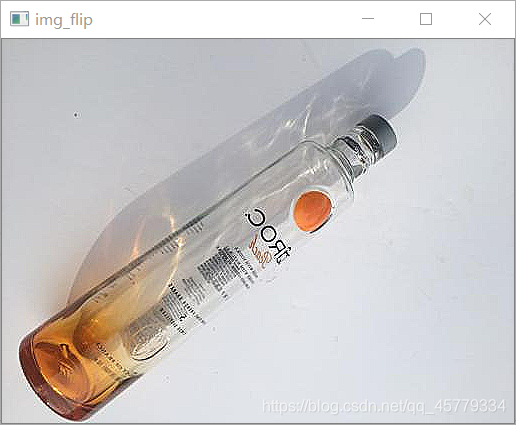
#2.图像翻转
img_flip = cv2.flip(dst, 0)
# cv2.imshow("img_flip", img_flip)
El efecto se muestra en la figura:
- Imagen antes de procesar

- Afilado de bordes de función de kernel, mejora de características
- Voltea la imagen según los ejes X, Y, X + Y respectivamente
Recorre diferentes categorías de imágenes en una carpeta
dataset_dir = "G://Python//class//ml2020//class_dataset//dataset//images"
class_list = ["glass", "metal", "paper", "plastic"]

if os.path.isdir(dataset_dir):
    #进入数据集路径下
    os.chdir(dataset_dir)
    #依次遍历4类的文件夹
    for class_name in class_list:
        class_dir_path = dataset_dir + "//" + class_name
        print(class_dir_path)
        img_files_path = os.listdir(class_dir_path)
        print(img_files_path)
        #进入对应的文件夹
        os.chdir(class_dir_path)
        print(len(img_files_path))
        #依次遍历每个类的文件夹中的图片
        i = 1
        for img_path in img_files_path:
            process_img = cv2.imread(class_dir_path + "//" +img_path)
            print(class_dir_path + "//" +img_path)
            #图像处理部分XXXX
            i += 1
        print(class_name + "processes done!")
    print("ALL done!")
else:
    print("the dataset path is incorrect!")
Código completo
import cv2
import numpy as np
import os

def img_process(img, img_class, img_num, class_dir_path, id):
    '''
    图像处理的主程序
    '''
    if id == 0:
        processed_img = contrast_brightness_image(img, 1.2, 10)
    elif id == 1:
        processed_img = gasuss_noise(img)
    elif id == 2:
        processed_img = mirror(img)
    elif id == 3:
        processed_img = resize(img)
    elif id == 4:
        processed_img = rotate(img)
    elif id == 5:
        processed_img = shear(img)
    else:
        #1.图像锐化
        kernel = np.array([[0, -1, 0], [-1, 5, -1], [0, -1, 0]], np.float32) #定义一个核
        #采用核边缘锐化,增强目标物体的边缘及色彩特征信息
        dst = cv2.filter2D(img, -1, kernel=kernel)
        # cv2.imshow("img_filter2D", dst)
        #2.图像翻转
        processed_img = cv2.flip(dst, 0)
    #3.图片保存
    cv2.imwrite(class_dir_path + "//" + img_class + str(img_num) + ".jpg", processed_img)

'''opencv数据增强
    对图片进行色彩增强、高斯噪声、水平镜像、放大、旋转、剪切
'''

def contrast_brightness_image(src1, a, g):
    '''
        色彩增强(通过调节对比度和亮度)
    '''
    h, w, ch = src1.shape  # 获取shape的数值,height和width、通道
    # 新建全零图片数组src2,将height和width,类型设置为原图片的通道类型(色素全为零,输出为全黑图片)
    src2 = np.zeros([h, w, ch], src1.dtype)
    # addWeighted函数说明:计算两个图像阵列的加权和
    dst = cv2.addWeighted(src1, a, src2, 1 - a, g)
    return dst


def gasuss_noise(image, mean=0, var=0.001):
    '''
        添加高斯噪声
        mean : 均值
        var : 方差
    '''
    image = np.array(image / 255, dtype=float)
    noise = np.random.normal(mean, var ** 0.5, image.shape)
    out = image + noise
    if out.min() < 0:
        low_clip = -1.
    else:
        low_clip = 0.
    out = np.clip(out, low_clip, 1.0)
    out = np.uint8(out * 255)
    return out

def mirror(image):
    '''
        水平镜像
    '''
    h_flip = cv2.flip(image, 1)
    return h_flip

def resize(image):
    '''
        放大两倍
    '''
    height, width = image.shape[:2]
    large = cv2.resize(image, (2 * width, 2 * height))
    return large

def rotate(image):
    '''
        旋转
    '''
    rows, cols = image.shape[:2]
    M = cv2.getRotationMatrix2D((cols / 2, rows / 2), 10, 1)
    dst = cv2.warpAffine(image, M, (cols, rows))
    return dst

def shear(image):
    '''
        剪切
    '''
    height, width = image.shape[:2]
    cropped = image[int(height / 9):height, int(width / 9):width]
    return cropped

def cv_process_show(image):
    cv2.imshow("src", image)

    contrast_brightness_image = contrast_brightness_image(image, 1.2, 10)
    cv2.imshow("contrast_brightness_image", contrast_brightness_image)

    gasuss_noise_image = gasuss_noise(image, mean=0, var=0.001)
    cv2.imshow("gasuss_noise_image", gasuss_noise_image)

    mirror_image = mirror(image)
    cv2.imshow("mirror_image", mirror_image)

    resize_image = resize(image)
    cv2.imshow("resize_image", resize_image)

    rotate_image = rotate(image)
    cv2.imshow("rotate_image", rotate_image)

    shear_image = shear(image)
    cv2.imshow("shear_image", shear_image)

    #1.图像锐化
    kernel = np.array([[0, -1, 0], [-1, 5, -1], [0, -1, 0]], np.float32) #定义一个核
    #采用核边缘锐化,增强目标物体的边缘及色彩特征信息
    dst = cv2.filter2D(image, -1, kernel=kernel)
    #2.图像翻转
    processed_img = cv2.flip(dst, 0)
    cv2.imshow("img_filter2D", processed_img)

def batch_preocess(dataset_dir, class_list):
    if os.path.isdir(dataset_dir):
        #进入数据集路径下
        os.chdir(dataset_dir)
        #依次遍历4类的文件夹
        for class_name in class_list:
            class_dir_path = dataset_dir + "//" + class_name
            print(class_dir_path)
            img_files_path = os.listdir(class_dir_path)
            print(img_files_path)
            #进入对应的文件夹
            os.chdir(class_dir_path)
            print(len(img_files_path))
            #依次遍历每个类的文件夹中的图片
            i = 1
            for img_path in img_files_path:
                process_img = cv2.imread(class_dir_path + "//" +img_path)
                print(class_dir_path + "//" +img_path)
                #数据增强子函数
                img_process(process_img, class_name, len(img_files_path) + i, class_dir_path, i)
                i += 1

            print(class_name + "processes done!")
        print("ALL done!")

    else:
        print("the dataset path is incorrect!")

if __name__ == '__main__':
    dataset_dir = "G://Python//class//ml2020//class_dataset//dataset//images_processed"
    class_list = ["glass", "metal", "paper", "plastic"]
    img_dir = r"G:\Python\class\ml2020\PaddlePaddle\test_pic\metal1.jpg"
    image = cv2.imread(img_dir)
    # 单张照片处理效果展示
    cv_process_show(image)
    # 批量处理
    # batch_preocess(dataset_dir, class_list)
referencia: