Tabla de contenido
Grabe una pequeña demostración donde el código local de Java pasa la codificación base64 de la imagen al servidor a través de httpclient, y luego el servidor almacena la imagen.
Código de cliente local:
Obtener codificación base64 de imágenes
	// 将图片文件转化为字节数组字符串,并对其进行Base64编码处理
    public static String getImageBase64(String imgFilePath) {


        byte[] data = null;

        // 读取图片字节数组
        try {


            InputStream in = new FileInputStream(imgFilePath);
            data = new byte[in.available()];
            in.read(data);
            in.close();
        } catch (IOException e) {


            e.printStackTrace();
        }

        // 对字节数组Base64编码
        BASE64Encoder encoder = new BASE64Encoder();
        return encoder.encode(data);// 返回Base64编码过的字节数组字符串
    }
Utilice httpclient para ejecutar la publicación
Introduzca el paquete httpclient en maven
        <dependency>
            <groupId>org.apache.httpcomponents</groupId>
            <artifactId>httpclient</artifactId>
            <version>4.5.2</version>
        </dependency>
        <dependency>
            <groupId>org.apache.httpcomponents</groupId>
            <artifactId>httpcore</artifactId>
            <version>4.4.6</version>
        </dependency>
    public static void HttpClientPost(String url,List<NameValuePair> list) throws Exception {


        // 获取默认的请求客户端
        CloseableHttpClient client = HttpClients.createDefault();
        // 通过HttpPost来发送post请求
        HttpPost httpPost = new HttpPost(url);

        // 我们发现Entity是一个接口,所以只能找实现类,发现实现类又需要一个集合,集合的泛型是NameValuePair类型
        UrlEncodedFormEntity formEntity = new UrlEncodedFormEntity(list);
        // 通过setEntity 将我们的entity对象传递过去
        httpPost.setEntity(formEntity);

        // 通过client来执行请求,
        CloseableHttpResponse response = client.execute(httpPost);
        //下面是获取响应
//        HttpEntity entity = response.getEntity();
//        String str = EntityUtils.toString(entity, "UTF-8");
//        System.out.println(str);

        response.close();
    }
Al final. Defina el método y llame a httpost. Luego especifique 3 parámetros, 1 dirección de acceso
- tipo tipo de acceso
- nombre de archivo nombre de archivo personalizado
- codificación base64str
- http: // dirección de acceso localhost / api
    public static void  send(){


        System.out.println("发送图片请求");

        // post带参数
        List<NameValuePair> list = new ArrayList<NameValuePair>();
        BasicNameValuePair b = new BasicNameValuePair("type", "uploadimg");
        BasicNameValuePair b2 = new BasicNameValuePair("filename", "kl.jpg");
        BasicNameValuePair b3 = new BasicNameValuePair("base64str", getImageBase64("C:\\Users\\ASUS\\Desktop\\kl.jpg"));
        list.add(b);
        list.add(b2);
        list.add(b3);
        try {


            HttpClientPost("http://localhost/api",list);
        } catch (Exception e) {


            e.printStackTrace();
        }
    }
Código del servidor:
Obtenga los parámetros en requst y luego guarde la imagen
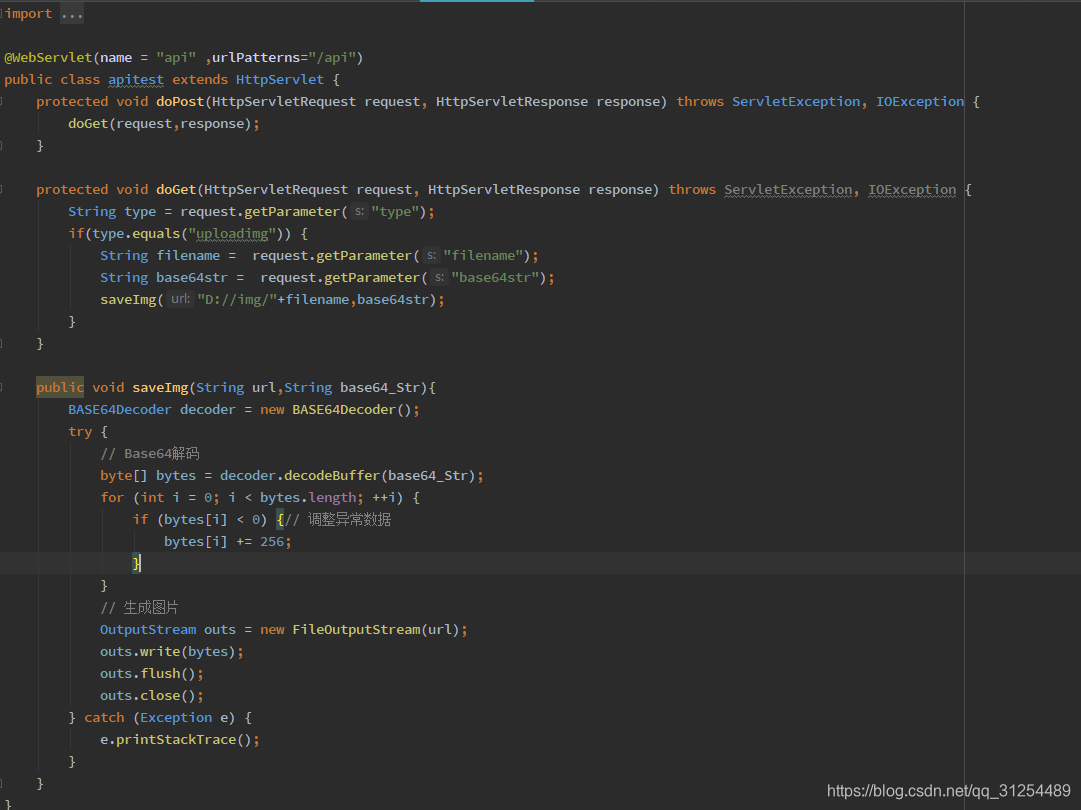
@WebServlet(name = "api" ,urlPatterns="/api")
public class apitest extends HttpServlet {


    protected void doPost(HttpServletRequest request, HttpServletResponse response) throws ServletException, IOException {


        doGet(request,response);
    }

    protected void doGet(HttpServletRequest request, HttpServletResponse response) throws ServletException, IOException {


        String type = request.getParameter("type");
        if(type!=null &&type.equals("uploadimg")) {


            String filename =  request.getParameter("filename");
            String base64str =  request.getParameter("base64str");
            saveImg("D://img/"+filename,base64str);
        }
    }

    public void saveImg(String url,String base64_Str){


        BASE64Decoder decoder = new BASE64Decoder();
        try {


            // Base64解码
            byte[] bytes = decoder.decodeBuffer(base64_Str);
            for (int i = 0; i < bytes.length; ++i) {


                if (bytes[i] < 0) {

    // 调整异常数据
                    bytes[i] += 256;
                }
            }
            // 生成图片
            OutputStream outs = new FileOutputStream(url);
            outs.write(bytes);
            outs.flush();
            outs.close();
        } catch (Exception e) {


            e.printStackTrace();
        }
    }
}
Luego usamos tomcat para probarlo localmente.
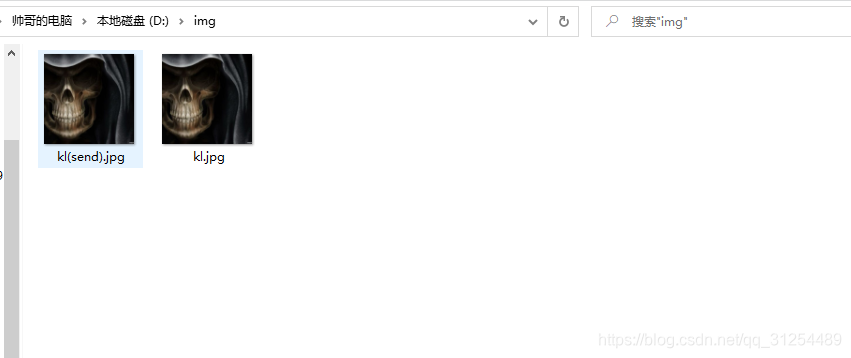
Anula el método init del servelet. Inicie el temporizador y detecte si existe el archivo D: //img/kl.jpg, luego el servidor enviará el archivo a D: // img / kl (enviar) .jpg
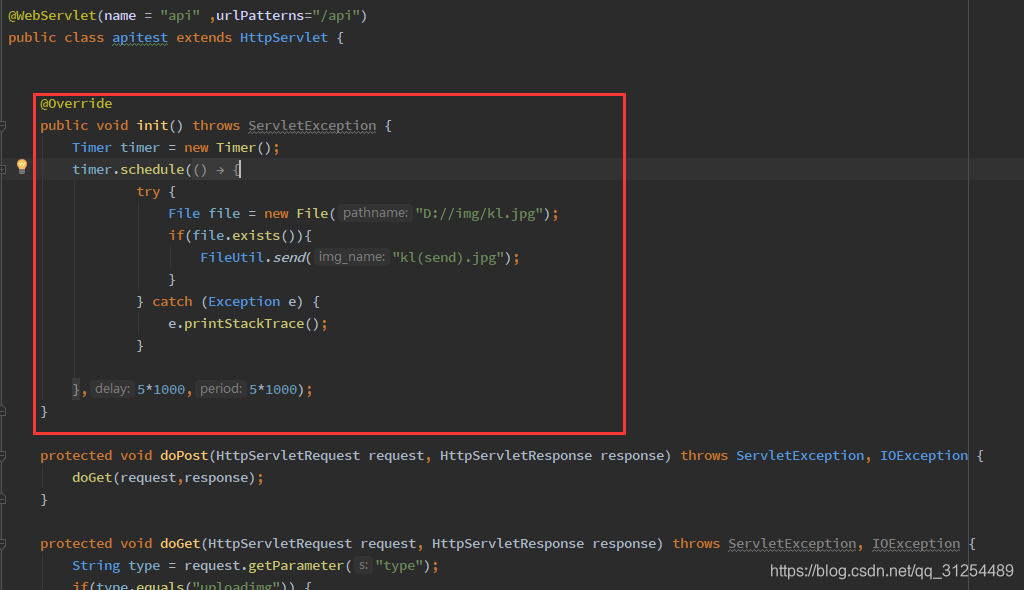
        Timer timer = new Timer();
        timer.schedule(new TimerTask() {


            @Override
            public void run() {


                try {


                    File file = new File("D://img/kl.jpg");
                    if(file.exists()){


                        FileUtil.send("kl(send).jpg");
                    }
                } catch (Exception e) {


                    e.printStackTrace();
                }

            }
        },5*1000,5*1000);
ok, inicie Tomcat, luego visite / api, luego severlet ejecuta el método init para iniciar el temporizador
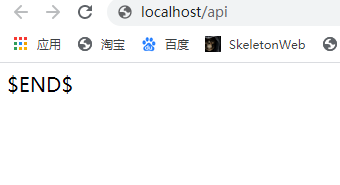
. . . Después de 5 segundos, ya está.