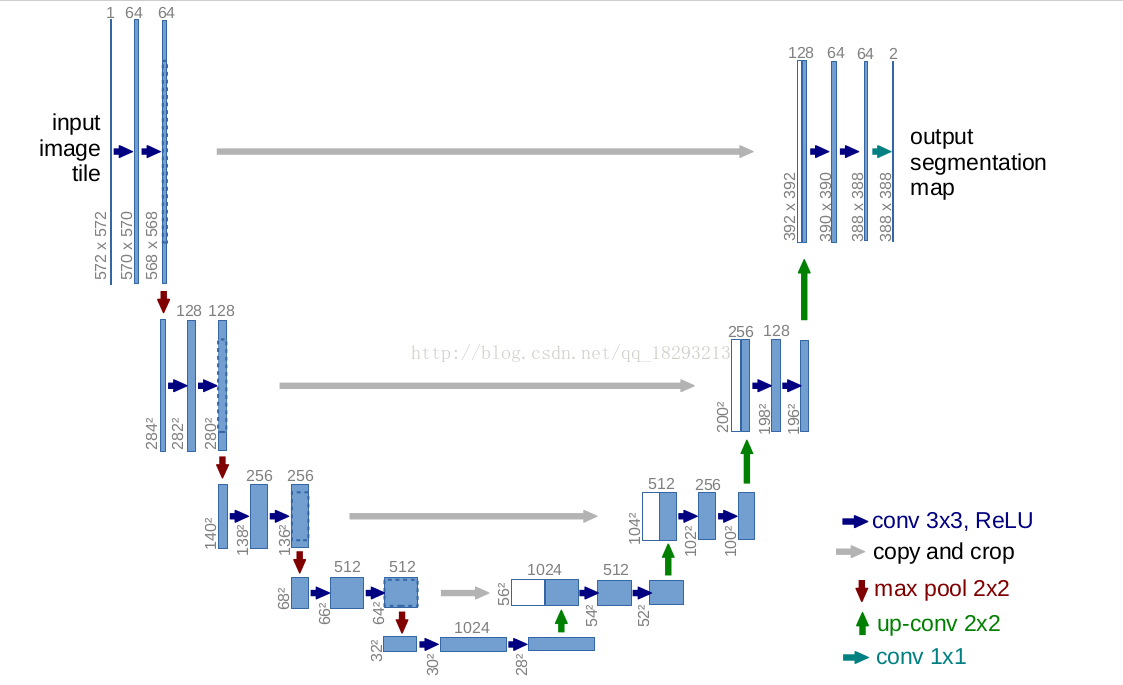
This week learning neural network is U-net, it is understood, of U-net paper is to achieve results after participating in the competition ISBI article published for everyone to learn, paper original link:
 (Photo from Baidu)
1 def conv_relu_layer(net,numfilters,name):
2     network = tf.layers.conv2d(net,
3                         activation=tf.nn.relu,
4                         filters= numfilters,
5                         kernel_size=(3,3),
6                         padding='Valid',
7                         name= "{}_conv_relu".format(name))
8      return network
2、maxpooling
1 def maxpool(net,name):
2     network = tf.layers.max_pooling2d(net,
3                     pool_size= (2,2),
4                     strides = (2,2),
5                     padding = 'valid',
6                     name = "{}_maxpool".format(name))
7     return network
3、up-conv
1 def up_conv(net,numfilters,name):
2     network = tf.layers.conv2d_transpose(net,
3                     filters = numfilters,
4                     kernel_size= (2,2),
5                     strides= (2,2),
6                     padding= 'valid',
7                     activation= tf.nn.relu,
8                     name = "{}_up_conv".format(name))
9     return network
4、copy-prop
1 def copy_crop(skip_connect,net):
2     skip_connect_shape = skip_connect.get_shape()
3     net_shape = net.get_shape()
4     print(net_shape[1])
5     size = [-1,net_shape[1].value,net_shape[2].value,-1]
6     skip_connect_crop = tf.slice(skip_connect,[0,0,0,0],size)
7     concat = tf.concat([skip_connect_crop,net],axis=3)
8     return concat
5、conv1*1
def conv1x1(net,numfilters,name):
    return tf.layers.conv2d(net,filters=numfilters,strides=(1,1),kernel_size=(1,1),name = "{}_conv1x1".format(name),padding='SAME')
 1 #define input data
 2 input  = tf.placeholder(dtype=tf.float32,shape = (64,572,572,3))
 3
 4
 5 #define downsample path
 6 network = conv_relu_layer(input,numfilters=64,name='lev1_layer1')
 7 skip_con1 = conv_relu_layer(network,numfilters=64,name='lev1_layer2')
 8 network = maxpool(skip_con1,'lev2_layer1')
 9 network = conv_relu_layer(network,128,'lev2_layer2')
10 skip_con2 = conv_relu_layer(network,128,'lev2_layer3')
11 network = maxpool(skip_con2,'lev3_layer1')
12 network = conv_relu_layer(network,256,'lev3_layer1')
13 skip_con3 = conv_relu_layer(network,256,'lev3_layer2')
14 network = maxpool(skip_con3,'lev4_layer1')
15 network = conv_relu_layer(network,512,'lev4_layer2')
16 skip_con4 = conv_relu_layer(network,512,'lev4_layer3')
17 network = maxpool(skip_con4,'lev5_layer1')
18 network = conv_relu_layer(network,1024,'lev5_layer2')
19 network = conv_relu_layer(network,1024,'lev5_layer3')
20
21 #define upsample path
22 network = up_conv(network,512,'lev6_layer1')
23 network = copy_crop(skip_con4,network)
24 network = conv_relu_layer(network,numfilters=512,name='lev6_layer2')
25 network = conv_relu_layer(network,numfilters=512,name='lev6_layer3')
26
27 network = up_conv(network,256,name='lev7_layer1')
28 network = copy_crop(skip_con3,network)
29 network = conv_relu_layer(network,256,name='lev7_layer2')
30 network = conv_relu_layer(network,256,'lev7_layer3')
31
32
33 network = up_conv(network,128,name='lev8_layer1')
34 network = copy_crop(skip_con2,network)
35 network = conv_relu_layer(network,128,name='lev8_layer2')
36 network = conv_relu_layer(network,128,'lev8_layer3')
37
38
39 network = up_conv(network,64,name='lev9_layer1')
40 network = copy_crop(skip_con1,network)
41 network = conv_relu_layer(network,64,name='lev9_layer2')
42 network = conv_relu_layer(network,64,name='lev9_layer3')
43 network = conv1x1(network,2,name='lev9_layer4')
Using U-net architecture to achieve the following TensorFlow

(Photo from Baidu)
Learning process met a GitHub project Gangster published at the following link:
Run test_predict.py model predictions obtained results can be visualized
Finally data_version.py can save the test set and the result set to the specified picture format and the specified path
Note that the program is best run on Ubuntu, Windows should be a lot of changes in
The nature of U-net or rewrite over from cnn, cnn before understanding is not very deep, especially for this time to do something about cnn
At the same time learned by querying the data cnn power lies
1, a small shallow domain convolution sensing layer, easy to learn some features of a local area
2, a larger sensing layer deeper domain convolution can learn something more abstract features
These sensitivity characteristics of abstract object size, position and direction of a lower, thereby contributing to improve the classification performance
And the fundamental understanding u-net or be based on FCN ah, the next few days is not going to be back, mainly solid foundation
These are the schedule this week, come on!