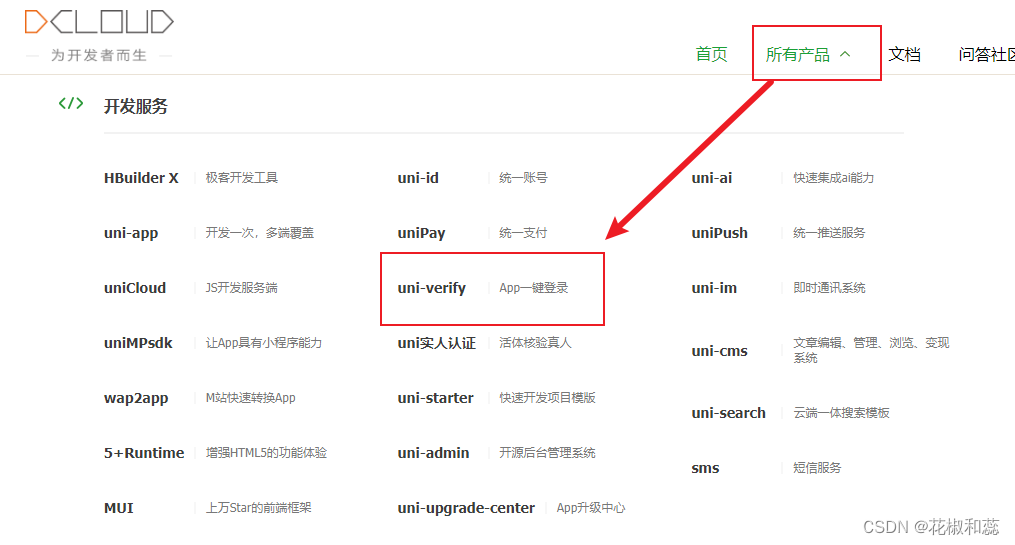
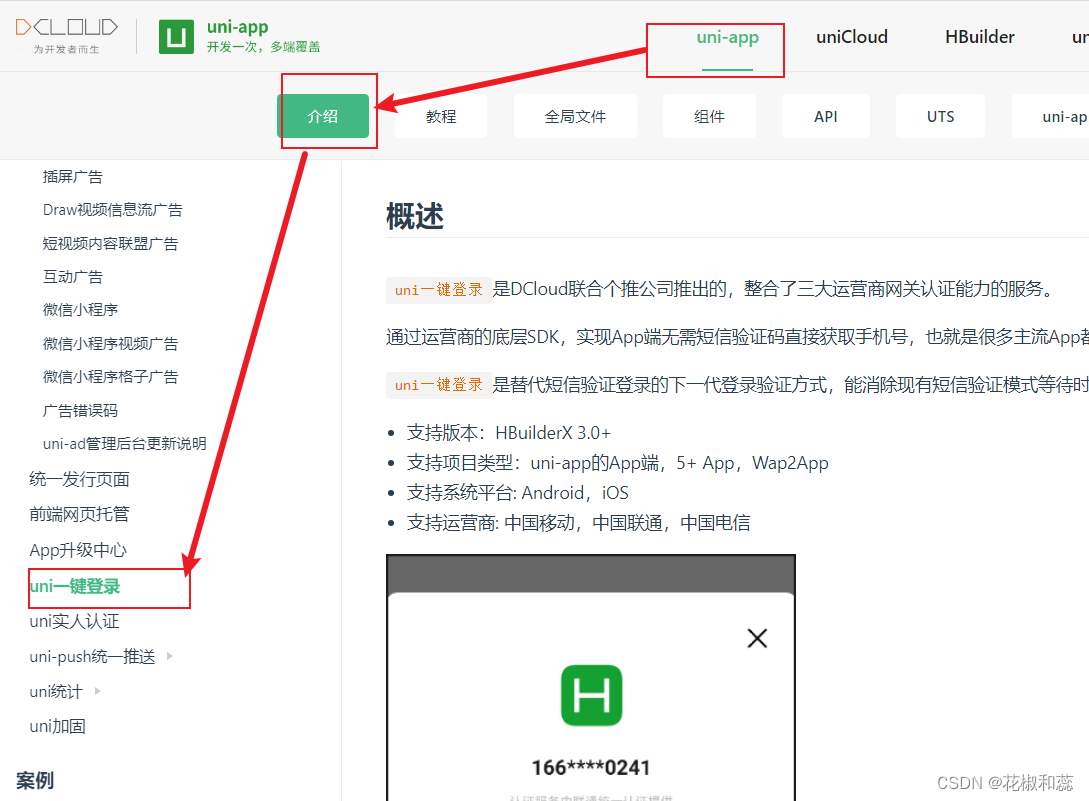
Please click here to log in to the Dcloud official website with one click . If you are interested, you can check out the official website. There are very detailed examples. Select the App to log in with one click and you can see an overview of some commonly used ones,
such as:
1. Call uni.login to pop up the one-click login page
2. For the one-click login process, you can choose to pre-login uni.prelogin() or log in directly to uni.login()
3. You must first activate the Dcloud one-click login service , log in to the Dcloud Developer Center account to activate the one-click login service. This requires payment. Each call is 0.02 yuan. There is no limit to the amount of recharge, which is enough for your testing.
4. Set up uniCloud cloud functions. One-click login requires calling uniCloud.getPhoneNumber()
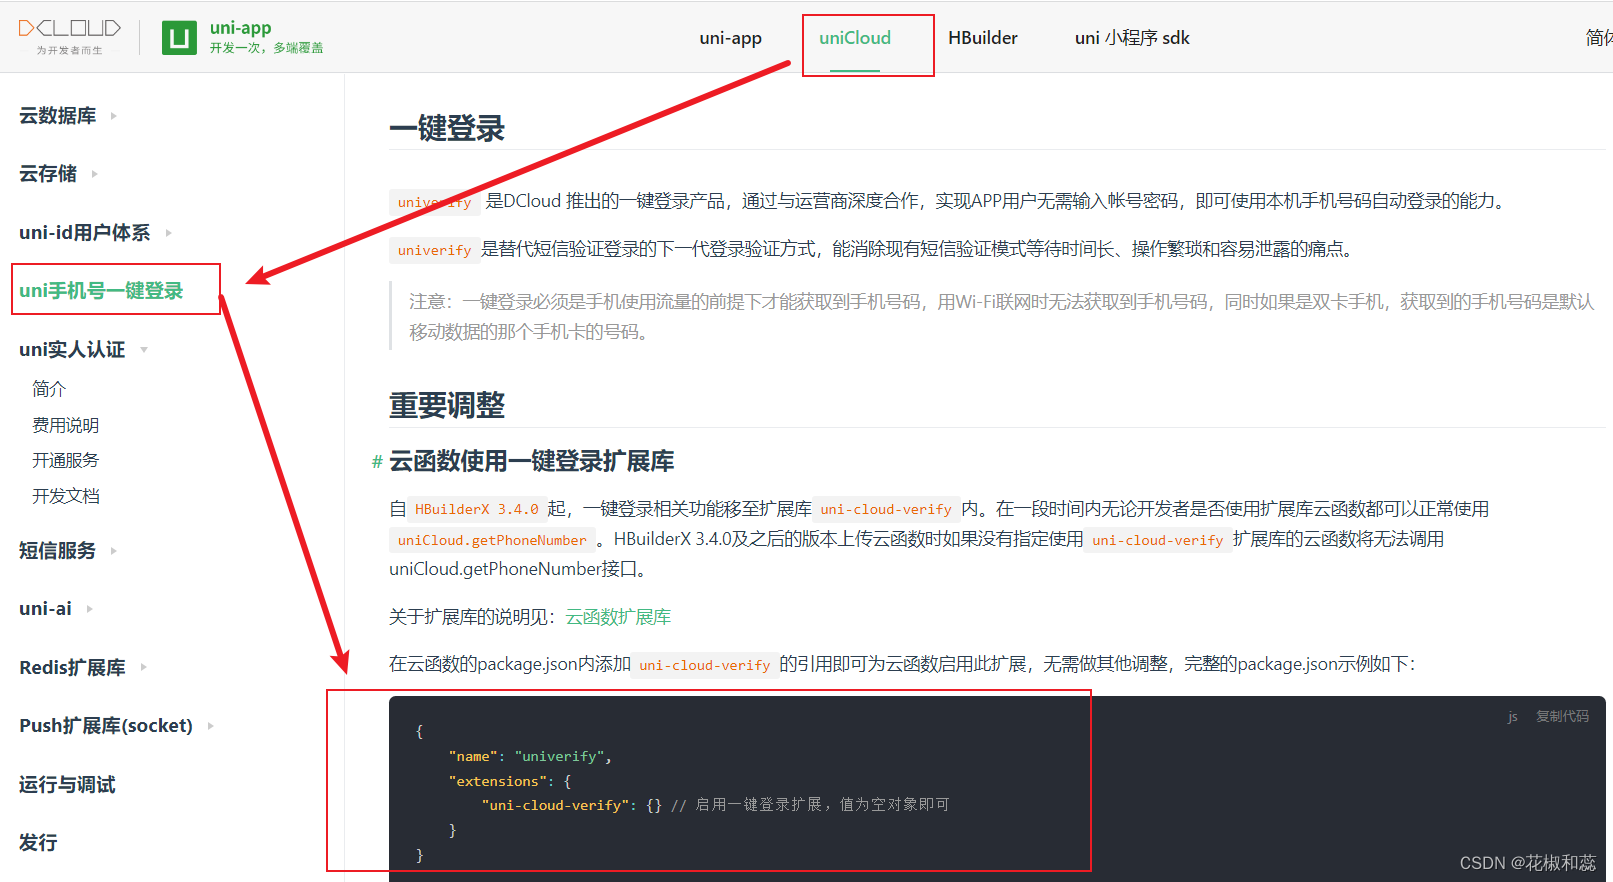
5. When uploading cloud functions in HBuilderX 3.4.0 and later versions, if the cloud function using the uni-cloud-verify extension library is not specified, uniCloud will not be called. getPhoneNumber interface, so add the reference to uni-cloud-verify in the package.json of the cloud function.
6. The one-click login page is configured. How to configure it, you can see the univerifyStyle data structure.
7. Close the one-click login authorization interface and call uni.closeAuthView()
8. The user clicks the one-click login custom button
9. After the one-click login is successful, it is judged according to its own back-end interface whether to directly enter the app page or to register for business processing.
Please click here for an overview of uni’s one-click login.
One-click login with Uni mobile phone number, please click here
Specific implementation of one-click login:
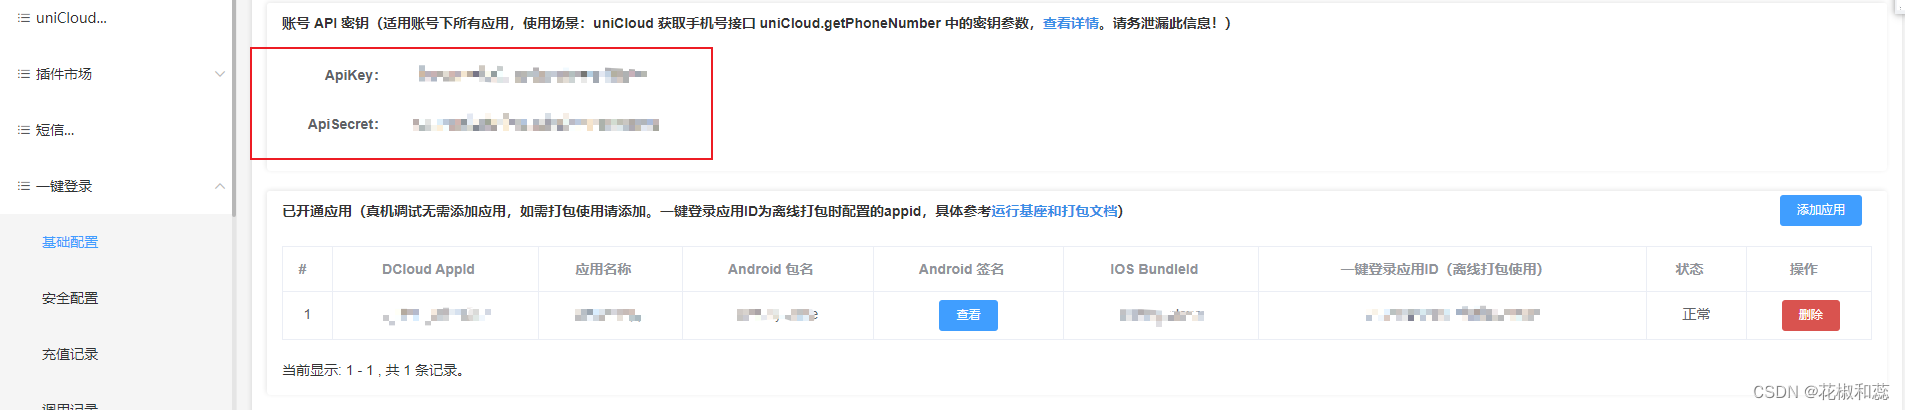
First, you must have a Dcloud account. After applying for the application, apply to activate the one-click login service. For the detailed process of activating the one-click login service, please click here , select one-click login on the left, click Basic Configuration, and take the values of ApiKey and ApiSecret
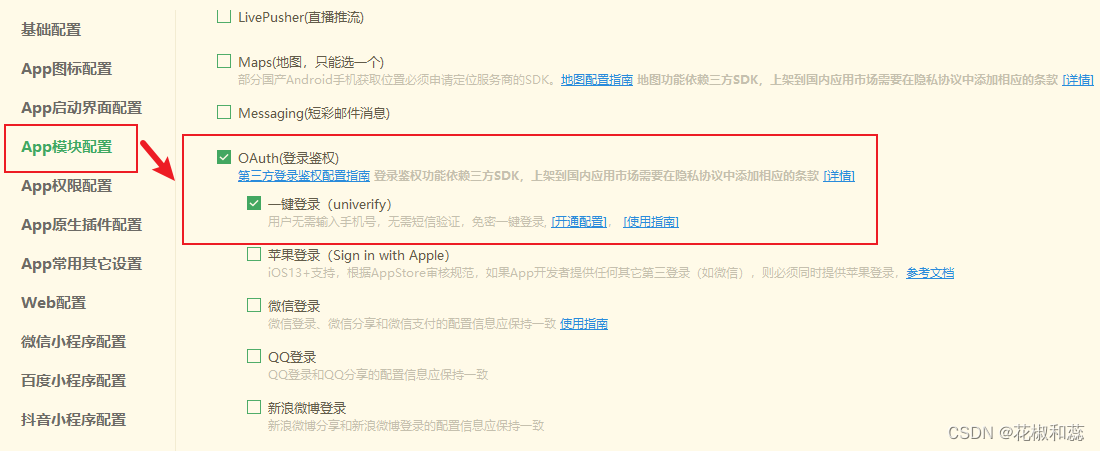
1. Select App module configuration in mainfest.json and check One-click login
2. To achieve one-click login, you need to use the API of UniCloud cloud function: uniCloud.getPhoneNumber.
The steps to create uniCloud.getPhoneNumber cloud function are as follows :
1. Find the cloudfunctions folder under the uniCloud folder in the project root directory. If there is no such folder, you can create it manually.
2. Create a new folder in the cloudfunctions folder as the name of your cloud function, such as getPhoneNumber. My name here is login
3. Go to the getPhoneNumber folder and create a JavaScript file, such as index.js.
4. Write the code of the cloud function in index.js to implement the logic of obtaining the mobile phone number.
Note: This code caused an error below. The error has been resolved. Do not copy this code directly. Use the resolved code.
exports.main = async (event, context) => {


//登录Dcloud账号,左侧选择一键登录,点击基础配置,取ApiKey和ApiSecret的值
	const res = await uniCloud.getPhoneNumber({


		provider: 'univerify',
		apiKey: '对应的apiKey',
		apiSecret: '对应的apiSecret',
		access_token: event.access_token,
		openid: event.openid
	})

	// 这里需要改成你们自己后端登录成功后的接口地址 ...
	const url = event.serversUrl + '/user/login'

	// md5加密方式:手机号 时间戳 私钥
	const phone = res.phoneNumber
	const timestamp = new Date().getTime()
	const signKey = '对应的signKey '
	const sign = crypto.createHash('md5').update(phone + timestamp + signKey).digest('hex')

	const result = await uniCloud.httpclient.request(url, {


		method: 'POST',
		data: {


			phone,
			timestamp,
			sign
		},
		contentType: 'json',
		dataType: 'json',
		// 是否在证书不受信任时返回错误
		rejectUnauthorized: false
	})
	console.log('服务端返回结果=', result)

	if (result.data.code == 200) {


		return {


			code: 0,
			message: '获取手机号成功',
			data: result.data.data
		}
	} else {


		return {


			code: result.data.code,
			message: result.data.msg,
			data: result.data.data
		}
	}
}
5. In the uniCloud folder in the project root directory, add a reference to uni-cloud-verify in the package.json of the cloud function to enable this extension for the cloud function. No other adjustments are required.
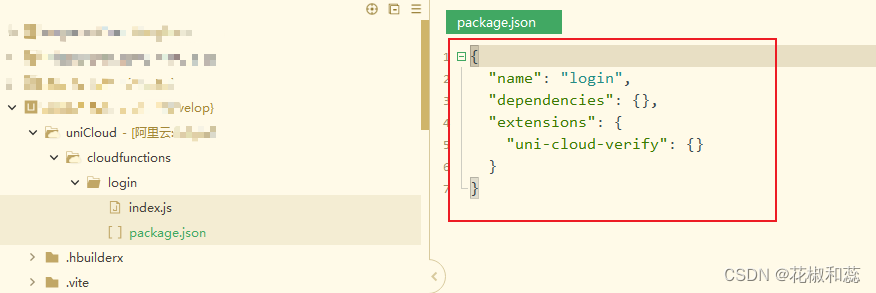
{


	"name": "login",
	  "dependencies": {

    },
	"extensions": {


	"uni-cloud-verify": {

    } // 启用一键登录扩展,值为空对象即可
	}
}
3. Specific uses on the page
. Regarding how to use it, I have gone through some pitfalls myself.
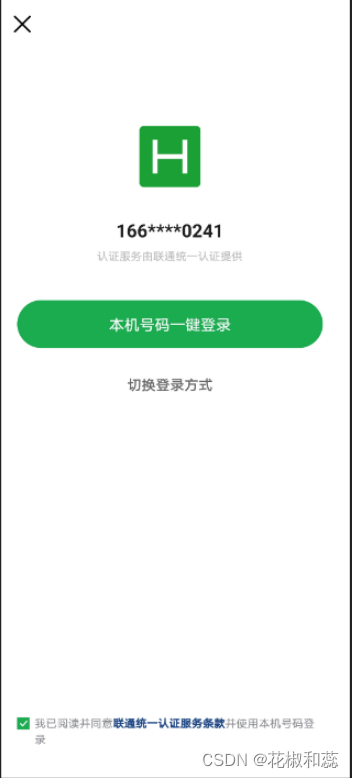
1. First, the one-click login page is similar to a pop-up window. When the app is first opened, the one-click login page will pop up.
If you do not want to choose one-click login, Click the cross in the upper left corner to close the pop-up window.
The first pitfall I encountered was that I didn’t understand one-click login.
I drew a one-click login page based on the UI. During the implementation process, I was always confused about how to obtain the encrypted mobile phone number and the corresponding supplier. The authentication service is used to render the page. The misunderstanding is that the one-click login page is configured.
Since it is a pop-up window, there must be a display page after it is closed. What I display here is the account login page after closing it.
2. In the uniapp introduction, click uni one-click login on the left menu bar.
There is a flow chart inside. First pre-login and then one-click login.
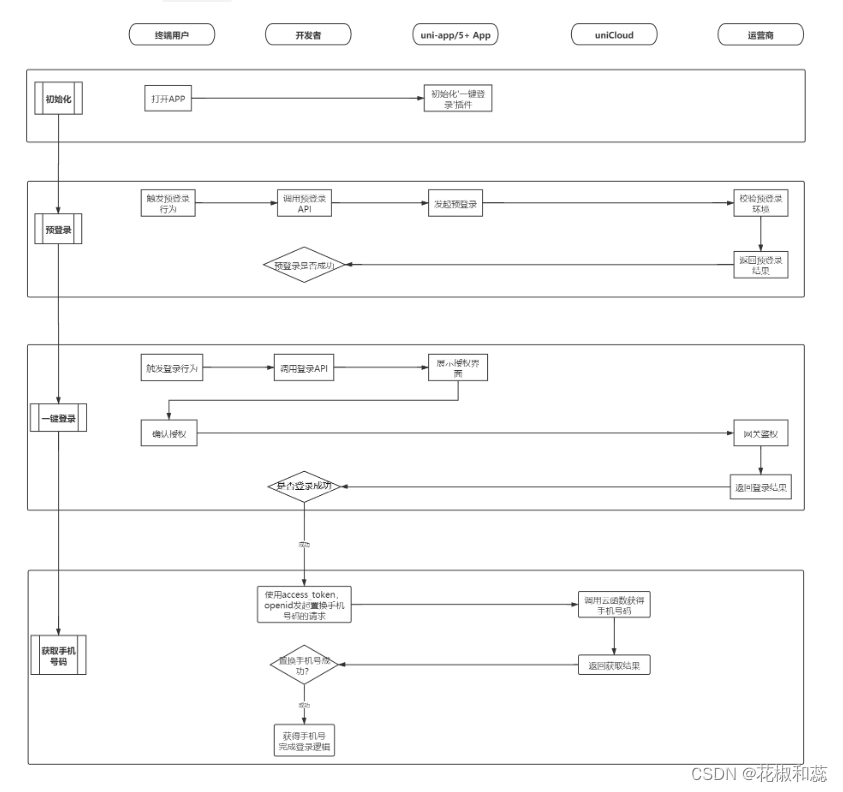
Regarding pre-login, you need to call uni.preLogin(), mainly to check the pre-login environment
and then call uni.login().
This is very confusing. I always think that the login method is called after clicking the one-click login button
. That is, uni.login() obtains the user's login credential code. This code is then sent to the back-end server. The server uses
this credential for login verification and returns the user's identity information or generates the user's session credential. To put it bluntly, only
after calling uni.login() can we get the mobile phone number and The corresponding supplier authentication service
, the mobile phone number and the corresponding supplier authentication service on the one-click login page will be displayed,
followed by the one-click login button. When the button is clicked, uniCloud.callFunction will be triggered, which is to call the cloud function. , the parameter returned by the cloud
function includes the user's complete mobile phone number. With this mobile phone number, we can adjust our own back-end interface and determine whether to
release it to the homepage or require the user to go to the registration page based on the identification given by the back-end.
function preLogin(isShowMsg = false) {


		//预登陆检查是否符合一键登录的环境
		uni.preLogin({


			provider: "univerify",
			success: (res) => {


			//调用login方法,我是vue3,没有thi实例,vue2框架this.login()
				login()
			},
			fail(err) {


				// 如果手机没有插入有效的sim卡,或者手机蜂窝数据网络关闭,都有可能造成预登录校验失败。

				if (isShowMsg && err.errMsg != "login:ok") {


					// 不同运营商 返回的报错字段不同
					uni.showModal({


						title: "当前设备环境不支持一键登录",
						content:
							err.errMsg ||
							err.metastate.resultMsg ||
							err.metastate.error_data ||
							err.metastate.resultDesc ||
							"请检查是否插入有效sim卡及开启蜂窝数据网络",
						showCancel: false,
					});
				}

			},
		});

	}
function login() {


		uni.login({


			provider: 'univerify',
			univerifyStyle: {


				"fullScreen": true, // 是否全屏显示,true表示全屏模式,false表示非全屏模式,默认值为false。
				"backgroundColor": "#ffffff", // 授权页面背景颜色,默认值:#ffffff
				"icon": {


					"path": "static/images/logo.png",// 自定义显示在授权框中的logo,仅支持本地图片 默认显示App logo
					"width": "60px",  //图标宽度 默认值:60px
					"height": "60px",//图标高度 默认值:60px,
				},
				"phoneNum": {


					"color": "#525252",// 手机号文字颜色 默认值:#202020
					"fontSize": "22",// 手机号字体大小 默认值:18
				},
				"slogan": {


					"color": "#525252", //  slogan 字体颜色 默认值:#8a8b90
					"fontSize": "14"
				},
				"authButton": {


					"normalColor": "#FF9CAE", // 授权按钮正常状态背景颜色 默认值:#3479f5
					"highlightColor": "#FF9CAE", // 授权按钮按下状态背景颜色 默认值:#2861c5(仅ios支持)
					"disabledColor": "#73aaf5", // 授权按钮不可点击时背景颜色 默认值:#73aaf5(仅ios支持)
					"textColor": "#ffffff", // 授权按钮文字颜色 默认值:#ffffff
					"title": "一键登录/注册" // 授权按钮文案 默认值:“本机号码一键登录”
				},
				"otherLoginButton": {


					"visible": "true", // 是否显示其他登录按钮,默认值:true
					"normalColor": "", // 其他登录按钮正常状态背景颜色 默认值:透明
					"highlightColor": "", // 其他登录按钮按下状态背景颜色 默认值:透明
					"textColor": "#656565", // 其他登录按钮文字颜色 默认值:#656565
					"title": "验证码登录", // 其他登录方式按钮文字 默认值:“其他登录方式”
					"borderColor": "",  //边框颜色 默认值:透明(仅iOS支持)
					"borderRadius": "0px",// 其他登录按钮圆角 默认值:"24px" (按钮高度的一半)
				},
				"privacyTerms": {


					"defaultCheckBoxState": false, // 条款勾选框初始状态 默认值: true
					"uncheckedImage": "", // 可选 条款勾选框未选中状态图片(仅支持本地图片 建议尺寸 24x24px)(3.2.0+ 版本支持)
					"checkedImage": "", // 可选 条款勾选框选中状态图片(仅支持本地图片 建议尺寸24x24px)(3.2.0+ 版本支持)
					"checkBoxSize": 12, // 可选 条款勾选框大小,仅android支持
					"textColor": "#BBBBBB", // 文字颜色 默认值:#BBBBBB
					"termsColor": "#5496E3", //  协议文字颜色 默认值: #5496E3
					"prefix": "请阅读并同意", // 条款前的文案 默认值:“我已阅读并同意”
					"suffix": "并使用本机号码登录", // 条款后的文案 默认值:“并使用本机号码登录”
					"privacyItems": [  // 自定义协议条款,最大支持2个,需要同时设置url和title. 否则不生效
						{


							"url": "/pages/privacy/use", // 点击跳转的协议详情页面
							"title": "《xxx用户注册协议》" //用户注册协议名称
						},

						{


							"url": "/pages/privacy/privacy", // 点击跳转的协议详情页面
							"title": "《xx隐私政策》" // 隐私政策名称
						}
					]

				}

			},
			success: (res) => {


				uniCloud.callFunction({


					name: 'login', // 你的云函数名称
					data: {


						access_token: res.authResult
							.access_token, // 客户端一键登录接口返回的access_token
						openid: res.authResult.openid // 客户端一键登录接口返回的openid
					}
				}).then(dataRes => {


					console.log('云函数返回的参数', dataRes)
					data.form.mobile = dataRes.result.data.phoneNumber
					$Api.post("user/direct",data.form).then((res) => {


						console.log(res,'调后端接口判断登录后操作');
						if(res&&res.code==0){


						if(res.id){


                    	uni.switchTab({


					 url: "/pages/square/square",
				});
                       }else{


                       uni.navigateTo({


								url: "/pages/user/register?mobile=" + data.form.mobile,
							});
                                       }
                                     }
					});

				}).catch(err => {


					console.log('云函数报错', err)
				})
				uni.showToast({


					title: res.authResult,
					icon: "none"
				})
				uni.closeAuthView() //关闭一键登录弹出窗口
			},
			fail(res) {

     // 登录失败
				uni.closeAuthView() //关闭一键登录弹出窗口
				console.log('失败')
			},
		})
	}
3. After the uni.login() call is successful, the one-click login page appears, and then the style is adjusted. The large frame cannot be changed. You can only adjust some things such as font size, color, etc. How to adjust the icon I have never realized the distance between phoneNumber and phoneNumber. If you have realized it, please leave me a message. Thank you.
Configured through universalStyle, the official website is like this. For my own configuration, see the code above.
{


    "fullScreen": false, // 是否全屏显示,默认值: false
    "backgroundColor": "#ffffff",  // 授权页面背景颜色,默认值:#ffffff
    "backgroundImage": "", // 全屏显示的背景图片,默认值:"" (仅支持本地图片,只有全屏显示时支持)
    "icon": {


        "path": "static/xxx.png", // 自定义显示在授权框中的logo,仅支持本地图片 默认显示App logo
        "width":  "60px",  //图标宽度 默认值:60px
        "height": "60px"   //图标高度 默认值:60px
    },
    "closeIcon": {


        "path": "static/xxx.png" // 自定义关闭按钮,仅支持本地图片。 HBuilderX3.3.7+版本支持
    },
    "phoneNum": {


        "color": "#202020"  // 手机号文字颜色 默认值:#202020
    },
    "slogan": {


        "color": "#BBBBBB"  //  slogan 字体颜色 默认值:#BBBBBB
    },
    "authButton": {


        "normalColor": "#3479f5", // 授权按钮正常状态背景颜色 默认值:#3479f5
        "highlightColor": "#2861c5",  // 授权按钮按下状态背景颜色 默认值:#2861c5(仅ios支持)
        "disabledColor": "#73aaf5",  // 授权按钮不可点击时背景颜色 默认值:#73aaf5(仅ios支持)
        "textColor": "#ffffff",  // 授权按钮文字颜色 默认值:#ffffff
        "title": "本机号码一键登录", // 授权按钮文案 默认值:“本机号码一键登录”
        "borderRadius": "24px"	// 授权按钮圆角 默认值:"24px" (按钮高度的一半)
    },
    "otherLoginButton": {


        "visible": true, // 是否显示其他登录按钮,默认值:true
        "normalColor": "", // 其他登录按钮正常状态背景颜色 默认值:透明
        "highlightColor": "", // 其他登录按钮按下状态背景颜色 默认值:透明
        "textColor": "#656565", // 其他登录按钮文字颜色 默认值:#656565
        "title": "其他登录方式", // 其他登录方式按钮文字 默认值:“其他登录方式”
        "borderColor": "",  //边框颜色 默认值:透明(仅iOS支持)
        "borderRadius": "0px" // 其他登录按钮圆角 默认值:"24px" (按钮高度的一半)
    },
    "privacyTerms": {


        "defaultCheckBoxState":true, // 条款勾选框初始状态 默认值: true
        "isCenterHint":false, //未勾选服务条款时点击登录按钮的提示是否居中显示 默认值: false (3.7.13+ 版本支持)
        "uncheckedImage":"", // 可选 条款勾选框未选中状态图片(仅支持本地图片 建议尺寸 24x24px)(3.2.0+ 版本支持)
        "checkedImage":"", // 可选 条款勾选框选中状态图片(仅支持本地图片 建议尺寸24x24px)(3.2.0+ 版本支持)
        "checkBoxSize":12, // 可选 条款勾选框大小
        "textColor": "#BBBBBB", // 文字颜色 默认值:#BBBBBB
        "termsColor": "#5496E3", //  协议文字颜色 默认值: #5496E3
        "prefix": "我已阅读并同意", // 条款前的文案 默认值:“我已阅读并同意”
        "suffix": "并使用本机号码登录", // 条款后的文案 默认值:“并使用本机号码登录”
        "privacyItems": [  // 自定义协议条款,最大支持2个,需要同时设置url和title. 否则不生效
            {


                "url": "https://", // 点击跳转的协议详情页面
                "title": "用户服务协议" // 协议名称
            }
        ]
    },
    "buttons": {

      // 自定义页面下方按钮仅全屏模式生效(3.1.14+ 版本支持)
        "iconWidth": "45px", // 图标宽度(高度等比例缩放) 默认值:45px
        "list": [
            {


                "provider": "apple",
                "iconPath": "/static/apple.png" // 图标路径仅支持本地图片
            },
            {


                "provider": "weixin",
                "iconPath": "/static/wechat.png" // 图标路径仅支持本地图片
            }
        ]
    }
}
I encountered an error here. The prefix of this interface in the cloud function is underfiend, which caused it to not be found. The code in the cloud function index.js was written by someone else before. After I printed it, I found that the event only returned two parameters, access_token. and openid, there is no event.serversUrl parameter, so the undefined code displayed is

changed to:
exports.main = async (event, context) => {


//登录Dcloud账号,左侧选择一键登录,点击基础配置,取ApiKey和ApiSecret的值
	const res = await uniCloud.getPhoneNumber({


	appid: '_xxxxA3', // 替换成自己开通一键登录的应用的DCloud appid
		provider: 'univerify',
		apiKey: '对应的apiKey',
		apiSecret: '对应的apiSecret',
		access_token: event.access_token,
		openid: event.openid
	})
return {


			code: 0,
			message: '获取手机号成功',
			data:res
		}

}
Then after the call is successful, the data format will be returned like this

All we need is the complete mobile phone number

. Call uni.login on your own page, uniCloud.callFunction({}).then((dataRes=>{ console.log('Parameters returned by the cloud function', dataRes) })) , you can get it after printing:
{


    "result": {


        "code": 0,
        "message": "获取手机号成功",
        "data": {


            "code": 0,
            "success": true,
            "phoneNumber": "1510000xxxx"
        }
    }
}
Let’s talk about a little detail. If you want to print and see the results in the cloud function, you must right-click the cloud function and select Upload Deployment. Otherwise, the cloud function will not be updated. I just waited to see the results and tried several times. Only then did I react.

Welcome to leave a message or private message to communicate~~~~