Article directory
- How to build a WordPress blog website and publish it to the public Internet?
-
- Overview
- Preparation
- 1 Install database management tools
- 2 Create a new database
- 3 Install PHP7.4
- 4. Create a new site
- 5 cpolar configuration
-
- 5.1 Reserve a second-level subdomain name in the background
- 5.2 Modify the cpolar configuration file and add a tunnel pointing to port 8080
- 5.3 Verify whether the cpolar configuration file is correct
- 6 WordPress initialization configuration
- 6.1 WordPress initialization settings
- 6.2 Customizing a theme for WordPress
- 6.4 Install WordPress relative URL plugin (required)
- Modify config.php configuration
- Summarize:
How to build a WordPress blog website and publish it to the public Internet?
Overview
Build a truly useful Web site. You can use it to write blogs, build your own corporate site, foreign trade site, etc., and publish it to the public Internet.
Preparation
Check the component dependency requirements of the current WordPress version
Visit WordPress official website: https://wordpress.org/download/
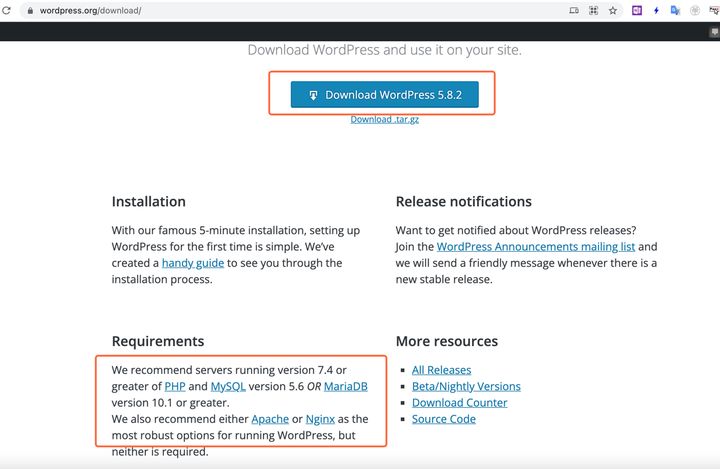
At the time of publishing this tutorial, the current latest WordPress version is 5.8.2
The red box below shows that it depends on PHP 7.4
Let’s compare the component versions in PHPStudy. Currently, PHP 7.4 is not installed and needs to be installed later. We are satisfied with everything else.
Next, we need to do the following:
- Install database management tools
- Create a database
- Install PHP 7.4
- Create a new site for WordPress
- Install and configure WordPress
1 Install database management tools
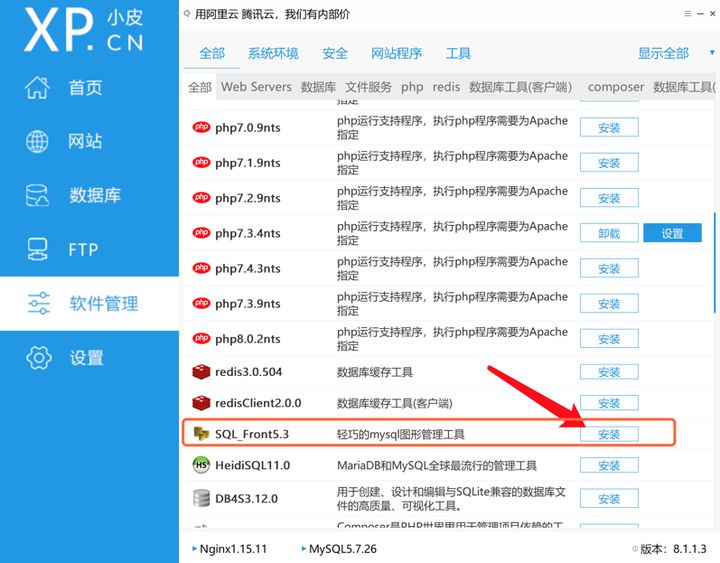
1.1 Install the graph database management tool, SQL_Front
In the PHPStudy panel - 软件管理find SQL_Front and click 安装the button
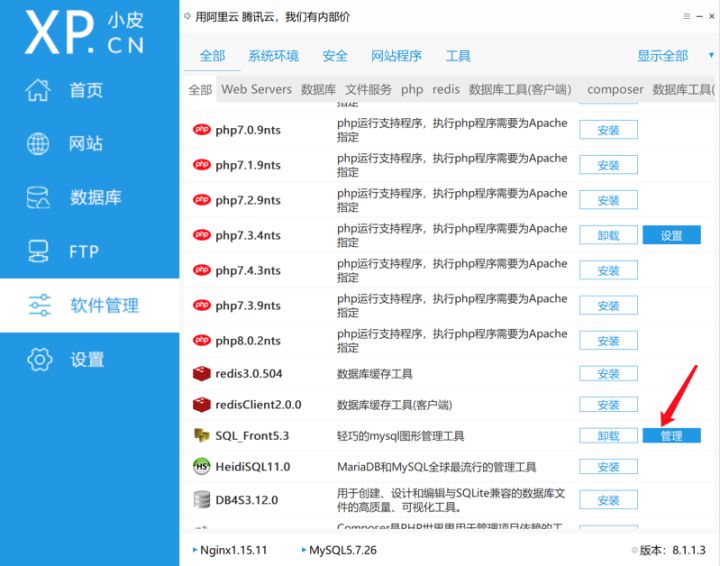
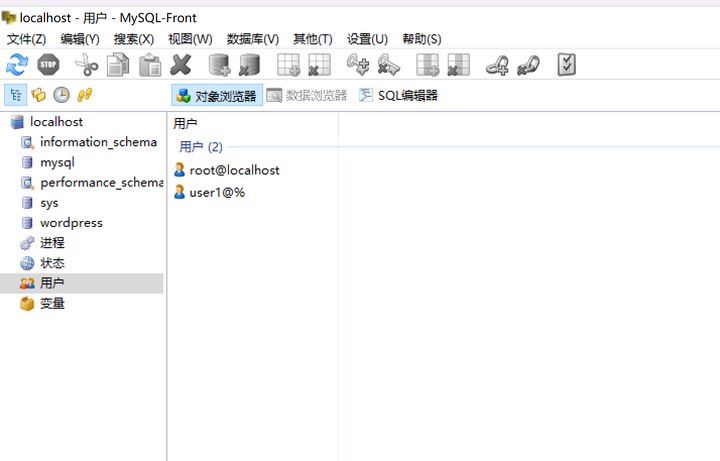
After installation, click 管理the button to open the database tool
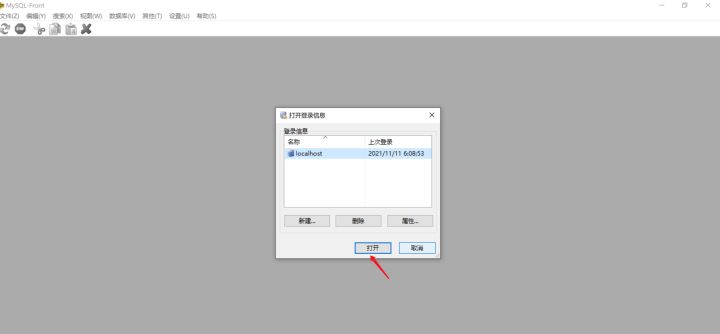
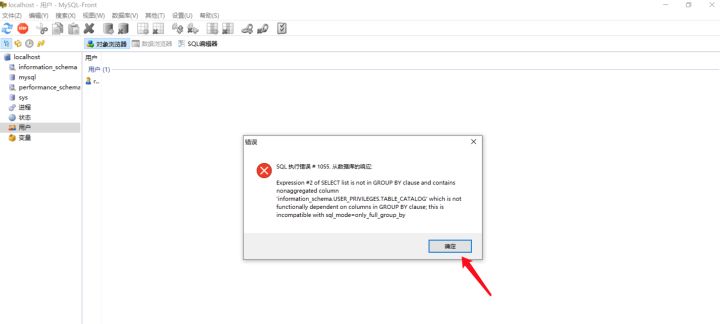
Select localhostthe local database and click 打开the button
If there is an error message, just click 确认and ignore it, it will not affect it.
2 Create a new database
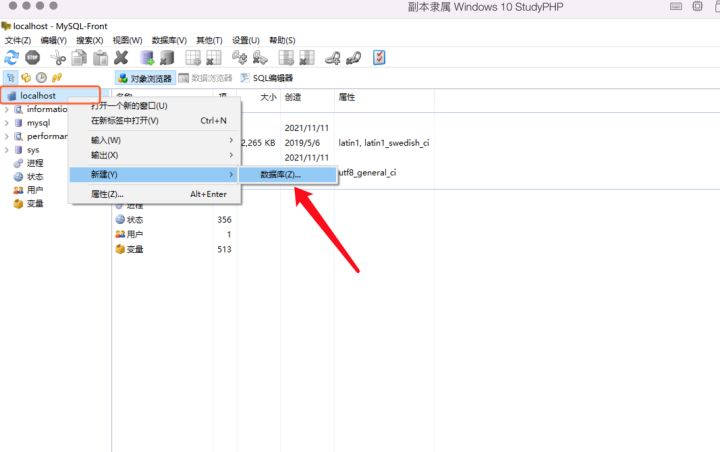
2.1 Create database
Right-click on localhost and select 新建–数据库
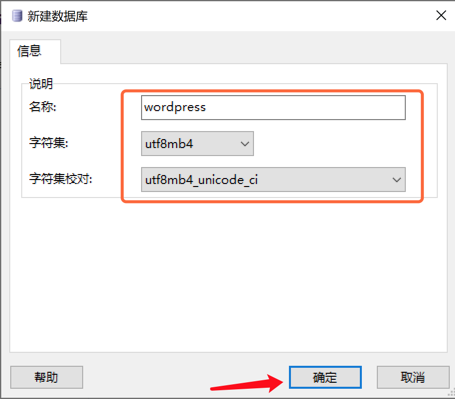
The database name can be customized, fill it in as follows:
Database name: wordpressCharacter set: utf8mb4Character set Varsity:utf8mb4_unicode_ci
After that, click on 确认the button.
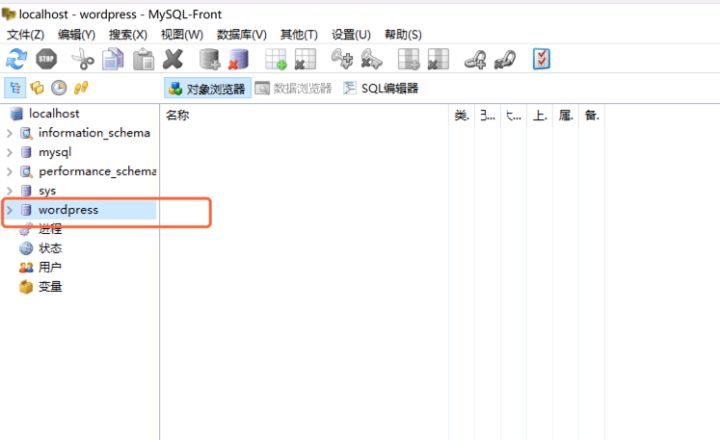
Database created successfully.
2.2 Create a user for the database
For security reasons, we create a separate username and password for the WordPress database to manage it instead of using the root account.
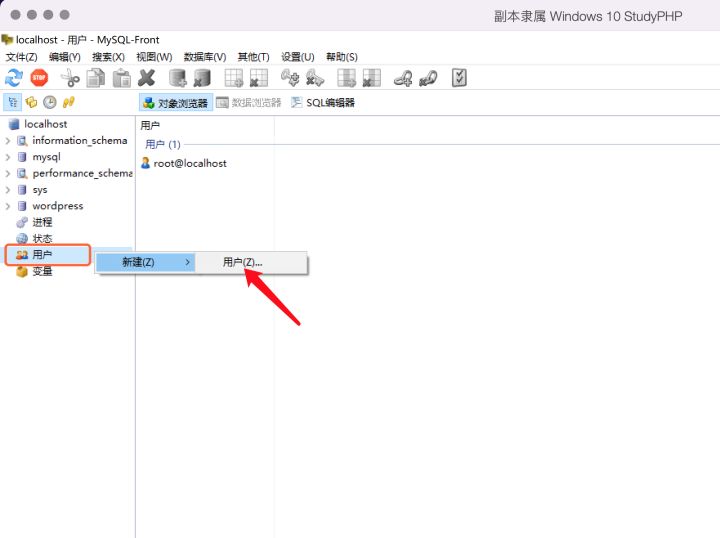
Right-click to 用户bring up the menu and select 新建–用户
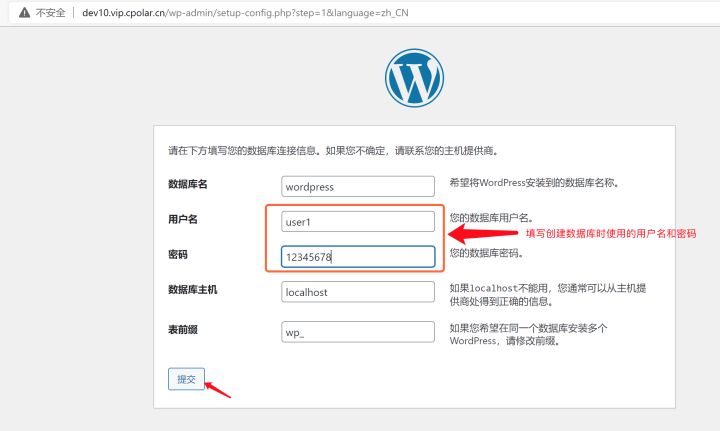
In this example, we create a simple username user1, password: 12345678
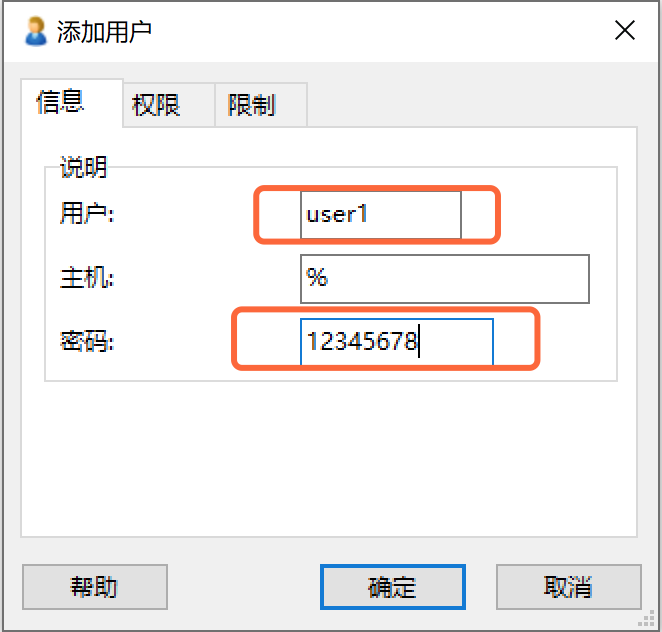
Note: This example is for teaching demonstration. The username and password are simple. In a production environment, you should create more complex usernames and passwords.
Select 权限the column, add permissions for the user, 赋予权限select the database, specify the wordpress database, and then check all permissions on the right. This user can only control the wordpress database and cannot read or write other databases.
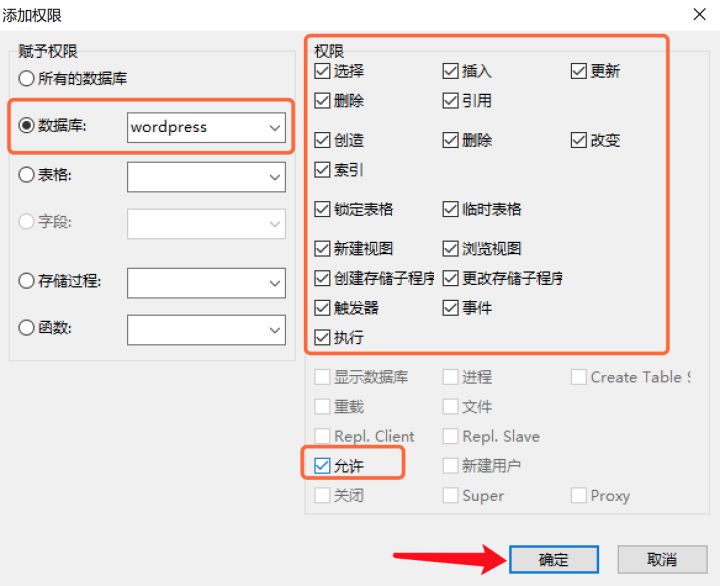
Select the configured WordPress permissions and click 确定the button.
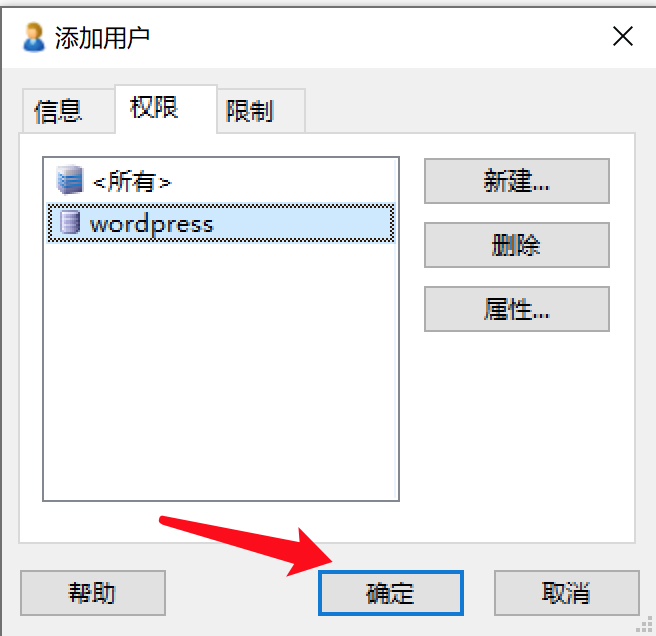
After adding it, it will look like the picture below:
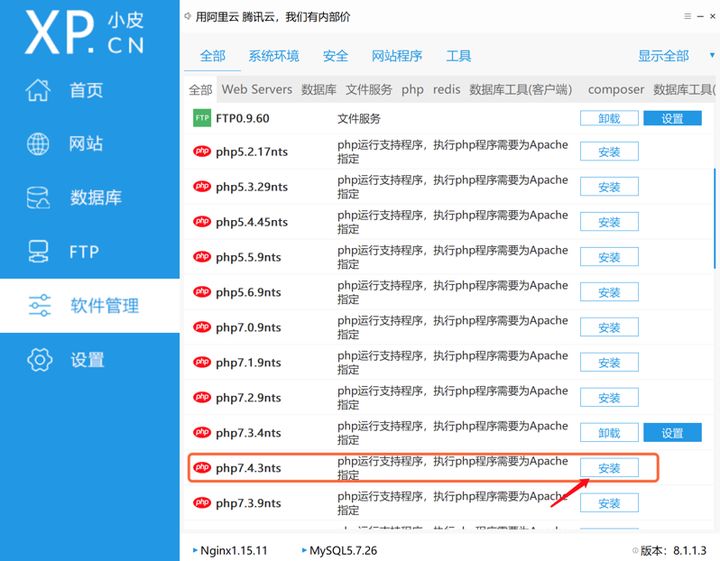
3 Install PHP7.4
In the PHPStudy admin panel – 软件管理php7.4.3nts, click 安装.
4. Create a new site
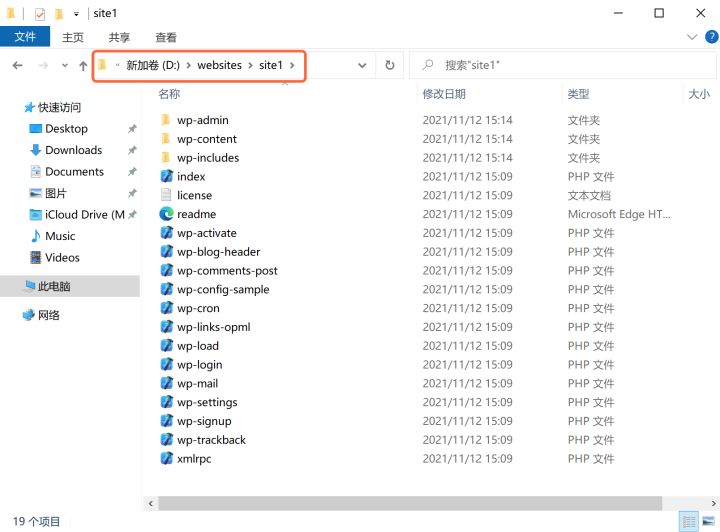
4.1 Create the site root directory
We create a websites directory on the D drive, and then create a site1 directory below as the root directory of this wordpress site, as shown in the figure:
4.2 Visit the WordPress official website and download the latest version of the compressed package
Download address: https://wordpress.org/latest.zip
After downloading, unzip and copy all file contents
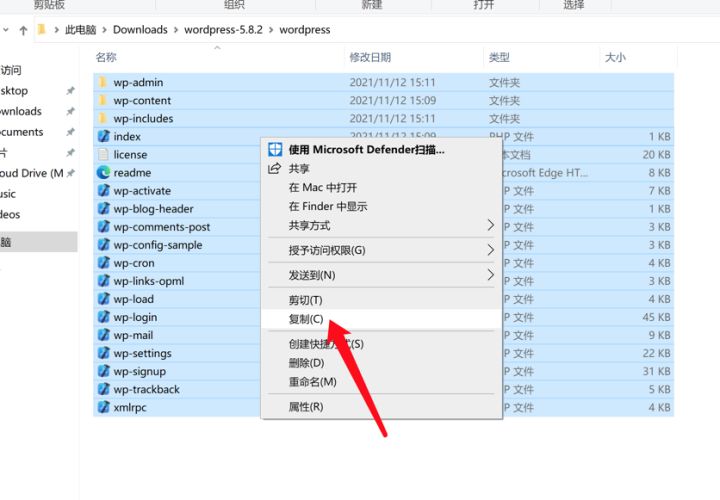
Paste it into the site1 directory, as shown below:
4.3 Create a new website
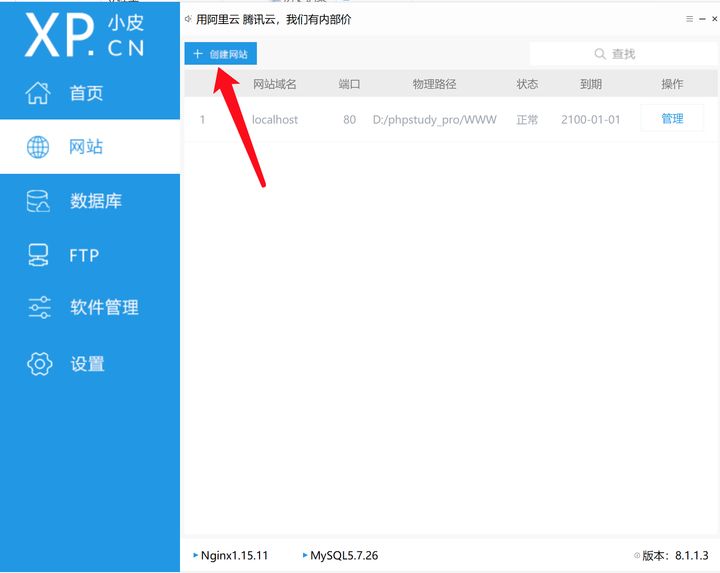
In the PHPStudy panel – website – click 创建网站the button
Configure as shown below:
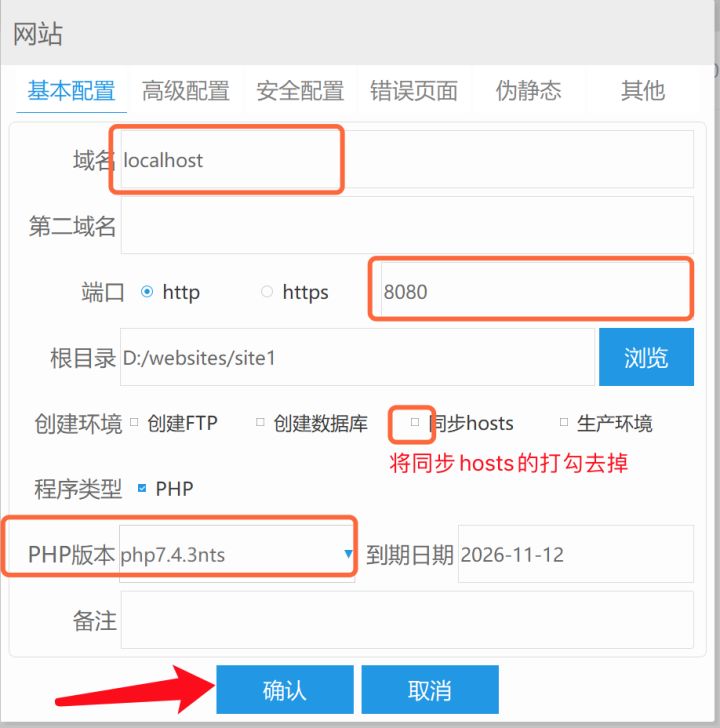
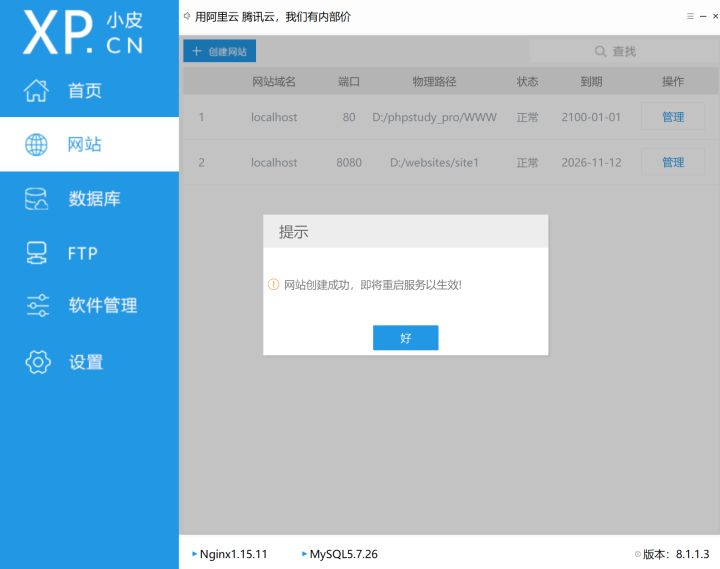
We created a new site on this machine, port 8080. As shown below:
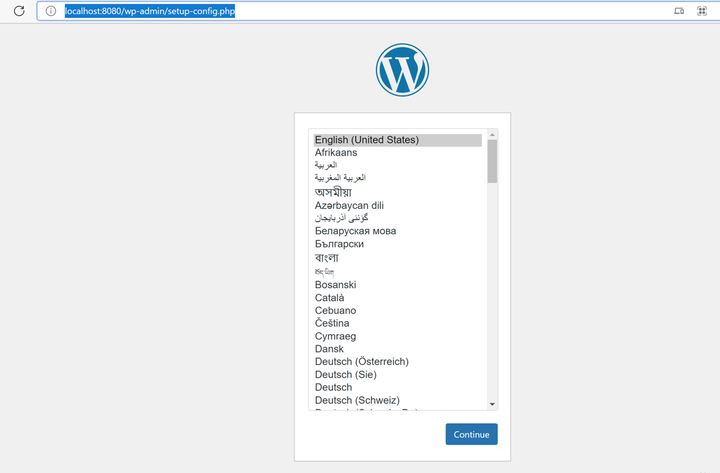
4.4 Open the browser and test it
http://localhost:8080/ , as shown below, proves that the new website is successfully created.
5 cpolar configuration
If you have not installed cpolar before, please refer to the "Part 1" tutorial of this series.
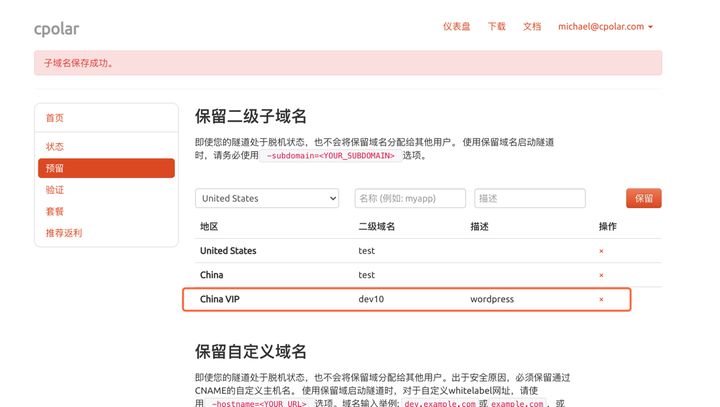
5.1 Reserve a second-level subdomain name in the background
cpolar background – reserved – reserved second-level subdomain name, in this example: Second-level subdomain name: dev10 (you can configure it differently) Region: Select China VIP(cn_vip) Description: wordpress (optional)
As shown below:
5.2 Modify the cpolar configuration file and add a tunnel pointing to port 8080
Using VS Code, open the cpolar configuration file
In this example, the path of the configuration file is: C:\Users\michael.cpolar\cpolar.yml
Open style:
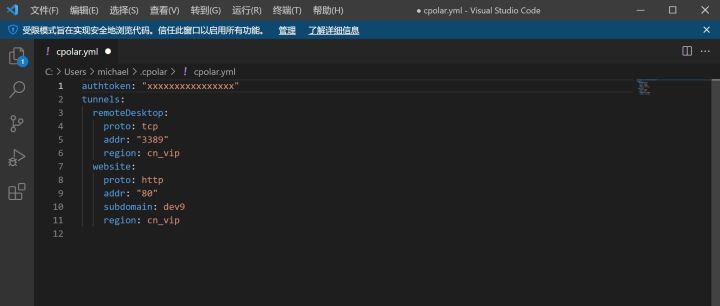
At the end of the configuration file, we add a new tunnel with the tunnel name wordpress, pointing to port 8080, the second-level subdomain name is dev10, and the region is cn_vip, as follows:
wordpress:
    proto: http
    addr: "8080"
    subdomain: dev10  #这里改为您自己的二级子域名
    region: cn_vip
The modified configuration file is as shown below:

Note: The ymal format is indent-sensitive. Note that the indentation of the WordPress tunnel is consistent with the indentation of the above demo site website.
If the indentation is inconsistent, please adjust it appropriately.
After making changes, save the file.
5.3 Verify whether the cpolar configuration file is correct
Open a command line window as administrator
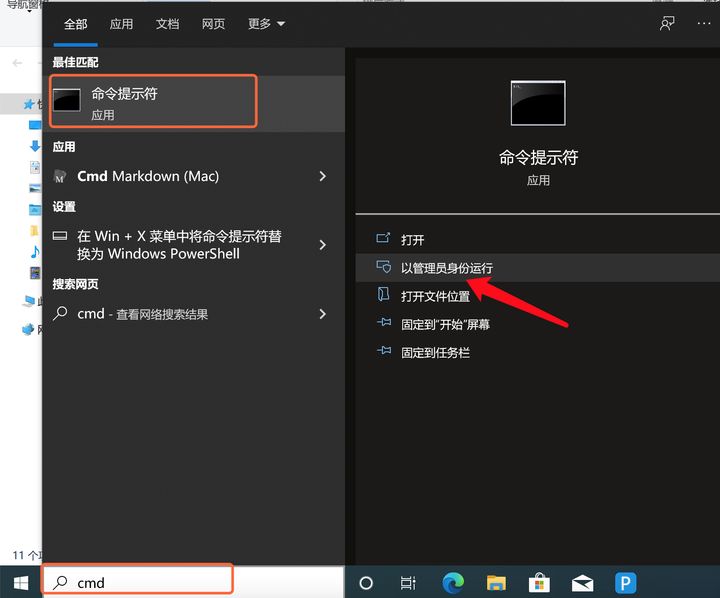
Turn off the cpolar service in the background
cpolar service stop
Run cpolar in the foreground, and use start-all as the subcommand, which means to start all tunnels in the configuration file to test whether the configuration file is correct.
cpolar start-all
If the following picture is displayed, the configuration file is correct.

Press CTRL+C to turn off the foreground cpolar
Start the background cpolar service
cpolar service start
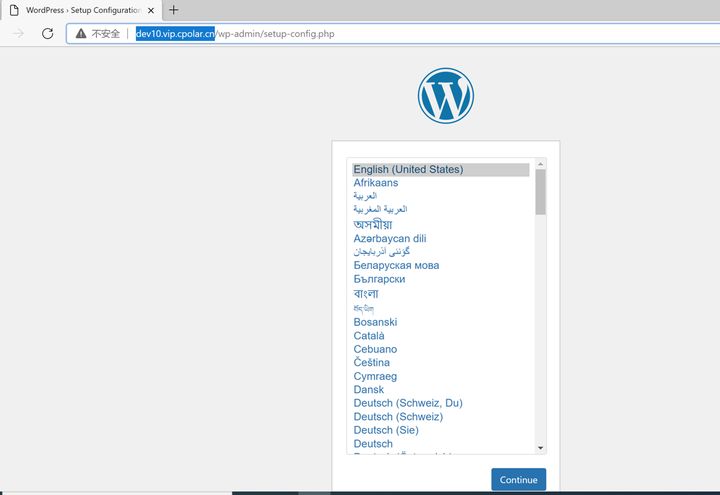
Let’s open the browser and test http://dev10.vip.cpolar.cn/
If the following picture is displayed as well, it means that the public network domain name is configured successfully.
6 WordPress initialization configuration
6.1 WordPress initialization settings
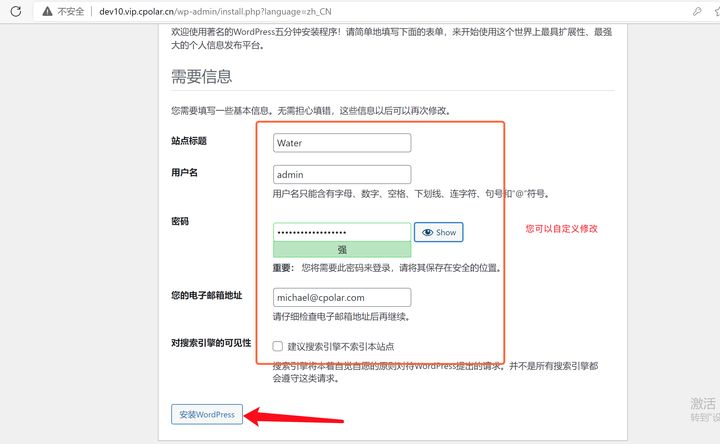
Now let’s start with WordPress initialization setup
Select 中文简体, press 继续button

Here use the database account and password created earlier
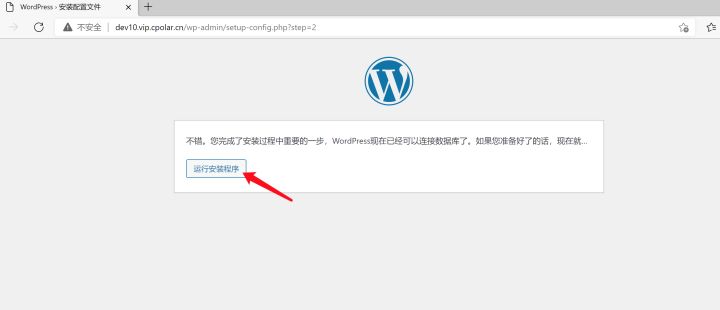
Here you can customize the configuration according to your preferences, click安装WordPress
After successful installation, jump to the WordPress backend control panel
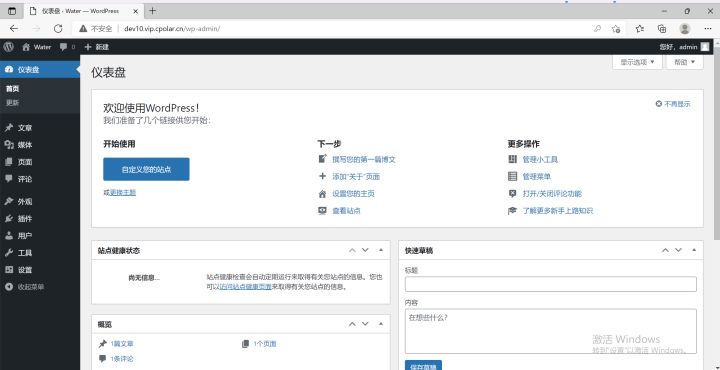
WordPress installed successfully!
6.2 Customizing a theme for WordPress
WordPress is very customizable. By clicking on your site name in the WordPress banner at the top of the page (when you are logged in) you will be taken to the dashboard. From there, you can change themes, add pages and posts, edit menus, add plugins, and more. This is just a taster for setting up some fun stuff on the Raspberry Pi's web server.
Next, let’s try changing a theme.
WordPress Dashboard –> 外观–>主题
Click 安装主题the button as shown below:
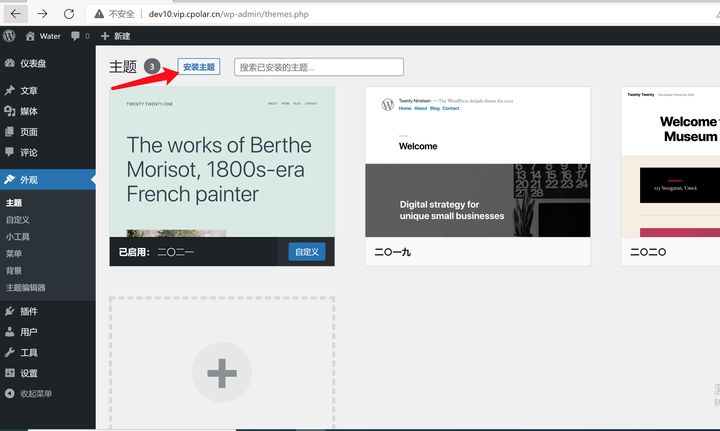
Click 热门, select a theme you like, and click 安装the button
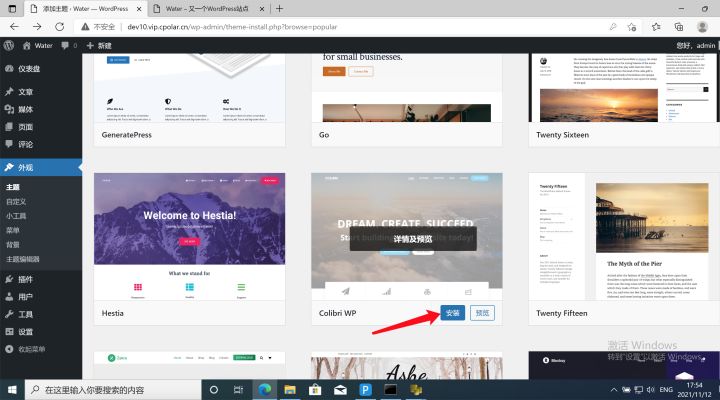
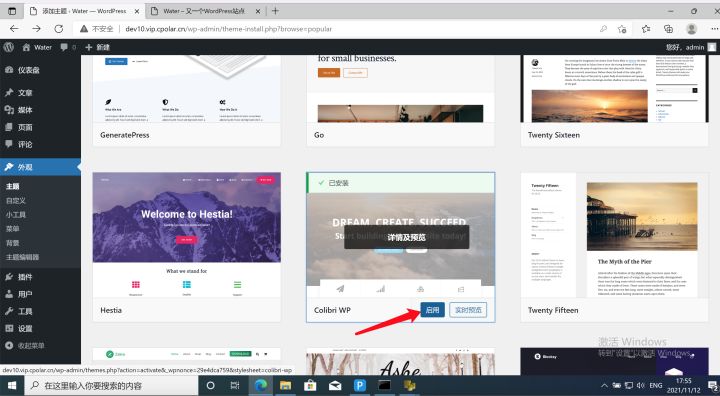
After the theme is installed successfully, click 启用the button.
Open a new browser window and open http://dev10.vip.cpolar.cn/
Let’s take a look at what the new theme looks like.

Congratulations! Our new blog site has been basically created successfully!
6.4 Install WordPress relative URL plugin (required)
You must ensure that WordPress publishes as relative URLs, otherwise you will get an error when accessing using https addresses.
You can do this by installing one of the following plugins
Plugin:
In this example, we install Relative URLthe plugin:
- Login to WordPress
仪表盘–>插件–>安装插件

- Enter in the keyword search bar and press
Relative URLEnter
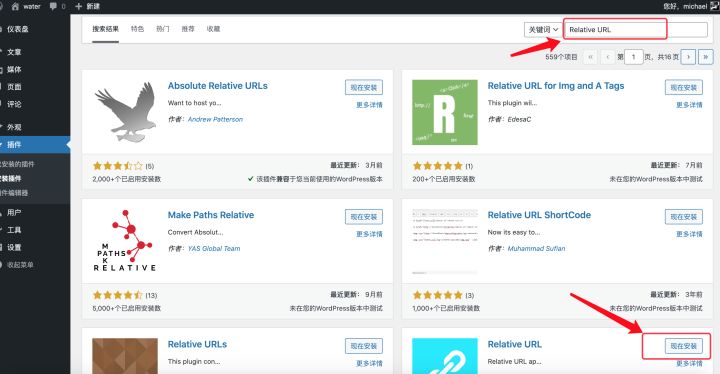
- After finding the plug-in, click
现在安装the button - When the installation is successful, click
启用the button to activate the plug-in.
Modify config.php configuration
You have to make sure WordPress understands that it is meant to be served through the tunnel hostname. You can configure WordPress by modifying wp-config.php to include the following line:
define('WP_SITEURL', 'http://' . $_SERVER['HTTP_HOST']);
define('WP_HOME', 'http://' . $_SERVER['HTTP_HOST']);
- Modify the wp-config.php file. Open the wp-config.php file in the root directory of the website, add the above items, and save it.
After configuration, it looks like this:

Now, our blog site can be accessed normally by the public network! Let's see the effect:
Use https address to access: https://dev10.vip.cpolar.cn/
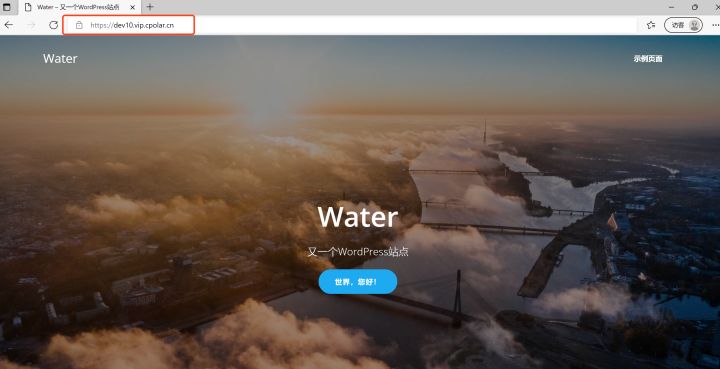
Looking at the beautiful little lock in the red frame, I feel much better now. ^ ^
We have successfully set up a WordPress site.
Summarize:
We have created a new website, installed and configured the latest version of wordpress, configured a public network tunnel, a second-level subdomain name, and configured a theme style for the new site. You have a blog site of your own, and you can write blogs. Start your own self-media journey.
In the following tutorials, we will continue to improve the configuration of the WordPress site and configure SSL for it. If you like it, please share it with your friends and pay attention to subsequent chapters.
Welcome to learn more about cpolar
Reprinted from cpolar pole cloud article: How to build a WordPress blog website and publish it to the public Internet?