
Introduction: K6 is a modern open source software load testing tool designed to help developers and testers quickly and effectively test the load capacity of their websites and applications.
The feature of K6 is that it has powerful real-time performance data monitoring function, and it is easy to use and configure. When using K6 for load testing, developers and testers can easily simulate thousands of users visiting the target website at the same time, so as to test the load capacity, performance and stability of the website. It is considered one of the most popular and powerful open source load testing tools out there.
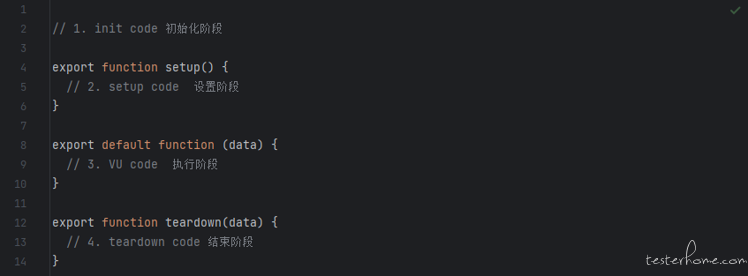
Before writing test scripts, let's understand the four stages of the K6 test life cycle.
The test script runs the four phases in the same order:
-
Preparation phase : initialize the code in the context, such as referencing modules, loading files, and defining test lifecycle functions;
-
Setup phase : run the setup function, which is usually used to set up the test environment and generate data;
-
Execution stage : virtual user operation This part of code is located in the default function or scene function, and simulates the operation of the virtual user according to the definition of the option;
-
End phase : Run the teardown function, which is usually used for cleaning operations after virtual users end. Close connections, release resources, clean up data, etc.
-
init will be executed once per VU (vu means virtual user)
-
setup is executed only once before the test starts
-
The vu code is executed once every iteration, according to the test option
-
teardown is executed only once after the test is over, where setup and teardown are optional functions
K6 test script structure
K6 test scripts follow the JavaScript modular structure. Each test script needs to have one or more functions that define test scenarios, user behavior, performance metrics, etc.
The following is an example of a typical K6 test script structure:
// 导入所需的模块import http from 'k6/http';import { sleep, check } from 'k6';// 配置测试参数export let options = {
    vus: 10,            // 虚拟用户数
    duration: '30s',    // 持续时间};// 定义测试场景export default function () {
    // 用户行为逻辑
    let response = http.get('https://testerhome.com/');

    // 断言检查
    check(response, {
        '请求响应码是否为200': (r) => r.status === 200,
    });

    // 模拟用户等待时间
    sleep(1);}
The K6 test script is divided into several parts:
-
Reference module : Use the import statement to refer to the modules provided by K6, such as http is used to send HTTP requests, and sleep is used to simulate user waiting.
-
Configure test parameters : use the options variable to define test configuration parameters, such as the number of virtual users (vus), etc.
-
Define test scenarios : use export default function to define test scenario functions. Here, write the behavioral logic of simulating users, including sending requests, processing responses and simulating waiting.
-
Assertion checks : Use the check function to define assertion checks to verify that the response to a request satisfies certain conditions. In the example, we check if the status code of the response is 200.
-
Simulate user waiting time : Use the sleep function to simulate the waiting time between virtual users to control the concurrency of virtual users.
Request and Response Handling
Let's make two virtual interface services first, which is convenient for us to call and test later. Here, Flask is used to build a get interface and a post interface.
from flask import Flask,requestfrom gevent import pywsgiimport jsonapp=Flask(__name__)app.config['JSON_AS_ASCII'] = [email protected]("/getdemo",methods=["GET"])def getdemo():
name = request.args.get('name')
# 就认返回内答 return_dic= {'return_code':'200','message': name + ' hello k6'}
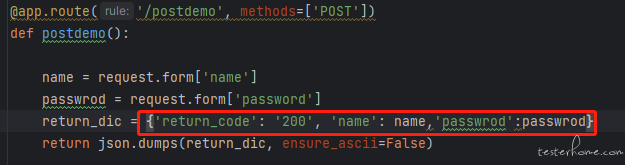
return json.dumps(return_dic, ensure_ascii=False)@app.route('/postdemo', methods=['POST'])def postdemo():
name = request.form['name']
passwrod = request.form['password']
return_dic = {'return_code': '200', 'name': name,'passwrod':passwrod}
return json.dumps(return_dic, ensure_ascii=False)if __name__ == '__main__':
server = pywsgi.WSGIServer(('0.0.0.0',5000),app)
server.serve_forever()Initiate a get request
import http from 'k6/http';export default function () {//发送 GET 请求
    let response = http.get('http://localhost:5000/getdemo?name=TesterHome');
    console.log('响应正文:', response.body);
    console.log('响应码:', response.status);
    console.log('获取返回json中的message:', response.json( 'message' ));
console.log('请求响应时间:', response.timings);}-
First, the K6/http module is referenced for sending http requests,
-
Use the http.get() method to initiate a request to the getdemo interface
-
Finally, output the response body, response code, message in the body, and request response time
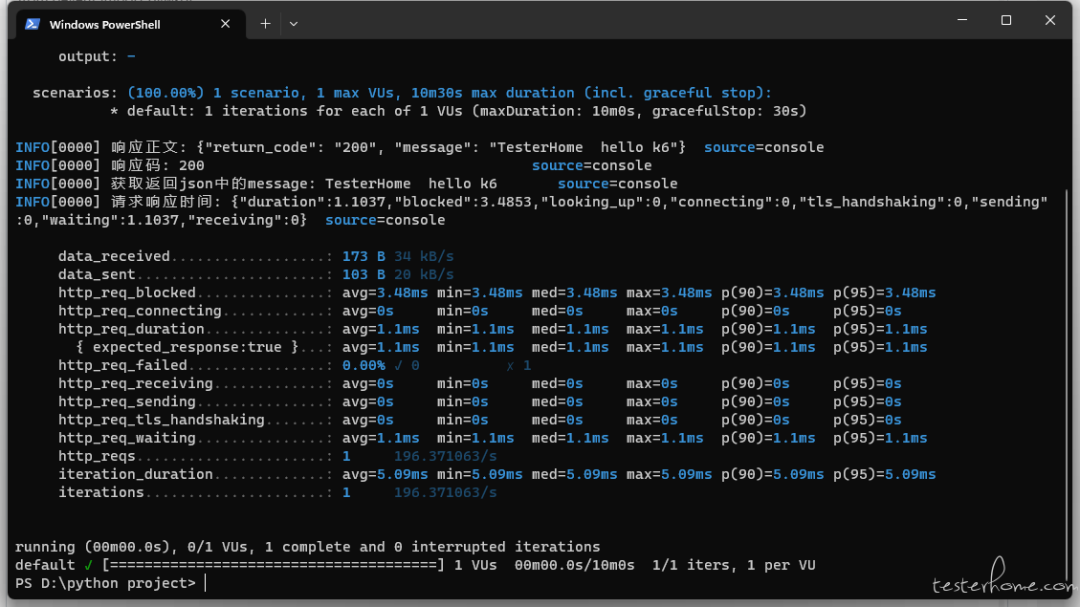
Take a look at the execution results together:
Initiate a post request
import http from 'k6/http';export default function () {// 发送 POST 请求
    let data = {
    name: 'TesterHome' ,
    password:'TesterHomePasswrod'
    };

    let response = http.post('http://localhost:5000/postdemo', data);
    console.log('响应正文:', response.body);
    console.log('获取返回json结果中的name节点:', response.json().name);
    console.log('请求响应时间:', response.timings);}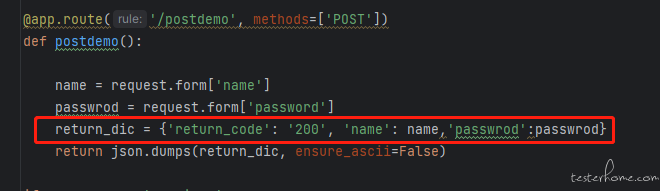
-
Reference the K6/http module for sending http requests
-
Defines the request parameter object data
-
Use the http.post() method with request parameters to initiate a request to the postdemo interface we defined earlier
-
Finally output the response body, request response time, and the returned json result to read the name node value
Results of the:
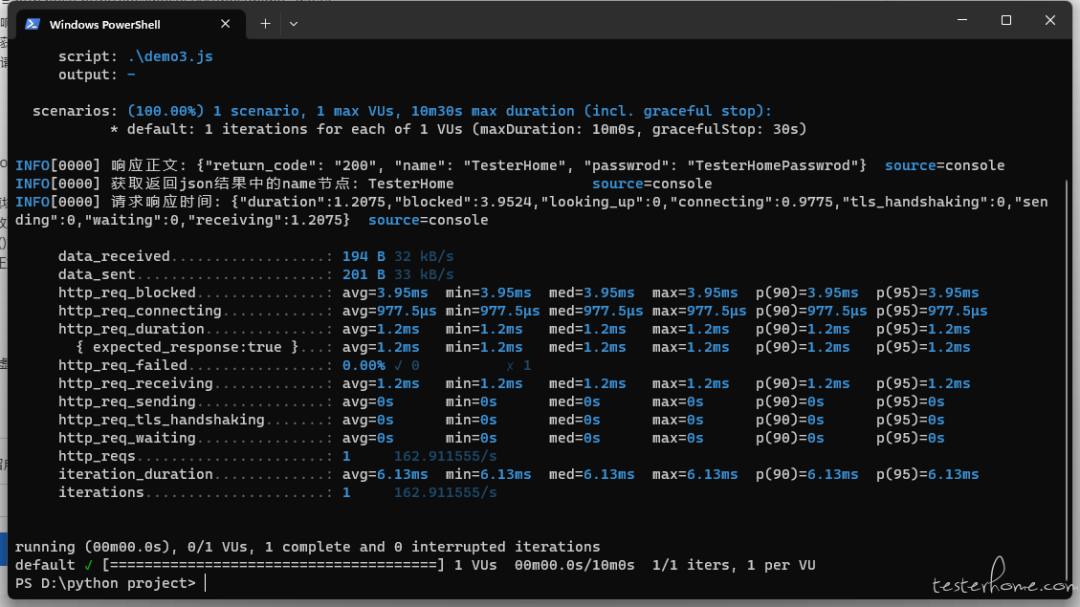
The return is consistent with the return of our defined virtual interface, and the name and password are also assigned as the parameters we passed in.
Set the number and duration of virtual users
Specify the number and duration of virtual users by setting configuration options.
import http from 'k6/http';// 配置选项export let options = {
    vus: 2,         // 虚拟用户数量
    duration: '3s', // 持续时间};export default function () {// 发送 GET 请求
    let response = http.get('http://localhost:5000/getdemo?name=TesterHome');

    console.log('响应正文:', response.body);
    console.log('响应码:', response.status);
    console.log('获取返回json中的message:', response.json( 'message' ));
    console.log('请求响应时间:', response.timings);}
The configuration options in the options object can be used to define the behavior of the test, performance parameters and other settings
-
Vus: Indicates the number of virtual users
-
Duration: Indicates the duration
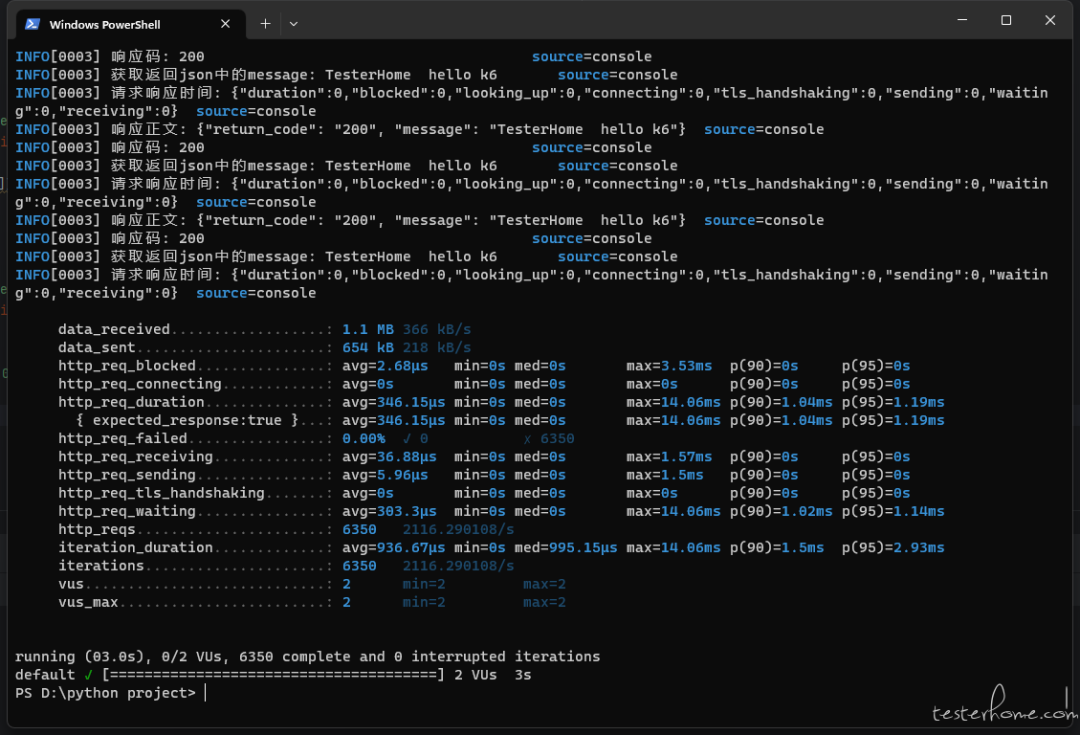
In this example, 2 virtual users are provisioned and the test script is run continuously for 3 seconds.
Virtual users and duration can be adjusted as needed to meet performance testing needs
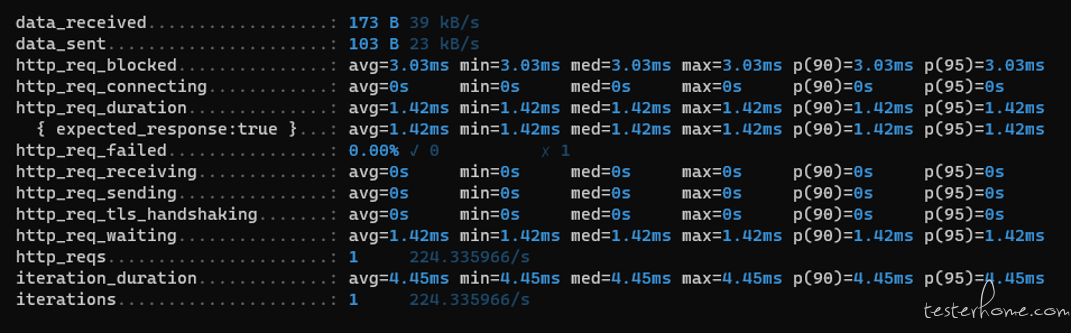
Execute tests and generate reports
-
data_received: the total amount of data received
-
data_sent: the total amount of data sent
-
http_req_blocked: Request waiting time, that is, the time when the request is blocked
-
http_req_connecting: request connection time
-
http_req_duration: The total time of the request, equal to http_req_sending + http_req_waiting + http_req_receiving
-
http_req_failed: number of failed requests
-
http_req_receiving: Response receiving time
-
http_req_sending: request sending time
-
http_req_waiting: Waiting for server response time
-
http_reqs: number of requests sent during test execution
-
iteration_duration: the duration of each test iteration
-
iterations: The total number of test iterations executed. Each test script loop runs as an iteration
Output granular data in JSON format
by command
k6 run --out json=test_results.json **.jsGenerate granular data in json format.
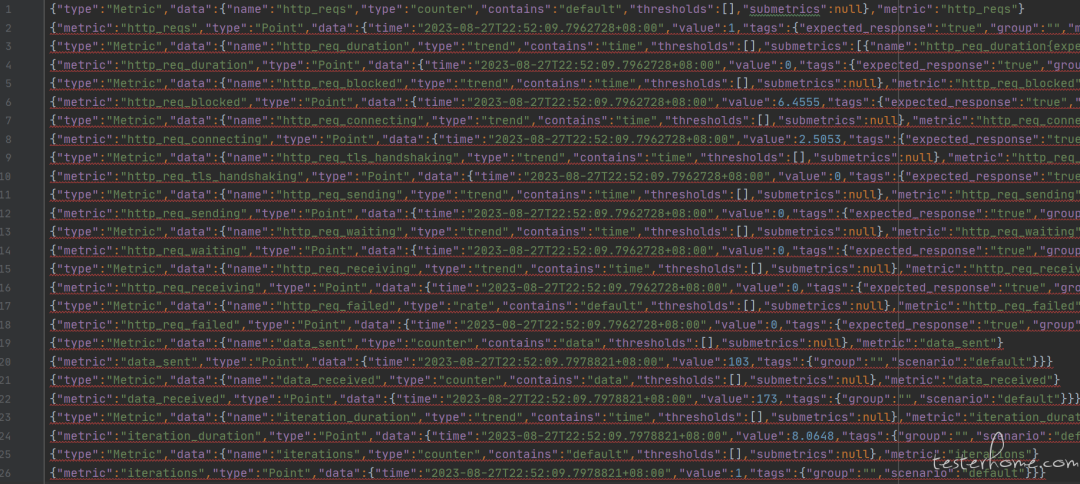
Each row either contains information about the metric or records a data point (sample) for the metric
A row consists of three items:
-
type - has the value Metric or Point, where Metric means to declare a metric and Point is the actual data point (sample) of the metric.
-
data - the data collection.
-
metric - the name of the metric.
In the future, you can also combine the function of tags to develop customized reports for json data.
Generate easy-to-read html reports
You can use the three-party library k6-reporter to assist in generating html test reports. Let's see how to use it.
import http from 'k6/http';//引入 k6-reporter三方库import { htmlReport } from "https://raw.githubusercontent.com/benc-uk/k6-reporter/main/dist/bundle.js";export default function () {

    // 发送 GET 请求
        let response = http.get('http://localhost:5000/getdemo?name=TesterHome');

        console.log('响应正文:', response.body);
        console.log('响应码:', response.status);
        console.log('获取返回json中的message:', response.json( 'message' ));
        console.log('请求响应时间:', response.timings);}//使用handleSummary 将聚合数据传入htmlReposr,转换生成result.htmlexport function handleSummary(data) {
  return {
    "result.html": htmlReport(data),
  };}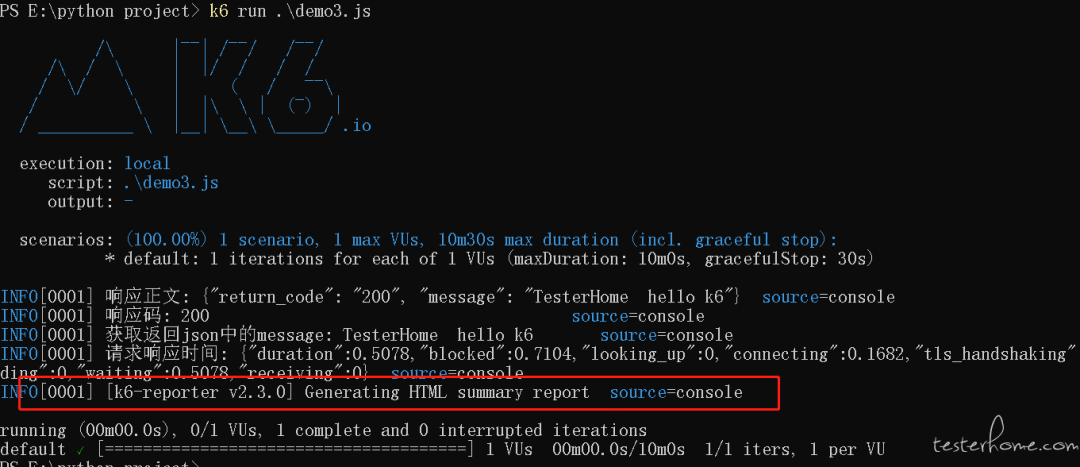
Run the script to generate the result.html page.

You can also use handleSummary to convert data to any text format file, such as: JSON, HTML, XML, etc.
Combined with the label function, it is possible to better develop customized reports on the data.
Finally: The complete software testing video tutorial below has been sorted out and uploaded, and friends who need it can get it by themselves [Guaranteed 100% free]

Software Testing Interview Documentation
We must study to find a high-paying job. The following interview questions are the latest interview materials from first-tier Internet companies such as Ali, Tencent, and Byte, and some Byte bosses have given authoritative answers. Finish this set The interview materials believe that everyone can find a satisfactory job.

