This project is an undergraduate coursework and is for reference only. If you have any questions or suggestions, please communicate with the author
Article Directory
foreword
TCP连接:Socket套接字基础知识
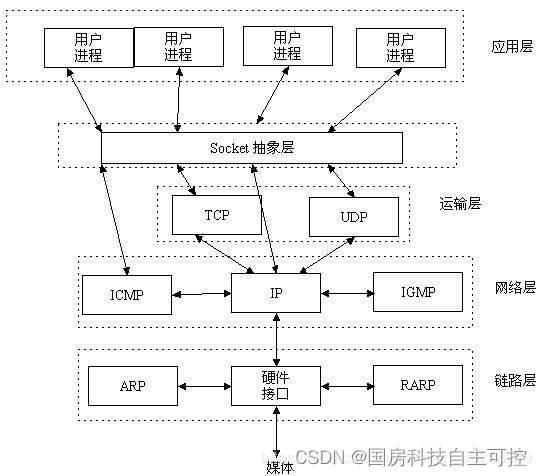
TCP (Transmission Control Protocol Transmission Control Protocol) regards connection as the most basic abstraction . Many characteristics of TCP are related to the basic characteristic that TCP is connection-oriented. So we need to have a clearer understanding of TCP connections.
Every TCP connection has two endpoints .
So what is the endpoint of the TCP connection?
1. The endpoint of the TCP connection
The end point of the TCP connection is not the IP address of the host, not the application process, nor the protocol port of the transport layer.
TCP implements communication between two terminals, so in addition to obtaining the IP address of the target host, it also needs the corresponding application process port number Port of the target host, so the
endpoint of the TCP connection is called a socket or socket . according toRFC 793Definition: The port number is spliced to the IP address to form a socket
, so TCP uses the Socket socket as the endpoint.
套接字socket = (IP地址:端口号)
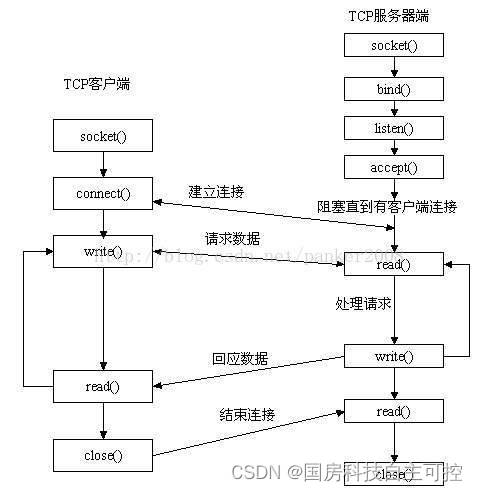
Each TCP connection is uniquely determined by the two endpoints at the two ends of the communication (that is, the socket pair). Right now:
TCP连接:: = { socket1,socket2 } = { (IP1, Port1), (IP2, Port2) }
Here IP1 and IP2 are the IP addresses of the two endpoint hosts respectively , and Port1 and Port are the port numbers in the two endpoint hosts respectively
One understanding is that Socket is an implementation of this mode: that is, socket is a special file, and some socket functions are operations on it (read/write IO, open, close).
TCP/IP and Socket detailed reference materials
2. Code Analysis
code structure
(1) Header file
1.client.h
Mainly include some libraries, define some functions, and create socket objects.
The code is as follows:
#ifndef CLIENT_H
#define CLIENT_H

#include <QMainWindow>
#include <QTcpSocket>
#include <QKeyEvent>
#include <QWidget>

namespace Ui {


class Client;
}

class Client : public QMainWindow
{


    Q_OBJECT

public:
    explicit Client(QWidget *parent = nullptr);
    ~Client();

private slots:
    void on_connect_button_clicked(bool checked);

    void on_send_button_clicked();

    void readyRead_SLOT();

    void connected_SLOT();

private:
    Ui::Client *ui;
    QTcpSocket *socket;
};

#endif // CLIENT_H
2.server.h
code show as below:
#ifndef SERVER_H
#define SERVER_H

#include <QMainWindow>
#include <QTcpServer>
#include <QTcpSocket>
#include <QString>

QT_BEGIN_NAMESPACE
namespace Ui {

     class Server; }
QT_END_NAMESPACE

class Server : public QMainWindow
{


    Q_OBJECT

public:
    Server(QWidget *parent = nullptr);
    ~Server();

private slots:
    void on_send_button_clicked();

    void on_startorstop_Listen_clicked(bool checked);

    void readyRead_SLOT();

    void newConnection_SLOT();

private:
    Ui::Server *ui;
    QTcpSocket *socket;
    QTcpServer *server;
};
#endif // SERVER_H
(2) Source files
1、client.cpp
Mainly include some libraries, define some functions, create socket and server objects
#include "client.h"
#include "ui_client.h"
#include "stdio.h"

#include "QString"

Client::Client(QWidget *parent) :
    QMainWindow(parent),
    ui(new Ui::Client)
{


    ui->setupUi(this);
    //设置clicked(bool checked)点击反转状态打开
    ui->connect_button->setCheckable(true);

    socket = new QTcpSocket();

    //信号:客户端申请连接成功 槽函数:允许写入数据
    connect(socket,SIGNAL(connected()),this,SLOT(connected_SLOT()));
}

Client::~Client()
{


    delete ui;
}

//信号:客户端申请连接成功 槽函数:允许写入数据
void Client::connected_SLOT()
{


    connect(socket,SIGNAL(readyRead()),this,SLOT(readyRead_SLOT()));//如果socket中有缓存消息,触发槽函数
}

//接收消息并显示到接收框
void Client::readyRead_SLOT()
{


    qDebug() << "Client Received!";
    QString buffer;
    //读取缓冲区数据
    buffer = socket->readAll();
    if(!buffer.isEmpty())
    {


        //刷新显示
        ui->receiver->appendPlainText(buffer);
    }
}

//连接和断开按键
void Client::on_connect_button_clicked(bool checked)
{


    if(checked)
    {


        QString IP = ui->ipnum->text();
        int Port = ui->portnum->text().toUInt();
        //取消已有的连接
        socket->abort();
        //连接服务器
        socket->connectToHost(IP,Port);
        //如果等待超过1000ms
        if(!socket->waitForConnected(1000))
        {


            qDebug() << "Connect failed, please try again later!";
            //连接失败,再次点击则重新连接,将checked恢复为true
            ui->connect_button->toggle();
            return;
        }
        qDebug() << "Connect Successfully! Connect with IP:" << IP << "; port:" << Port;
        //修改按键文字
        ui->connect_button->setText("断开连接");
        //发送键使能
        ui->send_button->setEnabled(true);
    }
    else
    {


        qDebug() << "Disconnect!";
        //断开连接
        socket->disconnectFromHost();
        //修改按键文字&发送键静默
        ui->connect_button->setText("连接");
        ui->send_button->setEnabled(false);
    }
}

//发送消息,写入socket缓存区
void Client::on_send_button_clicked()
{


    qDebug() << "Client Send: " << ui->sender->toPlainText().toLatin1();
    //将输入框的内容写入socket缓冲区
    socket->write(ui->sender->toPlainText().toLatin1());
    //刷新socket缓冲区
    socket->flush();
}
2、server.cpp
#include "server.h"
#include "ui_server.h"

Server::Server(QWidget *parent)
    : QMainWindow(parent)
    , ui(new Ui::Server)
{


    ui->setupUi(this);
    //设置clicked(bool checked)点击反转状态打开
    ui->startorstop_Listen->setCheckable(true);

    socket = new QTcpSocket();
    server = new QTcpServer();

    //信号:新的客户端连接建立 槽函数:获取客户端套接字,允许写入数据
    connect(server,SIGNAL(newConnection()),this,SLOT(newConnection_SLOT()));
}

Server::~Server()
{


    delete ui;
}

//信号:新的客户端连接建立 槽函数:获取客户端套接字,允许写入数据
void Server::newConnection_SLOT()
{


    socket = server->nextPendingConnection(); //获取已经连接的客户端套接字
    connect(socket,SIGNAL(readyRead()),this,SLOT(readyRead_SLOT()));//如果socket中有缓存消息,触发槽函数
}

//接收消息并显示到接收框
void Server::readyRead_SLOT()
{


    qDebug() << "Server Received!";
    QString buffer;
    //读取缓冲区数据
    buffer = socket->readAll();
    if(!buffer.isEmpty())
    {


        //刷新显示
        ui->receiver->appendPlainText(buffer);
    }
}


//开始监听和停止监听按键
void Server::on_startorstop_Listen_clicked(bool checked)
{


    if(checked)
    {


        int port = ui->portnum->text().toUInt();
        //如果未监听到
        if(!server->listen(QHostAddress::Any, port))
        {


            qDebug() << server->errorString();
            //连接失败,再次点击则重新连接,将checked恢复为true
            ui->startorstop_Listen->toggle();
            return;
        }
        qDebug() << "Listen Successfully! Message from port:" << port;
        //修改按钮文字
        ui->startorstop_Listen->setText("停止监听");
        //发送键使能
        ui->send_button->setEnabled(true);
    }
    else
    {


         qDebug() << "Stop Listening!";
        //如果已经连接则断开连接
        if(socket->state() == QAbstractSocket::ConnectedState)
        {


            //断开连接
            socket->disconnectFromHost();
        }
        //关闭倾听服务
        server->close();
        //修改按钮文字&发送键静默
        ui->startorstop_Listen->setText("开始监听");
        ui->send_button->setEnabled(false);
    }
}

//发送消息,写入socket缓存区
void Server::on_send_button_clicked()
{


    qDebug() << "Server Send: " << ui->sender->toPlainText().toLatin1();
    //将输入框的内容写入socket缓冲区
    socket->write(ui->sender->toPlainText().toLatin1());
    //刷新socket缓冲区
    socket->flush();
}
3、main.cpp
#include "server.h"
#include "client.h"

#include <QApplication>

int main(int argc, char *argv[])
{


    QApplication a(argc, argv);
    Server w1;
    Client w2;

    //Client窗口通过鼠标单机获得聚焦
    w2.setFocusPolicy(Qt::ClickFocus);
    //将客户端和服务端窗口移动到屏幕合适位置
    w1.move(320,340);
    w2.move(960,340);

    //打开客户端和服务端窗口
    w1.show();
    w2.show();

    return a.exec();
}
(3) UI design files
client.ui
server.ui
can be manually designed, and the corresponding text box or window, key name and code should be consistent.
(If you are too lazy to design and want to see the effect, you can directly download the source code at the bottom )


3. Summary and source code link
The comments in the code are very complete and need to be corrected. Thank you for reading. Your support is the greatest help to me!
source code here