Apple lovers love the sleek design and simple user interface of this device. However, setting up backups for your Mac can be frustrating since most external hard drives must be formatted before they can be used. However, the process doesn't have to be daunting once you know how to back up your Mac to an external hard drive.
Choose an external hard drive: Solid State Drive (SSD) or Hard Disk Drive (HDD)

The first step in creating a backup for your Mac is to choose an external drive that offers the best data recovery options. Choosing between SSD or HDD requires understanding the pros and cons of each product.
Hard disk drive
Pros: Storage capacity, price
Cons: Physical Damage, Physical Size, Speed
If you're looking to store large amounts of data, a traditional HDD is probably the best choice, as larger capacity drives are more reasonably priced. However, HDDs use spinning platters to write data to, which creates two different problems. First, spinning disks are very prone to failure if dropped or mishandled. Second, if you choose segmented information protection data recovery, backup takes time.
SSD
Pros: speed, size, failure rate, long life
Cons: Price point, storage size
If you're looking to store 2 TB or less of data, SSDs offer more value, being fast, small and long-lasting. SSDs use flash memory instead of spinning disks to write data to memory chips. While this technique makes them less likely to suffer physical damage, it can get expensive if storing large amounts of data. Also, while they last longer than hard drives, the technology is relatively new, which means predictions of their longevity potential are still guesswork.
format external drive

Copying files from your Mac to an external drive preserves data on its own terms. Since most external hard drives are formatted for PCs, you will need to format the hard drive for macOS before your Mac backup can begin.
① Connect the hard drive to the Mac.
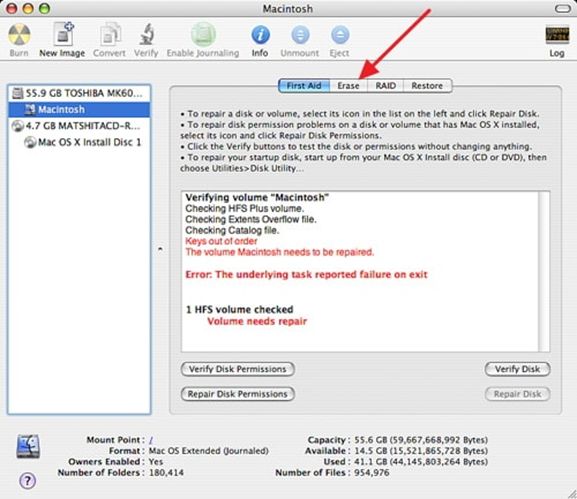
② Open Applications > Utilities > Disk Utility.
③ Find the external hard drive in the list of drives.
④ Click "Erase" in the "Disk Utility" option. Confirm the action.
⑤ A "Format" popup window will let you choose the following options:
● Mac OS Extended Journale (Mac OS Extended Journale) uses the Mac format to protect data integrity.
● Mac OS Extended Journaled (Journaled, Encrypted) adds password and partition encryption for Mac format.
● Mac OS Extended(Case-sensitive,Journaled)生成区分大小写的文件夹和Mac格式。(“Backup”和“backup”将是两个不同的文件。)
● Mac OS 扩展日志式(Case-sensitive,Journaled,Encrypted)为分区添加密码和加密保护,同时还包括文件夹区分大小写名称的Mac格式。
● MS-DOS(FAT)允许您使用32 GB或更小的Windows卷。
● ExFAT允许您使用超过32 GB的Windows卷。
⑥ 重命名新驱动器。
⑦ 在“安全选项”下,确保将驱动器设置为将过去的数据写入三次或更多次。
⑧ 删除并确认。
使用Time Machine备份

您的Mac附带了Apple的内置备份功能Time Machine。学习如何使用Time Machine的功能可以帮助您创建数据恢复备份。
使用外部驱动
要设置Time Machine,您需要先购买外部存储解决方案,例如:
① 使用Mac上的USB,FireWire或Thunderbolt端口连接的外部硬盘驱动器。
② 将外部硬盘驱动器连接到网络上AirPort Extreme基站的USB端口。
③ 一个AirPort Time Capsule,带有网络附加存储的Apple的无线路由器,可在网络上设置。
当连接外部驱动器时,Time Machine会自动建议您加密备份。
如何选择备份磁盘
将驱动器连接到Mac时,Time Machine会建议备份磁盘。但是,如果它不自动执行此操作,您也可以轻松选择磁盘。
① 打开Time Machine菜单。
② 打开Time Machine偏好设置或选择Apple菜单>系统偏好设置> Time Machine。
打开“系统偏好设置”后,可以单击“选择备份磁盘“,“选择磁盘”或“添加或删除备份磁盘”。从列表中选择一个备份磁盘,然后单击“使用磁盘”。如果考虑安全性或方便性,可以选择多个磁盘,可以继续重复这些步骤以添加更多磁盘,例如用于家庭、工作或任何其他必要位置的磁盘。

❖ 如何使用Time Machine备份
设置Time Machine后,程序会自动为您进行备份。其中包括24小时内连续每小时备份。该程序保存一个月的每日备份和前几个月的每周备份。磁盘已满后,Time Machine会自动删除最旧的备份。
Time Machine提供了多种方式来个性化备份。
① 要立即备份,请转到Time Machine菜单,然后单击“立即备份”。
② 要禁用自动备份,请打开Time Machine首选项。对于macOS Sierra或更高版本,您可以取消选择自动备份。在OS X El Capitan或更早版本中,您需要关闭Time Machine。如果您选择关闭自动备份,您仍然可以使用“立即备份”手动备份Mac。
③ 要终止正在进行的备份,请转到Time Machine菜单,然后选择“Skip This Backup”或“Stop Back Up”。
④ 要查看备份的状态,请转到Time Machine菜单。图标将告诉您以下三种状态之一:Time Machine正在备份,空闲直到下一次自动备份或无法完成备份。
⑤ 要自定义备份,请从Time Machine菜单中打开Time Machine首选项,单击“选项”,然后单击+并选择要排除的项目。
AirPort Time Capsule

AirPort Time Capsule允许您创建自动无线备份,而无需连接外部备份驱动器。设置助手内置于iOS和OS X的AirPort实用工具中,一旦设置了Time Capsule,备份磁盘将自动显示在Time Machine偏好设置中。
① 打开Time Machine。
② 单击首选项。
③ 突出显示“AirPort Time Capsule上的数据”磁盘。
④ 单击“使用磁盘”。
重要提示:Apple于2018年宣布停止使用AirPort系列,但将在未来五年继续为其提供支持。随着Apple取消AirPort路由器/ NAS产品线,找到一个长期数据备份云解决方案是大多数Mac用户的想法,而Acronis拥有针对Mac的最佳备份解决方案。
Acronis True Image for Macs的优势

Acronis True Image可以轻松备份整个Mac,只需两次点击即可创建完整的镜像备份,同时提供Time Machine无法提供的多种强大工具。
设备灵活性:许多Mac用户完全融入到Apple环境中,使用Apple的移动设备,如iPhone和iPad以及MacBook和Mac台式机。找到能够备份所有设备的单一解决方案变得越来越重要,这就是为什么Acronis True Image是一个很好的选择。除了备份macOS之外,Acronis True Image的一个许可还支持无限数量的iOS移动设备。同样值得注意的是,安克诺斯也支持Windows和Android设备,使其成为当今多设备混合操作系统家庭的更好解决方案。Time Machine仅适用于Mac,因此如果您家中有人转换到Android,他们的数据就可能无法统一得到保护。
活动磁盘克隆:Acronis True Image还允许您克隆活动的Mac系统磁盘,而无需停止和重新启动。这意味着您可以连接USB-c电缆,以便将所有数据超级快速地传输到新的Mac计算机,或者在外部硬盘驱动器上制作完全一样的Mac副本。
一体化恢复工具:您还可以使用它创建Acronis Survival Kit,这是一款一体化恢复工具,可将您恢复系统所需的一切内容放在一个外置硬盘上,包括启动媒体和所有内容备份。
云存储和功能:对Acronis True Image的订购还包括云存储,多个强大的基于云的功能,以及随时随地访问备份中的数据,这使您可以在任何有互联网连接的地方检索单个照片和文件。Time Machine不支持云备份,如果灾难损坏您的原始备份和本地备份,则会使您的数据面临风险。
基于AI的防勒索软件:最后,虽然macOS机器很少遭遇受勒索软件攻击,但网络犯罪分子越来越多地针对Mac。Acronis True Image是唯一一款集成防御勒索软件技术的个人备份产品,该软件使用基于人工智能的技术实时检测和阻止攻击。
所以,Mac备份,显然Acronis True Image胜过Time Machine。

使用Acronis True Image如何备份Mac到一个外部硬盘驱动

Acronis True Image只需几次快速点击即可实现完整的Mac备份:
① 打开Acronis True Image软件,然后单击“备份”。
② 您的整个Mac将被预先选为源。(如果需要,可以为备份指定名称。)
③ 单击备份位置,然后选择外部硬盘驱动器。(您还可以通过单击齿轮图标自定义计划,备份方案,版本控制和其他选项。)
④ 设置目标位置后,单击备份,完成