This article is reproduced from: https://www.cnblogs.com/shamo89/p/8184960.html
foreword
The automatic configuration that SpringBoot does for us is really convenient and fast, but for novices, if they don't understand the internal startup principle of SpringBoot, they will inevitably suffer in the future. So this time, the blogger will work with you to unveil the mystery of SpringBoot step by step, so that it is not mysterious.
text
When we develop any Spring Boot project, we will use the following startup classes
@SpringBootApplication
public class Application {
    public static void main(String[] args) {
        SpringApplication.run(Application.class, args);
    }
}
As can be seen from the above code, the Annotation definition (@SpringBootApplication) and the class definition (SpringApplication.run) are the most dazzling, so to uncover the mystery of SpringBoot, we have to start with these two.
The secret behind SpringBootApplication
@Target(ElementType.TYPE)
@Retention(RetentionPolicy.RUNTIME)
@Documented
@Inherited
@SpringBootConfiguration
@EnableAutoConfiguration
@ComponentScan(excludeFilters = {
        @Filter(type = FilterType.CUSTOM, classes = TypeExcludeFilter.class),
        @Filter(type = FilterType.CUSTOM, classes = AutoConfigurationExcludeFilter.class) })
public @interface SpringBootApplication {
...
}
Although the definition uses multiple Annotations to label the original information, there are actually only three Annotations that are important:
- @Configuration (@SpringBootConfiguration click to view and find that @Configuration is still applied)
- @EnableAutoConfiguration
- @ComponentScan
Therefore, if we use the following SpringBoot startup class, the entire SpringBoot application can still be functionally equivalent to the previous startup class:
@Configuration
@EnableAutoConfiguration
@ComponentScan
public class Application {
    public static void main(String[] args) {
        SpringApplication.run(Application.class, args);
    }
}
It is tiring to write these three each time, so it is convenient to write a @SpringBootApplication. Next, these three Annotations are introduced separately.
@Configuration
The @Configuration here is not unfamiliar to us. It is the @Configuration used by the configuration class of the Spring Ioc container in the form of JavaConfig. The SpringBoot community recommends using the configuration form based on JavaConfig. Therefore, after the startup class here is marked with @Configuration, It is actually a configuration class of an IoC container.
To give a few simple examples to review, the difference between XML and config configuration methods:
The XML-based configuration at the expression level looks like this:
<?xml version="1.0" encoding="UTF-8"?>
<beans xmlns="http://www.springframework.org/schema/beans"
       xmlns:xsi="http://www.w3.org/2001/XMLSchema-instance"
       xsi:schemaLocation="http://www.springframework.org/schema/beans http://www.springframework.org/schema/beans/spring-beans-3.0.xsd"
       default-lazy-init="true">
    <!--bean定义-->
</beans>
The configuration based on JavaConfig is like this:
@Configuration
public class MockConfiguration{
    //bean定义
}
Any Java class definition annotated with @Configuration is a JavaConfig configuration class.
The XML-based configuration at the registration bean definition level looks like this:
<bean id="mockService" class="..MockServiceImpl">
    ...
</bean>
The configuration based on JavaConfig is like this:
@Configuration
public class MockConfiguration{
    @Bean
    public MockService mockService(){
        return new MockServiceImpl();
    }
}
For any method marked with @Bean, its return value will be registered in Spring's IoC container as a bean definition, and the method name will default to the id of the bean definition.
- Expressing the dependency injection relationship level
In order to express the dependency between beans and beans, it is generally like this in XML form:
<bean id="mockService" class="..MockServiceImpl">
    <propery name ="dependencyService" ref="dependencyService" />
</bean>

<bean id="dependencyService" class="DependencyServiceImpl"></bean>
The configuration based on JavaConfig is like this:
@Configuration
public class MockConfiguration{
    @Bean
    public MockService mockService(){
        return new MockServiceImpl(dependencyService());
    }

    @Bean
    public DependencyService dependencyService(){
        return new DependencyServiceImpl();
    }
}
If the definition of a bean depends on other beans, you can directly call the creation method of the dependent bean in the corresponding JavaConfig class.
@ComponentScan
The annotation @ComponentScan is very important in Spring. It corresponds to the elements in the XML configuration. The function of @ComponentScan is to automatically scan and load qualified components (such as @Component and @Repository, etc.) or bean definitions, and finally define these beans. Loaded into the IoC container.
We can fine-grainly customize the scope of @ComponentScan automatic scanning through attributes such as basePackages. If not specified, the default Spring framework implementation will scan from the package that declares the class where @ComponentScan is located.
Note: So SpringBoot's startup class is best placed under the root package, because basePackages is not specified by default.
@EnableAutoConfiguration
Personally, I feel that @EnableAutoConfiguration is the most important Annotation, so I will interpret it at the end. Do you still remember the Annotation definitions provided by the Spring framework whose names start with @Enable? For example, @EnableScheduling, @EnableCaching, @EnableMBeanExport, etc., @EnableAutoConfiguration’s concept and way of doing things are actually in the same line. A brief summary is that with the support of @Import, bean definitions related to specific scenarios are collected and registered .
- @EnableScheduling loads Spring scheduling framework-related bean definitions into the IoC container through @Import.
- @EnableMBeanExport is to load JMX related bean definitions to the IoC container through @Import.
And @EnableAutoConfiguration also uses the help of @Import to load all bean definitions that meet the auto-configuration conditions into the IoC container, that's all!
@EnableAutoConfiguration, as a composite Annotation, defines its own key information as follows:
@SuppressWarnings("deprecation")
@Target(ElementType.TYPE)
@Retention(RetentionPolicy.RUNTIME)
@Documented
@Inherited
@AutoConfigurationPackage
@Import(EnableAutoConfigurationImportSelector.class)
public @interface EnableAutoConfiguration {
    ...
}
Among them, the most critical is @Import(EnableAutoConfigurationImportSelector.class). With the help of EnableAutoConfigurationImportSelector, @EnableAutoConfiguration can help SpringBoot applications load all qualified @Configuration configurations into the IoC container created and used by the current SpringBoot. like an octopus
With the support of an original tool class of the Spring framework: SpringFactoriesLoader, @EnableAutoConfiguration can automatically configure the function intelligently and you are done!

The hero behind the automatic configuration: SpringFactoriesLoader details
SpringFactoriesLoader is a private extension scheme of the Spring framework. Its main function is to load the configuration from the specified configuration file META-INF/spring.factories.
public abstract class SpringFactoriesLoader {
    //...
    public static <T> List<T> loadFactories(Class<T> factoryClass, ClassLoader classLoader) {
        ...
    }


    public static List<String> loadFactoryNames(Class<?> factoryClass, ClassLoader classLoader) {
        ....
    }
}
When used with @EnableAutoConfiguration, it provides more support for configuration lookup, that is, according to the complete class name of @EnableAutoConfiguration org.springframework.boot.autoconfigure.EnableAutoConfiguration as the key to look up, get a corresponding set of @Configuration classes
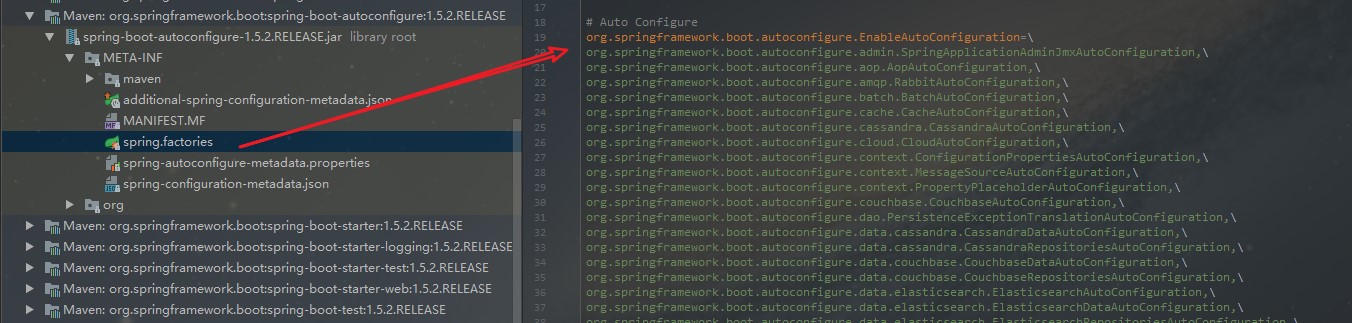
The above picture is an excerpt from the META-INF/spring.factories configuration file in SpringBoot's autoconfigure dependency package, which can illustrate the problem well.
Therefore, the magic knight automatically configured by @EnableAutoConfiguration becomes: search all META-INF/spring.factories configuration files from the classpath, and pass the configuration items corresponding to org.springframework.boot.autoconfigure.EnableutoConfiguration through reflection (Java Refletion) is instantiated as the corresponding IoC container configuration class in the form of JavaConfig marked with @Configuration, and then aggregated into one and loaded into the IoC container.
Deep dive into the SpringApplication execution flow
The implementation of SpringApplication's run method is the main route of our journey. The main process of this method can be roughly summarized as follows:
1) If we are using the static run method of SpringApplication, then this method first creates an instance of the SpringApplication object, and then calls the instance method of the created SpringApplication. When the SpringApplication instance is initialized, it will do several things in advance:
- Depending on whether there is a characteristic class (org.springframework.web.context.ConfigurableWebApplicationContext) in the classpath, it is decided whether to create an ApplicationContext type used by the web application.
- Use SpringFactoriesLoader to find and load all available ApplicationContextInitializers on the application's classpath.
- Use SpringFactoriesLoader to find and load all available ApplicationListeners in the application's classpath.
- Infer and set the defining class of the main method.
2) After the SpringApplication instance is initialized and the settings are completed, the logic of the run method is executed. At the beginning of the method execution, all the SpringApplicationRunListeners that can be found and loaded through the SpringFactoriesLoader are traversed and executed. Calling their started() method tells these SpringApplicationRunListeners, "Hey, the SpringBoot application is about to start executing!".
3) Create and configure the Environment that the current Spring Boot application will use (including configuring the PropertySource and Profile to be used).
4) Traverse the environmentPrepared() method of calling all SpringApplicationRunListener and tell them: "The Environment used by the current SpringBoot application is ready!".
5) If the SpringApplication's showBanner property is set to true, print the banner.
6) According to whether the user has clearly set the applicationContextClass type and the inference result of the initialization phase, decide what type of ApplicationContext should be created for the current SpringBoot application and create it, and then decide whether to add ShutdownHook according to the conditions, decide whether to use a custom BeanNameGenerator, and decide whether to Use a custom ResourceLoader, of course, the most important thing, set the previously prepared Environment to the created ApplicationContext.
7) After the ApplicationContext is created, SpringApplication will use Spring-FactoriesLoader again to find and load all available ApplicationContext-Initializers in the classpath, and then traverse and call the initialize (applicationContext) method of these ApplicationContextInitializers to further process the created ApplicationContext.
8) Traverse the contextPrepared() method of all SpringApplicationRunListener calls.
9) The core step is to load all the configurations obtained through @EnableAutoConfiguration and other forms of IoC container configurations into the prepared ApplicationContext.
10) Traverse the contextLoaded() method of all SpringApplicationRunListener calls.
11) Call the refresh() method of the ApplicationContext to complete the last process available to the IoC container.
12) Find out whether CommandLineRunner is registered in the current ApplicationContext, and if so, traverse and execute them.
13) Under normal circumstances, traverse and execute the finished() method of SpringApplicationRunListener, (if the whole process is abnormal, the finished() method of all SpringApplicationRunListener will still be called, but in this case, the exception information will be passed in for processing)
to remove After the event notification point, the whole process is as follows:

Summarize
So far, the core components of SpringBoot have completed the basic analysis. On the whole, most of them are some concepts and practices behind the Spring framework. SpringBoot only solidifies and sublimates specific scenarios in advance based on these concepts and practices. And it is precisely these solidifications that make it more convenient and efficient to develop applications based on the Sping framework.