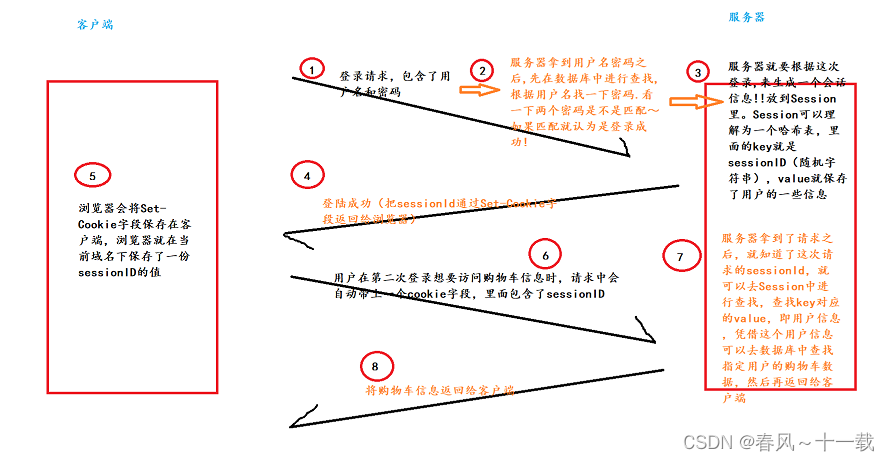
The HTTP protocol itself is a "stateless" protocol. By default, there is no direct connection between this communication and the next communication between the client and server of the HTTP protocol.
But in actual development, we often need to know the relationship between requests. For example, after a successful login to a website, the server can know whether the request has already been logged in when the server accesses it for the second time.
The main purpose of Cookie and Session is to make up for the stateless nature of HTTP
Cookie和Session
1. Basic Concepts
1. Cookie
- Cookie is a field in the HTTP protocol, and it is also an ancient way for browsers to save data on the client side.
- The cookie is generated by the server and is set and returned to the browser through the Set-Cookie field of the HTTP response. The cookie is stored on the browser side. The browser will store the cookie according to the domain name/address, and send it to the server together with the next request. Usually, it is used to determine whether the two requests are from the same user to decide what to return. page. For example, different users' shopping carts have different game score information.
- The cookie stores a string of key-value pair structure, and the key-value pairs here are all customized by the programmer.
Cookies are a mechanism for storing on the browser side
Take a chestnut:
When we go to the hospital to see a doctor, we should register first. When registering, we need to provide an ID card. At the same time, we get a "visit card", which is equivalent to the patient's "token". Subsequent visits to various departments for inspection, diagnosis, prescription of medicines, etc., do not need to show the ID card, as long as the patient's identity can be identified by the medical card.
When we have finished the treatment and do not want the medical card, we can cancel the card. At this time, the association between the patient's identity and the medical treatment card is destroyed (similar to the logout operation of the website). When we see a doctor again, we can apply for a new visit card, and we will get a new "token" at this time
At this point, the server needs to record the token information and the user information corresponding to the token. This is what the Session mechanism does.
2. Session
There are many requests received by the server at the same time, and it is necessary to clearly distinguish which user different requests belong to. It is necessary to record the correspondence between each user token and user information on the server side; in the above In the example, the medical card is a "token". In order for this token to take effect, the hospital needs to record the association between each visit card and patient information through the system.
- The essence of Session is a "hash table", which stores some key-value pair structures. The key is the ID of the token (token/sessionId), and the value is the user information (the user information can be flexibly designed according to needs).
- sessionId is a "unique string" generated by the server. From the perspective of the session mechanism, this unique string is called "sessionId". But from the standpoint of the entire login process, this unique string can also be called "token".
- sessionId and token can be understood as different names for the same thing (different perspectives)
- When the user logs in, the server adds a new record to the Session, and returns the sessionId / token to the client through the Set-Cookie field
- When the client sends a request to the server later, it needs to bring the sessionId/token in the request (for example, through the Cookie field in the HTTP request).
- After the server receives the request, it obtains the corresponding user information in the session information according to the sessionId / token in the request, and then performs subsequent operations.
- The session of servlet is stored in memory by default, if the server is restarted, the session data will be lost
For example, when a user logs in to a website for the first time, adds related products to his shopping cart and logs out, and then wants to view his shopping cart information again for the second time, the process is as follows:
Session is a mechanism for storing on the server side
2. Contact
- Cookie and Session often cooperate with each other, but not necessarily
- Cookie is the mechanism on the client side, Session is the mechanism on the server side
- It is completely possible to use cookies to save some data on the client side. These data are not necessarily user identity information, nor are they necessarily token/sessionId
- The token / sessionId in Session does not need to be passed through Cookie / Set-Cookie
3. User login case
1. Specific implementation ideas
We can use the knowledge mentioned above to implement a case of user login by ourselves. The specific idea is:
- First
html, there must be an input box containing the username and password, and a login button. Then there must be oneLogServlet, to handle the login request. - Then have one
LogServlet, to handle the login request. - Finally, do one more
IndexServlet, after the simulated login is completed, jump to the home page. In this homepage, the user's identity information can be obtained (the user data customized by the programmer can be stored here. For example, the number of visits by the current user can be stored)
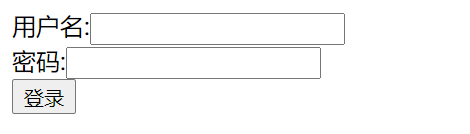
2. Write a static login page
We can simply write a login page (no need to be too complicated, mainly to learn the core login logic, you can beautify it yourself)
<!DOCTYPE html>
<html lang="en">
<head>
    <meta charset="UTF-8">
    <meta http-equiv="X-UA-Compatible" content="IE=edge">
    <meta name="viewport" content="width=device-width, initial-scale=1.0">
    <title>登录页面</title>
</head>
<body>
    <form action="login" method="post">
        用户名:<input type="text" name="username">
        <br>
        密码:<input type="password" name="password">
        <br>
        <input type="submit" value="登录">
    </form>
</body>
</html>
3. Handle the login request
(1) LoginServlet class
step1: Read the username and password from the request body
String username = req.getParameter("username");
String password = req.getParameter("password");
step2: Determine whether the user name and password are correct (the database is not read here, and the user name and password are fixed directly. We directly set the user name to zhangsan and the password to 123
 if (!"zhangsan".equals(username) || !"123".equals(password)) {


            // 登录失败!!
            resp.getWriter().write("登录失败!");
            return;
        }
step3: successful login
System.out.println("登录成功");
- If the login is successful, a session will be created, and if the session does not exist, it will be created
- The session is checked according to the sessionId in the request. The sessionId is in the cookie. This is the first login. At this time, there is no cookie in the request (the cookie is returned by the server), which will trigger "create if not found". process
- At the same time, the operations performed here: first create an HttpSession object (as value), then generate a random string as sessionId (key); then insert the key and value into the hash table
- At the same time, the generated sessionId is returned to the browser through the Set-Cookie field
 HttpSession httpSession = req.getSession(true);
        //    还可以存入程序员自定义的数据, 可以存入身份信息(用户名和登录次数)
        httpSession.setAttribute("username", "zhangsan");
        httpSession.setAttribute("loginCount", 0);//自动装箱机制帮助我们把整数0转换成包装类
Step4: Let the page jump to the home page, and use redirection to achieve it
resp.sendRedirect("index");
Complete LoginServlet class code:
import javax.servlet.ServletException;
import javax.servlet.annotation.WebServlet;
import javax.servlet.http.HttpServlet;
import javax.servlet.http.HttpServletRequest;
import javax.servlet.http.HttpServletResponse;
import javax.servlet.http.HttpSession;
import java.io.IOException;

@WebServlet("/login")
public class LoginServlet extends HttpServlet {


    @Override
    protected void doPost(HttpServletRequest req, HttpServletResponse resp) throws ServletException, IOException {


        resp.setContentType("text/html; charset=utf-8");
        String username = req.getParameter("username");
        String password = req.getParameter("password");
        if (!"zhangsan".equals(username) || !"123".equals(password)) {


            resp.getWriter().write("登录失败!");
            return;
        }
        System.out.println("登录成功");
        HttpSession httpSession = req.getSession(true);
        httpSession.setAttribute("username", "zhangsan");
        httpSession.setAttribute("loginCount", 0);
        resp.sendRedirect("index");
    }
}
(2) IndexServlet class
Core steps:
- Determine whether the user has successfully logged in
- Get user information
- return an html page
Complete IndexServlet class code:
import javax.servlet.ServletException;
import javax.servlet.annotation.WebServlet;
import javax.servlet.http.HttpServlet;
import javax.servlet.http.HttpServletRequest;
import javax.servlet.http.HttpServletResponse;
import javax.servlet.http.HttpSession;
import java.io.IOException;
@WebServlet("/index")
public class IndexServlet extends HttpServlet {
@Override
protected void doGet(HttpServletRequest req, HttpServletResponse resp) throws ServletException, IOException {
// 根据当前用户请求中的 sessionId, 获取到用户信息, 并显示到页面上.
resp.setContentType("text/html; charset=utf-8");
// 1. 判定当前用户是否已经登录了. (请求中有没有 sessionId, 以及 sessionId 是否合法)
// 如果会话不存在, 就不能创建了~ 只是查询, 不是登录
HttpSession httpSession = req.getSession(false);
if (httpSession == null) {
// 当前没有找到合法会话, 当前用户尚未登录, 重定向到 login.html, 让用户进行登录
resp.sendRedirect("login.html");
return;
}
// 2. 如果用户已经登录, 就可以从 HttpSession 中拿到用户信息了.
String username = (String) httpSession.getAttribute("username");
Integer loginCount = (Integer) httpSession.getAttribute("loginCount");
loginCount = loginCount + 1;
httpSession.setAttribute("loginCount", loginCount);
// 3. 返回一个 HTML 页面
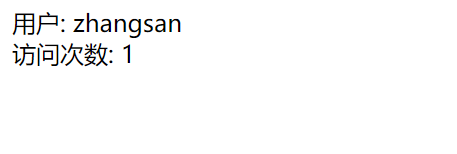
StringBuilder html = new StringBuilder();
html.append("<div>用户: " + username + "</div>");
html.append("<div>访问次数: " + loginCount + "</div>");
resp.getWriter().write(html.toString());
}
}
4. Verification Procedure
After completing all the previous steps, we can verify the program (we package and deploy the program through Smart Tomcat)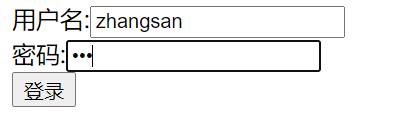
After the login is successful, we can also capture the two interactions between the browser and the server through Fiddler:


the first interaction between the client and the server is a POST request, and the body contains the user name and password information: 
also See the sessionId field in the response:


This Location indicates the location we want to redirect to. It is because of this redirection mechanism that the second interaction between the browser and the server is triggered: 
the request in the second interaction It is a GET request 
, which also includes the same field as the sessionId returned by the previous server. 

Finally, you can see that the response also has the corresponding html content.