目录
2.1.2 MyBatis-Plus实现多租户架构的核心原理
2.2.2 Spring Cloud Alibaba服务订阅负载均衡的核心原理
2.3.2 基于Spring Cloud Alibaba的配置信息动态变更的核心原理
2.4.2 基于Spring Cloud ALibaba,动态加载和持久化高可用流量防护规则的原理
2.6.2 Spring Cloud Alibaba是如何封装RocketMQ的?
2.7.2 Spring Cloud Gateway如何整合Redis,做网关限流
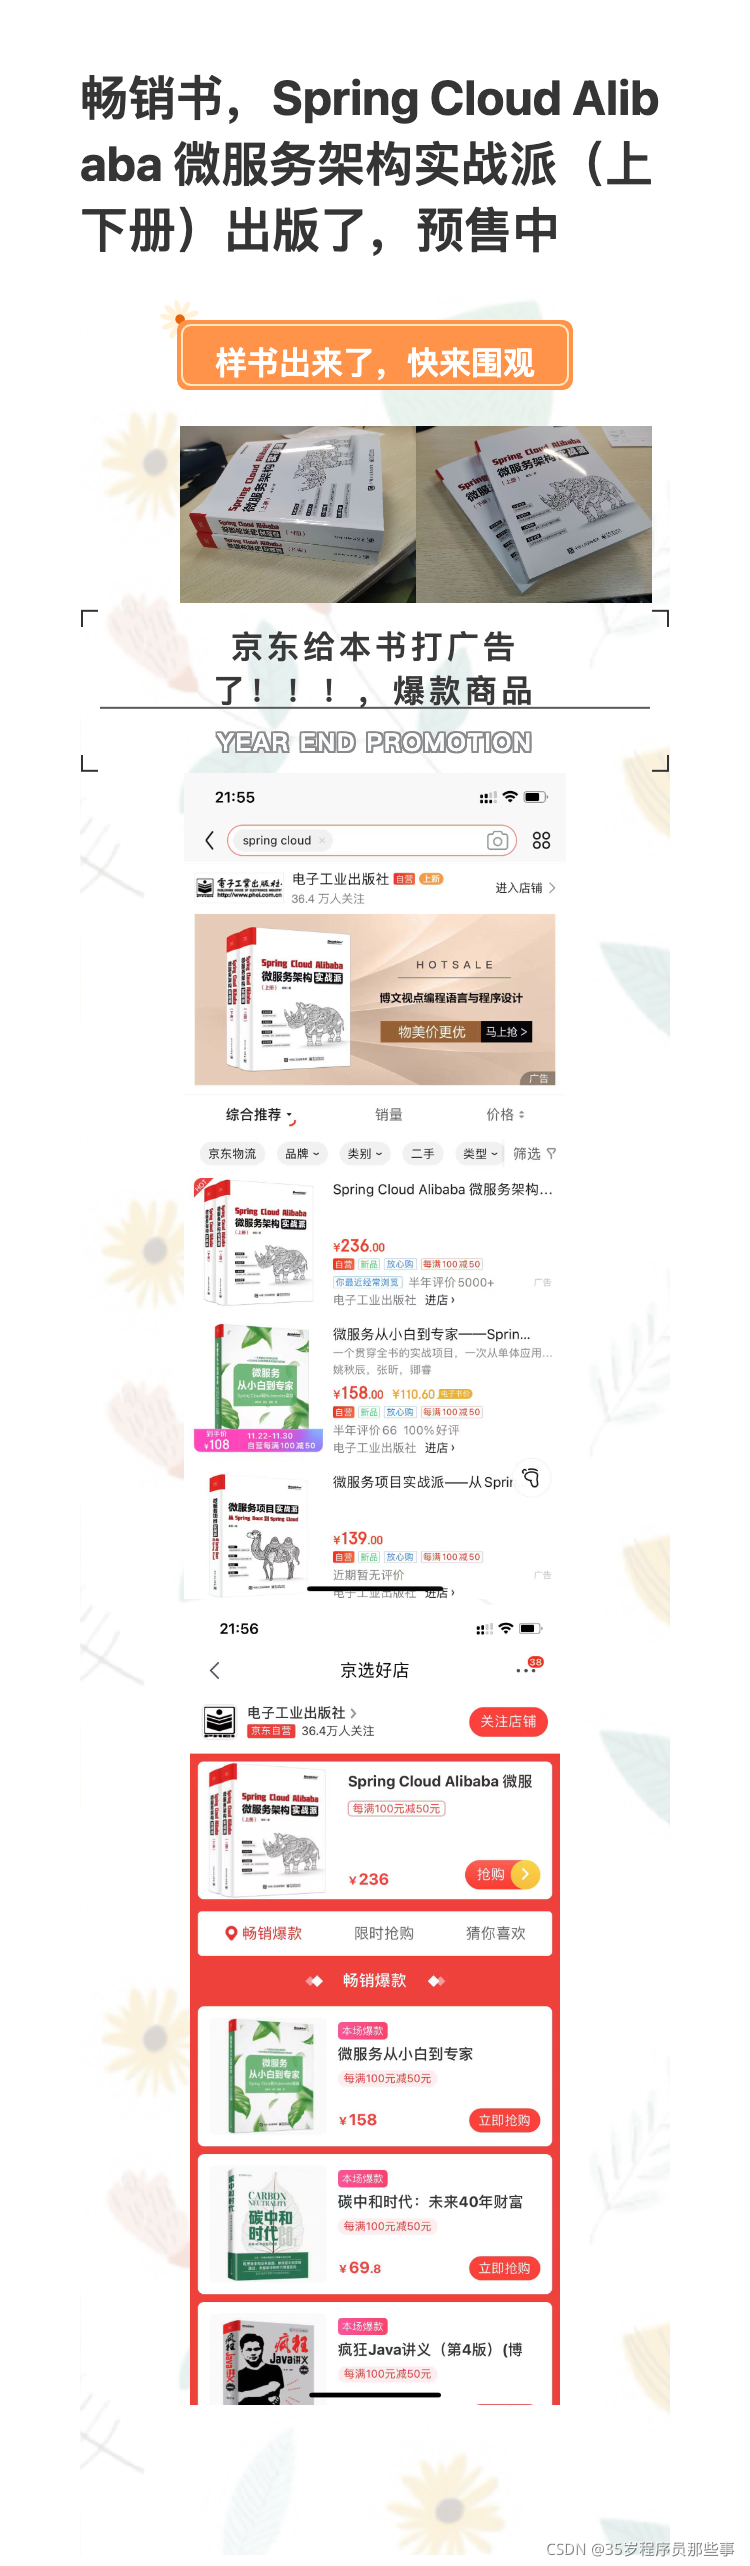
笔者的畅销书 Spring Cloud Alibaba微服务架构实战派(上下册)出版了,京东、当当和天猫已经开始预售。
1 写书缘由
笔者也是机缘巧合,才会开启自己的写书之路。
在写这本书之前,我先后在两家杭州的“独角兽”公司担任技术负责人,并推进公司核心业务的“中台化”改造。在落地业务中台和技术中台的过程中,督促并指导开发人员统一使用Spring Cloud Alibaba作为中台服务最底层的基础框架。为了快速推进业务服务Spring Cloud Alibaba化的进度,我冲在业务的第一线,收集和整理开发人员在使用Spring Cloud Alibaba过程中反馈的技术问题,并提供有效的技术解决方案,直至项目落地。
我每周都会做技术复盘,通过分析大量的问题总结出一个结论:开发人员反馈的问题大部分都是由于Spring Cloud Alibaba使用不合理所造成的。也就是说,很多开发人员并不了解Spring Cloud Alibaba的原理及如何落地实践。于是,我就产生了把我这几年落地Spring Cloud Alibaba的经验通过图书的方式输出的想法。
2 本书上册核心内容
2.1 Spring Cloud Alibaba基础实战
2.1.1 主要内容
Spring Cloud Alibaba“牛刀小试”,包括:使用Spring Cloud Alibaba作为基础框架实现乐观锁、实现多数据源和实现SQL语句中表名的动态替换。
【实例】用Maven和Spring Cloud Alibaba实现多环境部署,学习完本章内容,读者可以快速的使用配套源码,搭建可扩展的多环境运维部署环境。
【实例】用“MyBatis-Plus + Spring Cloud Alibaba”实现多租户架构,学习完本章内容,读者可以快速的使用配套源码,实现微服务架构中的多租户架构。
2.1.2 MyBatis-Plus实现多租户架构的核心原理
熟悉Mybatis原理的开发应该都知道它的拦截器机制,Mybatis会使用注解@Intercepts去标注一个拦截器,并在Mybatis框架启动的过程中,扫描当前Spring IOC容器中被注解@Intercepts标记的拦截器。
第一步:MyBatis-Plus定义一个全局拦截器MybatisPlusInterceptor类,如下所示。
//通过注解@Intercepts,将MyBatis-Plus和Mybatis绑定在一起
@Intercepts(
    {
        @Signature(type = StatementHandler.class, method = "prepare", args = {Connection.class, Integer.class}),
        @Signature(type = StatementHandler.class, method = "getBoundSql", args = {}),
        @Signature(type = Executor.class, method = "update", args = {MappedStatement.class, Object.class}),
        @Signature(type = Executor.class, method = "query", args = {MappedStatement.class, Object.class, RowBounds.class, ResultHandler.class}),
        @Signature(type = Executor.class, method = "query", args = {MappedStatement.class, Object.class, RowBounds.class, ResultHandler.class, CacheKey.class, BoundSql.class}),
    }
)
public class MybatisPlusInterceptor implements Interceptor {
    @Setter
    private List<InnerInterceptor> interceptors = new ArrayList<>();
    @Override
    public Object intercept(Invocation invocation) throws Throwable {
      //遍历内部拦截器列表,并执行InnerInterceptor.beforeUpdate()
    }
}
第二步:MyBatis-Plus定义一个内部多租户拦截器TenantLineInnerInterceptor类,如下所示。
public class TenantLineInnerInterceptor extends JsqlParserSupport implements InnerInterceptor {
    private TenantLineHandler tenantLineHandler;
    //使用代理和反射,生成一个租户处理器TenantLineHandler
    @Override
    public void setProperties(Properties properties) {
        PropertyMapper.newInstance(properties)
            .whenNotBlack("tenantLineHandler", ClassUtils::newInstance, this::setTenantLineHandler);
    }
    ...
}
2.2 分布式服务治理——基于Nacos
2.2.1 主要内容
认识分布式服务治理
了解主流的注册中心
将应用接入Nacos 注册中心
用“NacosNamingService类 + @EnableDiscoveryClient”实现服务的注册/订阅
用“Ribbon + Nacos Client”实现服务发现的负载均衡
用CP模式和AP模式来保持注册中心的数据一致性
用缓存和文件来存储Nacos的元数据
用Nacos Sync来实现应用服务的数据迁移
2.2.2 Spring Cloud Alibaba服务订阅负载均衡的核心原理
Spring Cloud Alibaba定义了一个加载负载均衡规则的类NacosRule,它继承了ribbon-loadbalancer项目中的AbstractLoadBalancerRule类,具体如下所示:
public class NacosRule extends AbstractLoadBalancerRule {
  @Autowired
	private NacosDiscoveryProperties nacosDiscoveryProperties;
	@Autowired
	private NacosServiceManager nacosServiceManager;
  @Override
	public Server choose(Object key) {
		try {
      //获取Nacos的集群名称
			String clusterName = this.nacosDiscoveryProperties.getClusterName();
      //获取Group的名称
			String group = this.nacosDiscoveryProperties.getGroup();
			DynamicServerListLoadBalancer loadBalancer = (DynamicServerListLoadBalancer) getLoadBalancer();
			String name = loadBalancer.getName();
      //实例化一个Nacos Client的服务注册中心的名称服务对象NamingService
			NamingService namingService = nacosServiceManager
					.getNamingService(nacosDiscoveryProperties.getNacosProperties());
      //获取指定服务名称的所有健康的服务实例信息
			List<Instance> instances = namingService.selectInstances(name, group, true);
			if (CollectionUtils.isEmpty(instances)) {
				LOGGER.warn("no instance in service {}", name);
				return null;
			}
			...
      //使用负载均衡算法,均衡的选举一个服务实例,并返回一个NacosServer对象,完成负载均衡
			Instance instance = ExtendBalancer.getHostByRandomWeight2(instancesToChoose);
			return new NacosServer(instance);
		}
		catch (Exception e) {
			LOGGER.warn("NacosRule error", e);
			return null;
		}
	}
}
Spring Cloud Alibaba复用了Nacos提供的服务负载均衡算法,当然开发人员可以自己实现一个负载均衡算法。Nacos的服务负载均衡算法如下所示。
public class Balancer {
  //按照随机权重,进行服务的负载均衡
  protected static Instance getHostByRandomWeight(List<Instance> hosts) {
        NAMING_LOGGER.debug("entry randomWithWeight");
        if (hosts == null || hosts.size() == 0) {
            NAMING_LOGGER.debug("hosts == null || hosts.size() == 0");
            return null;
        }
        NAMING_LOGGER.debug("new Chooser");
        List<Pair<Instance>> hostsWithWeight = new ArrayList<Pair<Instance>>();
        //过滤掉不健康的服务实例
        for (Instance host : hosts) {
            if (host.isHealthy()) {
                hostsWithWeight.add(new Pair<Instance>(host, host.getWeight()));
            }
        }
        NAMING_LOGGER.debug("for (Host host : hosts)");
        Chooser<String, Instance> vipChooser = new Chooser<String, Instance>("www.taobao.com");
        //刷新服务实例的权重信息,这些权重信息可以通过Nacos的UI控制台,或者Open API动态的修改,并实时的生效
        vipChooser.refresh(hostsWithWeight);
        NAMING_LOGGER.debug("vipChooser.refresh");
        //执行负载均衡算法
        return vipChooser.randomWithWeight();
    }
  ...
}
//负载均衡算法选择器
public class Chooser<K, T> {
  public T randomWithWeight() {
        Ref<T> ref = this.ref;
        //产生随机种子
        double random = ThreadLocalRandom.current().nextDouble(0, 1);
        //采用二分查找,获取下标编号
        int index = Arrays.binarySearch(ref.weights, random);
        if (index < 0) {
            index = -index - 1;
        } else {
            return ref.items.get(index);
        }
        if (index >= 0 && index < ref.weights.length) {
            if (random < ref.weights[index]) {
                return ref.items.get(index);
            }
        }
        return ref.items.get(ref.items.size() - 1);
    }
}关于Spring Cloud Alibaba和Nacos的分布式服务治理的相关原理,可以阅读本书相关的章节
2.3 分布式配置管理——基于Nacos
2.3.1 主要内容
认识分布式配置管理
了解主流的配置中心
将应用接入Nacos配置中心
用HTTP协议和gRPC框架实现通信渠道
用“Sofa-Jraft + Apache Derby”保证配置中心的数据一致性
用数据库持久化配置中心的数据
用“Spring Cloud Alibaba Config + Nacos Config”实现配置管理(公共配置、应用配置和扩展配置)
2.3.2 基于Spring Cloud Alibaba的配置信息动态变更的核心原理
首先,开发者在本地配置文件中,开启动态配置,如下所示。
###默认为true
spring.cloud.nacos.config.refreshEnabled=true其次,初始化一个配置信息的上下文刷新类NacosContextRefresher,如下所示。
@Configuration(proxyBeanMethods = false)
@ConditionalOnProperty(name = "spring.cloud.nacos.config.enabled", matchIfMissing = true)
public class NacosConfigAutoConfiguration {
  //利用Spring Boot的自动配置原理,初始化NacosContextRefresher对象,并托管到Spring Framework的IOC容器中
  @Bean
	public NacosContextRefresher nacosContextRefresher(
			NacosConfigManager nacosConfigManager,
			NacosRefreshHistory nacosRefreshHistory) {
		return new NacosContextRefresher(nacosConfigManager, nacosRefreshHistory);
	}
  ...
}最后,用Nacos Client,向Nacos的配置中心注册一个监听器,如下所示。
public class NacosContextRefresher
		implements ApplicationListener<ApplicationReadyEvent>, ApplicationContextAware {
  private AtomicBoolean ready = new AtomicBoolean(false);
  //用Spring FrameWork的事件机制,自动触发添加Nacos配置信息监听器的事件
  @Override
	public void onApplicationEvent(ApplicationReadyEvent event) {
    //防止应用使用多个Spring Context(多个IOC容器)
		if (this.ready.compareAndSet(false, true)) {
			this.registerNacosListenersForApplications();
		}
	}
  //注册Nacos监听器
	private void registerNacosListenersForApplications() {
		if (isRefreshEnabled()) {
			for (NacosPropertySource propertySource : NacosPropertySourceRepository
					.getAll()) {
				if (!propertySource.isRefreshable()) {
					continue;
				}
				String dataId = propertySource.getDataId();
        //注意监听器注册的维度是dataId,也就是说,如果应用中存在多个属性文件,就会注册多个对应的监听器
				registerNacosListener(propertySource.getGroup(), dataId);
			}
		}
	}
  //执行注册监听器
	private void registerNacosListener(final String groupKey, final String dataKey) {
		String key = NacosPropertySourceRepository.getMapKey(dataKey, groupKey);
    //注册Nacos Client的监听器AbstractSharedListener
		Listener listener = listenerMap.computeIfAbsent(key,
				lst -> new AbstractSharedListener() {
					@Override
					public void innerReceive(String dataId, String group,
							String configInfo) {
						refreshCountIncrement();
						nacosRefreshHistory.addRefreshRecord(dataId, group, configInfo);
						// todo feature: support single refresh for listening
						applicationContext.publishEvent(
								new RefreshEvent(this, null, "Refresh Nacos config"));
						if (log.isDebugEnabled()) {
							log.debug(String.format(
									"Refresh Nacos config group=%s,dataId=%s,configInfo=%s",
									group, dataId, configInfo));
						}
					}
				});
		try {
      //调用Nacos Client的NacosConfigService,向Nacos配置中心注册一个监听器
			configService.addListener(dataKey, groupKey, listener);
		}
		catch (NacosException e) {
			log.warn(String.format(
					"register fail for nacos listener ,dataId=[%s],group=[%s]", dataKey,
					groupKey), e);
		}
	}
}关于Nacos配置中心监听器的原理,可以阅读本书的相关章节。
2.4 分布式系统的高可用流量防护——基于Sentinel
2.4.1 主要内容
认识分布式流量防护
认识Sentinel
将应用接入Sentinel
用HTTP或者Netty实现通信渠道
用过滤器和拦截器实现组件的适配
用“流量控制”实现流量防护
用“熔断降级”实现流量防护
用“系统自适应保护”实现流量防护
用Nacos实现规则的动态配置和持久化
2.4.2 基于Spring Cloud ALibaba,动态加载和持久化高可用流量防护规则的原理
首先,初始化一个数据源处理器SentinelDataSourceHandler类,如下所示。
@Configuration(proxyBeanMethods = false)
@ConditionalOnProperty(name = "spring.cloud.sentinel.enabled", matchIfMissing = true)
@EnableConfigurationProperties(SentinelProperties.class)
public class SentinelAutoConfiguration {
  @Bean
	@ConditionalOnMissingBean
	public SentinelDataSourceHandler sentinelDataSourceHandler(
			DefaultListableBeanFactory beanFactory, SentinelProperties sentinelProperties,
			Environment env) {
    //实例化一个SentinelDataSourceHandler对象
		return new SentinelDataSourceHandler(beanFactory, sentinelProperties, env);
	}
  ...
}
其次,利用Spring FrameWork的SmartInitializingSingleton类,在Bean工厂初始化之前,初始化持久化数据源,具体如下所示。
public class SentinelDataSourceHandler implements SmartInitializingSingleton {
  ...
  @Override
	public void afterSingletonsInstantiated() {
		sentinelProperties.getDatasource()
				.forEach((dataSourceName, dataSourceProperties) -> {
					try {
					  ...
            //定义一个数据源属性类AbstractDataSourceProperties
						AbstractDataSourceProperties abstractDataSourceProperties = dataSourceProperties
								.getValidDataSourceProperties();
						abstractDataSourceProperties.setEnv(env);
						abstractDataSourceProperties.preCheck(dataSourceName);
						registerBean(abstractDataSourceProperties, dataSourceName
								+ "-sentinel-" + validFields.get(0) + "-datasource");
					}
					catch (Exception e) {
						log.error("[Sentinel Starter] DataSource " + dataSourceName
								+ " build error: " + e.getMessage(), e);
					}
				});
	}

  private void registerBean(final AbstractDataSourceProperties dataSourceProperties,
			String dataSourceName) {
      ...
    	this.beanFactory.registerBeanDefinition(dataSourceName,
				builder.getBeanDefinition());
		  //初始化流量防护规则的数据源
		  AbstractDataSource newDataSource = (AbstractDataSource) this.beanFactory
				.getBean(dataSourceName);
      //将数据源的属性规则,注册到Sentinel中
		  dataSourceProperties.postRegister(newDataSource);
  }
}
最后,动态的将流量防护规则注册到Sentinel中,具体如下所示。
public class AbstractDataSourceProperties {
  ...
  public void postRegister(AbstractDataSource dataSource) {
		switch (this.getRuleType()) {
    //注册流控规则
		case FLOW:
			FlowRuleManager.register2Property(dataSource.getProperty());
			break;
    //注册降级规则
		case DEGRADE:
			DegradeRuleManager.register2Property(dataSource.getProperty());
			break;
    //注册基于参数的流控规则
		case PARAM_FLOW:
			ParamFlowRuleManager.register2Property(dataSource.getProperty());
			break;
    //注册系统自适应规则
		case SYSTEM:
			SystemRuleManager.register2Property(dataSource.getProperty());
			break;
    //注册鉴权规则
		case AUTHORITY:
			AuthorityRuleManager.register2Property(dataSource.getProperty());
			break;
     //注册网关流控规则
		case GW_FLOW:
			GatewayRuleManager.register2Property(dataSource.getProperty());
			break;
    //注册网关API定义规则
		case GW_API_GROUP:
			GatewayApiDefinitionManager.register2Property(dataSource.getProperty());
			break;
		default:
			break;
		}
	}
}
关于Spring Cloud Alibaba与Sentinel的相关原理,可以查阅本书相关章节。
2.5 高性能的分布式事务框架——Seata
2.5.1 主要内容
认识分布式事务
认识Seata
将应用接入Seata
用Netty实现客户端与服务器端之间的通信渠道
用拦截器和过滤器适配主流的RPC框架
用AT模式实现分布式事务
用TCC模式实现分布式事务
用XA模式实现分布式事务
用Saga模式实现分布式事务
2.5.2 Seata Server启动原理
首先,Seata使用Shell脚本seata-server.sh,启动io.seata.server.Server,具体如下所示。
public class Server {
  public static void main(String[] args) throws IOException {
        ...
        ParameterParser parameterParser = new ParameterParser(args);
        MetricsManager.get().init();
        System.setProperty(ConfigurationKeys.STORE_MODE, parameterParser.getStoreMode());
        //初始化一个RPC对象NettyRemotingServer(基于Netty)
        NettyRemotingServer nettyRemotingServer = new NettyRemotingServer(WORKING_THREADS);
        nettyRemotingServer.setListenPort(parameterParser.getPort());
        UUIDGenerator.init(parameterParser.getServerNode());
        SessionHolder.init(parameterParser.getStoreMode());
        //初始化一个处理全局事务的对象DefaultCoordinator,比如开启全局事务、提交全局事务和回滚全局事务等
        DefaultCoordinator coordinator = new DefaultCoordinator(nettyRemotingServer);
        coordinator.init();
        nettyRemotingServer.setHandler(coordinator);
        ShutdownHook.getInstance().addDisposable(coordinator);
        ShutdownHook.getInstance().addDisposable(nettyRemotingServer);
        if (NetUtil.isValidIp(parameterParser.getHost(), false)) {
            XID.setIpAddress(parameterParser.getHost());
        } else {
            XID.setIpAddress(NetUtil.getLocalIp());
        }
        XID.setPort(nettyRemotingServer.getListenPort());
        try {
            //初始化Netty服务端完成之后,并启动服务端(启动NettyServerBootstrap),等待客户端连接
            nettyRemotingServer.init();
        } catch (Throwable e) {
            logger.error("nettyServer init error:{}", e.getMessage(), e);
            System.exit(-1);
        }
        System.exit(0);
    }
}
其次,注册事件处理器,主要用于处理客户端的通信消息事件,比如开启全局事务、提交全局事务等,具体如下所示。
public class NettyRemotingServer extends AbstractNettyRemotingServer {
  @Override
  public void init() {
    //注册处理客户端消息事件的处理器,每种类型的事件一个处理器
    registerProcessor();
  }
  private void registerProcessor() {
        // 1. 注册请求消息处理器
        ServerOnRequestProcessor onRequestProcessor =
            new ServerOnRequestProcessor(this, getHandler());
        super.registerProcessor(MessageType.TYPE_BRANCH_REGISTER, onRequestProcessor, messageExecutor);
        super.registerProcessor(MessageType.TYPE_BRANCH_STATUS_REPORT, onRequestProcessor, messageExecutor);
        super.registerProcessor(MessageType.TYPE_GLOBAL_BEGIN, onRequestProcessor, messageExecutor);
        super.registerProcessor(MessageType.TYPE_GLOBAL_COMMIT, onRequestProcessor, messageExecutor);
        super.registerProcessor(MessageType.TYPE_GLOBAL_LOCK_QUERY, onRequestProcessor, messageExecutor);
        super.registerProcessor(MessageType.TYPE_GLOBAL_REPORT, onRequestProcessor, messageExecutor);
        super.registerProcessor(MessageType.TYPE_GLOBAL_ROLLBACK, onRequestProcessor, messageExecutor);
        super.registerProcessor(MessageType.TYPE_GLOBAL_STATUS, onRequestProcessor, messageExecutor);
        super.registerProcessor(MessageType.TYPE_SEATA_MERGE, onRequestProcessor, messageExecutor);
        // 2. 注册响应消息处理器
        ServerOnResponseProcessor onResponseProcessor =
            new ServerOnResponseProcessor(getHandler(), getFutures());
        super.registerProcessor(MessageType.TYPE_BRANCH_COMMIT_RESULT, onResponseProcessor, messageExecutor);
        super.registerProcessor(MessageType.TYPE_BRANCH_ROLLBACK_RESULT, onResponseProcessor, messageExecutor);
        // 3. 注册rm消息处理器
        RegRmProcessor regRmProcessor = new RegRmProcessor(this);
        super.registerProcessor(MessageType.TYPE_REG_RM, regRmProcessor, messageExecutor);
        // 4. 注册tm消息处理器
        RegTmProcessor regTmProcessor = new RegTmProcessor(this);
        super.registerProcessor(MessageType.TYPE_REG_CLT, regTmProcessor, null);
        // 5. 注册心跳消息处理器
        ServerHeartbeatProcessor heartbeatMessageProcessor = new ServerHeartbeatProcessor(this);
        super.registerProcessor(MessageType.TYPE_HEARTBEAT_MSG, heartbeatMessageProcessor, null);
    }
}
关于Spring Cloud Alibaba与Seata相关的原理,可以查阅本书的相关章节。
2.6 高可靠性分布式消息中间件RocketMQ
2.6.1 主要内容
消息中间件概述
搭建RocketMQ的运行环境
将应用接入RocketMQ
用Netty实现RocketMQ的通信渠道
用“异步”“同步”和“最多发送一次”模式生产消息
用Push和Pull模式实现消息的消费
用两阶段提交和定时回查事务状态实现事务消息
2.6.2 Spring Cloud Alibaba是如何封装RocketMQ的?
首先,使用RocketMQListenerBindingContainer类,初始化一个消费者,具体代码如下所示。
public class RocketMQListenerBindingContainer
		implements InitializingBean, RocketMQListenerContainer, SmartLifecycle {
  @Override
	public void afterPropertiesSet() throws Exception {
		initRocketMQPushConsumer();
	}
  //初始化一个消费者DefaultMQPushConsumer
  private void initRocketMQPushConsumer() throws MQClientException {
		Assert.notNull(rocketMQListener, "Property 'rocketMQListener' is required");
		Assert.notNull(consumerGroup, "Property 'consumerGroup' is required");
		Assert.notNull(nameServer, "Property 'nameServer' is required");
		Assert.notNull(topic, "Property 'topic' is required");
		String ak = rocketBinderConfigurationProperties.getAccessKey();
		String sk = rocketBinderConfigurationProperties.getSecretKey();
    //Spring Cloud Alibaba默认支持Push模式
		if (!StringUtils.isEmpty(ak) && !StringUtils.isEmpty(sk)) {
			RPCHook rpcHook = new AclClientRPCHook(new SessionCredentials(ak, sk));
			consumer = new DefaultMQPushConsumer(consumerGroup, rpcHook,
					new AllocateMessageQueueAveragely(),
					rocketBinderConfigurationProperties.isEnableMsgTrace(),
					rocketBinderConfigurationProperties.getCustomizedTraceTopic());
			consumer.setInstanceName(RocketMQUtil.getInstanceName(rpcHook,
					topic + "|" + UtilAll.getPid()));
			consumer.setVipChannelEnabled(false);
		}
		else {
			consumer = new DefaultMQPushConsumer(consumerGroup,
					rocketBinderConfigurationProperties.isEnableMsgTrace(),
					rocketBinderConfigurationProperties.getCustomizedTraceTopic());
		}
		consumer.setNamesrvAddr(RocketMQBinderUtils.getNameServerStr(nameServer));
		consumer.setConsumeThreadMax(rocketMQConsumerProperties.getConcurrency());
		consumer.setConsumeThreadMin(rocketMQConsumerProperties.getConcurrency());
    //广播和集群模式
		switch (messageModel) {
		case BROADCASTING:
			consumer.setMessageModel(
					org.apache.rocketmq.common.protocol.heartbeat.MessageModel.BROADCASTING);
			break;
		case CLUSTERING:
			consumer.setMessageModel(
					org.apache.rocketmq.common.protocol.heartbeat.MessageModel.CLUSTERING);
			break;
		default:
			throw new IllegalArgumentException("Property 'messageModel' was wrong.");
		}
    //过滤模式
		switch (selectorType) {
		case TAG:
			consumer.subscribe(topic, selectorExpression);
			break;
		case SQL92:
			consumer.subscribe(topic, MessageSelector.bySql(selectorExpression));
			break;
		default:
			throw new IllegalArgumentException("Property 'selectorType' was wrong.");
		}
    //消费类型:顺序和并行
		switch (consumeMode) {
		case ORDERLY:
			consumer.setMessageListener(new DefaultMessageListenerOrderly());
			break;
		case CONCURRENTLY:
			consumer.setMessageListener(new DefaultMessageListenerConcurrently());
			break;
		default:
			throw new IllegalArgumentException("Property 'consumeMode' was wrong.");
		}
		if (rocketMQListener instanceof RocketMQPushConsumerLifecycleListener) {
			((RocketMQPushConsumerLifecycleListener) rocketMQListener)
					.prepareStart(consumer);
		}
	}
  ...
}
其次,在RocketMQInboundChannelAdapter类,开启消费者,开始消费消息,具体如下所示。
public class RocketMQInboundChannelAdapter extends MessageProducerSupport {
  ...
  @Override
	protected void doStart() {
		if (consumerProperties == null
				|| !consumerProperties.getExtension().getEnabled()) {
			return;
		}
		try {
      //开启消费者,开始消费消息
			rocketMQListenerContainer.start();
			instrumentationManager
					.getHealthInstrumentation(rocketMQListenerContainer.getTopic()
							+ rocketMQListenerContainer.getConsumerGroup())
					.markStartedSuccessfully();
		}
		catch (Exception e) {
			instrumentationManager
					.getHealthInstrumentation(rocketMQListenerContainer.getTopic()
							+ rocketMQListenerContainer.getConsumerGroup())
					.markStartFailed(e);
			log.error("RocketMQTemplate startup failed, Caused by " + e.getMessage());
			throw new MessagingException(MessageBuilder.withPayload(
					"RocketMQTemplate startup failed, Caused by " + e.getMessage())
					.build(), e);
		}
	}
}
public class RocketMQListenerBindingContainer
		implements InitializingBean, RocketMQListenerContainer, SmartLifecycle {
  ...
  @Override
	public void start() {
		if (this.isRunning()) {
			throw new IllegalStateException(
					"container already running. " + this.toString());
		}
		try {
      //调用消费者,开始消费消息
			consumer.start();
		}
		catch (MQClientException e) {
			throw new IllegalStateException("Failed to start RocketMQ push consumer", e);
		}
		this.setRunning(true);
	}
}
关于Spring Cloud Alibaba与RocketMQ的相关原理,可以查阅本书的相关章节。
2.7 高性能网关Spring Cloud Gateway
2.7.1 主要内容
认识网关
用Reactor Netty实现 Spring Cloud Gateway的通信渠道
用“路由规则定位器”(RouteDefinitionLocator)加载网关的路由规则
用“Redis + Lua”进行网关API的限流
2.7.2 Spring Cloud Gateway如何整合Redis,做网关限流
首先,Spring Cloud Gateway整合了spring-data-redis,并利用Spring Boot的自动配置,初始化Redis客户端,具体如下所示。
@Configuration(proxyBeanMethods = false)
@AutoConfigureAfter(RedisReactiveAutoConfiguration.class)
@AutoConfigureBefore(GatewayAutoConfiguration.class)
@ConditionalOnBean(ReactiveRedisTemplate.class)
@ConditionalOnClass({ RedisTemplate.class, DispatcherHandler.class })
class GatewayRedisAutoConfiguration {
  //整合Lua脚本
	@Bean
	@SuppressWarnings("unchecked")
	public RedisScript redisRequestRateLimiterScript() {
		DefaultRedisScript redisScript = new DefaultRedisScript<>();
		redisScript.setScriptSource(new ResourceScriptSource(
				new ClassPathResource("META-INF/scripts/request_rate_limiter.lua")));
		redisScript.setResultType(List.class);
		return redisScript;
	}
  //构造“基于Redis的分布式限流器”
	@Bean
	@ConditionalOnMissingBean
	public RedisRateLimiter redisRateLimiter(ReactiveStringRedisTemplate redisTemplate,
			@Qualifier(RedisRateLimiter.REDIS_SCRIPT_NAME) RedisScript<List<Long>> redisScript,
			ConfigurationService configurationService) {
		return new RedisRateLimiter(redisTemplate, redisScript, configurationService);
	}

}
其次,用分布式限流器进行限流,具体如下所示。
@ConfigurationProperties("spring.cloud.gateway.redis-rate-limiter")
public class RedisRateLimiter extends AbstractRateLimiter<RedisRateLimiter.Config>
		implements ApplicationContextAware {
    //结合Redis+Lua,使用令牌桶算法完成分布式限流
  	public Mono<Response> isAllowed(String routeId, String id) {
		if (!this.initialized.get()) {
			throw new IllegalStateException("RedisRateLimiter is not initialized");
		}
    //加载路由配置信息
		Config routeConfig = loadConfiguration(routeId);
		int replenishRate = routeConfig.getReplenishRate();
    //获取桶的容量
		int burstCapacity = routeConfig.getBurstCapacity();
    //获取请求Token数
		int requestedTokens = routeConfig.getRequestedTokens();
		try {
			List<String> keys = getKeys(id);
			List<String> scriptArgs = Arrays.asList(replenishRate + "",
					burstCapacity + "", Instant.now().getEpochSecond() + "",
					requestedTokens + "");
      //用Redis客户端执行Lua限流脚本
			Flux<List<Long>> flux = this.redisTemplate.execute(this.script, keys,
					scriptArgs);
			return flux.onErrorResume(throwable -> {
				if (log.isDebugEnabled()) {
					log.debug("Error calling rate limiter lua", throwable);
				}
				return Flux.just(Arrays.asList(1L, -1L));
			}).reduce(new ArrayList<Long>(), (longs, l) -> {
				longs.addAll(l);
				return longs;
			}).map(results -> {
				boolean allowed = results.get(0) == 1L;
				Long tokensLeft = results.get(1);
				Response response = new Response(allowed,getHeaders(routeConfig, tokensLeft));
				if (log.isDebugEnabled()) {
					log.debug("response: " + response);
				}
				return response;
			});
		}
		catch (Exception e) {
		}
		return Mono.just(new Response(true, getHeaders(routeConfig, -1L)));
	}
}
如果想了解Spring Cloud Alibaba与Spring Cloud Gateway的详细原理,读者可以查阅本书的相关章节。
3 总结
本文详细介绍了——Spring Cloud Alibaba微服务架构实战派(上下册)中上册的核心内容及相关原理,如果读者想了解更加详细的原理剖析和项目实战,欢迎购买和查阅本书。
4 欢迎关注公众号,35岁程序员那些事