Series catalog
First: three minutes to quickly understand the basic configuration Mybatis
The second: take you three minutes to understand Mybatis mapping file (sql, resultMap mapping, etc.)
Title III: three minutes take you mybatis association mapping (one case study, Many to many)
Originality is not easy, if you like it, just like it and pay attention to it!
Article Directory
1. Integration environment construction-jar package preparation
1. The jar packages that spring needs to use are (8+2):
- spring-aop-5.0.4.RELEASE.jar、
- spring-aspects-5.0.4.RELEASE.jar、
- spring-beans-5.0.4.RELEASE.jar、
- spring-context-5.0.4.RELEASE.jar、
- spring-core-5.0.4.RELEASE.jar、
- spring-expression-5.0.4.RELEASE.jar、
- spring-jdbc-5.0.4.RELEASE.jar、
- spring-tx-5.0.4.RELEASE-javadoc.jar
- And supplementary jars for aop and aspect (2)
- aopalliance-1.0.jar
- aspectjweaver-1.5.4.jar
2. The jar package that mybatis needs to use is
- mybatis-3.4.6.jar
- commons-logging-1.2.jar
- log4j-1.2.17.jar
3.Spring integrates the middle jar of mybatis
- //Database startup jar
- mysql-connector-java-5.1.9.jar
- //mybatis supports spring integrated middleware jar
- mybatis-spring-1.3.1.jar
- // Data source supports jar
- commons-dbcp2-2.1.1.jar
- commons-pooI2-2.4.2.jar
2. Integrate environment construction-create project
1. eclipse environment creation
Create a spring-mybatis project (a java project or a dynamic website project) in the eclipse environment, and add the jar package in the first step to the project classpath.
2. Two ways to add jar to the classpath
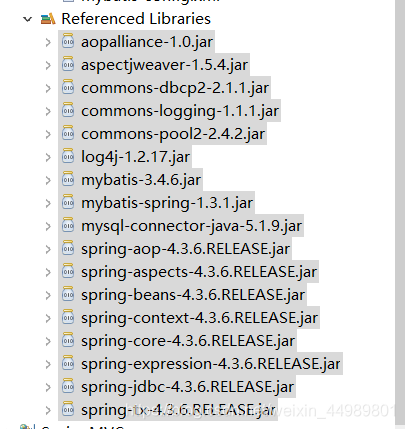
- Method of adding java project to the internal path: paste the jar package into the src directory, select all, right-click, select build path, click add build path, and the screenshot after adding is as follows:
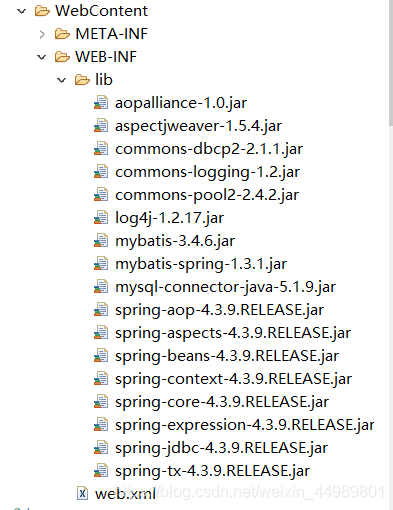
- The dynamic website is added to the internal path method: paste the jar package into the lib directory of the project and publish it to the class path. The screenshot after adding is as follows:
Three, integrated environment construction-writing configuration documents
1.db.properties (database related information document)
- Create a new file in the src directory, name it db.properties, and add information about connecting to the database in it.
<!--db.properties文件内容-->
jdbc.driver=com.mysql.jdbc.Driver
jdbc.url=jdbc:mysql://localhost:3306/mybatis?useSSL=true
jdbc.username=root
jdbc.password=mysql200410
jdbc.maxTotal=30
jdbc.maxIdle=10
jdbc.initialSize=5
2.spring configuration file
- Create a new xml file in the src directory, name it applicationContext, and configure spring related information in it
<?xml version="1.0" encoding="UTF-8"?>
<beans xmlns="http://www.springframework.org/schema/beans"
	xmlns:xsi="http://www.w3.org/2001/XMLSchema-instance"
	xmlns:tx="http://www.springframework.org/schema/tx"
	xmlns:aop="http://www.springframework.org/schema/aop"
	xmlns:jdbc="http://www.springframework.org/schema/jdbc"
	xmlns:context="http://www.springframework.org/schema/context"
	xsi:schemaLocation="http://www.springframework.org/schema/jdbc http://www.springframework.org/schema/jdbc/spring-jdbc-4.3.xsd
		http://www.springframework.org/schema/beans http://www.springframework.org/schema/beans/spring-beans.xsd
		http://www.springframework.org/schema/context http://www.springframework.org/schema/context/spring-context-4.3.xsd
		http://www.springframework.org/schema/aop http://www.springframework.org/schema/aop/spring-aop-4.3.xsd
		http://www.springframework.org/schema/tx http://www.springframework.org/schema/tx/spring-tx-4.3.xsd">

	<!-- 加载配置文件db.properties方式1:通过类来加载
	<bean class="org.springframework.beans.factory.config.PreferencesPlaceholderConfigurer">
		<property name="locations">
			<array>
				<value>db.properties</value>
			</array>
		</property>
	</bean>
	-->
	<!--  <!-- 加载配置文件db.properties方式2:通过context来加载-->
	<context:property-placeholder location="classpath:db.properties"/>
	 <!--配置数据源 -->
	<bean id="dataSource" class="org.apache.commons.dbcp2.BasicDataSource">
		 <!--数据库驱动 -->
        <property name="driverClassName" value="${jdbc.driver}" />
        <!--连接数据库的url -->
        <property name="url" value="${jdbc.url}" />
        <!--连接数据库的用户名 -->
        <property name="username" value="${jdbc.username}" />
        <!--连接数据库的密码 -->
        <property name="password" value="${jdbc.password}" />
        <!--最大连接数 -->
        <property name="maxTotal" value="${jdbc.maxTotal}" />
        <!--最大空闲连接  -->
        <property name="maxIdle" value="${jdbc.maxIdle}" />
        <!--初始化连接数  -->
        <property name="initialSize" value="${jdbc.initialSize}" />
	</bean>
	 <!--配置事物管理  -->
	<bean id="dataSourceTransactionManager" class="org.springframework.jdbc.datasource.DataSourceTransactionManager">
		<property name="dataSource" ref="dataSource"></property>
	</bean>
	 <!--开启事物注解  -->
	<tx:annotation-driven transaction-manager="dataSourceTransactionManager"/>
	 <!--配置mybatis工厂  -->
	<bean id="sqlSessionFactoryBean" class="org.mybatis.spring.SqlSessionFactoryBean">
	 <!--加载数据源  -->
		<property name="dataSource" ref="dataSource"/>
		 <!--加载配置文件  -->
		<property name="configLocation" value="mybatis-config.xml"></property>
	</bean>
</beans>
3.mybatis configuration file
- Create a new xml file in the src directory, named mybatis-config.xml, and configure the relevant information of mybatis in it.
<?xml version="1.0" encoding="UTF-8" ?>
<!DOCTYPE configuration
PUBLIC "-//mybatis.org//DTD Config 3.0//EN"
"http://mybatis.org/dtd/mybatis-3-config.dtd">
<configuration>
<!--设置pojo别名-->
<typeAliases><package name="org.spring.beans"/></typeAliases>
<!--加载CustomerMapper.xml文件-->
	<mappers>
		<mapper resource="org/spring/mapper/CustomerMapper.xml"/>
	</mappers>
</configuration>
Four, development and integration-completion of the project
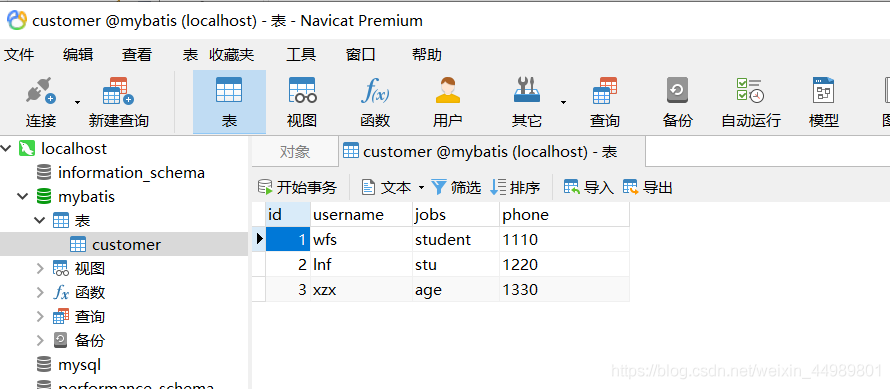
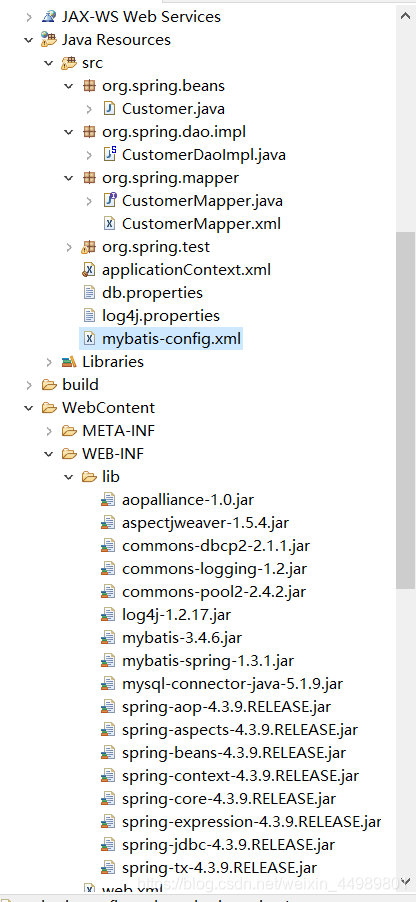
- In the above-built environment, for project testing, the database table diagram and architecture diagram are as follows:
1. Implement the persistence layer
- Create the org.spring.benas package in the src directory and create a Customer class. The variables in this class correspond to the fields of the table in the database.
package org.spring.beans;

public class Customer {
	private int Id;
	private String username;
	private String jobs;
	private String phone;
	public Customer() {
		super();
		// TODO Auto-generated constructor stub
	}
	public Customer(int Id, String username, String jobs, String phone) {
		super();
		this.Id = Id;
		this.username = username;
		this.jobs = jobs;
		this.phone = phone;
	}
	public int getId() {
		return Id;
	}
	public void setId(int Id) {
		this.Id = Id;
	}
	public String getUsername() {
		return username;
	}
	public void setUsername(String username) {
		this.username = username;
	}
	public String getJobs() {
		return jobs;
	}
	public void setJobs(String jobs) {
		this.jobs = jobs;
	}
	public String getPhone() {
		return phone;
	}
	public void setPhone(String phone) {
		this.phone = phone;
	}
	@Override
	public String toString() {
		return "Customer [id=" + Id + ", username=" + username + ", jobs=" + jobs + ", phone=" + phone + "]";
	}

}
2. Create a database mapping file
- Create the org.spring.mapper package in the src directory and create the CustomerMapper.xml file, and write the sql statement into it.
<?xml version="1.0" encoding="UTF-8"?>
<!DOCTYPE mapper
PUBLIC "-//mybatis.org//DTD Mapper 3.0//EN"
"http://mybatis.org/dtd/mybatis-3-mapper.dtd">
<mapper namespace="org.spring.mapper.CustomerMapper">
	<select id="querycustomer" resultType="org.spring.beans.Customer" parameterType="int">
		select * from customer where id=#{id}
	</select>
</mapper>
3. Realize the dao layer (in order to facilitate the mapping, we will rename it to CustomerMapper.java)
- Create the CustomerMapper.java interface under the org.spring.mapper package in the src directory, and write the method into it.
package org.spring.mapper;

import org.spring.beans.Customer;

public interface CustomerMapper {
	public Customer querycustomer(int id);

}
4. Implement the implementation class of the dao layer
- Create the org.spring.dao.impl package in the src directory and create the CustomerDaoImpl.java implementation class. In the process of achieving integration, we need to inherit the SqlSessionTemplate class or SqlSessionDaoSupport, and obtain the data through the getSqlSessionO method of one of these two classes. The required SqlSession.
package org.spring.dao.impl;

import org.mybatis.spring.support.SqlSessionDaoSupport;
import org.spring.beans.Customer;
import org.spring.mapper.CustomerMapper;

public class CustomerDaoImpl extends SqlSessionDaoSupport implements CustomerMapper{

	@Override
	public Customer querycustomer(int id) {
		return this.getSqlSession().selectOne("org.spring.mapper.CustomerMapper.querycustomer", id);
	}

}
5. Implement log4j.xml log
# Global logging configuration
log4j.rootLogger=ERROR, stdout
# MyBatis logging configuration...
log4j.logger.org.spring=DEBUG
# Console output...
log4j.appender.stdout=org.apache.log4j.ConsoleAppender
log4j.appender.stdout.layout=org.apache.log4j.PatternLayout
log4j.appender.stdout.layout.ConversionPattern=%5p [%t] - %m%n
- It should be noted that when we paste the log4j.xml file, we need to modify the location of the corresponding package in log4j.logger.org.spring=DEBUG. Otherwise, an error will occur.
Five, project testing
- Create the org.spring.test package in the src directory and create the Test.java class to complete the test.
package org.spring.test;

import org.spring.beans.Customer;
import org.spring.mapper.CustomerMapper;
import org.springframework.context.ApplicationContext;
import org.springframework.context.support.ClassPathXmlApplicationContext;

public class Test {
	public static void main(String[] args) {
		ApplicationContext context = new ClassPathXmlApplicationContext("applicationContext.xml");
		CustomerMapper cus = (CustomerMapper) context.getBean("customerMapper");
		Customer customer = cus.querycustomer(2);
		System.out.println(customer);
	}
}
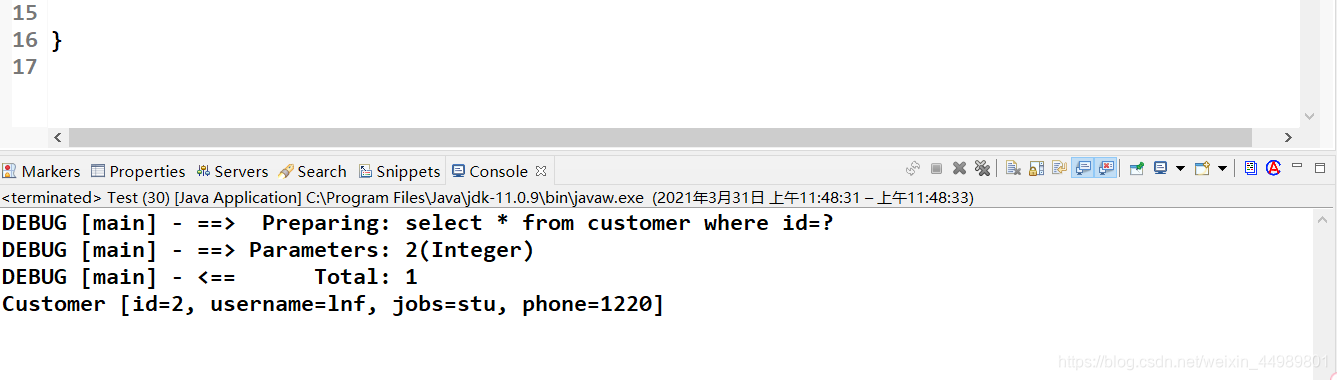
- The test result is correct and the integration work is completed. The test results are as follows:
Originality is not easy, if you like it, just like it and pay attention to it! Seeking praise and attention!