Tomcat service deployment, virtual host configuration and parameter optimization
One, Tomcat overview
1.1 Introduction
Tomcat server is a free and open source web application server. It is a lightweight application server. It is commonly used in small and medium-sized systems and where there are not many concurrent users. It is the first choice for developing and debugging JSP programs. Generally speaking, although Tomcat is the same as Apache or Nginx web servers, it has the function of processing HTML pages, but because its ability to process static HTML is far less than Apache or Nginx, Tomcat is usually used as a Servlet and JSP container, running separately rear end.
1.2 Tomcat composition
Tomcat consists of a series of components, of which there are three core components:
(1) Web container: complete the function of the web server.
(2) Servlet container: the name is catalina, which is used to process Servlet code.
(3) JSP container: used to translate JSP dynamic web pages into Servlet code.
1.2.1 JSP
Java Servlet is a program running on a web server or application server. It serves as an intermediate layer between a request from a web browser or other HTTP client and a database or application on the HTTP server. Using Servlet, you can collect user input from web forms, present records from databases or other sources, and create web pages dynamically. Similar to CGI (Common Gateway Interface) function.
JSP stands for Java Server Pages, which is a dynamic web development technology. It uses JSP tags to insert Java code in HTML pages. Tags usually start with <% and end with %>.
JSP is a Java servlet, mainly used to implement the user interface part of a Java web application.
JSP obtains user input data through web forms, accesses databases and other data sources, and then dynamically creates web pages.
Two, Tomcat service deployment
2.1 Tomcat server configuration
Jdk must be installed before Tomcat is deployed, because jdk is a necessary environment for Tomcat to run.
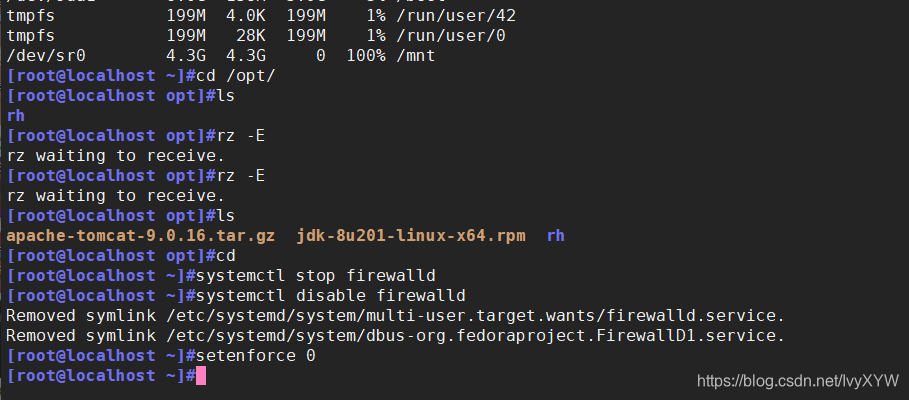
1. Turn off the firewall and upload the software packages required to install Tomcat to the /opt directory
jdk-8u201-linux-x64.rpm
apache-tomcat-9.0.16.tar.gz

systemctl stop firewalld
systemctl disable firewalld
setenforce 0
2. Install JDK
cd /opt
rpm -qpl jdk-8u201-linux-x64.rpm 检查软件包的工作目录
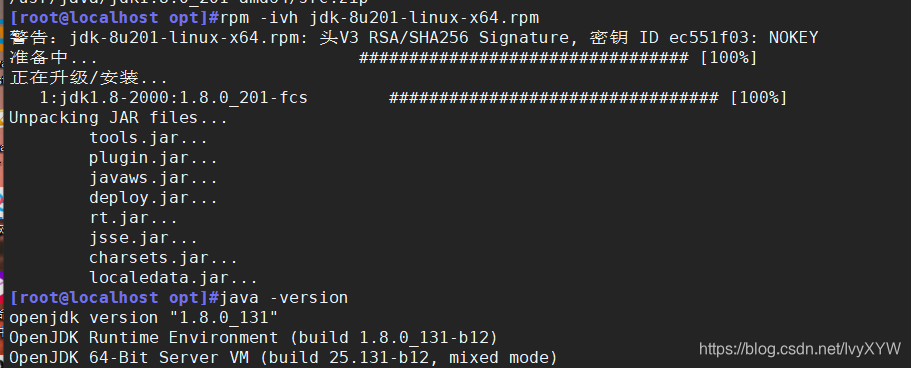
rpm -ivh jdk-8u201-linux-x64.rpm
java -version

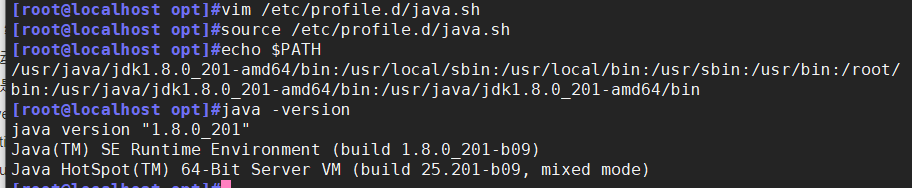
3. Set JDK environment variables
vim /etc/profile.d/java.sh

export JAVA_HOME=/usr/java/jdk1.8.0_201-amd64		#输出定义Java的工作目录
export CLASSPATH=.:$JAVA_HOME/lib/tools.jar:$JAVA_HOME/lib/dt.jar	 #输出指定Java所需的类文件
export PATH=$JAVA_HOME/bin:$PATH		#输出重新定义环境变量,$PATH一定要放在$Java后面,让系统先读取工作目录中的版本信息

source /etc/profile.d/java.sh
java -version

CLASSPATH:编译、运行Java程序时,JRE 会去该变量指定的路径中搜索所需的类(.class) 文件。
dt.jar:是关于运行环境的类库,主要是swing 的包。
tools.jar:主要是一些jdk. 工具的类库,包括javac, java, javap,javadoc等。
JDK:java development kit ( java开发工具)
JRE:java runtime envi ronment (java运行时环境)
JVM:java virtuak machine ( java虚拟机),使java程序可以在多种平台上运行class文件。
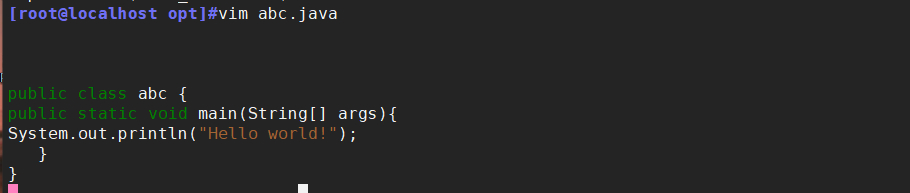
vim abc.java

public class abc {


public static void main(String[] args){


System.out.println("Hello world!");
   }
}

javac abc.java
java abc


javac:负责的是编译的部分,当执行javac时,会启动java的编译器程序。对指定扩展名的.java文件进行编译。生成了jvm可以识别的字节码文件。也就是class文件,也就是java的运行程序。
java:负责运行的部分.会启动jvm.加载运行时所需的类库,并对class文件进行执行.一个文件要被执行,必须要有一个执行的起始点,这个起始点就是main函数.

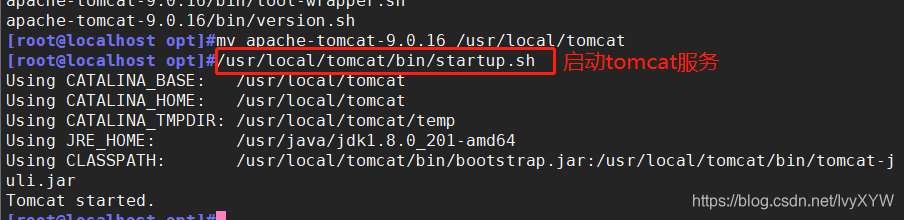
4. Install and start Tomcat
cd /opt
tar zxvf apache-tomcat-9.0.16.tar.gz
mv apache-tomcat-9.0.16 /usr/local/tomcat
##启动tomcat ##
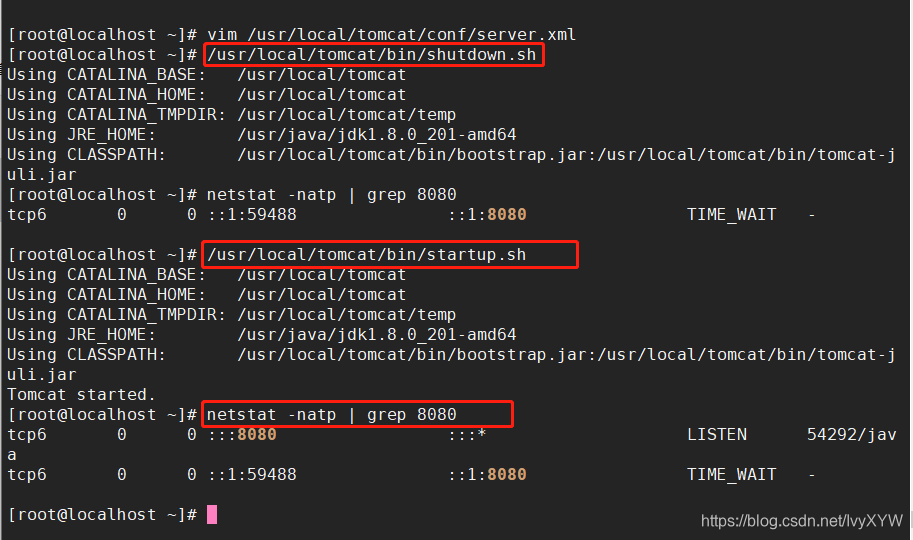
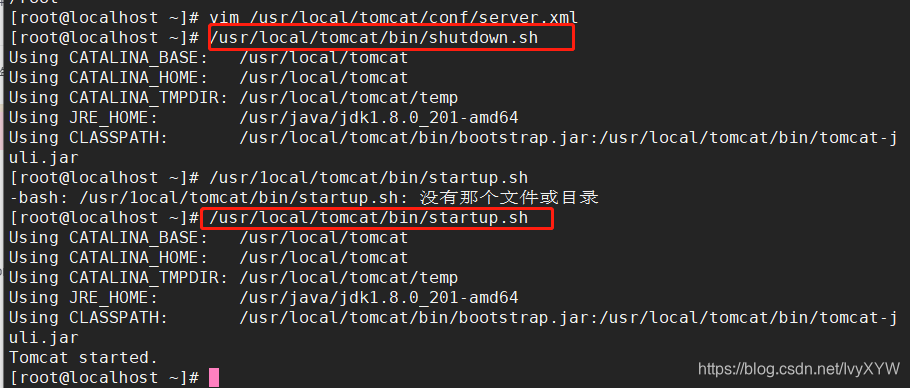
/usr/local/tomcat/bin/startup.sh
netstat -natp | grep 8080


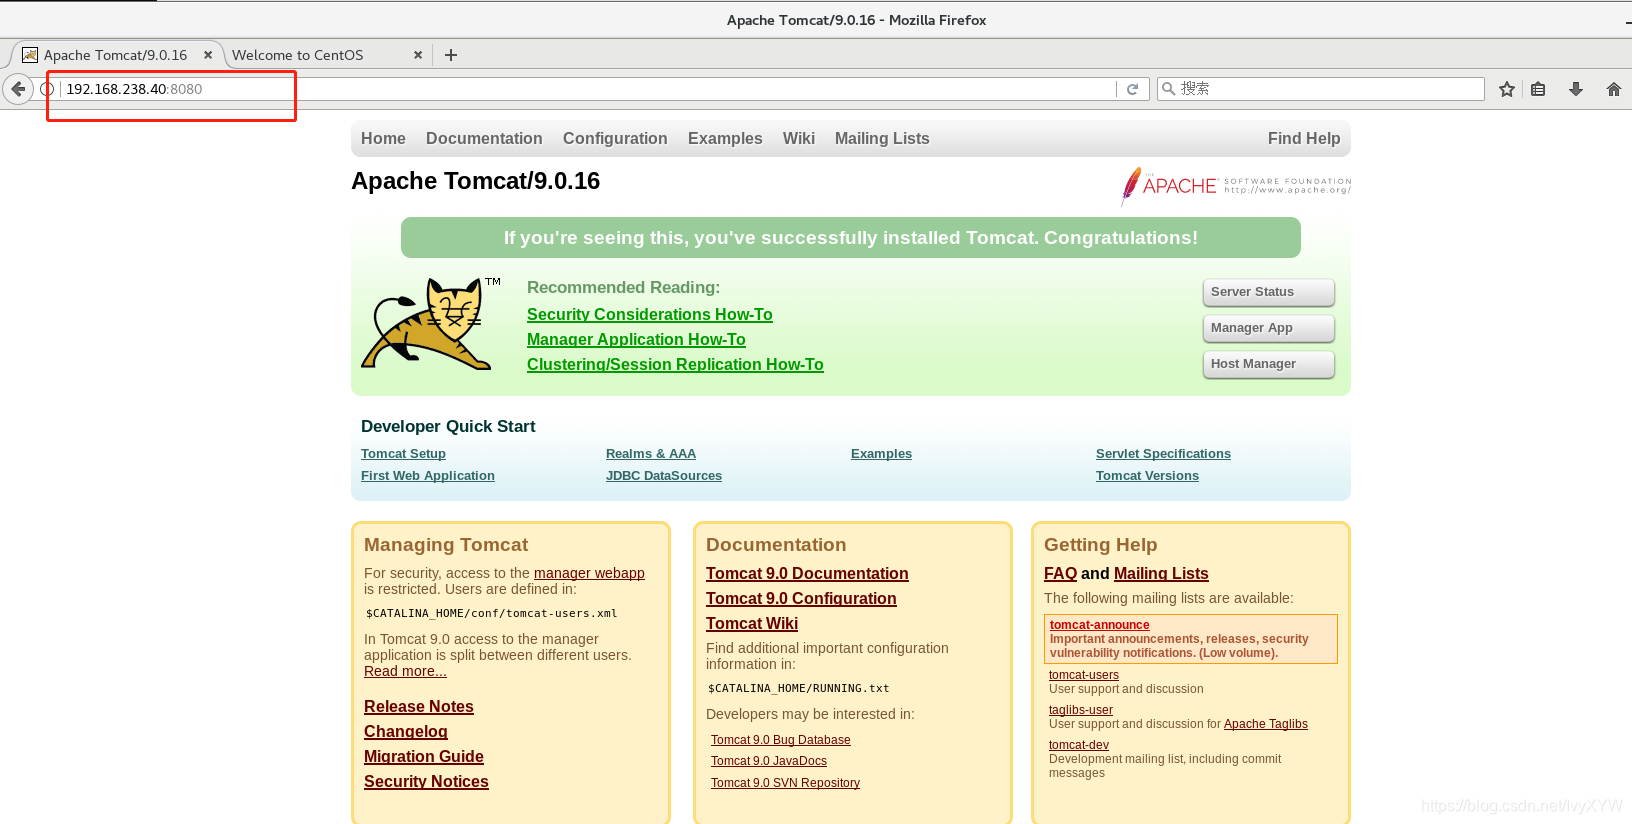
浏览器访问Tomcat的默认主页http://192. 168.238.40:8080
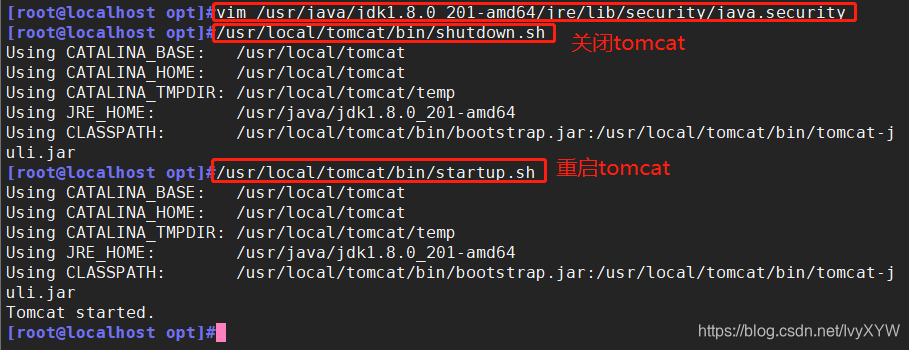
5. Optimize tomcat startup speed
The first time you start tomcat, you may find that Tomcat is very slow to start. By default, it may take tens of seconds. You can modify the jdk parameter to change it.
vim /usr/java/jdk1.8.0_201-amd64/jre/lib/security/java.security
--117行--修改
securerandom.source=file:/dev/urandom    	#random和urandom都属于伪终端,都会提供和数据流,但urandom速度更快
/usr/local/tomcat/bin/shutdown.sh
/usr/local/tomcat/bin/startup.sh

2.2.1.1 Description of main directories
ll /usr/local/tomcat/
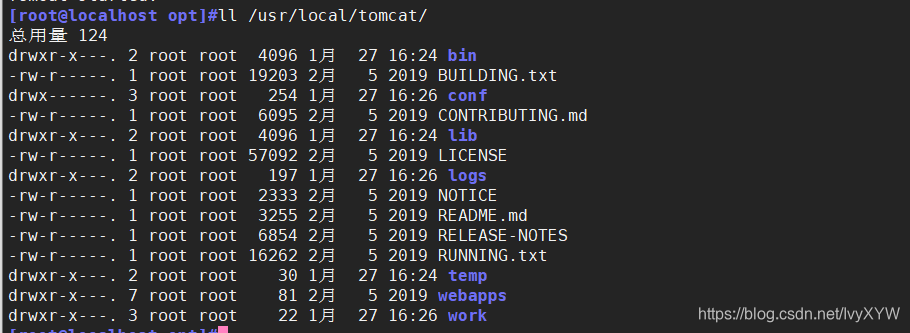
● bin:存放启动和关闭Tomcat 的脚本文件,比较常用的是catalina.sh、 startup.sh、 shutdown.sh 三个文件
● conf:存放Tomcat 服务器的各种配置文件,比较常用的是server. xml、 context. xml、tomcat-users. xml、web. xml四个文件。
● lib:存放Tomcat 服务器的jar包,一般不作任何改动,除非连接第三方服务,比如redis, 那就需要添加相对应的jar包
● logs:存放Tomcat 日志
● temp:存放Tomcat运行时产生的文件
● webapps:存放项目资源的目录
● work:Tomcat 工作目录,一般清除 Tomcat 缓存的时候会使用到
2.3 Tomcat virtual host configuration
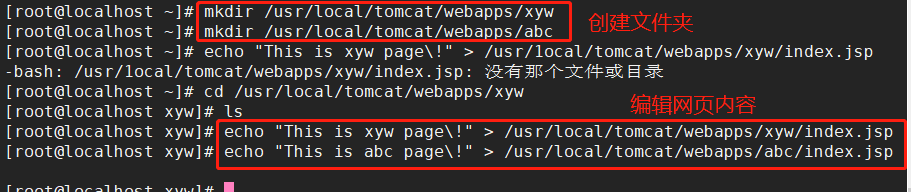
Many times the company has multiple projects to run, so it is certainly impossible to run multiple Tomcat services on one server, which will consume too much system resources. At this point, you need to use the Tomcat virtual host. For example, two new domain names, www.xyw.com and www.abc.com are now added, and it is hoped that different project contents can be accessed through these two domain names.
1. Create xyw and abc project directories and files
mkdir /usr/local/tomcat/webapps/xyw
mkdir /usr/ local/ tomcat/ webapps/abc
echo "This is xyw page\!" > /usr/local/tomcat/webapps/xyw/index.jsp
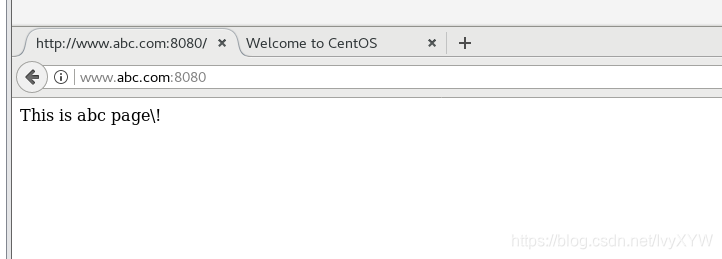
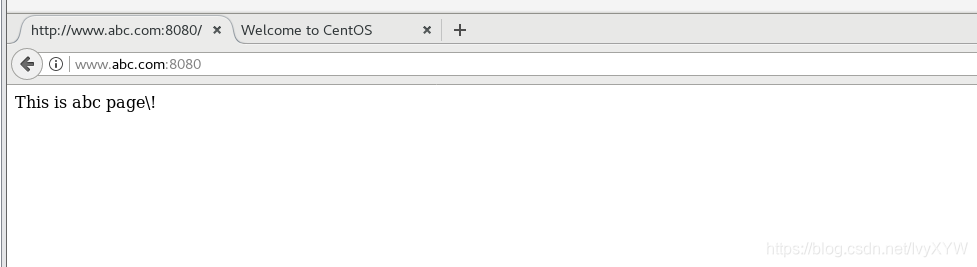
echo "This is abc page\!" > /usr/local/tomcat/webapps/abc/index.jsp
2. Modify the Tomcat main configuration file
vim /usr/local/tomcat/conf/server.xml
--165行前--插入
<Host name="www.xyw.com" appBase= "webapps" unpackWARs="true" autoDeploy="true" xmlValidation="false" xmlNamespaceAware="false">
<Context docBase="/usr/local/tomcat/webapps/xyw" path="" reloadable="true" />
</Host>

<Host name="wwW.abc.com" appBase="webapps" unpackWARs="true" autoDeploy="true" xmlValidation="false" xmlNamespaceAware="false">
<Context docBase="/usr/local/tomcat/webapps/abc" path="" reloadable="true" />
</Host>
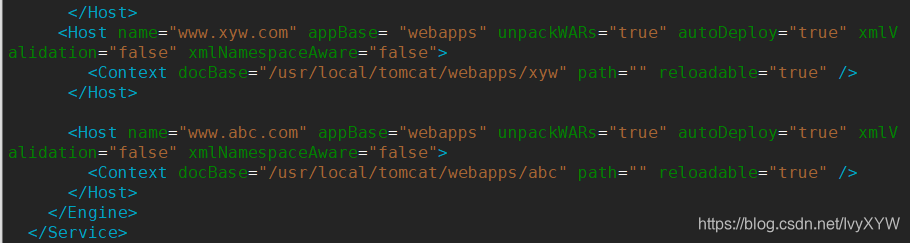
Host name:主机名
appBase:Tomcat程序工作目录,相对路径为webapps,绝对路径为/usr/local/tomcat/webapps
unpackWARs:是否解压war包
autoDeploy:指示Tomcat运行时,如有新的WEB应用是否允许自动部署
xmlValidation:是否验证xml文件执行有效性检验的标志
xmlNamespaceAware:是否启用xml命名空间,设置该值与xmlValidation为true,表示对web.xml文件执行有效性检验
docBase:WEB应用的目录
path:设置访问的URI为WEB应用的根目录
reloadable:是否在程序有改动时重新载入
/usr/local/tomcat/bin/shutdown.sh
/usr/local/tomcat/bin/startup.sh
3. Client browser access verification
echo "192.168.238.50 www.xyw.com www.abc.com" >> /etc/hosts

浏览器访问http://www.xyw.com:8080
页面显示This is xyw page\!
浏览器访问http://www.abc.com:8080
页面显示This is abc page\!
The default configuration under Tomcat's default installation is not suitable for the production environment. It may frequently appear suspended and needs to be restarted. Only through continuous stress testing and optimization can it run efficiently and stably.
Optimization mainly includes three aspects: operating system optimization (kernel parameter optimization), Tomcat configuration file parameter optimization, and Java virtual machine (JVM) tuning.
Fourth, Tomcat configuration file parameter optimization
Commonly used optimization related parameters are as follows:
[maxThreads] Tomcat uses threads to process each request received. This value represents the maximum number of threads that Tomcat can create. The default value is 200.
[MinSpareThreads] The minimum number of idle threads, the number of threads initialized when Tomcat is started, means that there are so many empty threads waiting even if no one is using it. The default value is 10.
[MaxSpareThreads] The maximum number of spare threads. Once the created threads exceed this value, Tomcat will close socket threads that are no longer needed. The default value is -1 (unlimited). Generally do not need to specify.
[URIEncoding] Specify the URL encoding format of the Tomcat container. The language encoding format is not as easy to configure as other Web server software and needs to be specified separately.
[ConnnectionTimeout] Network connection timeout, unit: milliseconds, set to 0 means never time out, this setting has hidden dangers. Usually the default is 20000 milliseconds.
[EnableLookups] Whether to reverse check the domain name to return the host name of the remote host, the value is: true or false, if it is set to false, it will directly return the IP address, in order to improve the processing capacity, it should be set to false.
[disableUploadTimeout] When uploading Whether to use a timeout mechanism. Should be set to true.
[Connect ionUploadTimeout] Upload timeout. Bijing file upload may take more time. Adjust this according to your own business needs so that the Servlet has a longer time to complete its execution. It needs to be compared with the previous parameter. It will take effect when used together.
[AcceptCount] Specifies the maximum queue length of incoming connection requests when all available threads for processing requests are used. Requests exceeding this number will not be processed. The default is 100.
[Compression] Whether to perform GZIP compression on the response data, off: means compression is forbidden: on: means compression is allowed (text will be compressed), force: means compression is carried out in all cases, the default value is off, it can be effective after compressed data The size of the page can generally be reduced by about 1/3 to save bandwidth.
[CompressionMinsize] indicates the minimum value of the compressed response. Only when the response message size is larger than this value will the message be compressed. If the compression function is enabled, the default value is 2048.
[CompressableMimeType] Compression type, specify which types of files are compressed.
[NoCompress ionUserAgents="gozilla, traviata"] For the following browsers, do not enable compression. The
above are some commonly used configuration parameters, and there are many other parameter settings. You can continue to optimize the parameters of HTTP Connector and AJP Connector. Value, you can refer to the detailed description of the official document for learning.
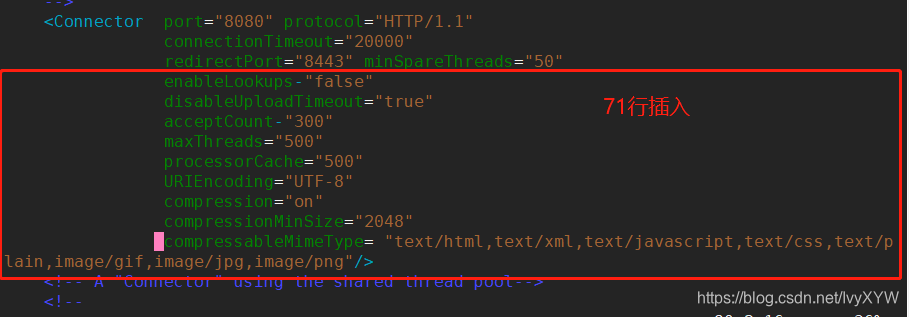
vim /usr/local/tomcat/conf/server.xml
<Connector port="8080" protocol="HTTP/11.1"
connectionTimeout="20000"
redirectPort="8443"
--71行--插入
minSpareThreads="50"
enableLookups="false"
disableUploadTimeout="true"
acceptCount="300"
maxThreads="500"
processorCache="500"
URIEncoding="UTF-8"
compression="on"
compressionMinSize="2048"
compressableMimeType= "text/html,text/xml,text/javascript,text/css,text/plain,image/gif,image/jpg,image/png"/>