Article Directory
1 RS232 drive test
1.1 Write application test program
The path of the experiment routine: i.MX6UL Terminator CD-ROM information/06_Linux driver routine/19_uart
creates the uart_test.c application test program, the specific content is as follows:
1 #include <stdio.h>
  2 #include <string.h>
  3 #include <unistd.h>
  4 #include <sys/types.h>
  5 #include <sys/stat.h>
  6 #include <fcntl.h>
  7 #include <termios.h>
  8 #include <errno.h>
  9 #include <poll.h>
 10
 11 int set_opt(int fd,int nSpeed, int nBits, char nEvent, int nStop)
 12 {


 13         struct termios newtio,oldtio;
 14         if  ( tcgetattr( fd,&oldtio)  !=  0) {


 15                 perror("SetupSerial 1");
 16                 return -1;
 17         }
 18         bzero( &newtio, sizeof( newtio ) );
 19         newtio.c_cflag  |=  CLOCAL | CREAD;
 20         newtio.c_cflag &= ~CSIZE;
 21
 22         switch( nBits )
 23         {


 24                 case 7:
 25                         newtio.c_cflag |= CS7;
 26                         break;
 27                 case 8:
 28                         newtio.c_cflag |= CS8;
 29                         break;
 30         }
 31
 32         switch( nEvent )
 33         {


 34         case 'O':
 35                 newtio.c_cflag |= PARENB;
 36                 newtio.c_cflag |= PARODD;
 37                 newtio.c_iflag |= (INPCK | ISTRIP);
 38                 break;
 39         case 'E':
 40                 newtio.c_iflag |= (INPCK | ISTRIP);
 41                 newtio.c_cflag |= PARENB;
 42                 newtio.c_cflag &= ~PARODD;
 43                 break;
 44         case 'N':
 45                 newtio.c_cflag &= ~PARENB;
 46                 break;
 47         }
 48
 49         switch( nSpeed )
 50         {


 51                 case 2400:
 52                         cfsetispeed(&newtio, B2400);
 53                         cfsetospeed(&newtio, B2400);
 54                         break;
 55                 case 4800:
 56                         cfsetispeed(&newtio, B4800);
 57                         cfsetospeed(&newtio, B4800);
 58                         break;
 59                 case 9600:
 60                         cfsetispeed(&newtio, B9600);
 61                         cfsetospeed(&newtio, B9600);
 62                         break;
 63                 case 115200:
 64                         cfsetispeed(&newtio, B115200);
 65                         cfsetospeed(&newtio, B115200);
 66                         break;
 67                 case 460800:
 68                         cfsetispeed(&newtio, B460800);
 69                         cfsetospeed(&newtio, B460800);
 70                         break;
 71                 default:
 72                         cfsetispeed(&newtio, B9600);
 73                         cfsetospeed(&newtio, B9600);
 74                         break;
 75         }
 76         if( nStop == 1 )
 77                 newtio.c_cflag &=  ~CSTOPB;
 78         else if ( nStop == 2 )
 79                 newtio.c_cflag |=  CSTOPB;
 80                 newtio.c_cc[VTIME]  = 0;
 81                 newtio.c_cc[VMIN] = 0;
 82                 tcflush(fd,TCIFLUSH);
 83         if((tcsetattr(fd,TCSANOW,&newtio))!=0)
 84         {


 85                 perror("com set error");
 86                 return -1;
 87         }
 88
 89         //      printf("set done!\n\r");
 90         return 0;
 91 }
 92 int main(int argc , char **argv)
 93 {


 94         int fd,wr_static,ret,nread,count=0;
 95         char *buffer = "hello world!\r\n";
 96         char buff[8];
 97         int i;
 98
 99         if(argc < 3)
100                 printf("Usage ...");
101
102         printf("\r\n uart__test start\r\n");
103
104         char *uart = argv[1];
105
106         if((fd = open(uart, O_RDWR|O_NOCTTY|O_NDELAY))<0){


107                 printf("open %s is failed",uart);
108         }
109         else {


110                 printf("open %s is success\n",uart);
111                 set_opt(fd, 115200, 8, 'N', 1);
112         }
113
114         if(atoi(argv[2]) == 0)
115         {


116                 while(1){


117                         if (ret == 0)
118                          printf("write time out\n");
119                         else{


120                                 ret = write(fd,buffer, strlen(buffer));
121                                 sleep(1);
122                         }
123             }
124         }
125
126         else if(atoi(argv[2]) == 1)
127         {


128                 memset(buff,0,8);
129                 while(1){


130                         while((nread = read(fd,buff,8))>0){


131                                 //count+=nread;
132                                 //printf("count = %d\r\n",count);
133                                 printf("read: ");
134                                 for(i = 0; buff[i] != 0; i++)
135                                         printf("%c",buff[i]);
136                                 printf("\r\n");
137                                 memset(buff,0,8);
138                         }
139                 }
140         }
141
142         close(fd);
143         return 0;
144 }
Lines 11~91 are used to set the baud rate of the serial port.
On line 92, the main function requires two parameters. The first parameter is the device node file of the serial port, such as /dev/ttymxc2. The second parameter selects read and write data, 0: write data, 1: read data.
On line 111, when opening the serial device file is successful, set the serial port parameters as: 115200/8/N/1. The user can modify it according to the actual situation.
Line 114~124, executed when the instruction is to write data. Use sleep function to delay, send data every 1s.
Lines 126~140 are executed when the instruction is to read data.
1.2 Run the test
First use the following command to compile the application test program:
arm-linux-gnueabihf-gcc -o uart_test uart_test.c is
compiled successfully, and the uart_test application program is obtained.
Then start to test the RS232 function. Because RS232 is TTL level, USB to TTL level device is needed, and then connect the uart3 pin on the development board, and open the USB to TTL level device terminal on the computer, as shown in Figure 1.2.1 :
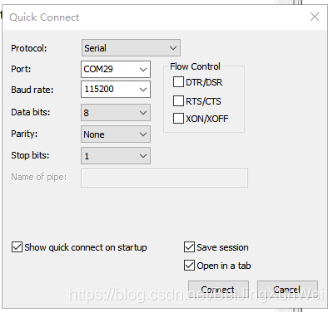
Select the correct port, the default baud rate in the application is 115200, so set the baud rate to 115200, and then connect the device.
Copy the compiled uart_test application test program to the development board, execute the following command to write data:
./uart_test /dev/ttymxc2 0 &The
running result is shown in Figure 1.2.2:

Use the following command to read the data: the
./uart_test /dev/ttymxc2 1 &
running result is shown in Figure 1.2.3:

Every time the application receives 8 bytes of data, it can be seen that the operation is normal.
2 RS485 test
In fact, the RS485 test and the RS232 test process are the same, but the interface is different, and you need to use a USB to 485 device. The application test procedure is the same. The test will not be repeated here, users can try it by themselves.
