This article is to install CUDA_10.1 (nvidia-driver455) and cuDNN_7.6.5 on the Ubuntu18.04.5 server,
- Ubuntu 18.04.5
- CUDA_10.1 (nvidia-driver455)
-
cuDNN_7.6.5
1. Preliminary preparation
1. Check the system version and graphics card model
cat  /etc/issue           # 查看系统版本

lspci | grep -i nvidia   #  查看电脑的显卡型号
2. Check whether the system has installed graphics driver nvidia-driver
nvidia-smi # 查看显卡驱动情况(此处未安装,应无信息显示)3. Driver models supported by the graphics card
ubuntu-drivers devices # 查看显卡支持的驱动型号
Here you can see that the recommended driver version of the system is 455:
4. Install the recommended version 455 graphics card driver
sudo ubuntu-drivers autoinstall # 安装默认显卡驱动(此处为455)5. Restart the server (no other users use the server)
(sudo)  reboot    # 立即重启
或
(sudo)  shutdown -r now    # 立即重启
6. Check whether the graphics card driver is installed successfully:
nvidia-smi Successful installation will show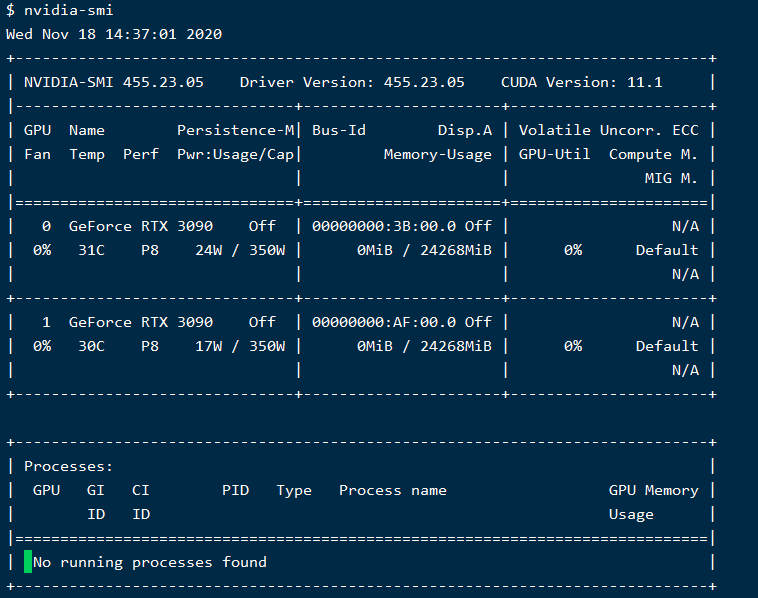
7. Uninstall the existing driver (need to restart to take effect)
$ sudo apt-get remove nvidia-*
或
$ sudo apt-get remove --purge nvidia*
2. Install CUDA _10.1 in RUN mode (I have installed 11.0, 11.1, and later changed to 10.1 due to project requirements, the picture is a bit mixed)
0. Before installation, you need to confirm that gcc and g++ have been installed
$ gcc --version
$ g++ --version
1. The official website cuda_10.1 download link :
2. Click to download: cuda_10.1.105_418.39_linux.run 
3. Upload the cuda_10.1.105_418.39_linux.run file to the home/your_username directory on the ubuntu system
4. Execute command installation
sudo sh cuda_10.1.105_418.39_linux.run5. Agree to the agreement: enter accept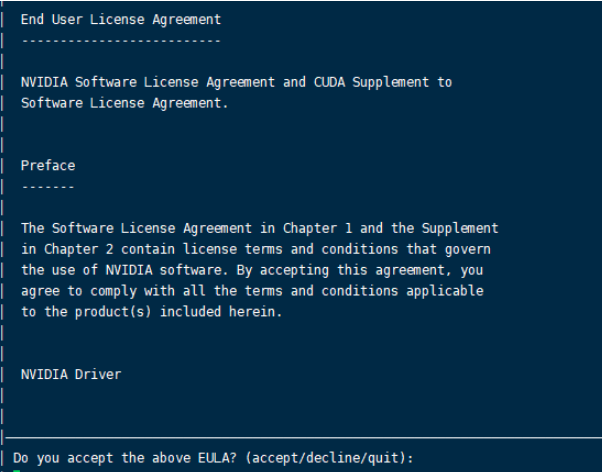
6. Choose whether to install nvidia-driver here (Enter to switch whether to choose, I have installed nvidia-driver separately, so choose not to install the driver here)
Finally choose install 
7. Successful installation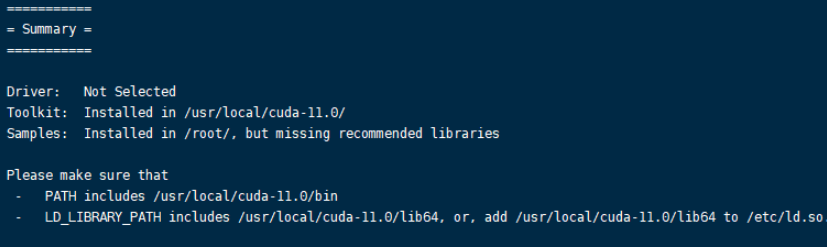
8. Environment configuration (two ways)
- 8.1, ~.bashrc # Modify the .bashrc file in the home directory, only for the current user
- 8.2. /etc/profile # Modify the profile file for all users
8.1 修改home目录下的.bashrc文件
cd ~          # 切换回home目录
vim .bashrc      # 修改.bashrc文件

# add cuda path    # 在文件末尾添加路径
export PATH="/usr/local/cuda-11.0/bin:$PATH"
export LD_LIBRARY_PATH="/usr/local/cuda-11.0/lib64:$LD_LIBRARY_PATH"

:wq   # 退出保存
8.2  修改profile文件,针对所有用户

sudo vim /etc/profile    # 修改/etc/profile文件

# add cuda path  # 文件末尾增加以下两行代码
export PATH="/usr/local/cuda-11.0/bin:$PATH"
export LD_LIBRARY_PATH="/usr/local/cuda-11.0/lib64:$LD_LIBRARY_PATH"

:wq   # 退出保存
9. Take effect immediately (or restart the server to take effect)
source .bashrc
或
source /etc/profile
10. Verify that the installation is successful nvcc -V (note the big V)
nvcc -V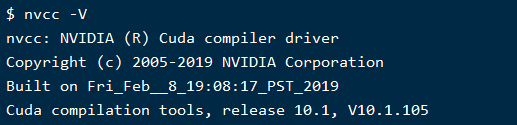
11. Uninstall the previously installed cuda
cd /usr/local/cuda-11.0/bin/

sudo ./cuda-uninstaller

sudo rm -rf /usr/local/cuda-11.0
Three, install cuDNN_7.6.5 in deb mode
1. The official download address of cudnn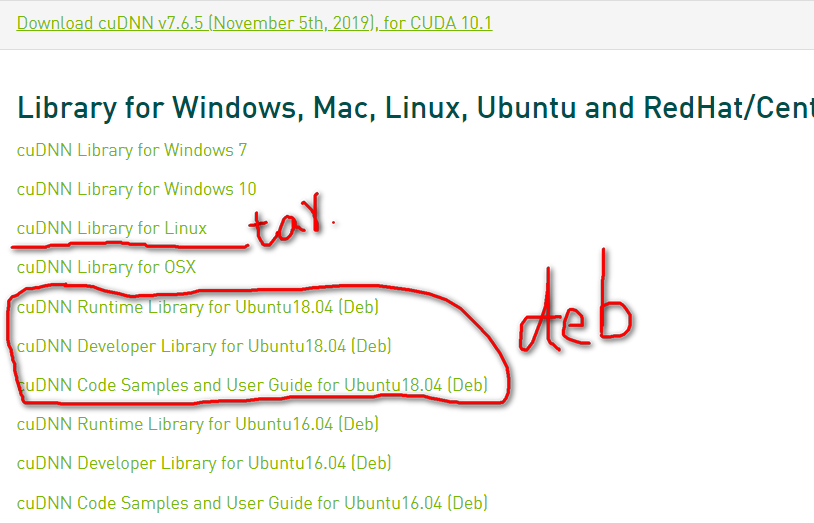
2. Installation method selection (deb)
Tar method: directly download cuDNN Library for Linux
deb method: need to download runtime, developer and Samples
It is recommended to install by deb: use tar to install without cudnn_doc_v7 file, and it is impossible to verify whether the installation is successful;
3. Copy the three downloaded files to the home/your_username directory
4. Execute the command to install 3 library files (first runtime, then developer, and finally doc)
sudo dpkg -i libcudnn7_7.6.5.32-1+cuda10.1_amd64.deb
sudo dpkg -i libcudnn7-dev_7.6.5.32-1+cuda10.1_amd64.deb
sudo dpkg -i libcudnn7-doc_7.6.5.32-1+cuda10.1_amd64.deb
5. Test whether cuDNN is installed successfully
1)复制cuDNN samples到home目录下
$ cp -r /usr/src/cudnn_samples_v7 /$HOME

2) 进入home目录
$ cd $HOME/cudnn_samples_v7/mnistCUDNN/

3) 编译mnistCUDNN
$ sudo make clean
$ sudo make

4)运行mnistCUDNN
$ sudo ./mnistCUDNN
(It takes a while to run) If Test passed appears! Indicates that cuDNN has been installed successfully.
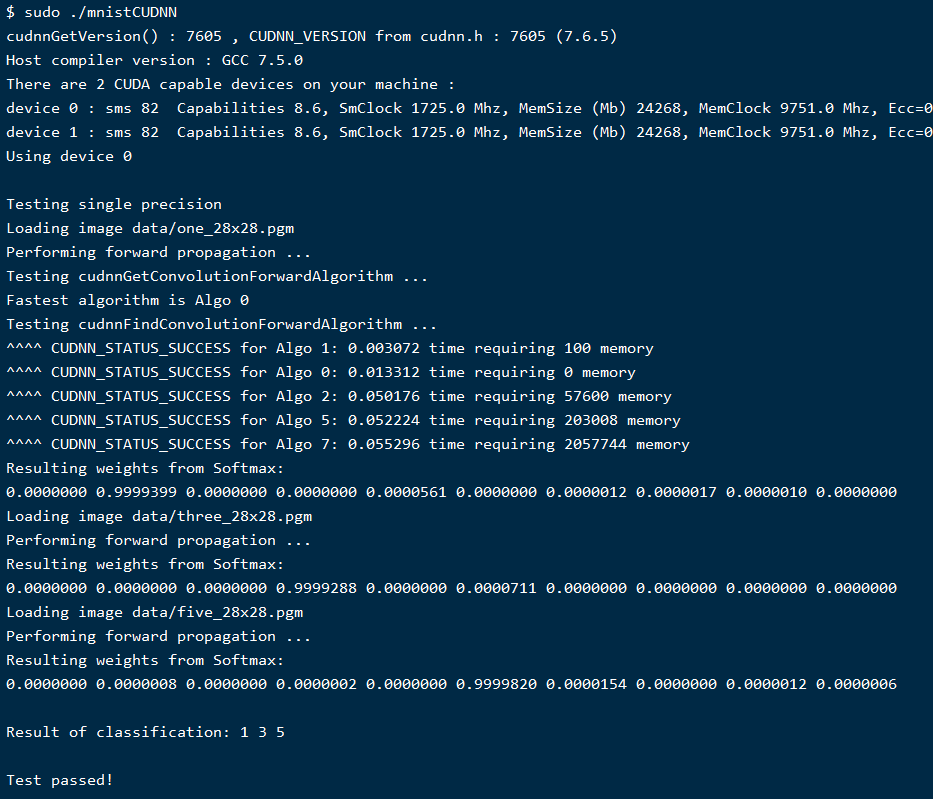
over! Nvidia-driver455, cuda10.1, cuDNN_7.6.5 have been successfully installed.
4. Reference articles in this article:
1), CUDA installation and usage guide under Linux
2), NVIDIA cuDNN v8 deb method installation tutorial
3), install CUDA under Linux and configure environment variables
4), Linux view GPU information and usage