弹性布局Flex
弹性布局允许子组件按照一定比例来分配父容器空间。Flutter中的弹性布局主要通过Flex和Expanded来配合实现。
Flex组件可以沿着水平或垂直方向排列子组件,如果你知道主轴方向,使用Row或Column会方便一些,因为Row和Column都继承自Flex,参数基本相同,所以能使用Flex的地方基本上都可以使用Row或Column。Flex本身功能是很强大的,它也可以和Expanded组件配合实现弹性布局。接下来我们只讨论Flex和弹性布局相关的属性(其它属性已经在介绍Row和Column时介绍过了)。
定义:
Flex({
    Key key,
    // 弹性布局的方向, Row默认为水平方向,Column默认为垂直方向
    @required this.direction,
    // 以下同线性布局
    this.mainAxisAlignment = MainAxisAlignment.start,
    this.mainAxisSize = MainAxisSize.max,
    this.crossAxisAlignment = CrossAxisAlignment.center,
    this.textDirection,
    this.verticalDirection = VerticalDirection.down,
    this.textBaseline,
    List<Widget> children = const <Widget>[],
  })
Flex继承自MultiChildRenderObjectWidget,对应的RenderObject为RenderFlex,RenderFlex中实现了其布局算法。
Expanded
可以按比例“扩伸” Row、Column和Flex子组件所占用的空间。
定义:
/**
 * Flexible组件可以使Row、Column、Flex等子组件在主轴方向有填充可用空间的能力,但是不强制子组件填充可用空间。
 * Expanded组件可以使Row、Column、Flex等子组件在其主轴方向上展开并填充可用空间,是强制子组件填充可用空间。
    const Expanded({
    Key key,
    int flex = 1,//组件占据剩余空间的比例
    @required Widget child,
    })
 */
flex参数为弹性系数,如果为0或null,则child是没有弹性的,即不会被扩伸占用的空间。如果大于0,所有的Expanded按照其flex的比例来分割主轴的全部空闲空间。
- Expanded组件可以使Row、Column、Flex等子组件在其主轴方向上展开并填充可用空间(例如,Row在水平方向,Column在垂直方向)。如果多个子组件展开,可用空间会被其flex
factor(表示扩展的速度、比例)分割。 - Expanded组件必须用在Row、Column、Flex内,并且从Expanded到封装它的Row、Column、Flex的路径必须只包括StatelessWidgets或StatefulWidgets组件(不能是其他类型的组件,像RenderObjectWidget,它是渲染对象,不再改变尺寸了,因此Expanded不能放进RenderObjectWidget)。
- 注意一点:在Row中使用Expanded的时候,无法指定Expanded中的子组件的宽度width,但可以指定其高度height。同理,在Column中使用Expanded的时候,无法指定Expanded中的子组件的高度height,可以指定宽度width。
示例:
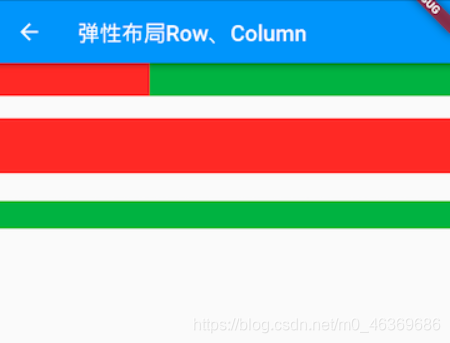
class FlexLayoutTestRoute extends StatelessWidget {
  @override
  Widget build(BuildContext context) {
    return Column(
      children: <Widget>[
        //Flex的两个子widget按1:2来占据水平空间
        Flex(
          direction: Axis.horizontal,
          children: <Widget>[
            Expanded(
              flex: 1,
              child: Container(
                height: 30.0,
                color: Colors.red,
              ),
            ),
            Expanded(
              flex: 2,
              child: Container(
                height: 30.0,
                color: Colors.green,
              ),
            ),
          ],
        ),
        Padding(
          padding: const EdgeInsets.only(top: 20.0),
          child: SizedBox(
            height: 100.0,
            //Flex的三个子widget,在垂直方向按2:1:1来占用100像素的空间
            child: Flex(
              direction: Axis.vertical,
              children: <Widget>[
                Expanded(
                  flex: 2,
                  child: Container(
                    height: 30.0,
                    color: Colors.red,
                  ),
                ),
                Spacer(
                  flex: 1,
                ),
                Expanded(
                  flex: 1,
                  child: Container(
                    height: 30.0,
                    color: Colors.green,
                  ),
                ),
              ],
            ),
          ),
        ),
      ],
    );
  }
}
运行效果如图所示:
示例中的Spacer的功能是占用指定比例的空间,实际上它只是Expanded的一个包装类,Spacer的源码如下:
class Spacer extends StatelessWidget {
  const Spacer({Key key, this.flex = 1})
    : assert(flex != null),
      assert(flex > 0),
      super(key: key);

  final int flex;

  @override
  Widget build(BuildContext context) {
    return Expanded(
      flex: flex,
      child: const SizedBox.shrink(),
    );
  }
}
总结:
弹性布局比较简单,唯一需要注意的就是Row、Column以及Flex的关系。
